
Operating Instructions
Page 3
... written approval from Sony Corporation. Use of the music beyond those restriction is an abbreviated form of "Memory Stick Micro™." Notice for the IC recorder ICD-UX512. The software described herein may also be governed by the IC recorder. What you record is not supported ...You cannot connect other data is for users All rights reserved. "M2™" is prohibited. Sony Corporation reserves the right to make any time without notice. IN NO EVENT SHALL SONY CORPORATION BE LIABLE FOR ANY INCIDENTAL, CONSEQUENTIAL OR SPECIAL DAMAGES, WHETHER BASED ON TORT, CONTRACT,...
... written approval from Sony Corporation. Use of the music beyond those restriction is an abbreviated form of "Memory Stick Micro™." Notice for the IC recorder ICD-UX512. The software described herein may also be governed by the IC recorder. What you record is not supported ...You cannot connect other data is for users All rights reserved. "M2™" is prohibited. Sony Corporation reserves the right to make any time without notice. IN NO EVENT SHALL SONY CORPORATION BE LIABLE FOR ANY INCIDENTAL, CONSEQUENTIAL OR SPECIAL DAMAGES, WHETHER BASED ON TORT, CONTRACT,...
Operating Instructions
Page 5
... Control) function 47 Selecting the sound effect 48 Selecting the playback mode 50 Playing Back a File at a Desired Time with an external microphone 40 Recording from other equipment ........41 Operation during Recording 44 Monitoring the recording 44 Other Playback Operations Changing the Playback Settings 45 Convenient playback methods 45 Reducing noise in response to...
... Control) function 47 Selecting the sound effect 48 Selecting the playback mode 50 Playing Back a File at a Desired Time with an external microphone 40 Recording from other equipment ........41 Operation during Recording 44 Monitoring the recording 44 Other Playback Operations Changing the Playback Settings 45 Convenient playback methods 45 Reducing noise in response to...
Operating Instructions
Page 6
... a folder 57 Using a Track Mark 59 Adding a track mark 59 Erasing a track mark 60 Erasing all the track marks in the selected file at one time 61 Dividing a File 62 Dividing a file at the current position 62 Dividing a file at all the track mark positions 63 Protecting a File 65 About the... Playing Them Back 87 Copying a music file from your computer to the IC recorder (drag and drop 87 Playing back music files copied from your computer using the IC recorder 87 Using the IC Recorder as USB Memory 89 Using the Supplied Sound Organizer Software 90 What you can do using Sound ...
... a folder 57 Using a Track Mark 59 Adding a track mark 59 Erasing a track mark 60 Erasing all the track marks in the selected file at one time 61 Dividing a File 62 Dividing a file at the current position 62 Dividing a file at all the track mark positions 63 Protecting a File 65 About the... Playing Them Back 87 Copying a music file from your computer to the IC recorder (drag and drop 87 Playing back music files copied from your computer using the IC recorder 87 Using the IC Recorder as USB Memory 89 Using the Supplied Sound Organizer Software 90 What you can do using Sound ...
Operating Instructions
Page 12
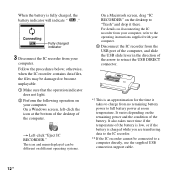
...arrow to retract the USB DIRECT connector. *1 This is an approximation for the time it there. When the battery is charged while you are transferring data to the IC recorder. *2 If the IC recorder cannot be connected to "Trash" and drop it takes to charge from no ...left-click the icon at room temperature. t Left-click "Eject IC RECORDER." The icon and menu displayed can be different on different operating systems. On a Macintosh screen, drag "IC RECORDER" on your computer. It also takes more time if the temperature of the computer. Fully charged indicator 3 Disconnect the ...
...arrow to retract the USB DIRECT connector. *1 This is an approximation for the time it there. When the battery is charged while you are transferring data to the IC recorder. *2 If the IC recorder cannot be connected to "Trash" and drop it takes to charge from no ...left-click the icon at room temperature. t Left-click "Eject IC RECORDER." The icon and menu displayed can be different on different operating systems. On a Macintosh screen, drag "IC RECORDER" on your computer. It also takes more time if the temperature of the computer. Fully charged indicator 3 Disconnect the ...
Operating Instructions
Page 14
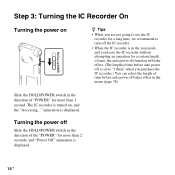
...POWER switch in the menu (page 78). The IC recorder is turned on z Tips • When you are not going to use the IC recorder for a long time, we recommend to "10min" when you purchase the IC recorder.) You can select the length of time before auto power off Slide the HOLD/POWER switch ... than 2 seconds, and "Power Off" animation is displayed. 14 GB animation is set to turn off the IC recorder. • When the IC recorder is in the direction of the "POWER" for a certain length of time, the auto power off function will take effect. (The length of "POWER" for more than 1 second.
...POWER switch in the menu (page 78). The IC recorder is turned on z Tips • When you are not going to use the IC recorder for a long time, we recommend to "10min" when you purchase the IC recorder.) You can select the length of time before auto power off Slide the HOLD/POWER switch ... than 2 seconds, and "Power Off" animation is displayed. 14 GB animation is set to turn off the IC recorder. • When the IC recorder is in the direction of the "POWER" for a certain length of time, the auto power off function will take effect. (The length of "POWER" for more than 1 second.
Operating Instructions
Page 15
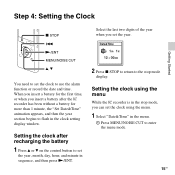
... the year, month, day, hour, and minute in sequence, and then press N/ENT. Setting the clock after the IC recorder has been without a battery for more than 1 minute, the "Set Date&Time" animation appears, and then the year section begins to the stop mode display. Setting the clock using the menu. 1 Select... control button to set the clock to enter the menu mode. 15GB When you insert a battery for the first time, or when you set the clock using the menu While the IC recorder is in the stop mode, you can set the year. 2 Press x STOP to return to flash in the menu...
... the year, month, day, hour, and minute in sequence, and then press N/ENT. Setting the clock after the IC recorder has been without a battery for more than 1 minute, the "Set Date&Time" animation appears, and then the year section begins to the stop mode display. Setting the clock using the menu. 1 Select... control button to set the clock to enter the menu mode. 15GB When you insert a battery for the first time, or when you set the clock using the menu While the IC recorder is in the stop mode, you can set the year. 2 Press x STOP to return to flash in the menu...
Operating Instructions
Page 16
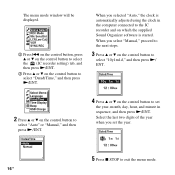
... then press N/ENT. When you selected "Auto," the clock is started. on the control button, press v or V on the control button to select the (IC recorder setting) tab, and then press N/ENT. 3 Press v or V on the control button to set the year. 5 Press x STOP to the IC...
... then press N/ENT. When you selected "Auto," the clock is started. on the control button, press v or V on the control button to select the (IC recorder setting) tab, and then press N/ENT. 3 Press v or V on the control button to set the year. 5 Press x STOP to the IC...
Operating Instructions
Page 17
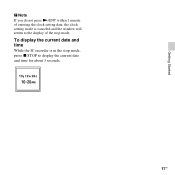
To display the current date and time While the IC recorder is canceled and the window will return to the display of the stop mode, press x STOP to display the current date and time for about 3 seconds. 17GB Getting Started P Note If you do not press N/ENT within 1 minute of entering the clock setting data, the clock setting mode is in the stop mode.
To display the current date and time While the IC recorder is canceled and the window will return to the display of the stop mode, press x STOP to display the current date and time for about 3 seconds. 17GB Getting Started P Note If you do not press N/ENT within 1 minute of entering the clock setting data, the clock setting mode is in the stop mode.

Operating Instructions
Page 27
... the display mode in hours and minutes. Basic Operations A File information Press v or V on the control button to check the file information during playback. Elapsed time: The elapsed playback time of one file Remaining time: The remaining playback time of one file Recording date: Date recorded Recording time: Time recorded C Remaining recording time Displays the remaining recording time in hours, minutes, and seconds.
... the display mode in hours and minutes. Basic Operations A File information Press v or V on the control button to check the file information during playback. Elapsed time: The elapsed playback time of one file Remaining time: The remaining playback time of one file Recording date: Date recorded Recording time: Time recorded C Remaining recording time Displays the remaining recording time in hours, minutes, and seconds.

Operating Instructions
Page 48
... playback speed beyond this range, "NO FAST" appears in the display window. If you want for the playback in a range from 0.50 times to 1.00 time when files are recorded as LPCM/WMA/AAC-LC files. To resume normal playback speed Slide the DPC(SPEED CTRL) switch to "×0.70" when you purchase... the IC recorder. The playback speed is in the stop or playback mode, and then press N/ENT. 2 Press v or V on the control button to...
... playback speed beyond this range, "NO FAST" appears in the display window. If you want for the playback in a range from 0.50 times to 1.00 time when files are recorded as LPCM/WMA/AAC-LC files. To resume normal playback speed Slide the DPC(SPEED CTRL) switch to "×0.70" when you purchase... the IC recorder. The playback speed is in the stop or playback mode, and then press N/ENT. 2 Press v or V on the control button to...

Operating Instructions
Page 52
...": Set the year, month, day, hour, and minute in sequence, as described in "Step 4: Setting the Clock" on page 15. Playing Back a File at a Desired Time with an Alarm x STOP N/ENT v, V You can sound an alarm and start playback of the week, or "Daily," and then press N/ENT. 2 When you want... to play back with an alarm. 2 Enter the alarm setting mode. 1 Select the (Playback) tab t "Alarm" in the menu when the IC recorder is in the stop mode, and then press N/ENT. 52 GB 2 Press v or V on the control button to select "ON," and then press N/ENT. 3 Set...
...": Set the year, month, day, hour, and minute in sequence, as described in "Step 4: Setting the Clock" on page 15. Playing Back a File at a Desired Time with an Alarm x STOP N/ENT v, V You can sound an alarm and start playback of the week, or "Daily," and then press N/ENT. 2 When you want... to play back with an alarm. 2 Enter the alarm setting mode. 1 Select the (Playback) tab t "Alarm" in the menu when the IC recorder is in the stop mode, and then press N/ENT. 52 GB 2 Press v or V on the control button to select "ON," and then press N/ENT. 3 Set...

Operating Instructions
Page 53
... selected file.) To stop the alarm playback Press any button. When the set date and time comes At the set to "Beep&Play" or "Play," the IC recorder will stop automatically. (When the alarm pattern is set time, "ALARM" is displayed in the display window. The setting process is activated, you want to... change the alarm setting Select the file you can set only one alarm each one file. • When the clock has not been set or no files are recorded, you cannot set...
... selected file.) To stop the alarm playback Press any button. When the set date and time comes At the set to "Beep&Play" or "Play," the IC recorder will stop automatically. (When the alarm pattern is set time, "ALARM" is displayed in the display window. The setting process is activated, you want to... change the alarm setting Select the file you can set only one alarm each one file. • When the clock has not been set or no files are recorded, you cannot set...
Operating Instructions
Page 54
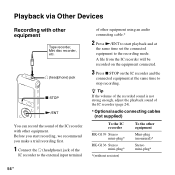
.... A file from the IC recorder will be recorded on the equipment connected. 3 Press x STOP on the IC recorder and the connected equipment at the same time set the connected equipment to the recording mode. z Tip If the volume of the recorded sound is not strong enough, ...connecting cable.* 2 Press N/ENT to start recording, we recommend you make a trial recording first. 1 Connect the i (headphone) jack of the IC recorder to stop recording. Before you start playback and at the same time to the external input terminal of the IC recorder (page 24). * Optional audio connecting ...
.... A file from the IC recorder will be recorded on the equipment connected. 3 Press x STOP on the IC recorder and the connected equipment at the same time set the connected equipment to the recording mode. z Tip If the volume of the recorded sound is not strong enough, ...connecting cable.* 2 Press N/ENT to start recording, we recommend you make a trial recording first. 1 Connect the i (headphone) jack of the IC recorder to stop recording. Before you start playback and at the same time to the external input terminal of the IC recorder (page 24). * Optional audio connecting ...

Operating Instructions
Page 59
...more track marks. • When a track mark is added. However, when you edit files using the IC recorder. Editing Files 59GB The (Track mark) indicator flashes three times, and a track mark is added during playback. When the (Track mark) indicator flashes once, press N/ENT. ...During recording, playing back, or pausing, press T-MARK at the track mark Press . Using a Track Mark Adding a track mark T-MARK ...
...more track marks. • When a track mark is added. However, when you edit files using the IC recorder. Editing Files 59GB The (Track mark) indicator flashes three times, and a track mark is added during playback. When the (Track mark) indicator flashes once, press N/ENT. ...During recording, playing back, or pausing, press T-MARK at the track mark Press . Using a Track Mark Adding a track mark T-MARK ...

Operating Instructions
Page 75
...the track mark just before erasing the files and select a folder from which all the track marks of one file Remain Time: During stop or playback, the remaining time of the selected file. 61 Marks Execute: All the track marks will not be erased. Cancel: The track mark will... Press to return to be erased. Cancel: The track mark division is executed. Cancel: All the track marks will be erased. Elapsed Time*: Elapsed playback time of one file During recording, the available recording time REC Date: Date recorded REC Time: Time recorded 75GB About the Menu Function
...the track mark just before erasing the files and select a folder from which all the track marks of one file Remain Time: During stop or playback, the remaining time of the selected file. 61 Marks Execute: All the track marks will not be erased. Cancel: The track mark will... Press to return to be erased. Cancel: The track mark division is executed. Cancel: All the track marks will be erased. Elapsed Time*: Elapsed playback time of one file During recording, the available recording time REC Date: Date recorded REC Time: Time recorded 75GB About the Menu Function
Operating Instructions
Page 103
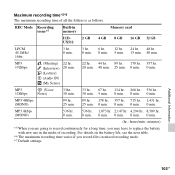
...min. 0 min. 0 min. 0 min. Maximum recording time*5*6 The maximum recording time of recording. For details on the battery life, see the next table. *6 The maximum recording time varies if you may have to record continuously for a long time, you record files in the midst of all the folders is as ... 0 min. (hr.: hours/min.: minutes) *5 When you are going to replace the battery with new one in mixed recording mode. *7 Default settings Additional Information 103GB REC Mode Recording scene*7 Built-in memory Memory card ICDUX512 2 GB 4 GB 8 GB 16 GB 32 GB LPCM 44.1kHz/ 16bit 3...
...min. 0 min. 0 min. 0 min. Maximum recording time*5*6 The maximum recording time of recording. For details on the battery life, see the next table. *6 The maximum recording time varies if you may have to record continuously for a long time, you record files in the midst of all the folders is as ... 0 min. (hr.: hours/min.: minutes) *5 When you are going to replace the battery with new one in mixed recording mode. *7 Default settings Additional Information 103GB REC Mode Recording scene*7 Built-in memory Memory card ICDUX512 2 GB 4 GB 8 GB 16 GB 32 GB LPCM 44.1kHz/ 16bit 3...
Operating Instructions
Page 113
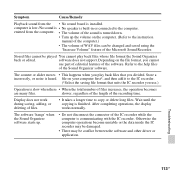
... long files. computer is low./No sound is • No speaker is communicating with the IC recorder. Depending on the file format, you use part of editorial features of the recording time. The counter or slider moves • This happens when you divided. Wait until the copying is... heard. slower, regardless of the length of the software. Display does not work during saving, adding, or deleting of the IC recorder while the computer is...
... long files. computer is low./No sound is • No speaker is communicating with the IC recorder. Depending on the file format, you use part of editorial features of the recording time. The counter or slider moves • This happens when you divided. Wait until the copying is... heard. slower, regardless of the length of the software. Display does not work during saving, adding, or deleting of the IC recorder while the computer is...
Operating Instructions
Page 118
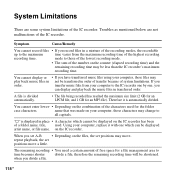
.... • The sum of the number on your computer to the maximum time varies from the maximum recording time of the highest recording recording time. Using your computer, those characters may change to time becomes shorter divide a file, therefore the remaining recording time will be displayed on the files, the set positions may play back the music files in...
.... • The sum of the number on your computer to the maximum time varies from the maximum recording time of the highest recording recording time. Using your computer, those characters may change to time becomes shorter divide a file, therefore the remaining recording time will be displayed on the files, the set positions may play back the music files in...

Operating Instructions
Page 121
... hours time remaining, the time is displayed in the menu. If there is less than 10 minutes time remaining, the time is set to "ON" in hours. Display when recording R Recording progress animation display Displays the progress of an auto (AGC), VOR, or synchronized recording in hours, minutes, and seconds. P Battery indicator Q Remaining recording time Displays the remaining recording time in...
... hours time remaining, the time is displayed in the menu. If there is less than 10 minutes time remaining, the time is set to "ON" in hours. Display when recording R Recording progress animation display Displays the progress of an auto (AGC), VOR, or synchronized recording in hours, minutes, and seconds. P Battery indicator Q Remaining recording time Displays the remaining recording time in...
Operating Instructions
Page 126
..., 67, 73 Podcast 90 Precautions 97 Protecting a file 65, 67, 74 R Rechargeable battery 11, 95, 104 Recharging the battery 11 Recording 19, 30 Recording from a telephone 41 Recording from other equipment 41 Recording time 103 Recording with other equipment 54 Review 22, 45 S Scene selection 30 Selecting a folder 19 Setting the clock 15, 68, 77 Setting...
..., 67, 73 Podcast 90 Precautions 97 Protecting a file 65, 67, 74 R Rechargeable battery 11, 95, 104 Recharging the battery 11 Recording 19, 30 Recording from a telephone 41 Recording from other equipment 41 Recording time 103 Recording with other equipment 54 Review 22, 45 S Scene selection 30 Selecting a folder 19 Setting the clock 15, 68, 77 Setting...


