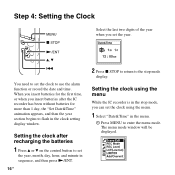
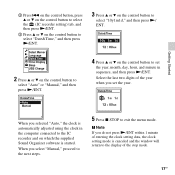
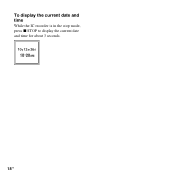
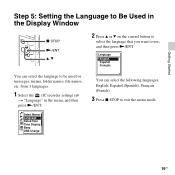
Operating Instructions (Large File - 11.69 MB)
Page 1
© 2011 Sony Corporation Printed in China IC Recorder Operating Instructions ICD-SX712 4-196-712-12(1) Getting Started Basic Operations Other Recording Operations Other Playback Operations Editing Files About the Menu Function Utilizing Your Computer Additional Information Troubleshooting Index
Operating Instructions (Large File - 11.69 MB)
Page 3
... and cannot be reproduced, translated or reduced to any time without prior written approval from Sony Corporation. • The recorded music is due to: - This is limited to private use only. Notice for the IC recorder ICD-SX712. IN NO EVENT SHALL SONY CORPORATION BE LIABLE FOR ANY INCIDENTAL, CONSEQUENTIAL OR SPECIAL DAMAGES, WHETHER BASED ON TORT...
Operating Instructions (Large File - 11.69 MB)
Page 5
... the batteries using a USB AC adaptor 14 When to charge/replace the batteries 14 Step 3: Turning the IC Recorder On .......15 Turning the power on a Memory Card 47 Recording across memory media - the VOR function 45 Recording on 15 Turning the power off 15 Step 4: Setting the Clock 16 Setting the clock after recharging...
Operating Instructions (Large File - 11.69 MB)
Page 6
...85 Menu Settings 86 Utilizing Your Computer Using the IC Recorder with Your Computer 103 Connecting the IC recorder to your computer 103 Structure of folders and files 104 Disconnecting the IC recorder from your computer 108 Copying Files from the IC Recorder to Your Computer 109 Copying Music Files from ...Your Computer to the IC recorder (drag and drop 110 Playing back music files copied from the ...
Operating Instructions (Large File - 11.69 MB)
Page 7
Using the IC Recorder as USB Memory 112 Using the Supplied Sound Organizer Software 113 What you can do using Sound Organizer 113 System requirements for your computer 114 Installing Sound Organizer 116 The Sound Organizer window .......... 117 Additional Information Using a USB AC Adaptor 119 Disconnecting the IC recorder from the AC outlet 120 Precautions 121 Specifications 124 System requirements 124 Design and specifications 125 Battery life 128 Troubleshooting Troubleshooting 130 Message List 140 System Limitations 145 Display Window Guide 147 Index 152 7GB
Operating Instructions (Large File - 11.69 MB)
Page 8
Getting Started Step 1: Checking the Contents of the Package IC Recorder (1) Remove the film on the display window before you use the IC recorder. You are supplied with some models in some regions only. Stereo headphones (1) USB connecting cable (1) Wind screen* (1) Use this to operate this manual could void ...
Operating Instructions (Large File - 11.69 MB)
Page 11
To put the IC recorder in the HOLD status To release the IC recorder from the HOLD status Slide the POWER/HOLD switch in order to prevent unintentional operations when you can disable all the buttons (HOLD) in the ... button operations are disabled. z Tip Even if the HOLD function is activated during recording, all the button operations are disabled. Slide the POWER/HOLD switch towards the center. P Note When the HOLD function is activated, you carry the IC recorder, etc. Getting Started Preventing unintentional operations (HOLD) You can stop the alarm playback...
Operating Instructions (Large File - 11.69 MB)
Page 12
...compartment lid, insert two NH-AAA rechargeable batteries with correct polarity, and close the lid. 2 Connect the IC recorder to connect the (USB) connector of the IC recorder and the USB port of your computer. Use the USB connecting cable supplied with some models in an animation...batteries.* 1 Insert rechargeable batteries. Recharging the batteries using a computer Remove the film on the display window before you use the IC recorder. Computer IC recorder To USB port of your computer To (USB) connector USB connecting cable While the batteries are charging, "Connecting" and the ...
Operating Instructions (Large File - 11.69 MB)
Page 13
... batteries are low, or if the batteries are charged while you are fully charged, the battery indicator will indicate " ." 3 Disconnect the IC recorder from no remaining battery power to "Trash" and drop it takes to charge from your computer. P Note If the battery indicator is an...The icon and menu displayed can be damaged or become unplayable. 1 Make sure that the operation indicator of the batteries. t Left-click "Eject IC RECORDER." For details on page 130. When using fully charged batteries or LR03 (size AAA) alkaline batteries Follow the step 1. P Note You cannot ...
Operating Instructions (Large File - 11.69 MB)
Page 14
Battery remain indication : "Low Battery Level" appears. z Tips • Do not use manganese batteries for this IC recorder. • When replacing the batteries, files recorded or alarm settings are not erased even when you remove the batteries. • When replacing the batteries, the clock ...supplied) (page 119). Charge the rechargeable batteries or replace the old batteries with new ones. m : "Low Battery" appears and the IC recorder will stop operation. When to charge/replace the batteries The battery indicator on the display shows the battery condition in an animation. 14 GB
Operating Instructions (Large File - 11.69 MB)
Page 15
.... animation is turned on z Tips • When you are not going to use the IC recorder for a long time, we recommend to turn off the IC recorder. • When the IC recorder is in the stop mode, and you purchase the IC recorder.) You can select the length of "POWER" for more than 2 seconds, and the "...Power Off" animation is set to "10min" when you leave the IC recorder without attempting an operation for more than 1 second. Turning the power off Slide the POWER/HOLD switch in the direction of time before auto power ...
Operating Instructions (Large File - 11.69 MB)
Page 16
... you insert batteries for more than 1 day, the "Set Date&Time" animation appears, and then the year section begins to use the alarm function or record the date and time. The menu mode window will be displayed. You need to set the clock to flash in sequence, and then press N/ENT... digits of the year when you set the year, month, day, hour, and minute in the clock setting display window. Setting the clock after the IC recorder has been without batteries for the first time, or when you can set the clock using the menu While the...
Operating Instructions (Large File - 11.69 MB)
Page 17
... display of the year when you selected "Auto," the clock is started. on the control button, press v or V on the control button to select the (IC recorder setting) tab, and then press N/ENT. 3 Press v or V on the control button to select "Date&Time," and then press N/ENT. 3 Press v or V on ... then press N/ENT. 4 Press v or V on which the supplied Sound Organizer software is automatically adjusted using the clock in the computer connected to the IC recorder and on the control button to set the year. When you set the year, month, day, hour, and minute in sequence, and then press N/ENT...
Operating Instructions (Large File - 11.69 MB)
Page 18
To display the current date and time While the IC recorder is in the stop mode, press x STOP to display the current date and time for about 3 seconds. 18 GB
Operating Instructions (Large File - 11.69 MB)
Page 19
You can select the following languages. You can select the language to be used for messages, menus, folder names, file names, etc. English, Español (Spanish), Français (French) 3 Press x STOP to use, and then press N/ENT. Getting Started Step 5: Setting the Language to Be Used in the menu, and then press N/ENT. from 3 languages. 1 Select the (IC recorder setting) tab t "Language" in the Display Window x STOP N/ENT v, V 2 Press v or V on the control button to select the language that you want to exit the menu mode. 19GB
Operating Instructions (Large File - 11.69 MB)
Page 20
... the battery indicator (page 14). • Noise may be sure to release the IC recorder from the HOLD status (page 11). 20 GB z Tip Before you start recording, we recommend you want to the direction you make a trial recording first, or monitor the recording (page 57). Built-in microphones Built-in microphones manually according to...
Operating Instructions (Large File - 11.69 MB)
Page 21
The (Built-in memory) tab will be displayed when you purchase the IC recorder. v, V ., > 21GB P Note Only the (Voice) tab will be displayed when you insert a memory card into the IC recorder (page 48). Basic Operations 2 Press to select the (Voice) tab, and then press > on the control button to display the folder selection window. 3 Press . The (Music) tab and the (Podcast) tab will be displayed when you transfer files from your computer (page 110, 114). on the control button, press v or V on the control button.
Operating Instructions (Large File - 11.69 MB)
Page 22
N/ENT 22 GB 4 Press v or V on the control button to select the folder in the direction of the source to record files. Starting to record (Auto (AGC) recording) 1 Turn the built-in microphones in v which you purchase the IC recorder, there are 5 folders V already available ( FOLDER01-05). 5 Press N/ENT. When you want to be recorded.
Operating Instructions (Large File - 11.69 MB)
Page 23
... or disconnect the USB AC adaptor (not supplied). x STOP Note while accessing The IC recorder is accessing data, do not need to press and hold z REC/PAUSE while recording. While the IC recorder is recording data and storing it on the memory media when the operation indicator flashes in orange ...and the IC recorder stops at the beginning of the current recording file. Doing so may damage the data. 23GB The ...
Operating Instructions (Large File - 11.69 MB)
Page 24
.... z Tips • You can record up to flash in the manual recording mode. During recording pause, the operation indicator flashes in red and " " begins to 199 files in memory is automatically released and the IC recorder enters the stop recording after you release . After you pause recording, recording pause is full (Cross-memory recording) (page 50). 24 GB on...