
Operating Instructions
Page 3
.... The supplied connecting cable is for the IC recorder ICD-SX57/SX67/SX77. special handling may also be governed by inappropriate waste handling of a separate user license agreement. This software is for Windows and cannot be treated as household waste. You cannot connect ...of California, USA only Perchlorate Material - Instead it shall be handed over to any time without prior written approval from Sony Corporation. Sony Corporation reserves the right to make any modification to this product, please contact your local Civic Office, your household waste ...
.... The supplied connecting cable is for the IC recorder ICD-SX57/SX67/SX77. special handling may also be governed by inappropriate waste handling of a separate user license agreement. This software is for Windows and cannot be treated as household waste. You cannot connect ...of California, USA only Perchlorate Material - Instead it shall be handed over to any time without prior written approval from Sony Corporation. Sony Corporation reserves the right to make any modification to this product, please contact your local Civic Office, your household waste ...
Operating Instructions
Page 5
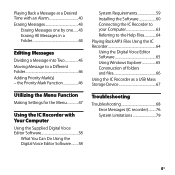
...Software 58 What You Can Do Using the Digital Voice Editor Software.........58 System Requirements 59 Installing the Software 60 Connecting the IC Recorder to your Computer 63 Referring to a Different Folder 46 Adding Priority Mark(s) - the Priority Mark Function 46 Utilizing the Menu Function...Message to the Help Files 64 Playing Back MP3 Files Using the IC Recorder 64 Using the Digital Voice Editor Software 65 Using Windows Explorer 65 Construction of folders and files 66 Using the IC Recorder as a USB Mass Storage Device 67 Troubleshooting Troubleshooting 68 Error Messages (IC...
...Software 58 What You Can Do Using the Digital Voice Editor Software.........58 System Requirements 59 Installing the Software 60 Connecting the IC Recorder to your Computer 63 Referring to a Different Folder 46 Adding Priority Mark(s) - the Priority Mark Function 46 Utilizing the Menu Function...Message to the Help Files 64 Playing Back MP3 Files Using the IC Recorder 64 Using the Digital Voice Editor Software 65 Using Windows Explorer 65 Construction of folders and files 66 Using the IC Recorder as a USB Mass Storage Device 67 Troubleshooting Troubleshooting 68 Error Messages (IC...
Operating Instructions
Page 8
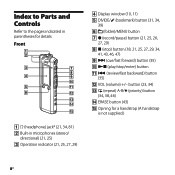
... the pages indicated in microphones (stereo/ directional) (21, 25) Operation indicator (21, 25, 27, 29) Display window (10, 11) DIVIDE/ (bookmark) button (31, 34, 39) (folder)/MENU button (record/pause) button (21, 25, 26, 27, 29) (stop) button (18, 21, 25, 27, 29, 34...
... the pages indicated in microphones (stereo/ directional) (21, 25) Operation indicator (21, 25, 27, 29) Display window (10, 11) DIVIDE/ (bookmark) button (31, 34, 39) (folder)/MENU button (record/pause) button (21, 25, 26, 27, 29) (stop) button (18, 21, 25, 27, 29, 34...
Operating Instructions
Page 10
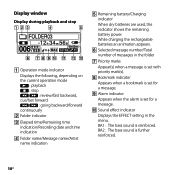
... Sound effect indicator Displays the EFFECT setting in the menu. BA2 : The bass sound is further reinforced. 10GB Display window Display during playback and stop Operation mode indicator Displays the following, depending on the current operation mode : playback : stop...review/fast backward, cue/fast forward : going backward/forward continuously Folder indicator Elasped time/Remaining time indication/Recording date and time indication Folder name/Message name/Artist name indication Remaining battery/Charging indicator When dry batteries are...
... Sound effect indicator Displays the EFFECT setting in the menu. BA2 : The bass sound is further reinforced. 10GB Display window Display during playback and stop Operation mode indicator Displays the following, depending on the current operation mode : playback : stop...review/fast backward, cue/fast forward : going backward/forward continuously Folder indicator Elasped time/Remaining time indication/Recording date and time indication Folder name/Message name/Artist name indication Remaining battery/Charging indicator When dry batteries are...
Operating Instructions
Page 14
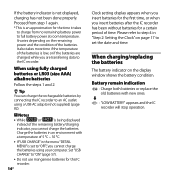
...with a temperature of time. Please refer to step 4 in an environment with new ones. : "LOW BATTERY" appears and the IC recorder will stop operation. It also takes more time if the temperature of the batteries is being displayed instead of the remaining battery/charging indicator, you...AC outlet using your computer. Proceed from no remaining battery power to full battery power at room temperature. It varies depending on the display window shows the battery condition. If the battery indicator is an approximation for the time it takes to charge from step 1 again. * ...
...with a temperature of time. Please refer to step 4 in an environment with new ones. : "LOW BATTERY" appears and the IC recorder will stop operation. It also takes more time if the temperature of the batteries is being displayed instead of the remaining battery/charging indicator, you...AC outlet using your computer. Proceed from no remaining battery power to full battery power at room temperature. It varies depending on the display window shows the battery condition. If the battery indicator is an approximation for the time it takes to charge from step 1 again. * ...

Operating Instructions
Page 16
...be displayed for an extended period of data, "UPDATING DATABASE..." Doing so may shorten depending on how you operate the IC recorder *2 When playing back through the internal speaker with the volume level set to process excessive amount of time. Wait until ...Note If the IC recorder is required to VOL12 *3 STHQ : Stereo high quality recording mode *4 ST : Stereo standard recording mode *5 STLP : Stereo long play recording mode *6 SP : Standard play recording mode *7 LP : Long play recording mode Note on the "UPDATING DATABASE..." appears in the display window or the operation indicator ...
...be displayed for an extended period of data, "UPDATING DATABASE..." Doing so may shorten depending on how you operate the IC recorder *2 When playing back through the internal speaker with the volume level set to process excessive amount of time. Wait until ...Note If the IC recorder is required to VOL12 *3 STHQ : Stereo high quality recording mode *4 ST : Stereo standard recording mode *5 STLP : Stereo long play recording mode *6 SP : Standard play recording mode *7 LP : Long play recording mode Note on the "UPDATING DATABASE..." appears in the display window or the operation indicator ...
Operating Instructions
Page 17
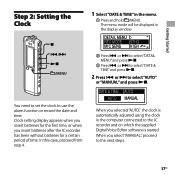
... time, or when you selected "AUTO," the clock is started. In this case, proceed from step 4. The menu mode will be displayed in the display window. Press or to select "DETAIL MENU" and press . Press or to select "DATE...Voice Editor software is automatically adjusted using the clock in the menu. Press and hold /MENU. When you insert batteries after the IC recorder has been without batteries for a certain period of time. Getting Started Step 2: Setting the Clock /MENU 1 Select "DATE & TIME" in the...
... time, or when you selected "AUTO," the clock is started. In this case, proceed from step 4. The menu mode will be displayed in the display window. Press or to select "DETAIL MENU" and press . Press or to select "DATE...Voice Editor software is automatically adjusted using the clock in the menu. Press and hold /MENU. When you insert batteries after the IC recorder has been without batteries for a certain period of time. Getting Started Step 2: Setting the Clock /MENU 1 Select "DATE & TIME" in the...
Operating Instructions
Page 18
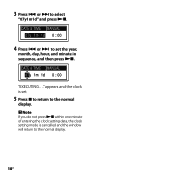
"EXECUTING...." appears and the clock is cancelled and the window will return to the normal display. 18GB 3 Press or to select "07y1m1d" and press . 4 Press or to set . 5 Press to return to the normal display. Note If you do not press within one minute of entering the clock setting data, the clock setting mode is set the year, month, day, hour, and minute in sequence, and then press .
"EXECUTING...." appears and the clock is cancelled and the window will return to the normal display. 18GB 3 Press or to select "07y1m1d" and press . 4 Press or to set . 5 Press to return to the normal display. Note If you do not press within one minute of entering the clock setting data, the clock setting mode is set the year, month, day, hour, and minute in sequence, and then press .
Operating Instructions
Page 21
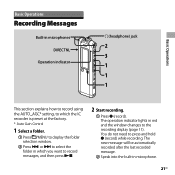
The new message will be automatically recorded after the last recorded message. Speak into the built-in red and the window changes to the recording display (page 11). You do not need to record messages, and then press . 2 Start recording. Press (record). Basic Operations Basic Operations Recording Messages Built-in microphones DIRECTNL Operation indicator...
The new message will be automatically recorded after the last recorded message. Speak into the built-in red and the window changes to the recording display (page 11). You do not need to record messages, and then press . 2 Start recording. Press (record). Basic Operations Basic Operations Recording Messages Built-in microphones DIRECTNL Operation indicator...
Operating Instructions
Page 22
... is lit in the display window. The IC recorder stops at the beginning of the current recording. Tips When you purchase the IC recorder, there are 5 folders already available, and you can record up to fast playback sound. Recording stops and you can make ... To avoid replacing batteries during a long recording session, use . To pause recording* release pause and resume recording review the current recording instantly** review during recording or recording pause. Doing so may damage the data. Noise may be recorded if an object, such as your finger, etc.,...
... is lit in the display window. The IC recorder stops at the beginning of the current recording. Tips When you purchase the IC recorder, there are 5 folders already available, and you can record up to fast playback sound. Recording stops and you can make ... To avoid replacing batteries during a long recording session, use . To pause recording* release pause and resume recording review the current recording instantly** review during recording or recording pause. Doing so may damage the data. Noise may be recorded if an object, such as your finger, etc.,...
Operating Instructions
Page 25
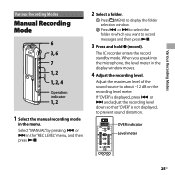
... the sound source to prevent sound distortion. When you want to record messages and then press . 3 Press and hold (record). Various Recording Modes Various Recording Modes Manual Recording Mode 6 3, 6 7 1, 2 1, 2, 4 Operation indicator 1, 2 1 Select the manual recording mode in the display window moves. 4 Adjust the recording level. Select "MANUAL" by pressing or in the "REC...
... the sound source to prevent sound distortion. When you want to record messages and then press . 3 Press and hold (record). Various Recording Modes Various Recording Modes Manual Recording Mode 6 3, 6 7 1, 2 1, 2, 4 Operation indicator 1, 2 1 Select the manual recording mode in the display window moves. 4 Adjust the recording level. Select "MANUAL" by pressing or in the "REC...
Operating Instructions
Page 27
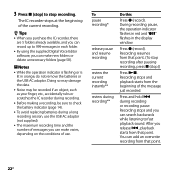
... by the sound around you have changed the microphone sensitivity, or for an important recording, set "VOR" to "ON" in the menu. The recording starts when the IC recorder detects sound. Set "MIC SENS" in the display window. 2 Press (record). Various Recording Modes 1 Press or to set "VOR" to "OFF" in the menu...
... by the sound around you have changed the microphone sensitivity, or for an important recording, set "VOR" to "ON" in the menu. The recording starts when the IC recorder detects sound. Set "MIC SENS" in the display window. 2 Press (record). Various Recording Modes 1 Press or to set "VOR" to "OFF" in the menu...

Operating Instructions
Page 31
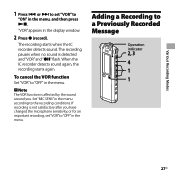
Recording with an External Microphone Stereo microphone 1 Connect an external microphone to the (microphone) jack when the IC recorder is added at the point you pressed the button. "SELECT INPUT" appears in the stop mode. The message will be divided into two, while recording continues. An animation which shows dividing appears below the level meter. The new message number is in the display window. 31GB Various Recording Modes 1 Press DIVIDE/ (bookmark) during recording.
Recording with an External Microphone Stereo microphone 1 Connect an external microphone to the (microphone) jack when the IC recorder is added at the point you pressed the button. "SELECT INPUT" appears in the stop mode. The message will be divided into two, while recording continues. An animation which shows dividing appears below the level meter. The new message number is in the display window. 31GB Various Recording Modes 1 Press DIVIDE/ (bookmark) during recording.
Operating Instructions
Page 32
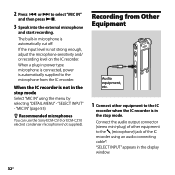
...audio connecting cable*. "MIC IN" (page 55). Recommended microphones You can use the Sony ECM-CS10 or ECM-CZ10 electret condenser microphone (not supplied). Recording from the IC recorder. When a plug in the stop mode. If the input level is automatically supplied to the ... of other equipment to select "MIC IN" and then press . 3 Speak into the external microphone and start recording. The built-in the display window. 32GB "SELECT INPUT" appears in microphone is automatically cut off. Connect the audio output connector (stereo mini-plug) of ...
...audio connecting cable*. "MIC IN" (page 55). Recommended microphones You can use the Sony ECM-CS10 or ECM-CZ10 electret condenser microphone (not supplied). Recording from the IC recorder. When a plug in the stop mode. If the input level is automatically supplied to the ... of other equipment to select "MIC IN" and then press . 3 Speak into the external microphone and start recording. The built-in the display window. 32GB "SELECT INPUT" appears in microphone is automatically cut off. Connect the audio output connector (stereo mini-plug) of ...
Operating Instructions
Page 40
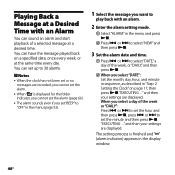
Playing Back a Message at a Desired Time with an alarm. 2 Enter the alarm setting mode. Select "ALARM" in the display window. 40GB You can have the message played back on page 17, then press . The setting process is displayed for the folder indicator, ... set up to 30 alarms. Notes When the clock has not been set or no messages are displayed. and then your settings are recorded, you cannot set the alarm. When " " is finished and "" (alarm indicator) appears in the menu and press . Press ...
Playing Back a Message at a Desired Time with an alarm. 2 Enter the alarm setting mode. Select "ALARM" in the display window. 40GB You can have the message played back on page 17, then press . The setting process is displayed for the folder indicator, ... set up to 30 alarms. Notes When the clock has not been set or no messages are displayed. and then your settings are recorded, you cannot set the alarm. When " " is finished and "" (alarm indicator) appears in the menu and press . Press ...
Operating Instructions
Page 42
..., the alarm setting remains on which you cannot set an alarm, that alarm will be cancelled and the alarm indicator will disappear from the display window. Notes You can set only one alarm each one . Press or to select "YES," and press &#...57862;. To cancel the alarm setting Follow steps 1 and 2 of the divided message. The alarm setting will sound after the recording is displayed. is finished. Cancel an alarm first. If you delete a message on only the first part of "To change the alarm setting."...
..., the alarm setting remains on which you cannot set an alarm, that alarm will be cancelled and the alarm indicator will disappear from the display window. Notes You can set only one alarm each one . Press or to select "YES," and press &#...57862;. To cancel the alarm setting Follow steps 1 and 2 of the divided message. The alarm setting will sound after the recording is displayed. is finished. Cancel an alarm first. If you delete a message on only the first part of "To change the alarm setting."...
Operating Instructions
Page 47
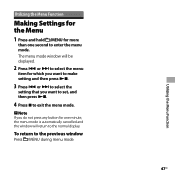
The menu mode window will be displayed. 2 Press or to select the menu item for which you want to make setting and then press . 3 Press &#... If you do not press any button for more than one minute, the menu mode is automatically cancelled and the window will return to the normal display. To return to the previous window Press /MENU during menu mode. 47GB Utilizing the Menu Function Utilizing the Menu Function Making Settings for the Menu...
The menu mode window will be displayed. 2 Press or to select the menu item for which you want to make setting and then press . 3 Press &#... If you do not press any button for more than one minute, the menu mode is automatically cancelled and the window will return to the normal display. To return to the previous window Press /MENU during menu mode. 47GB Utilizing the Menu Function Utilizing the Menu Function Making Settings for the Menu...

Operating Instructions
Page 54
...ALL ERASE BKMRK MOVE Settings (*: Initial setting) Turns the backlight in the display window on or off. 10 SEC*: The backlight in the display window lights up for 60 seconds. Press /MENU to return to the folder window before erasing the messages and select a folder from which all messages are to... the menu window and select "YES." OFF: The backlight in the display window lights up for 10 seconds. 60 SEC: The backlight in the display window does not light, even during operation. All messages in the selected folder will ...
...ALL ERASE BKMRK MOVE Settings (*: Initial setting) Turns the backlight in the display window on or off. 10 SEC*: The backlight in the display window lights up for 60 seconds. Press /MENU to return to the folder window before erasing the messages and select a folder from which all messages are to... the menu window and select "YES." OFF: The backlight in the display window lights up for 10 seconds. 60 SEC: The backlight in the display window does not light, even during operation. All messages in the selected folder will ...
Operating Instructions
Page 58
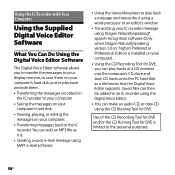
... on your computer). Using the CD Recording Tool for DVE, you can play back a message and transcribe it using a word-processor or an editor's window. Transcribing your computer. Transferring messages back to the IC recorder. Saved files can then be added to play tracks... of the CD Recording Tool for DVE and/or the CD Burning Tool for DVE. You...
... on your computer). Using the CD Recording Tool for DVE, you can play back a message and transcribe it using a word-processor or an editor's window. Transcribing your computer. Transferring messages back to the IC recorder. Saved files can then be added to play tracks... of the CD Recording Tool for DVE and/or the CD Burning Tool for DVE. You...

Operating Instructions
Page 59
Hard disk space: 70 MB or more - Sound board: Windows® XP Media Center Edition 2005, Windows® XP Media Center Edition 2004, Windows® XP Media Center Edition, Windows® XP Professional, Windows® XP Home Edition, Windows® 2000 Professional compatible - Using the IC Recorder with multi-boot operating environment are not supported. Display: High color...
Hard disk space: 70 MB or more - Sound board: Windows® XP Media Center Edition 2005, Windows® XP Media Center Edition 2004, Windows® XP Media Center Edition, Windows® XP Professional, Windows® XP Home Edition, Windows® 2000 Professional compatible - Using the IC Recorder with multi-boot operating environment are not supported. Display: High color...


