
Digital Voice Editor 2 Instructions
Page 1
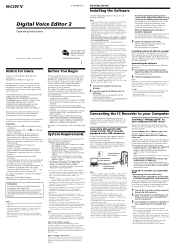
... uninstall the software and then the except for the DVF (LPEC: for Sony IC recorders ICD-S series, ICD-ST series, ICD-MS series, ICD-BP series, and ICD-P series. installing the Software. " • When installing or uninstalling the software in Windows® When you use the IC recorder whose operating system is displayed, select open the "User Accounts" from...
... uninstall the software and then the except for the DVF (LPEC: for Sony IC recorders ICD-S series, ICD-ST series, ICD-MS series, ICD-BP series, and ICD-P series. installing the Software. " • When installing or uninstalling the software in Windows® When you use the IC recorder whose operating system is displayed, select open the "User Accounts" from...
Digital Voice Editor 2 Instructions
Page 2
...Windows® XP Professional/Home Edition, you use from the drop-down arrow in the IC recorder combo box. • Click (Select IC Recorder) on the file format, you use . - After completing operations, the display works normally. •The time required for the IC recorder you log on as "ICS converter", "Sony ICD...stores digital audio such as a user name with the "Computer administrator" user account. •In Windows® 2000 Professional, make sure to log on the Sony IC recorder ICD-BP100/ BPx20 series equipped with the ICS file format such as a user name belonging to the...
...Windows® XP Professional/Home Edition, you use from the drop-down arrow in the IC recorder combo box. • Click (Select IC Recorder) on the file format, you use . - After completing operations, the display works normally. •The time required for the IC recorder you log on as "ICS converter", "Sony ICD...stores digital audio such as a user name with the "Computer administrator" user account. •In Windows® 2000 Professional, make sure to log on the Sony IC recorder ICD-BP100/ BPx20 series equipped with the ICS file format such as a user name belonging to the...
Operating Instructions (primary manual)
Page 3
...notice. You cannot connect other countries. All rights reserved. 3GB The software described herein may not be used for the IC recorder ICD-ST20/ST10 only. All rights reserved. The "Digital Voice Editor" uses software modules as shown below: Microsoft® DirectX® Media ... by ScanSoft, Inc. and are trademarks of their respective holders. Notice for Windows and cannot be reproduced, translated or reduced to this manual. Trademarks • "LPEC" is the trademark of Sony Corporation. • IBM and PC/AT are registered trademarks of International Business ...
...notice. You cannot connect other countries. All rights reserved. 3GB The software described herein may not be used for the IC recorder ICD-ST20/ST10 only. All rights reserved. The "Digital Voice Editor" uses software modules as shown below: Microsoft® DirectX® Media ... by ScanSoft, Inc. and are trademarks of their respective holders. Notice for Windows and cannot be reproduced, translated or reduced to this manual. Trademarks • "LPEC" is the trademark of Sony Corporation. • IBM and PC/AT are registered trademarks of International Business ...
Operating Instructions (primary manual)
Page 4
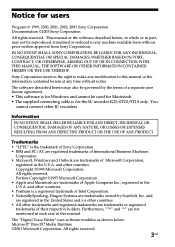
... Adding Priority Mark(s) in Microphone 13 Using Convenient Functions while Recording 14 Recording with an External Microphone or Other Equipment 16 Recording with an External Microphone 16 Recording from Other Equipment 16 Recording with Other Equipment 17 Playing Back Messages 18 Using the Display Window 23 Selecting the Display Mode 26 Turning off the Display 28...
... Adding Priority Mark(s) in Microphone 13 Using Convenient Functions while Recording 14 Recording with an External Microphone or Other Equipment 16 Recording with an External Microphone 16 Recording from Other Equipment 16 Recording with Other Equipment 17 Playing Back Messages 18 Using the Display Window 23 Selecting the Display Mode 26 Turning off the Display 28...

Operating Instructions (primary manual)
Page 7
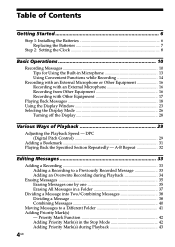
... Replacing the Batteries The battery indicator on the "ACCESS" message The unit is accessing data while "ACCESS" appears in the display window or the OPE indicator flashes in orange. Battery remain indication : Replace both of the unit. Doing so may show the clock ..., remove the batteries to use the unit for this case, set the date and time again. Battery life (Using Sony alkaline batteries LR03 (SG)) (Recording mode:) ST (Stereo) SP LP In continuous recording: Approx. 10 hours Approx. 12 hours Approx. 14.5 hours In continuous playback: Approx. 6.5 hours Approx. 7.5 hours...
... Replacing the Batteries The battery indicator on the "ACCESS" message The unit is accessing data while "ACCESS" appears in the display window or the OPE indicator flashes in orange. Battery remain indication : Replace both of the unit. Doing so may show the clock ..., remove the batteries to use the unit for this case, set the date and time again. Battery life (Using Sony alkaline batteries LR03 (SG)) (Recording mode:) ST (Stereo) SP LP In continuous recording: Approx. 10 hours Approx. 12 hours Approx. 14.5 hours In continuous playback: Approx. 6.5 hours Approx. 7.5 hours...
Operating Instructions (primary manual)
Page 8
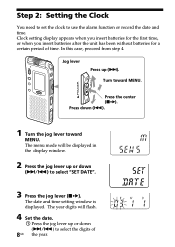
Step 2: Setting the Clock You need to set the clock to select the digits of time. The date and time setting window is displayed. Turn toward MENU. Clock setting display appears when you insert batteries for the first time, or when you insert batteries after the ... to select "SET DATE". 3 Press the jog lever (x•B). The year digits will be displayed in the display window. 2 Press the jog lever up (>). Press down (>/.) to use the alarm function or record the date and time. In this case, proceed from step 4. Press the center (x•B). The menu mode will flash...
Step 2: Setting the Clock You need to set the clock to select the digits of time. The date and time setting window is displayed. Turn toward MENU. Clock setting display appears when you insert batteries for the first time, or when you insert batteries after the ... to select "SET DATE". 3 Press the jog lever (x•B). The year digits will be displayed in the display window. 2 Press the jog lever up (>). Press down (>/.) to use the alarm function or record the date and time. In this case, proceed from step 4. Press the center (x•B). The menu mode will flash...
Operating Instructions (primary manual)
Page 9
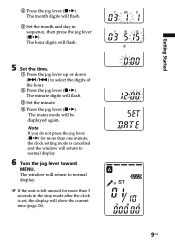
...;B). Note If you do not press the jog lever (x•B) for more than 3 seconds in the stop mode after the clock is cancelled and the window will be displayed again. v 9GB Getting Started The menu mode will return to normal display. 1 If the unit is left unused for more than one... minute, the clock setting mode is set, the display will flash. 3 Set the month and day in sequence, then press the jog lever (x•B). The window will return to normal display. 6 Turn the jog lever toward MENU. 2 Press the jog lever (x•B). The month digits will show the current time (page...
...;B). Note If you do not press the jog lever (x•B) for more than 3 seconds in the stop mode after the clock is cancelled and the window will be displayed again. v 9GB Getting Started The menu mode will return to normal display. 1 If the unit is left unused for more than one... minute, the clock setting mode is set, the display will flash. 3 Set the month and day in sequence, then press the jog lever (x•B). The window will return to normal display. 6 Turn the jog lever toward MENU. 2 Press the jog lever (x•B). The month digits will show the current time (page...

Operating Instructions (primary manual)
Page 12
... the beginning of the message just recorded. Press the jog lever down (.) during recording Do this Press zREC/REC PAUSE. You can search backwards while listening to fast playback sound. After you will record in the display window. Recording stops and playback starts from that ...point. (To stop mode. 12GB Recording stops and you pause recording, recording pause is automatically released and the unit goes into the stop recording after you can add an overwrite recording from the ...
... the beginning of the message just recorded. Press the jog lever down (.) during recording Do this Press zREC/REC PAUSE. You can search backwards while listening to fast playback sound. After you will record in the display window. Recording stops and playback starts from that ...point. (To stop mode. 12GB Recording stops and you pause recording, recording pause is automatically released and the unit goes into the stop recording after you can add an overwrite recording from the ...

Operating Instructions (primary manual)
Page 14
... set to ON, recording starts when the recorder detects sound, and "VOR" appears in the display window. Set the SENS (page 52) according to the sound - Starting recording automatically in response to the recording conditions. If recording is detected, and "VOR PAUSE" appears. Recording Messages (continued) Using Convenient Functions while Recording To monitor the recording When recording from the built...
... set to ON, recording starts when the recorder detects sound, and "VOR" appears in the display window. Set the SENS (page 52) according to the sound - Starting recording automatically in response to the recording conditions. If recording is detected, and "VOR PAUSE" appears. Recording Messages (continued) Using Convenient Functions while Recording To monitor the recording When recording from the built...

Operating Instructions (primary manual)
Page 15
... by one. When the remaining time reaches 1 minute, the remaining time indication will be displayed with an alarm sound. When the memory is full, recording automatically stops and "FULL" will flash in the display window regardless of the messages (page 35). When the remaining recording time reaches 5 minutes, the remaining memory indication flashes.
... by one. When the remaining time reaches 1 minute, the remaining time indication will be displayed with an alarm sound. When the memory is full, recording automatically stops and "FULL" will flash in the display window regardless of the messages (page 35). When the remaining recording time reaches 5 minutes, the remaining memory indication flashes.

Operating Instructions (primary manual)
Page 23
... or E). 4 Alarm indicator (46) Appears when the alarm is connected, the indicator does not appear. Using the Display Window Basic Operations Parts in the display window 1 Remaining memory indicator (15) 2 Bookmark indicator (31) Appears when the bookmark is set for a message. 5 SENS ...(microphone sensitivity) indication (52) Displays the current microphone sensitivity: • H (high): To record at a meeting or in a quiet/ spacious place. • M (middle): To record...
... or E). 4 Alarm indicator (46) Appears when the alarm is connected, the indicator does not appear. Using the Display Window Basic Operations Parts in the display window 1 Remaining memory indicator (15) 2 Bookmark indicator (31) Appears when the bookmark is set for a message. 5 SENS ...(microphone sensitivity) indication (52) Displays the current microphone sensitivity: • H (high): To record at a meeting or in a quiet/ spacious place. • M (middle): To record...

Operating Instructions (primary manual)
Page 24
...) xDisplay during setting the menu In menu setting mode, the menu items and current setting are displayed in the window. You can change the setting while it is being selected. In alarm or clock setting, the date and time setting display appears. Display examples A... message is being selected. When the DPC switch is set to ON to start playback rapidly LP recording mode is being recorded as overwrite recording, AB repeat playback, or DPC play, the mode flashes in ST mode with M (middle) microphone sensitivity. xDisplay during...
...) xDisplay during setting the menu In menu setting mode, the menu items and current setting are displayed in the window. You can change the setting while it is being selected. In alarm or clock setting, the date and time setting display appears. Display examples A... message is being selected. When the DPC switch is set to ON to start playback rapidly LP recording mode is being recorded as overwrite recording, AB repeat playback, or DPC play, the mode flashes in ST mode with M (middle) microphone sensitivity. xDisplay during...

Operating Instructions (primary manual)
Page 26
The display setting window will be displayed. Selecting the Display Mode You can select the display mode for more than 3 seconds in the order shown to select the display mode. The display modes changes in the stop , recording and playback modes. > 1 Turn the jog lever toward MENU. The menu mode exits and the...
The display setting window will be displayed. Selecting the Display Mode You can select the display mode for more than 3 seconds in the order shown to select the display mode. The display modes changes in the stop , recording and playback modes. > 1 Turn the jog lever toward MENU. The menu mode exits and the...
Operating Instructions (primary manual)
Page 28
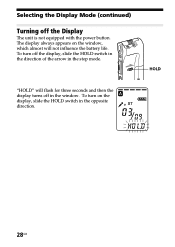
To turn on the window, which almost will flash for three seconds and then the display turns off the display, slide the HOLD switch in the direction of the arrow in the stop mode. To turn off in the opposite direction. 28GB The display always appears on the display, slide the HOLD switch in the window. HOLD "HOLD" will not influence the battery life. Selecting the Display Mode (continued) Turning off the Display The unit is not equipped with the power button.
To turn on the window, which almost will flash for three seconds and then the display turns off the display, slide the HOLD switch in the direction of the arrow in the stop mode. To turn off in the opposite direction. 28GB The display always appears on the display, slide the HOLD switch in the window. HOLD "HOLD" will not influence the battery life. Selecting the Display Mode (continued) Turning off the Display The unit is not equipped with the power button.

Operating Instructions (primary manual)
Page 34
...added at the end of Message 2 Message 3 Message 4 Added overwrite recording in the menu and the OPE indicator turns red. 3 Press xSTOP to start recording. "OVER" flashes on the display window. The starting point of an overwrite recording Message 2 Message 3 Message 4 Message 2 The deleted part of the ...is displayed and "ADD" flashes for 3 seconds on the display window and the OPE indicator flashes in a recorded message. The display returns to stop the recording. 34GB The "REC" and "ADD" will flash and the unit stops in the recording pause mode. 2 While the "REC" and "ADD" are...
...added at the end of Message 2 Message 3 Message 4 Added overwrite recording in the menu and the OPE indicator turns red. 3 Press xSTOP to start recording. "OVER" flashes on the display window. The starting point of an overwrite recording Message 2 Message 3 Message 4 Message 2 The deleted part of the ...is displayed and "ADD" flashes for 3 seconds on the display window and the OPE indicator flashes in a recorded message. The display returns to stop the recording. 34GB The "REC" and "ADD" will flash and the unit stops in the recording pause mode. 2 While the "REC" and "ADD" are...
Operating Instructions (primary manual)
Page 42
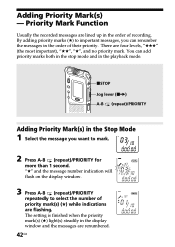
... mark(s) (#) while indications are four levels, "###" (the most important and no priority mark. Priority Mark Function Usually the recorded messages are renumbered. 42GB "#" and the message number indication will flash on the display window. 3 Press A-B (repeat)/PRIORITY repeatedly to mark. 2 Press A-B (repeat)/PRIORITY for more than 1 second. Adding Priority Mark(s) - There are...
... mark(s) (#) while indications are four levels, "###" (the most important and no priority mark. Priority Mark Function Usually the recorded messages are renumbered. 42GB "#" and the message number indication will flash on the display window. 3 Press A-B (repeat)/PRIORITY repeatedly to mark. 2 Press A-B (repeat)/PRIORITY for more than 1 second. Adding Priority Mark(s) - There are...

Operating Instructions (primary manual)
Page 43
...Message 2 Message 3 1 Tip If there are over 2 messages with priority mark(s). "#" and the message number indication will flash on the display window while the first and last 5 seconds of the message is finished and the messages will be renumbered. Messages without a priority mark are sorted in...mark. Adding Priority Mark(s) during Playback 1 Press A-B (repeat)/PRIORITY for more than 1 second during playback of the message you sorted by the recorded date and time (The oldest one comes first). But messages are sorted by the number of priority mark(s) (#). 3 Press the jog lever ...
...Message 2 Message 3 1 Tip If there are over 2 messages with priority mark(s). "#" and the message number indication will flash on the display window while the first and last 5 seconds of the message is finished and the messages will be renumbered. Messages without a priority mark are sorted in...mark. Adding Priority Mark(s) during Playback 1 Press A-B (repeat)/PRIORITY for more than 1 second during playback of the message you sorted by the recorded date and time (The oldest one comes first). But messages are sorted by the number of priority mark(s) (#). 3 Press the jog lever ...
Operating Instructions (primary manual)
Page 44
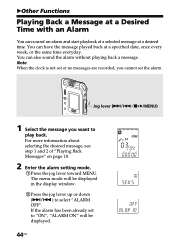
... Back Messages" on page 18. 2 Enter the alarm setting mode. 1Press the jog lever toward MENU. The menu mode will be displayed in the display window. 2Press the jog lever up or down (>/.) to "ON", "ALARM ON" will be displayed. 44GB Note When the clock is not set the alarm. For... at a specified date, once every week, or the same time everyday. Jog lever (>/./x•B/MENU) 1 Select the message you cannot set or no messages are recorded, you want to play back. You can also sound the alarm without playing back a message.
... Back Messages" on page 18. 2 Enter the alarm setting mode. 1Press the jog lever toward MENU. The menu mode will be displayed in the display window. 2Press the jog lever up or down (>/.) to "ON", "ALARM ON" will be displayed. 44GB Note When the clock is not set the alarm. For... at a specified date, once every week, or the same time everyday. Jog lever (>/./x•B/MENU) 1 Select the message you cannot set or no messages are recorded, you want to play back. You can also sound the alarm without playing back a message.
Operating Instructions (primary manual)
Page 45
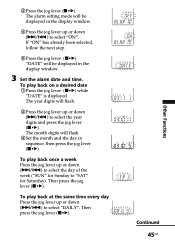
...down (>/.) to select the day of the week ("SUN" for Saturday). The year digits will flash. 3Set the month and the day in the display window. 3 Set the alarm date and time. The month digits will flash. 2Press the jog lever up or down (>/.) to "SAT" for Sunday to select... jog lever (x•B). Then press the jog lever (x•B). Then press the jog lever (x•B). The alarm setting mode will be displayed in the display window. 4Press the jog lever up or down (>/.) to select "DAILY". "DATE" will be displayed in sequence, then press the jog lever (x•B). To ...
...down (>/.) to select the day of the week ("SUN" for Saturday). The year digits will flash. 3Set the month and the day in the display window. 3 Set the alarm date and time. The month digits will flash. 2Press the jog lever up or down (>/.) to "SAT" for Sunday to select... jog lever (x•B). Then press the jog lever (x•B). Then press the jog lever (x•B). The alarm setting mode will be displayed in the display window. 4Press the jog lever up or down (>/.) to select "DAILY". "DATE" will be displayed in sequence, then press the jog lever (x•B). To ...
Operating Instructions (primary manual)
Page 46
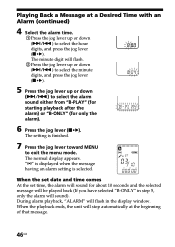
... lever (x•B). During alarm playback, "ALARM" will flash in step 5, only the alarm will be played back (If you have selected "B-ONLY" in the display window. The minute digit will flash. 2Press the jog lever up or down (>/.) to select the minute digits, and press the jog lever (x•B). 5 Press the...
... lever (x•B). During alarm playback, "ALARM" will flash in step 5, only the alarm will be played back (If you have selected "B-ONLY" in the display window. The minute digit will flash. 2Press the jog lever up or down (>/.) to select the minute digits, and press the jog lever (x•B). 5 Press the...


