Operating Instructions
Page 1
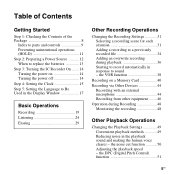
IC Recorder Operating Instructions ICD-PX312 4-267-065-11(2) Getting Started Basic Operations Other Recording Operations Other Playback Operations Editing Files About the Menu Function Utilizing Your Computer Additional Information Troubleshooting Index
IC Recorder Operating Instructions ICD-PX312 4-267-065-11(2) Getting Started Basic Operations Other Recording Operations Other Playback Operations Editing Files About the Menu Function Utilizing Your Computer Additional Information Troubleshooting Index
Operating Instructions
Page 2
... to Part 15 of Conformity Trade Name : SONY Model : ICD-PX312 Responsible Party : Sony Electronics Inc. These limits are cautioned that is not functioning normally. - The capacity of the text and characters, the text shown on device. Record these numbers whenever you may not cause harmful ...the interference by one or more of this product. This equipment generates, uses and can be displayed properly on the IC recorder may cause harmful interference to the following FCC statement applies only to private use only. Operation is subject to radio communications...
... to Part 15 of Conformity Trade Name : SONY Model : ICD-PX312 Responsible Party : Sony Electronics Inc. These limits are cautioned that is not functioning normally. - The capacity of the text and characters, the text shown on device. Record these numbers whenever you may not cause harmful ...the interference by one or more of this product. This equipment generates, uses and can be displayed properly on the IC recorder may cause harmful interference to the following FCC statement applies only to private use only. Operation is subject to radio communications...
Operating Instructions
Page 3
... supplied connecting cable is an abbreviated form of the copyright holders. What you record is prohibited. Sony Corporation reserves the right to make any modification to this document. 3GB The use only. Any use beyond those restriction is for the IC recorder ICD-PX312. This product supports "Memory Stick Micro™ (M2™)" media. "M2™...
... supplied connecting cable is an abbreviated form of the copyright holders. What you record is prohibited. Sony Corporation reserves the right to make any modification to this document. 3GB The use only. Any use beyond those restriction is for the IC recorder ICD-PX312. This product supports "Memory Stick Micro™ (M2™)" media. "M2™...
Operating Instructions
Page 5
... Source ..........12 When to replace the batteries 13 Step 3: Turning the IC Recorder On .......14 Turning the power on a Memory Card 40 Recording via Other Devices 44 Recording with an external microphone 44 Recording from other equipment ........46 Operation during playback 36 Starting to record automatically in the playback sound and making the human voice clearer -
... Source ..........12 When to replace the batteries 13 Step 3: Turning the IC Recorder On .......14 Turning the power on a Memory Card 40 Recording via Other Devices 44 Recording with an external microphone 44 Recording from other equipment ........46 Operation during playback 36 Starting to record automatically in the playback sound and making the human voice clearer -
Operating Instructions
Page 6
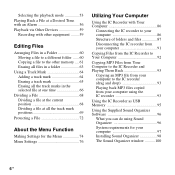
... 74 Menu Settings 76 Utilizing Your Computer Using the IC Recorder with Your Computer 86 Connecting the IC recorder to your computer 86 Structure of folders and files 87 Disconnecting the IC recorder from your computer 91 Copying Files from the IC Recorder to Your Computer 92 Copying MP3 Files from Your ...Computer to the IC Recorder and Playing Them Back 93 Copying an MP3 file from your computer to the IC recorder (drag and drop 93 Playing back MP3 files copied from your computer using the IC recorder 93 Using the IC Recorder as USB Memory 95 Using the Supplied...
... 74 Menu Settings 76 Utilizing Your Computer Using the IC Recorder with Your Computer 86 Connecting the IC recorder to your computer 86 Structure of folders and files 87 Disconnecting the IC recorder from your computer 91 Copying Files from the IC Recorder to Your Computer 92 Copying MP3 Files from Your ...Computer to the IC Recorder and Playing Them Back 93 Copying an MP3 file from your computer to the IC recorder (drag and drop 93 Playing back MP3 files copied from your computer using the IC recorder 93 Using the IC Recorder as USB Memory 95 Using the Supplied...
Operating Instructions
Page 7
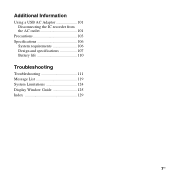
Additional Information Using a USB AC Adaptor 101 Disconnecting the IC recorder from the AC outlet 101 Precautions 103 Specifications 106 System requirements 106 Design and specifications 107 Battery life 110 Troubleshooting Troubleshooting 111 Message List 119 System Limitations 124 Display Window Guide 125 Index 129 7GB
Additional Information Using a USB AC Adaptor 101 Disconnecting the IC recorder from the AC outlet 101 Precautions 103 Specifications 106 System requirements 106 Design and specifications 107 Battery life 110 Troubleshooting Troubleshooting 111 Message List 119 System Limitations 124 Display Window Guide 125 Index 129 7GB
Operating Instructions
Page 8
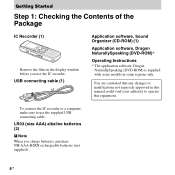
To connect the IC recorder to a computer, make sure to operate this equipment. LR03 (size AAA) alkaline batteries (2) P Note When you use the supplied USB connecting cable. USB connecting cable (1) ...-ROM)* Operating Instructions * The application software, Dragon NaturallySpeaking (DVD-ROM) is supplied with some regions only. Getting Started Step 1: Checking the Contents of the Package IC Recorder (1) Remove the film on the display window before you charge batteries, purchase NH-AAA-B2KN rechargeable batteries (not supplied). 8 GB You are cautioned that any...
To connect the IC recorder to a computer, make sure to operate this equipment. LR03 (size AAA) alkaline batteries (2) P Note When you use the supplied USB connecting cable. USB connecting cable (1) ...-ROM)* Operating Instructions * The application software, Dragon NaturallySpeaking (DVD-ROM) is supplied with some regions only. Getting Started Step 1: Checking the Contents of the Package IC Recorder (1) Remove the film on the display window before you charge batteries, purchase NH-AAA-B2KN rechargeable batteries (not supplied). 8 GB You are cautioned that any...
Operating Instructions
Page 11
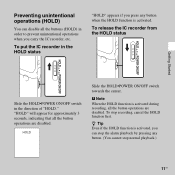
To put the IC recorder in the HOLD status "HOLD" appears if you press any button. (You cannot stop recording, cancel the HOLD function first. P Note When the HOLD function is activated. To stop normal playback.) 11GB Preventing unintentional operations (HOLD) You ...can stop the alarm playback by pressing any button when the HOLD function is activated during recording, all the button operations are disabled. To release the IC recorder from the HOLD status Getting Started Slide the HOLD•POWER ON/OFF switch in order to prevent unintentional ...
To put the IC recorder in the HOLD status "HOLD" appears if you press any button. (You cannot stop recording, cancel the HOLD function first. P Note When the HOLD function is activated. To stop normal playback.) 11GB Preventing unintentional operations (HOLD) You ...can stop the alarm playback by pressing any button when the HOLD function is activated during recording, all the button operations are disabled. To release the IC recorder from the HOLD status Getting Started Slide the HOLD•POWER ON/OFF switch in order to prevent unintentional ...
Operating Instructions
Page 12
...• Do not charge dry batteries. See "Step 4: Setting the Clock" on the display window before you use manganese batteries for this IC recorder. • When replacing the batteries, be sure to replace both batteries with correct polarity, and close the lid. If the battery compartment lid... insert batteries after you remove the batteries. • When replacing the batteries, the clock continues moving for about 1 minute after the IC recorder has been without batteries for a long time, remove the batteries to prevent damage from battery leakage and corrosion. P Notes • Do not...
...• Do not charge dry batteries. See "Step 4: Setting the Clock" on the display window before you use manganese batteries for this IC recorder. • When replacing the batteries, be sure to replace both batteries with correct polarity, and close the lid. If the battery compartment lid... insert batteries after you remove the batteries. • When replacing the batteries, the clock continues moving for about 1 minute after the IC recorder has been without batteries for a long time, remove the batteries to prevent damage from battery leakage and corrosion. P Notes • Do not...
Operating Instructions
Page 13
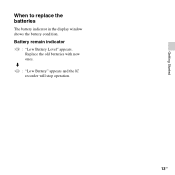
Replace the old batteries with new ones. Battery remain indicator : "Low Battery Level" appears. m : "Low Battery" appears and the IC recorder will stop operation. 13GB Getting Started When to replace the batteries The battery indicator in the display window shows the battery condition.
Replace the old batteries with new ones. Battery remain indicator : "Low Battery Level" appears. m : "Low Battery" appears and the IC recorder will stop operation. 13GB Getting Started When to replace the batteries The battery indicator in the display window shows the battery condition.
Operating Instructions
Page 14
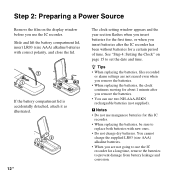
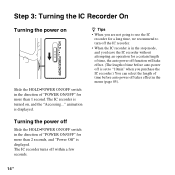
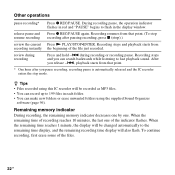
... in the menu (page 85). 14 GB z Tips • When you are not going to use the IC recorder for a long time, we recommend to "10min" when you purchase the IC recorder.) You can select the length of time before auto power off Slide the HOLD•POWER ON/OFF switch in... an operation for more than 2 seconds, and "Power Off" is displayed. Step 3: Turning the IC Recorder On Turning the power on , and the "Accessing..." The IC recorder is set to turn off the IC recorder. • When the IC recorder is in the direction of "POWER ON/OFF" for a certain length of time, the auto power...
... in the menu (page 85). 14 GB z Tips • When you are not going to use the IC recorder for a long time, we recommend to "10min" when you purchase the IC recorder.) You can select the length of time before auto power off Slide the HOLD•POWER ON/OFF switch in... an operation for more than 2 seconds, and "Power Off" is displayed. Step 3: Turning the IC Recorder On Turning the power on , and the "Accessing..." The IC recorder is set to turn off the IC recorder. • When the IC recorder is in the direction of "POWER ON/OFF" for a certain length of time, the auto power...
Operating Instructions
Page 15
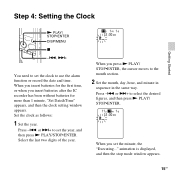
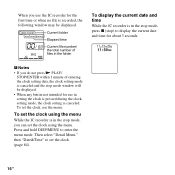
... desired figures, and then press N PLAY/ STOP•ENTER. When you press N PLAY/ STOP•ENTER, the cursor moves to use the alarm function or record the date and time. Step 4: Setting the Clock Getting Started N PLAY/ STOP•ENTER DISP/MENU x -., >+ You need to set the clock to the ..., day, hour, and minute in sequence in the same way. When you insert batteries for the first time, or when you insert batteries after the IC recorder has been without batteries for more than 1 minute, "Set Date&Time" appears, and then the clock setting window appears. Select the last two digits of...
... desired figures, and then press N PLAY/ STOP•ENTER. When you press N PLAY/ STOP•ENTER, the cursor moves to use the alarm function or record the date and time. Step 4: Setting the Clock Getting Started N PLAY/ STOP•ENTER DISP/MENU x -., >+ You need to set the clock to the ..., day, hour, and minute in sequence in the same way. When you insert batteries for the first time, or when you insert batteries after the IC recorder has been without batteries for more than 1 minute, "Set Date&Time" appears, and then the clock setting window appears. Select the last two digits of...
Operating Instructions
Page 16
... the clock using the menu. When you can set the clock using the menu While the IC recorder is in setting the clock is pressed during the clock setting mode, the clock setting is.../ STOP•ENTER within 1 minute of files in the folder To display the current date and time While the IC recorder is in the stop mode, press x (stop) to display the current date and time for use in the ...stop mode, you use the menu. Press and hold DISP/MENU to set the clock, use the IC recorder for the first time or when no file is canceled and the stop mode window will be displayed. Then ...
... the clock using the menu. When you can set the clock using the menu While the IC recorder is in setting the clock is pressed during the clock setting mode, the clock setting is.../ STOP•ENTER within 1 minute of files in the folder To display the current date and time While the IC recorder is in the stop mode, press x (stop) to display the current date and time for use in the ...stop mode, you use the menu. Press and hold DISP/MENU to set the clock, use the IC recorder for the first time or when no file is canceled and the stop mode window will be displayed. Then ...
Operating Instructions
Page 19
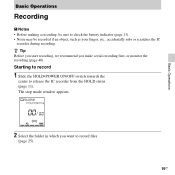
... 13). • Noise may be recorded if an object, such as your finger, etc., accidentally rubs or scratches the IC recorder during recording. z Tip Before you start recording, we recommend you want to record files (page 25). 19GB Basic Operations Basic Operations Recording P Notes • Before making a recording, be sure to release the IC recorder from the HOLD status (page...
... 13). • Noise may be recorded if an object, such as your finger, etc., accidentally rubs or scratches the IC recorder during recording. z Tip Before you start recording, we recommend you want to record files (page 25). 19GB Basic Operations Basic Operations Recording P Notes • Before making a recording, be sure to release the IC recorder from the HOLD status (page...
Operating Instructions
Page 20
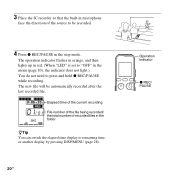
Elapsed time of the current recording File number of the file being recorded/ the total number of the source to be automatically recorded after the last recorded file. The new file will be recorded. 4 Press z REC/PAUSE in the stop mode. The operation indicator flashes in orange, and then lights up in red... the indicator does not light.) You do not need to press and hold z REC/PAUSE while recording. 3 Place the IC recorder so that the built-in microphone face the direction of recorded files in the folder zTip You can switch the elapsed time display to remaining time, or another display...
Elapsed time of the current recording File number of the file being recorded/ the total number of the source to be automatically recorded after the last recorded file. The new file will be recorded. 4 Press z REC/PAUSE in the stop mode. The operation indicator flashes in orange, and then lights up in red... the indicator does not light.) You do not need to press and hold z REC/PAUSE while recording. 3 Place the IC recorder so that the built-in microphone face the direction of recorded files in the folder zTip You can switch the elapsed time display to remaining time, or another display...

Operating Instructions
Page 21
... window or the operation indicator flashes in a folder. Doing so may damage the data. 21GB The folder containing the recorded file The number of the current recording file. Note while accessing The IC recorder is accessing data, do not remove the batteries or connect or disconnect the USB AC adaptor (not supplied). Basic Operations...
... window or the operation indicator flashes in a folder. Doing so may damage the data. 21GB The folder containing the recorded file The number of the current recording file. Note while accessing The IC recorder is accessing data, do not remove the batteries or connect or disconnect the USB AC adaptor (not supplied). Basic Operations...
Operating Instructions
Page 22
...in each folder. • You can record up to 199 files in the display window. Recording stops and playback starts from that point. (To stop resume recording recording after you pause recording, recording pause is automatically released and the IC recorder enters the stop ).) review the current Press... to the remaining time display, and the remaining recording time display will be recorded as MP3 files. • You can make new folders or erase unwanted folders using this IC recorder will also flash. During recording pause, the operation indicator flashes in red and ...
...in each folder. • You can record up to 199 files in the display window. Recording stops and playback starts from that point. (To stop resume recording recording after you pause recording, recording pause is automatically released and the IC recorder enters the stop ).) review the current Press... to the remaining time display, and the remaining recording time display will be recorded as MP3 files. • You can make new folders or erase unwanted folders using this IC recorder will also flash. During recording pause, the operation indicator flashes in red and ...
Operating Instructions
Page 24
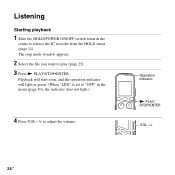
Playback will start soon, and the operation indicator will light in green. (When "LED" is set to "OFF" in the menu (page 83), the indicator does not light.) 4 Press VOL -/+ to release the IC recorder from the HOLD status (page 11). Listening Starting playback 1 Slide the HOLD•POWER ON/OFF switch towards the center to adjust the volume. The stop mode window appears. 2 Select the file you want to play (page 25). 3 Press N PLAY/STOP•ENTER. Operation indicator N PLAY/ STOP•ENTER VOL -/+ 24 GB
Playback will start soon, and the operation indicator will light in green. (When "LED" is set to "OFF" in the menu (page 83), the indicator does not light.) 4 Press VOL -/+ to release the IC recorder from the HOLD status (page 11). Listening Starting playback 1 Slide the HOLD•POWER ON/OFF switch towards the center to adjust the volume. The stop mode window appears. 2 Select the file you want to play (page 25). 3 Press N PLAY/STOP•ENTER. Operation indicator N PLAY/ STOP•ENTER VOL -/+ 24 GB
Operating Instructions
Page 25
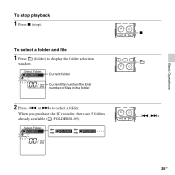
When you purchase the IC recorder, there are 5 folders already available ( FOLDER01-05). or >+ to display the folder selection window. x -., >+ 25GB Current folder Current file number/the total number of files in the folder 2 Press -. Basic Operations To stop playback 1 Press x (stop). To select a folder and file 1 Press (folder) to select a folder.
When you purchase the IC recorder, there are 5 folders already available ( FOLDER01-05). or >+ to display the folder selection window. x -., >+ 25GB Current folder Current file number/the total number of files in the folder 2 Press -. Basic Operations To stop playback 1 Press x (stop). To select a folder and file 1 Press (folder) to select a folder.

Operating Instructions
Page 27
...Press >+ repeatedly. (During the stop mode, keep the button pressed to skip the files continuously.*3) *1 When a track mark is set, the IC recorder goes backward or forward to the track mark before or after the current point (page 64). *2 These operations are for when "Easy Search" is... set to "OFF" (page 49). *3 In the continuous searching mode, the IC recorder does not locate track marks. Basic Operations 27GB To resume playback from that point, (Playback Pause function) press N PLAY/STOP•ENTER again. repeatedly....
...Press >+ repeatedly. (During the stop mode, keep the button pressed to skip the files continuously.*3) *1 When a track mark is set, the IC recorder goes backward or forward to the track mark before or after the current point (page 64). *2 These operations are for when "Easy Search" is... set to "OFF" (page 49). *3 In the continuous searching mode, the IC recorder does not locate track marks. Basic Operations 27GB To resume playback from that point, (Playback Pause function) press N PLAY/STOP•ENTER again. repeatedly....


