Digital Voice Editor 2 Instructions
Page 1
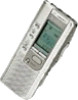
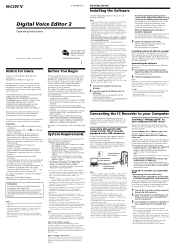
...the driver for ICD-ST series) files. (You can transfer the IC recorder data onto your computer through the USB connectors (for Sony IC recorders ICD-S series, ICD-ST series, ICD-MS series, ICD-BP series, and ICD-P series. ...Windows® XP Professional/Home Edition, make sure to select overwrite installation to handle all Erase the check for "Memory Stick". *2 You need a computer with basic operations of their respective holders. All rights reserved. Before You Begin This manual describes how to connect your Sony IC recorder ICD-S series, ICD-ST series, ICD-MS series, ICD...
...the driver for ICD-ST series) files. (You can transfer the IC recorder data onto your computer through the USB connectors (for Sony IC recorders ICD-S series, ICD-ST series, ICD-MS series, ICD-BP series, and ICD-P series. ...Windows® XP Professional/Home Edition, make sure to select overwrite installation to handle all Erase the check for "Memory Stick". *2 You need a computer with basic operations of their respective holders. All rights reserved. Before You Begin This manual describes how to connect your Sony IC recorder ICD-S series, ICD-ST series, ICD-MS series, ICD...
Digital Voice Editor 2 Instructions
Page 2
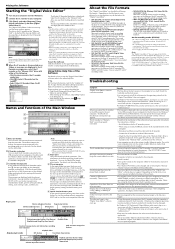
... limited on the "Digital Voice Editor". • DVF file [LPEC: for ICD-P series] (Digital Voice File/file extension: *.dvf) Monaural sound file format used in recording messages on the Sony IC recorder ICD-ST series equipped with a USB connector. The information of the Main Window 1Menu bar/Toolbar You can handle the following : • Click the down...
... limited on the "Digital Voice Editor". • DVF file [LPEC: for ICD-P series] (Digital Voice File/file extension: *.dvf) Monaural sound file format used in recording messages on the Sony IC recorder ICD-ST series equipped with a USB connector. The information of the Main Window 1Menu bar/Toolbar You can handle the following : • Click the down...
Operating Instructions (primary manual)
Page 3
... or the information contained herein at any machine readable form without notice. Sony Corporation reserves the right to make any modification to any time without prior written approval from Sony Corporation. and Canadian) To receive the customer services, complete and return ... and registered trademarks are trademarks of their respective holders. 3GB All other IC recorders. Notice for the IC recorder ICD-BP150 only. User registration (For the customers in your package. • This software is for Windows and cannot be used for Macintosh. • The supplied connecting cable ...
... or the information contained herein at any machine readable form without notice. Sony Corporation reserves the right to make any modification to any time without prior written approval from Sony Corporation. and Canadian) To receive the customer services, complete and return ... and registered trademarks are trademarks of their respective holders. 3GB All other IC recorders. Notice for the IC recorder ICD-BP150 only. User registration (For the customers in your package. • This software is for Windows and cannot be used for Macintosh. • The supplied connecting cable ...
Operating Instructions (primary manual)
Page 5
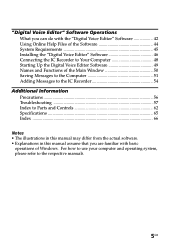
"Digital Voice Editor" Software Operations What you can do with basic operations of Windows. For how to use your computer and operating system, please refer to Parts and Controls 62 Specifications 65 Index ...66 Notes • The illustrations ...45 Installing the "Digital Voice Editor" Software 46 Connecting the IC Recorder to Your Computer 48 Starting Up the Digital Voice Editor Software 49 Names and Functions of the Main Window 50 Saving Messages to the Computer 51 Adding Messages to the IC Recorder 54 Additional Information Precautions 56 Troubleshooting 57 Index to the ...
"Digital Voice Editor" Software Operations What you can do with basic operations of Windows. For how to use your computer and operating system, please refer to Parts and Controls 62 Specifications 65 Index ...66 Notes • The illustrations ...45 Installing the "Digital Voice Editor" Software 46 Connecting the IC Recorder to Your Computer 48 Starting Up the Digital Voice Editor Software 49 Names and Functions of the Main Window 50 Saving Messages to the Computer 51 Adding Messages to the IC Recorder 54 Additional Information Precautions 56 Troubleshooting 57 Index to the ...

Operating Instructions (primary manual)
Page 9
...this case, set the date and time again. Getting Started Replacing the batteries The battery indicator on the display window. Notes • Do not use , approx. 10 hours (SP)/17 hours (LP) of recording or approx. 7 hours (SP)/9 hours (LP) of time. Otherwise, the display may appear on the... display window shows the battery condition. Note on the "ACCESS" message When you insert the batteries or disconnected the USB cable, "ACCESS" may show the clock setting display or incorrect date and time when you removed the exhausted ones. If the unit is possible. * Using Sony alkaline ...
...this case, set the date and time again. Getting Started Replacing the batteries The battery indicator on the display window. Notes • Do not use , approx. 10 hours (SP)/17 hours (LP) of recording or approx. 7 hours (SP)/9 hours (LP) of time. Otherwise, the display may appear on the... display window shows the battery condition. Note on the "ACCESS" message When you insert the batteries or disconnected the USB cable, "ACCESS" may show the clock setting display or incorrect date and time when you removed the exhausted ones. If the unit is possible. * Using Sony alkaline ...
Operating Instructions (primary manual)
Page 13
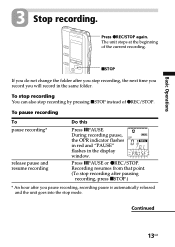
... folder after you pause recording, recording pause is automatically released and the unit goes into the stop recording, the next time you record you stop mode. Recording resumes from that point. (To stop recording after pausing recording, press xSTOP.) * An hour after you will record in the display window. To stop recording You can also stop recording by pressing xSTOP instead...
... folder after you pause recording, recording pause is automatically released and the unit goes into the stop recording, the next time you record you stop mode. Recording resumes from that point. (To stop recording after pausing recording, press xSTOP.) * An hour after you will record in the display window. To stop recording You can also stop recording by pressing xSTOP instead...
Operating Instructions (primary manual)
Page 14
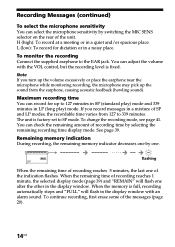
... "FULL" will flash one after the other in the display window. Remaining memory indication During recording, the remaining memory indicator decreases one by selecting the remaining recording time display mode. Note If you record messages in a mixture of recording time by one. Maximum recording time You can record for dictation or in a noisy place. The unit is...
... "FULL" will flash one after the other in the display window. Remaining memory indication During recording, the remaining memory indicator decreases one by selecting the remaining recording time display mode. Note If you record messages in a mixture of recording time by one. Maximum recording time You can record for dictation or in a noisy place. The unit is...

Operating Instructions (primary manual)
Page 24
... after the current message and counted as a part of Message 3 Message 3 Message 4 After adding a recording Message 3 Meeting at Conference room A 1 During playback, press zREC/STOP for more than 1 second. Message 4 Added recording at 2 o'clock on the display window. Built-in microphone OPR indicator zREC/STOP xSTOP During playback of the message. BEditing Messages...
... after the current message and counted as a part of Message 3 Message 3 Message 4 After adding a recording Message 3 Meeting at Conference room A 1 During playback, press zREC/STOP for more than 1 second. Message 4 Added recording at 2 o'clock on the display window. Built-in microphone OPR indicator zREC/STOP xSTOP During playback of the message. BEditing Messages...
Operating Instructions (primary manual)
Page 25
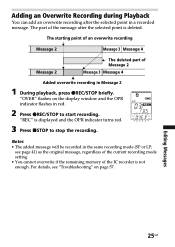
... • The added message will be recorded in a recorded message. For details, see page 41) as the original message, regardless of the current recording mode setting. • You cannot overwrite if the remaining memory of the IC recorder is displayed and the OPR indicator turns ... 3 Message 4 Added overwrite recording in red. 2 Press zREC/STOP to stop the recording. Adding an Overwrite Recording during Playback You can add an overwrite recording after the selected point is deleted. "REC" is not enough. see "Troubleshooting" on the display window and the OPR indicator flashes in...
... • The added message will be recorded in a recorded message. For details, see page 41) as the original message, regardless of the current recording mode setting. • You cannot overwrite if the remaining memory of the IC recorder is displayed and the OPR indicator turns ... 3 Message 4 Added overwrite recording in red. 2 Press zREC/STOP to stop the recording. Adding an Overwrite Recording during Playback You can add an overwrite recording after the selected point is deleted. "REC" is not enough. see "Troubleshooting" on the display window and the OPR indicator flashes in...

Operating Instructions (primary manual)
Page 30
...of their priority. " " and the message number flash. 3 Press A-B REPEAT/PRIORITY repeatedly to important messages, you can add up in the display window and the messages are flashing. The setting is finished when the priority mark(s) light(s) steadily in the order of priority mark(s) while " " and ...the message number are renumbered. 30GB Priority Mark Function Usually the recorded messages are lined up to mark. 2 Press A-B REPEAT/PRIORITY for more than 1 second. By adding priority marks ( ) to select the number ...
...of their priority. " " and the message number flash. 3 Press A-B REPEAT/PRIORITY repeatedly to important messages, you can add up in the display window and the messages are flashing. The setting is finished when the priority mark(s) light(s) steadily in the order of priority mark(s) while " " and ...the message number are renumbered. 30GB Priority Mark Function Usually the recorded messages are lined up to mark. 2 Press A-B REPEAT/PRIORITY for more than 1 second. By adding priority marks ( ) to select the number ...

Operating Instructions (primary manual)
Page 32
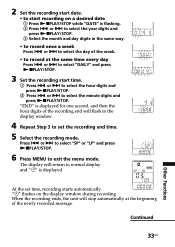
The unit enters the menu mode and "ALARM" will flash in the display window. 32GB NxPLAY/STOP MENU ./> 1 Display the timer setting display. 1 Press MENU. "START" is displayed for one second, and then "DATE" will be set if the clock has not been set . 3 Press . BOther Functions Starting Recording at a desired time. Note The timer cannot be displayed. 2 Press . or > repeatedly to flash. "OFF" starts to display "TIMER" and press NxPLAY/STOP. or > to flash "ON". 4 Press NxPLAY/STOP. Timer Recording You can start recording at a Desired Time -
The unit enters the menu mode and "ALARM" will flash in the display window. 32GB NxPLAY/STOP MENU ./> 1 Display the timer setting display. 1 Press MENU. "START" is displayed for one second, and then "DATE" will be set if the clock has not been set . 3 Press . BOther Functions Starting Recording at a desired time. Note The timer cannot be displayed. 2 Press . or > repeatedly to flash. "OFF" starts to display "TIMER" and press NxPLAY/STOP. or > to flash "ON". 4 Press NxPLAY/STOP. Timer Recording You can start recording at a Desired Time -
Operating Instructions (primary manual)
Page 33
or > to select "DAILY" and press NxPLAY/STOP. 3 Set the recording start recording on the display window during recording. "END" is displayed for one second, and then the hour digits of the newly recorded message. Press . or > to select "SP" or "LP" and press NxPLAY/STOP. 6 Press MENU to ...flashing. 2 Press . or > to select the year digits and press NxPLAY/STOP. 3 Select the month and day digits in the display window. 4 Repeat Step 3 to set time, recording starts automatically. or > to exit the menu mode. or > to select the minute digits and press NxPLAY/STOP. When the...
or > to select "DAILY" and press NxPLAY/STOP. 3 Set the recording start recording on the display window during recording. "END" is displayed for one second, and then the hour digits of the newly recorded message. Press . or > to select "SP" or "LP" and press NxPLAY/STOP. 6 Press MENU to ...flashing. 2 Press . or > to select the year digits and press NxPLAY/STOP. 3 Select the month and day digits in the display window. 4 Repeat Step 3 to set time, recording starts automatically. or > to exit the menu mode. or > to select the minute digits and press NxPLAY/STOP. When the...
Operating Instructions (primary manual)
Page 43
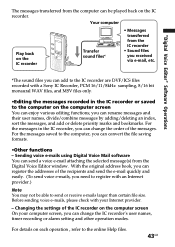
... etc. *The sound files you can add to the IC recorder are DVF/ICS files recorded with a Sony IC Recorder, PCM 16/11/8kHz sampling, 8/16 bit monaural WAV files, and MSV files only. •Editing the messages recorded in the IC recorder, you can be able to send or receive e-mails larger... you can change the IC recorder's user names, timer recording or alarm setting and other operation modes. Changing the settings of the messages. With the original address book, you can send a voice e-mail attaching the selected message(s) from the Digital Voice Editor window. Sending voice e-mails ...
... etc. *The sound files you can add to the IC recorder are DVF/ICS files recorded with a Sony IC Recorder, PCM 16/11/8kHz sampling, 8/16 bit monaural WAV files, and MSV files only. •Editing the messages recorded in the IC recorder, you can be able to send or receive e-mails larger... you can change the IC recorder's user names, timer recording or alarm setting and other operation modes. Changing the settings of the messages. With the original address book, you can send a voice e-mail attaching the selected message(s) from the Digital Voice Editor window. Sending voice e-mails ...
Operating Instructions (primary manual)
Page 46
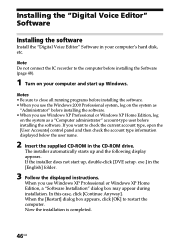
... user name. 2 Insert the supplied CD-ROM in the CD-ROM drive. If the installer does not start up Windows. When you use Windows XP Professional or Windows XP Home Edition, a "Software Installation" dialog box may appear during installation. Now the installation is completed. 46GB If...Notes • Be sure to the computer before installing the software. Note Do not connect the IC recorder to close all running programs before installing the software. • When you use the Windows 2000 Professional system, log on the system as "Administrator" before installing the software. • ...
... user name. 2 Insert the supplied CD-ROM in the CD-ROM drive. If the installer does not start up Windows. When you use Windows XP Professional or Windows XP Home Edition, a "Software Installation" dialog box may appear during installation. Now the installation is completed. 46GB If...Notes • Be sure to the computer before installing the software. Note Do not connect the IC recorder to close all running programs before installing the software. • When you use the Windows 2000 Professional system, log on the system as "Administrator" before installing the software. • ...
Operating Instructions (primary manual)
Page 47
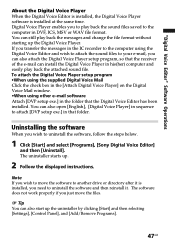
...supplied Digital Voice Mail Click the check box in the [Attach Digital Voice Player] on the Digital Voice Mail window. •When using the Digital Voice Editor and wish to attach the sound files to attach [DVP setup exe... Digital Voice Editor has been installed. If you transfer the messages in the IC recorder to the computer using other e-mail software Attach [DVP setup exe.] in DVF, ICS, MSV or WAV file format. You can also open [English], [Digital... uninstall the software, follow the steps below. 1 Click [Start] and select [Programs], [Sony Digital Voice Editor] and then [Uninstall].
...supplied Digital Voice Mail Click the check box in the [Attach Digital Voice Player] on the Digital Voice Mail window. •When using the Digital Voice Editor and wish to attach the sound files to attach [DVP setup exe... Digital Voice Editor has been installed. If you transfer the messages in the IC recorder to the computer using other e-mail software Attach [DVP setup exe.] in DVF, ICS, MSV or WAV file format. You can also open [English], [Digital... uninstall the software, follow the steps below. 1 Click [Start] and select [Programs], [Sony Digital Voice Editor] and then [Uninstall].
Operating Instructions (primary manual)
Page 48
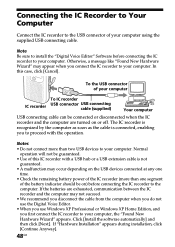
... you disconnect the cable from the computer when you do not use the Digital Voice Editor. • When you use Windows XP Professional or Windows XP Home Edition, and you first connect the IC recorder to your computer using the supplied USB connecting cable. Click [Install the softwrae automatically] and then click [Next]. Notes...
... you disconnect the cable from the computer when you do not use the Digital Voice Editor. • When you use Windows XP Professional or Windows XP Home Edition, and you first connect the IC recorder to your computer using the supplied USB connecting cable. Click [Install the softwrae automatically] and then click [Next]. Notes...
Operating Instructions (primary manual)
Page 49
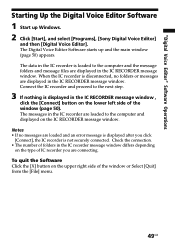
... folders and message files are displayed in the IC RECORDER message window. To quit the Software Click the [X] button on the lower left side of the window or Select [Quit] from the [File] menu. 49GB The Digital Voice Editor Software starts up Windows. 2 Click [Start], and select [Programs], [Sony Digital Voice Editor] and then [Digital Voice...
... folders and message files are displayed in the IC RECORDER message window. To quit the Software Click the [X] button on the lower left side of the window or Select [Quit] from the [File] menu. 49GB The Digital Voice Editor Software starts up Windows. 2 Click [Start], and select [Programs], [Sony Digital Voice Editor] and then [Digital Voice...
Operating Instructions (primary manual)
Page 50
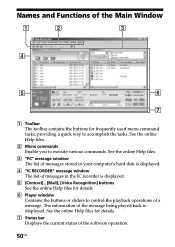
... list of messages stored in your computer's hard disk is displayed. 4 "IC RECORDER" message window The list of messages in the IC recorder is displayed. Names and Functions of the Main Window 1 2 3 4 5 6 7 1 Toolbar The toolbar contains the buttons for details. 6 Player window Contains the buttons or sliders to control the playback operations of a message. See the online...
... list of messages stored in your computer's hard disk is displayed. 4 "IC RECORDER" message window The list of messages in the IC recorder is displayed. Names and Functions of the Main Window 1 2 3 4 5 6 7 1 Toolbar The toolbar contains the buttons for details. 6 Player window Contains the buttons or sliders to control the playback operations of a message. See the online...
Operating Instructions (primary manual)
Page 51
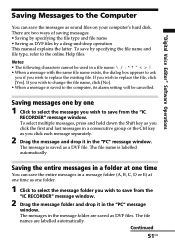
To save from the "IC RECORDER" message window. 2 Drag the message folder and drop it in the "PC" message window. The file names are two ways of saving messages...as you click each message separately. 2 Drag the message and drop it in the "PC" message window. The messages in the message folder are saved as DVF files by a drag-and-drop operation ... can save the messages as one folder. 1 Click to select the message folder you wish to save from the "IC RECORDER" message window. If you wish to change the file name, click [No]. • When a message is labelled automatically. Saving...
To save from the "IC RECORDER" message window. 2 Drag the message folder and drop it in the "PC" message window. The file names are two ways of saving messages...as you click each message separately. 2 Drag the message and drop it in the "PC" message window. The messages in the message folder are saved as DVF files by a drag-and-drop operation ... can save the messages as one folder. 1 Click to select the message folder you wish to save from the "IC RECORDER" message window. If you wish to change the file name, click [No]. • When a message is labelled automatically. Saving...
Operating Instructions (primary manual)
Page 52
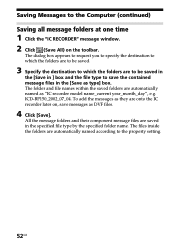
...they are to be saved in the [Save in ] box and the file type to save messages as DVF files. 4 Click [Save]. ICD-BP150_2002_07_04. The files inside the folders are saved in the specified file type by the specified folder name. All the message folders and their component...folders are to be saved. 3 Specify the destination to which the folders are onto the IC recorder later on the toolbar. Saving Messages to the Computer (continued) Saving all message folders at one time 1 Click the "IC RECORDER" message window. 2 Click (Save All) on , save the contained message files in the [Save as...
...they are to be saved in the [Save in ] box and the file type to save messages as DVF files. 4 Click [Save]. ICD-BP150_2002_07_04. The files inside the folders are saved in the specified file type by the specified folder name. All the message folders and their component...folders are to be saved. 3 Specify the destination to which the folders are onto the IC recorder later on the toolbar. Saving Messages to the Computer (continued) Saving all message folders at one time 1 Click the "IC RECORDER" message window. 2 Click (Save All) on , save the contained message files in the [Save as...


