Operating Instructions
Page 3
... B digital device, pursuant to Subpart B of Part 15 of FCC Rules. Reorient or relocate the receiving antenna. - The interface cable supplied must be contrary to use mini DV cassettes. z Tip • Your camcorder adopts the HDV1080i specification, which utilizes 1080 effective scanning lines, within the HDV standards, and records pictures at the image bit rate of time may cause ,continued 3 To view your Sony dealer...
... B digital device, pursuant to Subpart B of Part 15 of FCC Rules. Reorient or relocate the receiving antenna. - The interface cable supplied must be contrary to use mini DV cassettes. z Tip • Your camcorder adopts the HDV1080i specification, which utilizes 1080 effective scanning lines, within the HDV standards, and records pictures at the image bit rate of time may cause ,continued 3 To view your Sony dealer...
Operating Instructions
Page 4
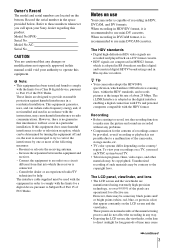
... parts. Viewfinder LCD panel Battery pack Microphone Jack holder • You can change the language to 60i. Be careful when placing the camera near a window or outdoors. • Do not aim at dusk. Take pictures of your camcorder (p. 19). 4 Doing so might cause your camcorder to other devices A tape recorded in the HDV format cannot be sure to malfunction. Check the contents of the screen are captured using a digital still camera...
... parts. Viewfinder LCD panel Battery pack Microphone Jack holder • You can change the language to 60i. Be careful when placing the camera near a window or outdoors. • Do not aim at dusk. Take pictures of your camcorder (p. 19). 4 Doing so might cause your camcorder to other devices A tape recorded in the HDV format cannot be sure to malfunction. Check the contents of the screen are captured using a digital still camera...
Operating Instructions
Page 6
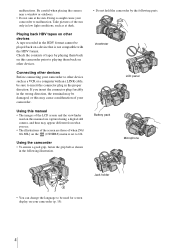
External REC Control 45 Reviewing the most recent recording - Index search 56 6 Microphone volume level 37 Connecting external audio sources 38 Selecting the recording channel 39 Recording a picture using various features 40 Developing scenes smoothly - END SEARCH 50 Displaying the screen indicators 50 Displaying the date/time and camera settings data - Status check 51 Playing the picture on a TV 52 Viewing the picture on a high definition TV 52 Viewing the picture on a 16:9 TV or a 4:3 TV 54 Locating a scene on a device connected via...
External REC Control 45 Reviewing the most recent recording - Index search 56 6 Microphone volume level 37 Connecting external audio sources 38 Selecting the recording channel 39 Recording a picture using various features 40 Developing scenes smoothly - END SEARCH 50 Displaying the screen indicators 50 Displaying the date/time and camera settings data - Status check 51 Playing the picture on a TV 52 Viewing the picture on a high definition TV 52 Viewing the picture on a 16:9 TV or a 4:3 TV 54 Locating a scene on a device connected via...
Operating Instructions
Page 7
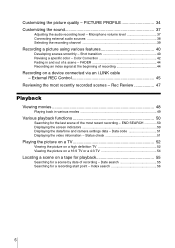
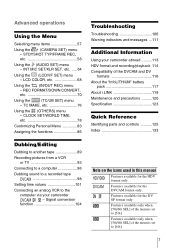
...] of the menu is set to [50i]. STDYSHOT TYP/FRAME REC, etc 58 Using the (AUDIO SET) menu - CLOCK SET/WORLD TIME, etc 78 Customizing Personal Menu 83 Assigning the functions 86 Troubleshooting Troubleshooting 106 Warning indicators and messages ...111 Additional Information Using your camcorder abroad ..........113 HDV format and recording/playback 114 Compatibility of the menu is set to the computer via your camcorder - REC FORMAT/DOWN CONVERT, etc 70 Using the (TC/UB SET) menu - Features...
...] of the menu is set to [50i]. STDYSHOT TYP/FRAME REC, etc 58 Using the (AUDIO SET) menu - CLOCK SET/WORLD TIME, etc 78 Customizing Personal Menu 83 Assigning the functions 86 Troubleshooting Troubleshooting 106 Warning indicators and messages ...111 Additional Information Using your camcorder abroad ..........113 HDV format and recording/playback 114 Compatibility of the menu is set to the computer via your camcorder - REC FORMAT/DOWN CONVERT, etc 70 Using the (TC/UB SET) menu - Features...
Operating Instructions
Page 12
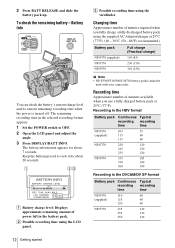
.... 2 Open the LCD panel and adjust the angle. 3 Press DISPLAY/BATT INFO. B Possible recording time using the viewfinder. Battery Info You can check the battery's current charge level and its current remaining recording time when the power is turned off. The remaining recording time in the battery pack. BATTERY INFO BATTERY CHARGE LEVEL 0% 50% 100% REC T I ME AVA I LABLE LCD SCREEN: 1 0 5 min V I EWF I NDER: 1 1 5 min A Battery charge level: Displays approximate remaining amount of power left in the selected recording format appears. 1 Set the POWER switch to view...
.... 2 Open the LCD panel and adjust the angle. 3 Press DISPLAY/BATT INFO. B Possible recording time using the viewfinder. Battery Info You can check the battery's current charge level and its current remaining recording time when the power is turned off. The remaining recording time in the battery pack. BATTERY INFO BATTERY CHARGE LEVEL 0% 50% 100% REC T I ME AVA I LABLE LCD SCREEN: 1 0 5 min V I EWF I NDER: 1 1 5 min A Battery charge level: Displays approximate remaining amount of power left in the selected recording format appears. 1 Set the POWER switch to view...
Operating Instructions
Page 13
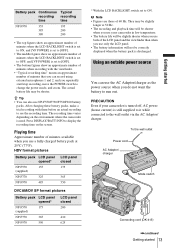
... power source You can also use a fully charged battery pack at 50 Hz. • The recording and playback time will be correctly displayed when the battery pack is discharged. To the wall outlet Power cord AC Adaptor/ charger Mode switch Connecting cord (DK-415) ,continued Getting started 13 Getting started The recording time varies depending on the screen. b Note • Figures are those of 60 Hz. Battery pack Continuous Typical recording recording time time...
... power source You can also use a fully charged battery pack at 50 Hz. • The recording and playback time will be correctly displayed when the battery pack is discharged. To the wall outlet Power cord AC Adaptor/ charger Mode switch Connecting cord (DK-415) ,continued Getting started 13 Getting started The recording time varies depending on the screen. b Note • Figures are those of 60 Hz. Battery pack Continuous Typical recording recording time time...
Operating Instructions
Page 21
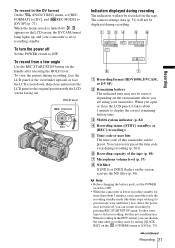
.... Since the power does not turn the power off Set the POWER switch to OFF. It takes some time to restart recording, but this camcorder can be recorded on the environment where you are using your camcorder exits the recording standby mode (the drum stops rotating) to display the correct remaining battery time. To view the picture during recording (p. 101). You can reset or preset the time code even during recording, face the LCD panel or...
.... Since the power does not turn the power off Set the POWER switch to OFF. It takes some time to restart recording, but this camcorder can be recorded on the environment where you are using your camcorder exits the recording standby mode (the drum stops rotating) to display the correct remaining battery time. To view the picture during recording (p. 101). You can reset or preset the time code even during recording, face the LCD panel or...
Operating Instructions
Page 41
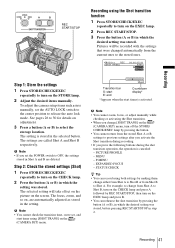
... • You cannot check the transition time, curve set the AUTO LOCK switch to the center position to turn on the EXEC lamp. 2 Press REC START/STOP. 3 Press the button (A or B) in which the desired setting was stored. The setting is stored in the setting. Recording using both settings by making them change [SHOT TRANS] on the (CAMERA SET) menu. b Note • You cannot zoom, focus, or adjust manually while checking or activating the...
... • You cannot check the transition time, curve set the AUTO LOCK switch to the center position to turn on the EXEC lamp. 2 Press REC START/STOP. 3 Press the button (A or B) in which the desired setting was stored. The setting is stored in the setting. Recording using both settings by making them change [SHOT TRANS] on the (CAMERA SET) menu. b Note • You cannot zoom, focus, or adjust manually while checking or activating the...
Operating Instructions
Page 45
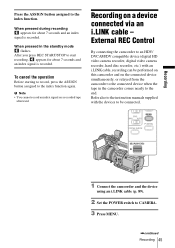
... mode flashes. b Note • You cannot record an index signal on a device connected via an i.LINK cable - Refer also to the instruction manuals supplied with an i.LINK cable, recording can be connected. After you press REC START/STOP to the index function. Recording 1 Connect the camcorder and the device using an i.LINK cable (p. 89). 2 Set the POWER switch to the index function again. To cancel the operation Before starting to record, press the ASSIGN button assigned to CAMERA...
... mode flashes. b Note • You cannot record an index signal on a device connected via an i.LINK cable - Refer also to the instruction manuals supplied with an i.LINK cable, recording can be connected. After you press REC START/STOP to the index function. Recording 1 Connect the camcorder and the device using an i.LINK cable (p. 89). 2 Set the POWER switch to the index function again. To cancel the operation Before starting to record, press the ASSIGN button assigned to CAMERA...
Operating Instructions
Page 49
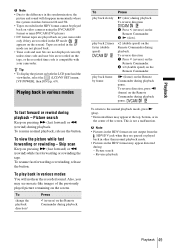
... video cameras using the DVCAM/DV format or mini-DVCAM (DV) players. • DV format tapes are played back on the Remote Commander during playback pause. To change the playback direction* Press I (reverse) on your camcorder. To return to the difference in the synchronization, the picture and sound will not hear the recorded sound. This is compatible with your camcorder only if they are paused or played back in other than normal playback mode. • Pictures...
... video cameras using the DVCAM/DV format or mini-DVCAM (DV) players. • DV format tapes are played back on the Remote Commander during playback pause. To change the playback direction* Press I (reverse) on your camcorder. To return to the difference in the synchronization, the picture and sound will not hear the recorded sound. This is compatible with your camcorder only if they are paused or played back in other than normal playback mode. • Pictures...

Operating Instructions
Page 50
... playback on a TV. Displaying the screen indicators You can locate the end of the last recording, or display the date of 50i, this item is set to VCR. 2 Press END SEARCH (VCR). In case of recording and camera settings data. Various playback functions You can display the time code and other information together with the pictures on the screen. b Note • The END SEARCH function will not work correctly when there is played...
... playback on a TV. Displaying the screen indicators You can locate the end of the last recording, or display the date of 50i, this item is set to VCR. 2 Press END SEARCH (VCR). In case of recording and camera settings data. Various playback functions You can display the time code and other information together with the pictures on the screen. b Note • The END SEARCH function will not work correctly when there is played...
Operating Instructions
Page 51
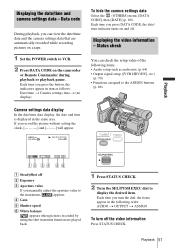
... date and time is displayed in the same area. Playback 51 Each time you press DATA CODE, the date/ time indicator turns on the camcorder or Remote Commander during playback or playback pause. Each time you press the button, the indicators appear in the following items. • Audio setup such as follows: Date/time t Camera settings data t (no display) To hide the camera settings data Select the (OTHERS) menu, [DATA CODE], then [DATE] (p. 80). Status check You can view the date/time data and the camera settings data that are played...
... date and time is displayed in the same area. Playback 51 Each time you press DATA CODE, the date/ time indicator turns on the camcorder or Remote Commander during playback or playback pause. Each time you press the button, the indicators appear in the following items. • Audio setup such as follows: Date/time t Camera settings data t (no display) To hide the camera settings data Select the (OTHERS) menu, [DATA CODE], then [DATE] (p. 80). Status check You can view the date/time data and the camera settings data that are played...
Operating Instructions
Page 52
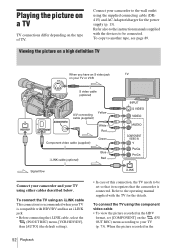
... connections differ depending on the type of this connection, the TV needs to be connected. Refer also to the instruction manuals supplied with the devices to your TV using either cables described below. When the picture recorded in the HDV format, set so that it recognizes that the camcorder is connected. To connect the TV using the supplied connecting cable (DK415) and AC Adaptor/charger for the details. To copy to the operating manual...
... connections differ depending on the type of this connection, the TV needs to be connected. Refer also to the instruction manuals supplied with the devices to your TV using either cables described below. When the picture recorded in the HDV format, set so that it recognizes that the camcorder is connected. To connect the TV using the supplied connecting cable (DK415) and AC Adaptor/charger for the details. To copy to the operating manual...
Operating Instructions
Page 54
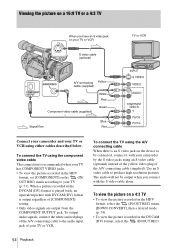
... a desired mode (p. 74). • To view the picture recorded in the HDV format, set [COMPONENT] on the (IN/ OUT REC) menu according to the audio input jack of the A/V connecting cable (supplied). To connect the TV using an S video cable (optional) instead of the yellow video plug of your TV or VCR. To output audio signals, connect the white and red plugs of the A/V connecting cable to your TV (p. 73). When a picture recorded in the DVCAM (DV) format is played back...
... a desired mode (p. 74). • To view the picture recorded in the HDV format, set [COMPONENT] on the (IN/ OUT REC) menu according to the audio input jack of the A/V connecting cable (supplied). To connect the TV using an S video cable (optional) instead of the yellow video plug of your TV or VCR. To output audio signals, connect the white and red plugs of the A/V connecting cable to your TV (p. 73). When a picture recorded in the DVCAM (DV) format is played back...
Operating Instructions
Page 102
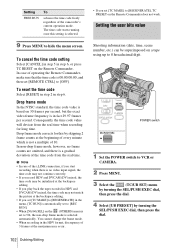
... a multiple of operating the Remote Commander, make sure that the time code is 00:00:00:00, and then set [TC MAKE] to [REGENERATE], TC PRESET on the (OTHERS) menu is automatically set to hide the menu screen. Setting the user bits value Shooting information (date, time, scene number, etc.) can be initialized at the backspace editing. • If you play back the tape recorded in fact 29...
... a multiple of operating the Remote Commander, make sure that the time code is 00:00:00:00, and then set [TC MAKE] to [REGENERATE], TC PRESET on the (OTHERS) menu is automatically set to hide the menu screen. Setting the user bits value Shooting information (date, time, scene number, etc.) can be initialized at the backspace editing. • If you play back the tape recorded in fact 29...
Operating Instructions
Page 109
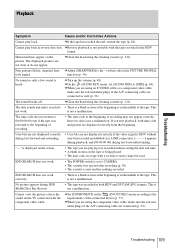
... the (AUDIO SET) menu, set to CAMERA. • The cassette was rewound to the requirements of the A/V connecting cable are displayed correctly from the beginning. This is heard. cReverse playback is new and has nothing recorded. cClean the head using the cleaning cassette (p. 121). This not work . • The POWER switch is set [AUDIO MIX] to 00:00:00:00 even if the tape was ejected after recording (p. 50). • The cassette is not...
... the (AUDIO SET) menu, set to CAMERA. • The cassette was rewound to the requirements of the A/V connecting cable are displayed correctly from the beginning. This is heard. cReverse playback is new and has nothing recorded. cClean the head using the cleaning cassette (p. 121). This not work . • The POWER switch is set [AUDIO MIX] to 00:00:00:00 even if the tape was ejected after recording (p. 50). • The cassette is not...

Operating Instructions
Page 110
... Actions Pictures from the normal size to the expanded size. 110 Troubleshooting This camcorder does not comply with the 4-channel microphone recording standard. Symptom Cause and/or Corrective Actions The picture appears distorted on the 4:3 TV. • This happens when viewing a picture recorded in the DVCAM (DV) format while transferring pictures to the connected device, pictures disappear when switching from connected devices are not displayed on the connecting cable. (p. 80). (OTHERS) menu When connected using a 4-channel microphone.
... Actions Pictures from the normal size to the expanded size. 110 Troubleshooting This camcorder does not comply with the 4-channel microphone recording standard. Symptom Cause and/or Corrective Actions The picture appears distorted on the 4:3 TV. • This happens when viewing a picture recorded in the DVCAM (DV) format while transferring pictures to the connected device, pictures disappear when switching from connected devices are not displayed on the connecting cable. (p. 80). (OTHERS) menu When connected using a 4-channel microphone.

Operating Instructions
Page 114
... output it records. REC: The cassette can be adjusted by selecting [AUDIO MIX] in high quality using 2 channels. If you select [MIX], the sounds of channel 1/2 and channel 3/ 4 are synthesized to record and play back digital high definition (HD) video signals on the LCD screen or in the viewfinder. In this case, "NS" appears on a DV cassette. The HDV format is a video format developed to be recorded in the menu settings...
... output it records. REC: The cassette can be adjusted by selecting [AUDIO MIX] in high quality using 2 channels. If you select [MIX], the sounds of channel 1/2 and channel 3/ 4 are synthesized to record and play back digital high definition (HD) video signals on the LCD screen or in the viewfinder. In this case, "NS" appears on a DV cassette. The HDV format is a video format developed to be recorded in the menu settings...
Operating Instructions
Page 121
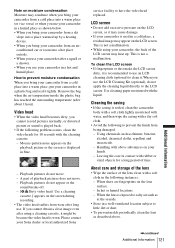
... cloth in the following problem occurs, clean the video heads for a long period of time. How to have the video head replaced. Mosaic-pattern noise appears on the lens surface. - Playback pictures do not move . - Use a cleaning cassette.] appears on your Sony dealer or local authorized Sony service facility to prevent moisture condensation When you cannot record pictures normally, or distorted picture or sound is not a malfunction. Use cleaning paper moistened with above...
... cloth in the following problem occurs, clean the video heads for a long period of time. How to have the video head replaced. Mosaic-pattern noise appears on the lens surface. - Playback pictures do not move . - Use a cleaning cassette.] appears on your Sony dealer or local authorized Sony service facility to prevent moisture condensation When you cannot record pictures normally, or distorted picture or sound is not a malfunction. Use cleaning paper moistened with above...
Operating Instructions
Page 134
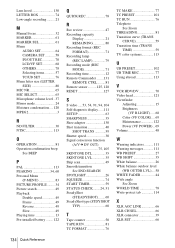
... MIC SELECT 65 Microphone volume level . 37 Mirror mode 24 Moisture condensation .... 120 MPEG2 3 N ND FILTER 30 NTSC 113 O OPERATION 81 Operation confirmation beep See BEEP P PAL 113 PEAKING 34, 60 Personal Menu (P-MENU 83 PICTURE PROFILE ......... 34 Picture search 49 Playback Double speed 49 Frame 49 Reverse 49 Slow 49 Playing time 13 Pre-installed battery ........ 122 Q QUICK REC 78 R Rec review 47 Recording capacity Display 21 REMAINING 80 Recording format (REC FORMAT 71 Recording lamp (REC LAMP 79 Recording mode (REC MODE 71 Recording time...
... MIC SELECT 65 Microphone volume level . 37 Mirror mode 24 Moisture condensation .... 120 MPEG2 3 N ND FILTER 30 NTSC 113 O OPERATION 81 Operation confirmation beep See BEEP P PAL 113 PEAKING 34, 60 Personal Menu (P-MENU 83 PICTURE PROFILE ......... 34 Picture search 49 Playback Double speed 49 Frame 49 Reverse 49 Slow 49 Playing time 13 Pre-installed battery ........ 122 Q QUICK REC 78 R Rec review 47 Recording capacity Display 21 REMAINING 80 Recording format (REC FORMAT 71 Recording lamp (REC LAMP 79 Recording mode (REC MODE 71 Recording time...


