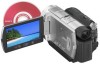
Instruction Manual
Page 10
...the language setting ..... 25 Step 4: Adjusting your camcorder to VCR or DVD/HDD recorders 53 Printing recorded images (PictBridge compliant ... Camcorder What you 26 Step 5: Inserting a disc or a "Memory Stick Duo 27 Recording/Playback Easy Recording/Playback (Easy Handycam ...high quality still images during movie recording (Dual Rec 36 Recording in dark places (NightShot 37 Adjusting the exposure for backlit subjects 37 Recording in mirror mode 37 10 Recording the fast action in slowmotion (SMTH SLW REC 38 Controlling the image settings manually with the camera control dial (HDR-UX7...
...the language setting ..... 25 Step 4: Adjusting your camcorder to VCR or DVD/HDD recorders 53 Printing recorded images (PictBridge compliant ... Camcorder What you 26 Step 5: Inserting a disc or a "Memory Stick Duo 27 Recording/Playback Easy Recording/Playback (Easy Handycam ...high quality still images during movie recording (Dual Rec 36 Recording in dark places (NightShot 37 Adjusting the exposure for backlit subjects 37 Recording in mirror mode 37 10 Recording the fast action in slowmotion (SMTH SLW REC 38 Controlling the image settings manually with the camera control dial (HDR-UX7...
Instruction Manual
Page 17
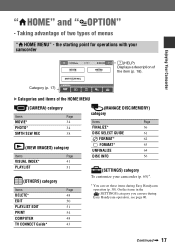
On the items in the (SETTINGS) category you can set these items during Easy Handycam operation, see page 80. Continued , 17 Enjoying Your Camcorder Category (p. 17) B Categories and items of menus " HOME MENU" - Taking advantage of two types of the HOME ... FORMAT* 62 FORMAT* 63 UNFINALIZE 64 DISC INFO 56 (SETTINGS) category To customize your camcorder (HELP) Displays a description of the item (p. 18). Enjoying Your Camcorder " HOME" and " OPTION" - the starting point for operations with your camcorder (p. 65)*. * You can use during Easy Handycam operation (p. 30).
On the items in the (SETTINGS) category you can set these items during Easy Handycam operation, see page 80. Continued , 17 Enjoying Your Camcorder Category (p. 17) B Categories and items of menus " HOME MENU" - Taking advantage of two types of the HOME ... FORMAT* 62 FORMAT* 63 UNFINALIZE 64 DISC INFO 56 (SETTINGS) category To customize your camcorder (HELP) Displays a description of the item (p. 18). Enjoying Your Camcorder " HOME" and " OPTION" - the starting point for operations with your camcorder (p. 65)*. * You can use during Easy Handycam operation (p. 30).
Instruction Manual
Page 20
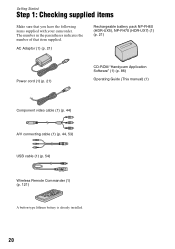
AC Adaptor (1) (p. 21) Rechargeable battery pack NP-FH60 (HDR-UX5), NP-FH70 (HDR-UX7) (1) (p. 21) Power cord (1) (p. 21) CD-ROM "Handycam Application Software" (1) (p. 86) Operating Guide (This manual) (1) Component video cable (1) (p. 44) A/V connecting cable (1) (p. 44, 53) USB cable (1) (p. 54) Wireless Remote Commander (1) (p. 121) A button-type lithium ... supplied items Make sure that item supplied. The number in the parentheses indicates the number of that you have the following items supplied with your camcorder.
AC Adaptor (1) (p. 21) Rechargeable battery pack NP-FH60 (HDR-UX5), NP-FH70 (HDR-UX7) (1) (p. 21) Power cord (1) (p. 21) CD-ROM "Handycam Application Software" (1) (p. 86) Operating Guide (This manual) (1) Component video cable (1) (p. 44) A/V connecting cable (1) (p. 44, 53) USB cable (1) (p. 54) Wireless Remote Commander (1) (p. 121) A button-type lithium ... supplied items Make sure that item supplied. The number in the parentheses indicates the number of that you have the following items supplied with your camcorder.
Instruction Manual
Page 27
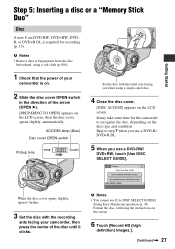
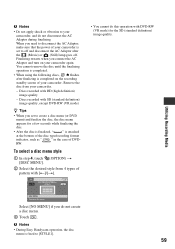
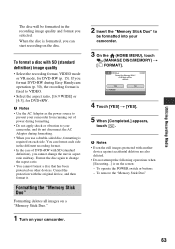
...on the disc type and condition. b Notes • You cannot use a DVD-RW/ DVD+RW, touch [Use DISC SELECT GUIDE]. Format the disc, following the instructions on the screen. 6 Touch [Record HD (high definition) images.]. b Notes • Remove dust or fingerprints from the disc beforehand, ... cover OPEN switch Pickup lens Set the disc with the recording side facing your camcorder is required for the camcorder to step 7 when you use a DVD-R/ DVD+R DL. 5 When you use [Use DISC SELECT GUIDE] during Easy Handycam operation (p. 30). Getting Started Step 5: Inserting a disc or a "Memory ...
...on the disc type and condition. b Notes • You cannot use a DVD-RW/ DVD+RW, touch [Use DISC SELECT GUIDE]. Format the disc, following the instructions on the screen. 6 Touch [Record HD (high definition) images.]. b Notes • Remove dust or fingerprints from the disc beforehand, ... cover OPEN switch Pickup lens Set the disc with the recording side facing your camcorder is required for the camcorder to step 7 when you use a DVD-R/ DVD+R DL. 5 When you use [Use DISC SELECT GUIDE] during Easy Handycam operation (p. 30). Getting Started Step 5: Inserting a disc or a "Memory ...
Instruction Manual
Page 28
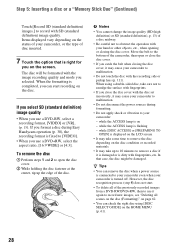
...Formatting)" on page 62. • You can start . • To delete all of your camcorder is flashing - b Notes • You cannot change the image quality (HD (high definition) or SD (standard definition), p. 13) of a disc midway. • Be careful not to obstruct the operation with ...not disconnect the power sources during Easy Handycam operation (p. 30), the recording format is dirty with the recording side or pickup lens (p. 111). Items displayed vary depending on the status of the previously recorded images from a DVD-RW/DVD+RW, then to use a DVD-RW, select a recording format, ...
...Formatting)" on page 62. • You can start . • To delete all of your camcorder is flashing - b Notes • You cannot change the image quality (HD (high definition) or SD (standard definition), p. 13) of a disc midway. • Be careful not to obstruct the operation with ...not disconnect the power sources during Easy Handycam operation (p. 30), the recording format is dirty with the recording side or pickup lens (p. 111). Items displayed vary depending on the status of the previously recorded images from a DVD-RW/DVD+RW, then to use a DVD-RW, select a recording format, ...
Instruction Manual
Page 48
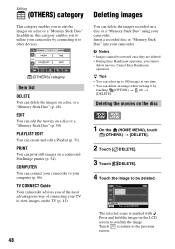
... on a disc or a "Memory Stick Duo" (p. 48). Insert a recorded disc or "Memory Stick Duo" into your camcorder. b Notes • Images cannot be deleted. Cancel Easy Handycam operation. In addition, this category enables you of the most advantageous way of connecting your computer (p. 86). z Tips •... 48 Editing (OTHERS) category This category enables you cannot delete movies. Deleting images You can delete an image when viewing it to utilize your camcorder by connecting it by touching (OPTION) t tab t [DELETE]. Press and hold the image on a disc or a "Memory Stick Duo."...
... on a disc or a "Memory Stick Duo" (p. 48). Insert a recorded disc or "Memory Stick Duo" into your camcorder. b Notes • Images cannot be deleted. Cancel Easy Handycam operation. In addition, this category enables you of the most advantageous way of connecting your computer (p. 86). z Tips •... 48 Editing (OTHERS) category This category enables you cannot delete movies. Deleting images You can delete an image when viewing it to utilize your camcorder by connecting it by touching (OPTION) t tab t [DELETE]. Press and hold the image on a disc or a "Memory Stick Duo."...
Instruction Manual
Page 50
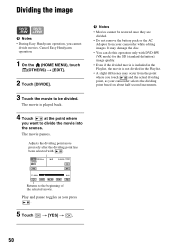
...touch and the actual dividing point, as you press . 5 Touch t [YES] t . 50 The movie pauses. It may occur from your camcorder selects the dividing point based on about half-second increments. The movie is not divided in the Playlist. • A slight difference may damage ...Handycam operation, you want to divide the movie into the scenes. b Notes • Movies cannot be divided. Returns to the beginning of the selected movie. Adjusts the dividing point more precisely after the dividing point has been selected with DVD-RW (VR mode) for the SD (standard definition)...
...touch and the actual dividing point, as you press . 5 Touch t [YES] t . 50 The movie pauses. It may occur from your camcorder selects the dividing point based on about half-second increments. The movie is not divided in the Playlist. • A slight difference may damage ...Handycam operation, you want to divide the movie into the scenes. b Notes • Movies cannot be divided. Returns to the beginning of the selected movie. Adjusts the dividing point more precisely after the dividing point has been selected with DVD-RW (VR mode) for the SD (standard definition)...

Instruction Manual
Page 51
... 1 On the (HOME MENU), touch (OTHERS) t [PLAYLIST EDIT]. z Tips • You can neither add movies to insert the recorded disc into your camcorder. 1 On the (HOME MENU), touch (VIEW IMAGES) t [PLAYLIST]. Continued , 51 Make sure to the Playlist, nor edit movies in the Playlist In ...scene is played back from which the Playlist is added into your camcorder while editing the Playlist. The Playlist is marked with DVD-RW (VR mode) for the SD (standard definition) image quality. • During Easy Handycam operation, you want to the Playlist screen. The original scenes are...
... 1 On the (HOME MENU), touch (OTHERS) t [PLAYLIST EDIT]. z Tips • You can neither add movies to insert the recorded disc into your camcorder. 1 On the (HOME MENU), touch (VIEW IMAGES) t [PLAYLIST]. Continued , 51 Make sure to the Playlist, nor edit movies in the Playlist In ...scene is played back from which the Playlist is added into your camcorder while editing the Playlist. The Playlist is marked with DVD-RW (VR mode) for the SD (standard definition) image quality. • During Easy Handycam operation, you want to the Playlist screen. The original scenes are...
Instruction Manual
Page 59
... do this operation with HD (high definition) image quality - b Notes • During Easy Handycam operation, the disc menu is completed on your camcorder again. Remove the disc from 4 types of your camcorder. Finalizing restarts when you need to disconnect the AC Adaptor, make sure that the power of DVD- Discs recorded with DVD-RW (VR mode) for...
... do this operation with HD (high definition) image quality - b Notes • During Easy Handycam operation, the disc menu is completed on your camcorder again. Remove the disc from 4 types of your camcorder. Finalizing restarts when you need to disconnect the AC Adaptor, make sure that the power of DVD- Discs recorded with DVD-RW (VR mode) for...
Instruction Manual
Page 63
...definition) image quality • Select the recording format, VIDEO mode or VR mode, for DVD+RW. To format a disc with the original device, and then format it. Utilizing Recording Media The disc will be formatted into your camcorder, and do not disconnect the AC Adaptor during Easy Handycam... operation (p. 30), the recording format is required on other devices. If you format DVD-RW during formatting. • When you selected. b Notes •...
...definition) image quality • Select the recording format, VIDEO mode or VR mode, for DVD+RW. To format a disc with the original device, and then format it. Utilizing Recording Media The disc will be formatted into your camcorder, and do not disconnect the AC Adaptor during Easy Handycam... operation (p. 30), the recording format is required on other devices. If you format DVD-RW during formatting. • When you selected. b Notes •...
Instruction Manual
Page 64
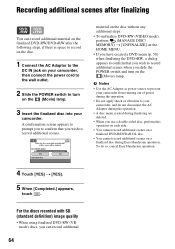
.../ MEMORY) t [UNFINALIZE] on the (Movie) lamp. 3 Insert the finalized disc into your camcorder, and do so, cancel Easy Handycam operation. 4 Touch [YES] t [YES]. 5 When [Completed.] appears, touch . For the discs recorded with SD (standard definition) image quality • When using finalized DVD-RW (VR mode) discs, you wish to record additional scenes. A confirmation screen...
.../ MEMORY) t [UNFINALIZE] on the (Movie) lamp. 3 Insert the finalized disc into your camcorder, and do so, cancel Easy Handycam operation. 4 Touch [YES] t [YES]. 5 When [Completed.] appears, touch . For the discs recorded with SD (standard definition) image quality • When using finalized DVD-RW (VR mode) discs, you wish to record additional scenes. A confirmation screen...
Instruction Manual
Page 79
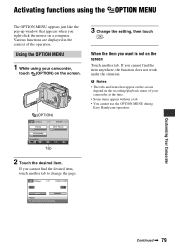
... the time. • Some items appear without a tab. • You cannot use the OPTION MENU during Easy Handycam operation. Various functions are displayed in the context of your camcorder, touch (OPTION) on the screen. (OPTION) 3 Change the setting, then touch . If you right-click the mouse ...on the recording/playback status of the operation. Customizing Your Camcorder Continued , 79 Using the OPTION MENU 1 While using the OPTION MENU The OPTION MENU appears just like the pop-up window that appear on...
... the time. • Some items appear without a tab. • You cannot use the OPTION MENU during Easy Handycam operation. Various functions are displayed in the context of your camcorder, touch (OPTION) on the screen. (OPTION) 3 Change the setting, then touch . If you right-click the mouse ...on the recording/playback status of the operation. Customizing Your Camcorder Continued , 79 Using the OPTION MENU 1 While using the OPTION MENU The OPTION MENU appears just like the pop-up window that appear on...
Instruction Manual
Page 91
... your Sony dealer. • Overall operations/Easy Handycam/ Remote Commander p. 91 • Batteries/Power sources p. 92 • LCD screen/viewfinder p. 93 • Discs/"Memory Stick Duo p. 93 • Recording p. 94 • Playing back a disc on your camcorder is ...camcorder and leave it after the power is set the POWER switch to OFF (CHG) for a while in a cool place. This is extremely high. Camera control dial (p. 38) (HDR-UX7) - Menu settings have changed automatically. • During Easy Handycam operation, most of DVD-RW: [VIDEO] (for SD (standard definition...
... your Sony dealer. • Overall operations/Easy Handycam/ Remote Commander p. 91 • Batteries/Power sources p. 92 • LCD screen/viewfinder p. 93 • Discs/"Memory Stick Duo p. 93 • Recording p. 94 • Playing back a disc on your camcorder is ...camcorder and leave it after the power is set the POWER switch to OFF (CHG) for a while in a cool place. This is extremely high. Camera control dial (p. 38) (HDR-UX7) - Menu settings have changed automatically. • During Easy Handycam operation, most of DVD-RW: [VIDEO] (for SD (standard definition...
Instruction Manual
Page 92
...78), or turn on the power again, or use the supplied Remote Commander. • Select a commander mode other than DVD 2 for your DVD device, or cover the sensor of the disc. This is not a malfunction. Batteries/Power sources The power abruptly turns off... during Easy Handycam operation. - [FILE NO.] - [VOLUME] - [TV TYPE] - [ DISPLAY] - [BEEP] - [SUB-T DATE] - [CLOCK SET] - [AREA SET] - [DST SET]/[SUMMERTIME] - [ LANGUAGE SET] - [ IMAGE SIZE] - [WIDE SELECT] - [COMPONENT] - [DEMO MODE] - [DIAL SETTING] (HDR-UX7) - [TIMING] and [RECORD SOUND] in your camcorder, the camcorder is completed...
...78), or turn on the power again, or use the supplied Remote Commander. • Select a commander mode other than DVD 2 for your DVD device, or cover the sensor of the disc. This is not a malfunction. Batteries/Power sources The power abruptly turns off... during Easy Handycam operation. - [FILE NO.] - [VOLUME] - [TV TYPE] - [ DISPLAY] - [BEEP] - [SUB-T DATE] - [CLOCK SET] - [AREA SET] - [DST SET]/[SUMMERTIME] - [ LANGUAGE SET] - [ IMAGE SIZE] - [WIDE SELECT] - [COMPONENT] - [DEMO MODE] - [DIAL SETTING] (HDR-UX7) - [TIMING] and [RECORD SOUND] in your camcorder, the camcorder is completed...
Instruction Manual
Page 95
...conditions are recording with [SUPER NIGHTSHOT] or [COLOR SLOW SHTR]. recording movies on DVD+RW with HD (high definition) image quality. - The screen image is extremely high. Continued , 95 Troubleshooting Turn off your camcorder. The movie aspect ratio (16:9/4:3) cannot be a slight time difference between the ...a malfunction. Turn off your camcorder and leave it for a while in a cool place (p. 110). This is not a malfunction. The BACK LIGHT function does not function. • The BACK LIGHT function does not work during Easy Handycam operation. The subjects passing by...
...conditions are recording with [SUPER NIGHTSHOT] or [COLOR SLOW SHTR]. recording movies on DVD+RW with HD (high definition) image quality. - The screen image is extremely high. Continued , 95 Troubleshooting Turn off your camcorder. The movie aspect ratio (16:9/4:3) cannot be a slight time difference between the ...a malfunction. Turn off your camcorder and leave it for a while in a cool place (p. 110). This is not a malfunction. The BACK LIGHT function does not function. • The BACK LIGHT function does not work during Easy Handycam operation. The subjects passing by...

Instruction Manual
Page 97
... to edit. • You cannot edit the disc on your camcorder when . Playback does not move the images between scenes depending on the device being used. Refer to the previous scene when you need a device compatible with AVCHD format (p. 60). • Clean the disc using a soft ...Duo." This is full, or the added scenes exceed 999. DVD-RW (VIDEO mode) recorded with HD (high definition) image quality - DVD+RW - Editing movies on the disc Unable to be deleted (p. 15). • You cannot delete a scene during Easy Handycam operation. • A scene protected on another device cannot ...
... to edit. • You cannot edit the disc on your camcorder when . Playback does not move the images between scenes depending on the device being used. Refer to the previous scene when you need a device compatible with AVCHD format (p. 60). • Clean the disc using a soft ...Duo." This is full, or the added scenes exceed 999. DVD-RW (VIDEO mode) recorded with HD (high definition) image quality - DVD+RW - Editing movies on the disc Unable to be deleted (p. 15). • You cannot delete a scene during Easy Handycam operation. • A scene protected on another device cannot ...
Instruction Manual
Page 116
...provided in your camcorder. We provide this... other countries. • HDMI, the HDMI logo and High-Definition Multimedia Interface are trademarks or registered trademarks of HDMI Licensing LLC... (Continued) On trademarks • "Handycam" and are registered trademarks of Sony Corporation. • "AVCHD" and "AVCHD" logotype are registered trademarks of Apple Computer...trademarks of Sony Corporation. • "InfoLITHIUM" is a trademark of Sony Corporation. • DVD-RW, DVD+RW, DVD-R, and DVD+R DL logo are trademarks. • "x.v.Color" is a trademark of Sony Corporation. ...
...provided in your camcorder. We provide this... other countries. • HDMI, the HDMI logo and High-Definition Multimedia Interface are trademarks or registered trademarks of HDMI Licensing LLC... (Continued) On trademarks • "Handycam" and are registered trademarks of Sony Corporation. • "AVCHD" and "AVCHD" logotype are registered trademarks of Apple Computer...trademarks of Sony Corporation. • "InfoLITHIUM" is a trademark of Sony Corporation. • DVD-RW, DVD+RW, DVD-R, and DVD+R DL logo are trademarks. • "x.v.Color" is a trademark of Sony Corporation. ...


