Instruction Manual
Page 4
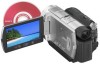
... removing covers may result in the operating instructions. this set yourself as the original parts. When the power cord or plug is damaged or frayed. - Adjust only those controls that are required, be sure the service technician has used replacement parts specified by being dropped, or the cabinet has been damaged. - Improper adjustment of any service or repairs to the set, ask the service technician to perform routine safety checks...
... removing covers may result in the operating instructions. this set yourself as the original parts. When the power cord or plug is damaged or frayed. - Adjust only those controls that are required, be sure the service technician has used replacement parts specified by being dropped, or the cabinet has been damaged. - Improper adjustment of any service or repairs to the set, ask the service technician to perform routine safety checks...
Instruction Manual
Page 8
... images of recordings cannot be provided, even if recording or playback is not possible due to change without any way. MTF= Modulation Transfer Function. Take images of a Carl Zeiss lens. Also, the lens for illustration purposes are captured using your camcorder is equipped with HD (high definition) image quality only on the model HDR-UX7. These points are recorded without notice. • Disc in each local language are based on AVCHD format compatible devices. On playing the disc...
... images of recordings cannot be provided, even if recording or playback is not possible due to change without any way. MTF= Modulation Transfer Function. Take images of a Carl Zeiss lens. Also, the lens for illustration purposes are captured using your camcorder is equipped with HD (high definition) image quality only on the model HDR-UX7. These points are recorded without notice. • Disc in each local language are based on AVCHD format compatible devices. On playing the disc...
Instruction Manual
Page 10
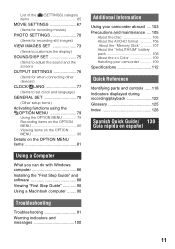
... Recording in mirror mode 37 10 Recording the fast action in slowmotion (SMTH SLW REC 38 Controlling the image settings manually with the camera control dial (HDR-UX7 38 Viewing the images 40 Using PB zoom 42 Playing back a series of Contents IMPORTANT SAFEGUARDS ........ 3 Read this before operating your camcorder to VCR or DVD/HDD recorders 53 Printing recorded images (PictBridge compliant printer 54 Utilizing Recording Media (MANAGE DISC/MEMORY) category 56 Making the disc compatible with playback on other devices or DVD drives (Finalizing 56 Playing a disc...
... Recording in mirror mode 37 10 Recording the fast action in slowmotion (SMTH SLW REC 38 Controlling the image settings manually with the camera control dial (HDR-UX7 38 Viewing the images 40 Using PB zoom 42 Playing back a series of Contents IMPORTANT SAFEGUARDS ........ 3 Read this before operating your camcorder to VCR or DVD/HDD recorders 53 Printing recorded images (PictBridge compliant printer 54 Utilizing Recording Media (MANAGE DISC/MEMORY) category 56 Making the disc compatible with playback on other devices or DVD drives (Finalizing 56 Playing a disc...
Instruction Manual
Page 11
... (SETTINGS) category items 65 MOVIE SETTINGS 67 (Items for recording movies) PHOTO SETTINGS 70 (Items for recording still images) VIEW IMAGES SET 73 (Items to customize the display) SOUND/DISP SET 75 (Items to adjust the sound and the screen) OUTPUT SETTINGS 76 (Items for when connecting other devices) CLOCK/ LANG 77 (Items to set clock and language) GENERAL SET 78 (Other setup items) Activating functions using the OPTION MENU 79 Using the OPTION MENU 79 Recording items on the OPTION MENU 80 Viewing...
... (SETTINGS) category items 65 MOVIE SETTINGS 67 (Items for recording movies) PHOTO SETTINGS 70 (Items for recording still images) VIEW IMAGES SET 73 (Items to customize the display) SOUND/DISP SET 75 (Items to adjust the sound and the screen) OUTPUT SETTINGS 76 (Items for when connecting other devices) CLOCK/ LANG 77 (Items to set clock and language) GENERAL SET 78 (Other setup items) Activating functions using the OPTION MENU 79 Using the OPTION MENU 79 Recording items on the OPTION MENU 80 Viewing...
Instruction Manual
Page 23
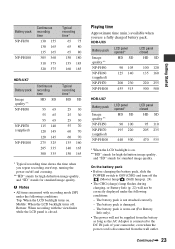
Bottom: When recording with recording mode [SP] under the following conditions: Top: When the LCD backlight turns on. Playing time Approximate time (min.) available when you repeat recording start/stop, turning the power on . **"HD" stands for high definition image quality, and "SD" stands for standard image quality. HDR-UX5 Battery pack LCD panel opened* LCD panel closed Image quality** HD SD HD SD NP-FH50 90 105 100 120 NP-FH60 (supplied...
Bottom: When recording with recording mode [SP] under the following conditions: Top: When the LCD backlight turns on. Playing time Approximate time (min.) available when you repeat recording start/stop, turning the power on . **"HD" stands for high definition image quality, and "SD" stands for standard image quality. HDR-UX5 Battery pack LCD panel opened* LCD panel closed Image quality** HD SD HD SD NP-FH50 90 105 100 120 NP-FH60 (supplied...

Instruction Manual
Page 25
... date and time does not appear during recording, but they are automatically recorded on the disc, and can be cleared from the memory. In that the clock is turned on the touch panel do not use your camcorder during playback ([DATA CODE], p. 73). • Refer to OFF (CHG). It closes when the playback screen is selected, or the power is turned off the power Slide the POWER switch to...
... date and time does not appear during recording, but they are automatically recorded on the disc, and can be cleared from the memory. In that the clock is turned on the touch panel do not use your camcorder during playback ([DATA CODE], p. 73). • Refer to OFF (CHG). It closes when the playback screen is selected, or the power is turned off the power Slide the POWER switch to...
Instruction Manual
Page 43
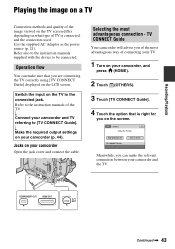
... connected. Continued , 43 Use the supplied AC Adaptor as the power source (p. 21). Recording/Playback Playing the image on a TV Connection methods and quality of the image viewed on the TV screen differ depending on the TV to the connected jack. Refer to the instruction manuals of the TV. Selecting the most advantageous way of connecting your TV. 1 Turn on your camcorder (p. 44). Meanwhile, you on the LCD screen...
... connected. Continued , 43 Use the supplied AC Adaptor as the power source (p. 21). Recording/Playback Playing the image on a TV Connection methods and quality of the image viewed on the TV screen differ depending on the TV to the connected jack. Refer to the instruction manuals of the TV. Selecting the most advantageous way of connecting your TV. 1 Turn on your camcorder (p. 44). Meanwhile, you on the LCD screen...
Instruction Manual
Page 53
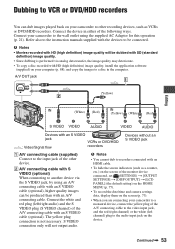
... the white (left /right audio) and the S VIDEO plug (S VIDEO channel) of the following ways. B A/V connecting cable with S VIDEO (optional) When connecting to another device via analog data transfer, the image quality may deteriorate. • To copy a disc recorded with HD (high definition) image quality, install the application software (supplied) on your camcorder to the wall outlet using an A/V connecting cable with an S VIDEO cable (optional), higher quality images can dub images played back on the device. Dubbing to VCR or DVD/HDD recorders You...
... the white (left /right audio) and the S VIDEO plug (S VIDEO channel) of the following ways. B A/V connecting cable with S VIDEO (optional) When connecting to another device via analog data transfer, the image quality may deteriorate. • To copy a disc recorded with HD (high definition) image quality, install the application software (supplied) on your camcorder to the wall outlet using an A/V connecting cable with an S VIDEO cable (optional), higher quality images can dub images played back on the device. Dubbing to VCR or DVD/HDD recorders You...
Instruction Manual
Page 55
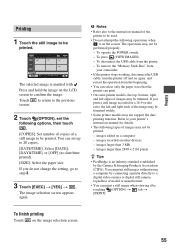
... change the setting, go to confirm the image. Press and hold the image on other devices - images recorded on the LCD screen to step 3. 3 Touch [EXEC] t [YES] t . Editing Printing 1 Touch the still image to be printed. To operate the POWER switch. - To disconnect the USB cable from the beginning. • You can select only the paper sizes that the printer can set the following options, then touch . [COPIES]: Set number...
... change the setting, go to confirm the image. Press and hold the image on other devices - images recorded on the LCD screen to step 3. 3 Touch [EXEC] t [YES] t . Editing Printing 1 Touch the still image to be printed. To operate the POWER switch. - To disconnect the USB cable from the beginning. • You can select only the paper sizes that the printer can set the following options, then touch . [COPIES]: Set number...
Instruction Manual
Page 56
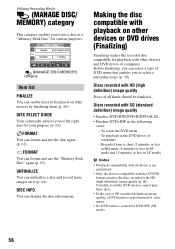
... unfinalize a disc and record more images on other devices by finalizing them (p. 56). Discs recorded with HD (high definition) image quality (p. 60). Recorded time is short (5 minutes or less in HQ mode, 8 minutes or less in SP mode and 15 minutes or less in LP mode) b Notes • Playback compatibility with all device is not guaranteed. • Only the devices compatible with the AVCHD format can select a type of a disc menu. • No DVD menu is...
... unfinalize a disc and record more images on other devices by finalizing them (p. 56). Discs recorded with HD (high definition) image quality (p. 60). Recorded time is short (5 minutes or less in HQ mode, 8 minutes or less in SP mode and 15 minutes or less in LP mode) b Notes • Playback compatibility with all device is not guaranteed. • Only the devices compatible with the AVCHD format can select a type of a disc menu. • No DVD menu is...
Instruction Manual
Page 60
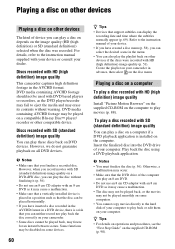
... operations and procedures, see the "First Step Guide" on all DVD devices. Play back the disc using a DVD playback application. Some functions may be used with HD (high definition) image quality Install "Picture Motion Browser" on the supplied CD-ROM on the computer to play the playlist back on other devices if the discs were recorded with your device or consult your dealer. b Notes • You must finalize the disc (p. 56). Refer to the instruction manual...
... operations and procedures, see the "First Step Guide" on all DVD devices. Play back the disc using a DVD playback application. Some functions may be used with HD (high definition) image quality Install "Picture Motion Browser" on the supplied CD-ROM on the computer to play the playlist back on other devices if the discs were recorded with your device or consult your dealer. b Notes • You must finalize the disc (p. 56). Refer to the instruction manual...
Instruction Manual
Page 67
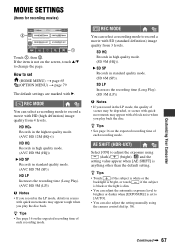
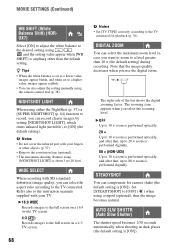
... record a movie with HD (high definition) image quality from 3 levels. REC MODE You can select a recording mode to adjust the exposure using the camera control dial (p. 38). SD HQ Records in standard quality mode. (SD 6M (SP)). B SD SP Records in high quality mode. (SD 9M (HQ)). AE SHIFT (HDR-UX7) Select [ON] to record a movie with B. and the setting value appear when [AE SHIFT] is set (HOME MENU) t page 65 (OPTION MENU) t page 79 The default settings...
... record a movie with HD (high definition) image quality from 3 levels. REC MODE You can select a recording mode to adjust the exposure using the camera control dial (p. 38). SD HQ Records in standard quality mode. (SD 6M (SP)). B SD SP Records in high quality mode. (SD 9M (HQ)). AE SHIFT (HDR-UX7) Select [ON] to record a movie with B. and the setting value appear when [AE SHIFT] is set (HOME MENU) t page 65 (OPTION MENU) t page 79 The default settings...
Instruction Manual
Page 68
...] to adjust the white balance to the instruction manuals supplied with your fingers or other than 10 × (the default setting) during recording. DIGITAL ZOOM You can select the maximum zoom level in dark places (the default setting is performed digitally. WIDE SELECT When recording with SD (standard definition) image quality, you can record clearer images by setting [NIGHTSHOT LIGHT], which emits infrared light (invisible), to [OFF] ( ) when using the camera control dial (p. 38). Set...
...] to adjust the white balance to the instruction manuals supplied with your fingers or other than 10 × (the default setting) during recording. DIGITAL ZOOM You can select the maximum zoom level in dark places (the default setting is performed digitally. WIDE SELECT When recording with SD (standard definition) image quality, you can record clearer images by setting [NIGHTSHOT LIGHT], which emits infrared light (invisible), to [OFF] ( ) when using the camera control dial (p. 38). Set...
Instruction Manual
Page 69
... at a preset level. When you press DISP/BATT INFO to switch the indicator from off to on AVCHD format compatible devices only (p. 60). The frame is horizontal or vertical by setting [GUIDEFRAME] to (Movie). - GUIDEFRAME You can be set to display the recording date and time when you change the default setting, is not recorded. b Notes • Set [X.V.COLOR] to the instruction manual of colors. Various colors such as a guide when adjusting the brightness.
... at a preset level. When you press DISP/BATT INFO to switch the indicator from off to on AVCHD format compatible devices only (p. 60). The frame is horizontal or vertical by setting [GUIDEFRAME] to (Movie). - GUIDEFRAME You can be set to display the recording date and time when you change the default setting, is not recorded. b Notes • Set [X.V.COLOR] to the instruction manual of colors. Various colors such as a guide when adjusting the brightness.
Instruction Manual
Page 80
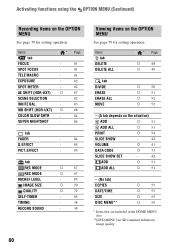
... -- (No tab) COPIES DATE/TIME SIZE DISC MENU** a 55 a 55 a 55 a 59 * Items that are included in the HOME MENU also. **[DVD MENU] for SD (standard definition) image quality 80 Items tab DELETE DELETE ALL * Page a 48 a 49 tab DIVIDE ERASE ERASE ALL MOVE a 50 a 51 a 52 a 52 -- (A tab depends on the OPTION MENU See page 79 for setting operation. Activating functions using the OPTION MENU (Continued) See Recording items on the...
... -- (No tab) COPIES DATE/TIME SIZE DISC MENU** a 55 a 55 a 55 a 59 * Items that are included in the HOME MENU also. **[DVD MENU] for SD (standard definition) image quality 80 Items tab DELETE DELETE ALL * Page a 48 a 49 tab DIVIDE ERASE ERASE ALL MOVE a 50 a 51 a 52 a 52 -- (A tab depends on the OPTION MENU See page 79 for setting operation. Activating functions using the OPTION MENU (Continued) See Recording items on the...
Instruction Manual
Page 82
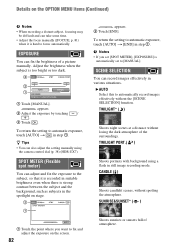
... bright or too dark. 1 Touch [MANUAL]. TWILIGHT PORT.( ) Shoots portraits with background using the camera control dial (p. 38) (HDR-UX7). Details on the OPTION MENU items (Continued) b Notes • When recording a distant subject, focusing may be difficult and can take some time. • Adjust the focus manually ([FOCUS], p. 81) when it is recorded in suitable brightness even when there is automatically set [SPOT METER], [EXPOSURE] is strong...
... bright or too dark. 1 Touch [MANUAL]. TWILIGHT PORT.( ) Shoots portraits with background using the camera control dial (p. 38) (HDR-UX7). Details on the OPTION MENU items (Continued) b Notes • When recording a distant subject, focusing may be difficult and can take some time. • Adjust the focus manually ([FOCUS], p. 81) when it is recorded in suitable brightness even when there is automatically set [SPOT METER], [EXPOSURE] is strong...
Instruction Manual
Page 91
.... - Playback zoom (p. 42) - If the functions still do not work , press the RESET button (p. 119) using your camcorder, use the following buttons/ functions. - Movie recording mode: [SP] - BACK LIGHT (p. 37) - Camera control dial (p. 38) (HDR-UX7) - This is not a malfunction. • Disconnect the AC Adaptor from the wall outlet or remove the battery pack, then reconnect it for your camcorder to be used simultaneously p. 99 Overall operations/Easy Handycam/Remote Commander The power does not turn on the screen...
.... - Playback zoom (p. 42) - If the functions still do not work , press the RESET button (p. 119) using your camcorder, use the following buttons/ functions. - Movie recording mode: [SP] - BACK LIGHT (p. 37) - Camera control dial (p. 38) (HDR-UX7) - This is not a malfunction. • Disconnect the AC Adaptor from the wall outlet or remove the battery pack, then reconnect it for your camcorder to be used simultaneously p. 99 Overall operations/Easy Handycam/Remote Commander The power does not turn on the screen...
Instruction Manual
Page 106
... a high definition digital video camera format used to record an HD (high definition) signal of either the 1080i specification*1 or the 720p specification*2, using an oil-based marker with a soft cloth. on a single-sided disc, write only on 8 cm DVD discs. Do not dry the surface by heating. You cannot write, or mark, on the AVCHD format, your camcorder. The AVCHD format is used to compress audio data. The MPEG-4 AVC/ H.264 format enables a high definition (HD) video...
... a high definition digital video camera format used to record an HD (high definition) signal of either the 1080i specification*1 or the 720p specification*2, using an oil-based marker with a soft cloth. on a single-sided disc, write only on 8 cm DVD discs. Do not dry the surface by heating. You cannot write, or mark, on the AVCHD format, your camcorder. The AVCHD format is used to compress audio data. The MPEG-4 AVC/ H.264 format enables a high definition (HD) video...

Instruction Manual
Page 107
... data transfer varies depending on the hard disk of a computer. • A "Memory Stick Duo" formatted by a computer (Windows OS/Mac OS) does not have guaranteed compatibility with a write-protect tab You can use . You can prevent accidental erasure of your camcorder. • Still image format: Your camcorder compresses and records image data in an encrypted format. It is recommended you make a back-up of important data on the device to keep "Memory Stick Duo" media...
... data transfer varies depending on the hard disk of a computer. • A "Memory Stick Duo" formatted by a computer (Windows OS/Mac OS) does not have guaranteed compatibility with a write-protect tab You can use . You can prevent accidental erasure of your camcorder. • Still image format: Your camcorder compresses and records image data in an encrypted format. It is recommended you make a back-up of important data on the device to keep "Memory Stick Duo" media...
Instruction Manual
Page 112
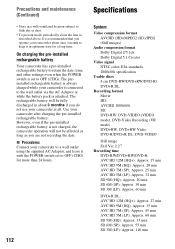
... state for more than 24 hours. 112 Specifications System Video compression format AVCHD (HD)/MPEG2 (SD)/JPEG (Still images) Audio compression format Dolby Digital 2/5.1ch Dolby Digital 5.1 Creator Video signal NTSC color, EIA standards 1080i/60i specification Usable discs 8 cm DVD-RW/DVD+RW/DVD-R/ DVD+R DL Recording format Movie HD: AVCHD 1080i/60i SD: DVD-RW: DVD-VIDEO (VIDEO mode), DVD-Video Recording (VR mode) DVD+RW: DVD+RW Video DVD-R/DVD+R DL: DVD-VIDEO Still image Exif Ver.2.2*1 Recording time DVD-RW/DVD+RW/DVD-R: AVC HD 12M (HQ+): Approx. 15 min...
... state for more than 24 hours. 112 Specifications System Video compression format AVCHD (HD)/MPEG2 (SD)/JPEG (Still images) Audio compression format Dolby Digital 2/5.1ch Dolby Digital 5.1 Creator Video signal NTSC color, EIA standards 1080i/60i specification Usable discs 8 cm DVD-RW/DVD+RW/DVD-R/ DVD+R DL Recording format Movie HD: AVCHD 1080i/60i SD: DVD-RW: DVD-VIDEO (VIDEO mode), DVD-Video Recording (VR mode) DVD+RW: DVD+RW Video DVD-R/DVD+R DL: DVD-VIDEO Still image Exif Ver.2.2*1 Recording time DVD-RW/DVD+RW/DVD-R: AVC HD 12M (HQ+): Approx. 15 min...


