
Operating Guide
Page 8
... that you have the following items supplied with your camcorder. AC Adaptor (1) (p. 9) Wireless Remote Commander (1) A button-type lithium battery is already installed. Insulation sheet Power cord (1) (p. 9) Handycam Station (1) (p. 9) Rechargeable battery pack NP-FH60 (1) (p. 9) Component video cable (1) (p. 16) A/V connecting cable (1) (p. 16) USB cable (1) (p. 30) CD-ROM "Handycam Application Software" (1) (p. 26) - Handycam Handbook (PDF) "Operating Guide" (This manual) (1) 8 Picture Motion...
... that you have the following items supplied with your camcorder. AC Adaptor (1) (p. 9) Wireless Remote Commander (1) A button-type lithium battery is already installed. Insulation sheet Power cord (1) (p. 9) Handycam Station (1) (p. 9) Rechargeable battery pack NP-FH60 (1) (p. 9) Component video cable (1) (p. 16) A/V connecting cable (1) (p. 16) USB cable (1) (p. 30) CD-ROM "Handycam Application Software" (1) (p. 26) - Handycam Handbook (PDF) "Operating Guide" (This manual) (1) 8 Picture Motion...
Operating Guide
Page 19
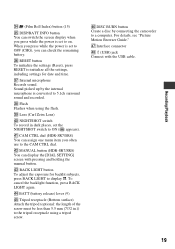
... flash. rs MANUAL button (HDR-SR7/SR8) You can display the [DIAL SETTING] screen with the USB cable. 19 rh DISC BURN button Create a disc by the internal microphone is converted to 5.1ch surround sound and recorded. For details, see "Picture Motion Browser Guide." Sound picked up by connecting the camcorder to a computer. To... check the remaining battery. ek Flash Flashes when using a tripod screw. NIGHTSHOT switch To record in .)) to the CAM CTRL dial. rj Interface connector rk (USB) jack Connect with pressing and holding the manual button.
... flash. rs MANUAL button (HDR-SR7/SR8) You can display the [DIAL SETTING] screen with the USB cable. 19 rh DISC BURN button Create a disc by the internal microphone is converted to 5.1ch surround sound and recorded. For details, see "Picture Motion Browser Guide." Sound picked up by connecting the camcorder to a computer. To... check the remaining battery. ek Flash Flashes when using a tripod screw. NIGHTSHOT switch To record in .)) to the CAM CTRL dial. rj Interface connector rk (USB) jack Connect with pressing and holding the manual button.

Operating Guide
Page 29
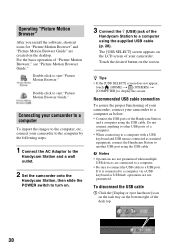
...) Software required to create an AVCHD disc - Microsoft .NET Framework 1.1* Software required to create a DVD - Enjoying with a computer 2 Set the camcorder onto the Handycam Station, then slide the POWER switch to turn on. 3 Connect the (USB) jack of the Handycam Station to the (USB) jack of the computer using the supplied USB cable. 4 Touch [ COMPUTER] on the LCD...
...) Software required to create an AVCHD disc - Microsoft .NET Framework 1.1* Software required to create a DVD - Enjoying with a computer 2 Set the camcorder onto the Handycam Station, then slide the POWER switch to turn on. 3 Connect the (USB) jack of the Handycam Station to the (USB) jack of the computer using the supplied USB cable. 4 Touch [ COMPUTER] on the LCD...
Operating Guide
Page 30
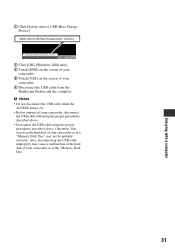
Double-click to a computer using the supplied USB cable (p. 28). Connecting your camcorder to a computer To import the images to the computer, etc., connect your camcorder to the computer by the following steps. 1 Connect the AC Adaptor to the Handycam Station and a wall outlet. 2 Set the camcorder onto the Handycam Station, then slide the POWER switch to turn...
Double-click to a computer using the supplied USB cable (p. 28). Connecting your camcorder to a computer To import the images to the computer, etc., connect your camcorder to the computer by the following steps. 1 Connect the AC Adaptor to the Handycam Station and a wall outlet. 2 Set the camcorder onto the Handycam Station, then slide the POWER switch to turn...
Operating Guide
Page 31
... the hard disk of your camcorder or of your camcorder, disconnect the USB cable following the proper procedures described above. • Disconnect the USB cable using the proper procedures described above. b Notes • Do not disconnect the USB cable while the ACCESS lamp is lit. • Before turning off your camcorder. 6 Disconnect the USB cable from the Handycam Station and the computer.
... the hard disk of your camcorder or of your camcorder, disconnect the USB cable following the proper procedures described above. • Disconnect the USB cable using the proper procedures described above. b Notes • Do not disconnect the USB cable while the ACCESS lamp is lit. • Before turning off your camcorder. 6 Disconnect the USB cable from the Handycam Station and the computer.

Operating Guide
Page 33
..., contact your Sony dealer or local authorized Sony service facility. If the problem persists even after you cannot service has occurred. C:04:00 C:(or E:) ss:ss (Self-diagnosis display) C:04:ss • The battery pack is extremely high/low. Use an...camcorder. • Disconnect the USB cable from the USB jack of your camcorder again in the viewfinder (HDR-SR7/SR8) or on the media check tool, see "Picture Motion Browser Guide." You can fix some symptoms by the computer. • Install "Picture Motion Browser" (p. 28). • Disconnect devices from the computer and the Handycam...
..., contact your Sony dealer or local authorized Sony service facility. If the problem persists even after you cannot service has occurred. C:04:00 C:(or E:) ss:ss (Self-diagnosis display) C:04:ss • The battery pack is extremely high/low. Use an...camcorder. • Disconnect the USB cable from the USB jack of your camcorder again in the viewfinder (HDR-SR7/SR8) or on the media check tool, see "Picture Motion Browser Guide." You can fix some symptoms by the computer. • Install "Picture Motion Browser" (p. 28). • Disconnect devices from the computer and the Handycam...
Handycam® Handbook
Page 2
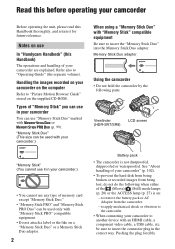
...Memory Stick Duo" into the Memory Stick Duo adaptor. be used with your camcorder.) When using a "Memory Stick Duo" with an HDMI cable, a component video cable, a USB cable, etc. to insert the connector plug in your camcorder.) • You cannot use any type of memory card except "Memory Stick ...operations and handling of your camcorder are explained. Viewfinder (HDR-SR7/SR8) LCD screen "Memory Stick" (You cannot use "Memory Stick Duo" marked with "Memory Stick PRO" compatible equipment. • Do not attach a label or the like on use In "Handycam Handbook" (this Handbook ...
...Memory Stick Duo" into the Memory Stick Duo adaptor. be used with your camcorder.) When using a "Memory Stick Duo" with an HDMI cable, a component video cable, a USB cable, etc. to insert the connector plug in your camcorder.) • You cannot use any type of memory card except "Memory Stick ...operations and handling of your camcorder are explained. Viewfinder (HDR-SR7/SR8) LCD screen "Memory Stick" (You cannot use "Memory Stick Duo" marked with "Memory Stick PRO" compatible equipment. • Do not attach a label or the like on use In "Handycam Handbook" (this Handbook ...

Handycam® Handbook
Page 15
... supplied items Make sure that item supplied. The number in the parentheses indicates the number of that you have the following items supplied with your camcorder. Handycam Handbook (This Handbook) "Operating Guide" (1) A/V connecting cable (1) (p. 41, 53) USB cable (1) (p. 54) 15 Picture Motion Browser (Software) - Rechargeable battery pack NP-FH60 (1) (p. 16, 101) Power cord (1) (p. 16...
... supplied items Make sure that item supplied. The number in the parentheses indicates the number of that you have the following items supplied with your camcorder. Handycam Handbook (This Handbook) "Operating Guide" (1) A/V connecting cable (1) (p. 41, 53) USB cable (1) (p. 54) 15 Picture Motion Browser (Software) - Rechargeable battery pack NP-FH60 (1) (p. 16, 101) Power cord (1) (p. 16...

Handycam® Handbook
Page 54
...Turn on your camcorder. 3 Connect the (USB) jack of the recording device. 4 Start the playback on your camcorder, and record it to the input mode. 3 Connect your camcorder to the recording device (VCR or DVD/ HDD recorder) with the A/V connecting cable (supplied) 1 or an A/V connecting cable with your ... them into your camcorder. 1 Connect the Handycam Station to obtain power from the wall outlet (p. 16). To print still images on the recording device. Connect your camcorder to the input jacks of the Handycam Station to the printer using the USB cable (p. 110). [USB SELECT] appears on...
...Turn on your camcorder. 3 Connect the (USB) jack of the recording device. 4 Start the playback on your camcorder, and record it to the input mode. 3 Connect your camcorder to the recording device (VCR or DVD/ HDD recorder) with the A/V connecting cable (supplied) 1 or an A/V connecting cable with your ... them into your camcorder. 1 Connect the Handycam Station to obtain power from the wall outlet (p. 16). To print still images on the recording device. Connect your camcorder to the input jacks of the Handycam Station to the printer using the USB cable (p. 110). [USB SELECT] appears on...
Handycam® Handbook
Page 55
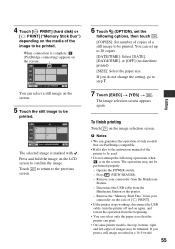
... [EXEC] t [YES] t . If you print a still image recorded in the case of images may not be printed. Press (VIEW IMAGES). - Disconnect the USB cable from the beginning. • You can set the following operations when is on the screen. If you do not change the setting, go to 20... printer. - Remove the "Memory Stick Duo" from your camcorder from the Handycam Station. - You can print. • On some printer models, the top, bottom, right, and left edges of [ PRINT]. • If the printer stops working, disconnect the USB cable, turn the printer off and on the screen. 5 Touch...
... [EXEC] t [YES] t . If you print a still image recorded in the case of images may not be printed. Press (VIEW IMAGES). - Disconnect the USB cable from the beginning. • You can set the following operations when is on the screen. If you do not change the setting, go to 20... printer. - Remove the "Memory Stick Duo" from your camcorder from the Handycam Station. - You can print. • On some printer models, the top, bottom, right, and left edges of [ PRINT]. • If the printer stops working, disconnect the USB cable, turn the printer off and on the screen. 5 Touch...
Handycam® Handbook
Page 95
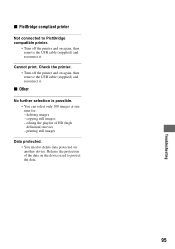
...100 images at one time for: - Release the protection of HD (high definition) movies - x PictBridge compliant printer Not connected to PictBridge compatible printer. • Turn off the printer and on again, then remove the USB cable (supplied) and reconnect it . editing the playlist of the data ...device used to delete data protected on another device. Check the printer. • Turn off the printer and on again, then remove the USB cable (supplied) and reconnect it . copying still images - Cannot print. deleting images - printing still images Data protected. • You tried ...
...100 images at one time for: - Release the protection of HD (high definition) movies - x PictBridge compliant printer Not connected to PictBridge compatible printer. • Turn off the printer and on again, then remove the USB cable (supplied) and reconnect it . editing the playlist of the data ...device used to delete data protected on another device. Check the printer. • Turn off the printer and on again, then remove the USB cable (supplied) and reconnect it . copying still images - Cannot print. deleting images - printing still images Data protected. • You tried ...
Handycam® Handbook
Page 117
... CTRL (Remote control 75 REPAIR IMG.DB F 59 RESET 109 S S VIDEO cable 43 S VIDEO jack 53 SCENE SELECTION.....80, 90 SD movie files 98 SD QUALITY 63 SD REC MODE 64 SD (standard definition) image quality 9 Self-diagnosis display...........92 SELF-TIMER 83 SEPIA 82 SETTINGS 61 ... Telephoto 29 Thumbnail 114 Trademark 105 Tripod 110 TV color system 96 TV CONNECT Guide.......... 40 TV TYPE 73 TWILIGHT 80 TWILIGHT PORT 80 U USB cable 15 USB jack 110 Using abroad 96 V VBR 11, 114 VF B.LIGHT (Viewfinder brightness) ....... 72 VIEW IMAGES SET........... 70 Viewing pictures on a TV...
... CTRL (Remote control 75 REPAIR IMG.DB F 59 RESET 109 S S VIDEO cable 43 S VIDEO jack 53 SCENE SELECTION.....80, 90 SD movie files 98 SD QUALITY 63 SD REC MODE 64 SD (standard definition) image quality 9 Self-diagnosis display...........92 SELF-TIMER 83 SEPIA 82 SETTINGS 61 ... Telephoto 29 Thumbnail 114 Trademark 105 Tripod 110 TV color system 96 TV CONNECT Guide.......... 40 TV TYPE 73 TWILIGHT 80 TWILIGHT PORT 80 U USB cable 15 USB jack 110 Using abroad 96 V VBR 11, 114 VF B.LIGHT (Viewfinder brightness) ....... 72 VIEW IMAGES SET........... 70 Viewing pictures on a TV...
Marketing Specifications
Page 2
... Video Cable A/V Cable (Stereo) Application CD-ROM w/ Driver USB Cable Enjoy Handycam DVD Optional Accessories Rechargeable InfoLITHIUM® Batteries (NPFH50/FH70/FH100) UPC Code: 27242719651 1. Available storage capacity may communicate with USB 2.0 connector may vary and a portion of Sony. Sony Electronics Inc. •16530 Via Esprillo •San Diego, CA 92127 •1.800.222.7669 •www.sony.com High Definition Camcorder...
... Video Cable A/V Cable (Stereo) Application CD-ROM w/ Driver USB Cable Enjoy Handycam DVD Optional Accessories Rechargeable InfoLITHIUM® Batteries (NPFH50/FH70/FH100) UPC Code: 27242719651 1. Available storage capacity may communicate with USB 2.0 connector may vary and a portion of Sony. Sony Electronics Inc. •16530 Via Esprillo •San Diego, CA 92127 •1.800.222.7669 •www.sony.com High Definition Camcorder...


