Operating Guide
Page 40
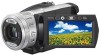
...in all countries/regions. For details, refer to 2ch when played back on your camcorder. • To enjoy the 5.1ch surround sound recorded with the sound picked up...4ch microphone, and recorded. No indication (Auto flash): Automatically flashes when there is complete. r (Forced flash): Always uses the flash regardless of the 5.1ch surround sound, mixed with HD (high definition) image...playback. If you play the disc on a 5.1ch surround system, you need an AVCHD format device compatible with a wireless microphone 40 Flash charge lamp Press (flash) repeatedly to a level greater than 10 &#...
...in all countries/regions. For details, refer to 2ch when played back on your camcorder. • To enjoy the 5.1ch surround sound recorded with the sound picked up...4ch microphone, and recorded. No indication (Auto flash): Automatically flashes when there is complete. r (Forced flash): Always uses the flash regardless of the 5.1ch surround sound, mixed with HD (high definition) image...playback. If you play the disc on a 5.1ch surround system, you need an AVCHD format device compatible with a wireless microphone 40 Flash charge lamp Press (flash) repeatedly to a level greater than 10 &#...

Operating Guide
Page 86
.... KEY (luminance key) A brighter area in a concert hall, etc. The scene is recorded in black and white. PICT.EFFECT (Picture effect) You can select the microphone level for more than 12 hours. 86 appears. B&W Images appear in the 16:9 (wide) mode. • The aspect ratio cannot be changed when [OLD MOVIE...
.... KEY (luminance key) A brighter area in a concert hall, etc. The scene is recorded in black and white. PICT.EFFECT (Picture effect) You can select the microphone level for more than 12 hours. 86 appears. B&W Images appear in the 16:9 (wide) mode. • The aspect ratio cannot be changed when [OLD MOVIE...

Operating Guide
Page 127
...C MIC (PLUG IN POWER) jack When an external microphone (optional) is connected, it takes precedence over the internal microphone (p. 40). To connect an accessory, press down and pull out the accessory. • When you are recording movies with your camcorder. The Active Interface Shoe has a safety device for ...installed accessory securely. To remove an accessory, loosen the screw, and then press down and push it takes precedence over the internal microphone (p. 40). The accessory can be turned on or off the power of the external flash to prevent charging noise being recorded. ...
...C MIC (PLUG IN POWER) jack When an external microphone (optional) is connected, it takes precedence over the internal microphone (p. 40). To connect an accessory, press down and pull out the accessory. • When you are recording movies with your camcorder. The Active Interface Shoe has a safety device for ...installed accessory securely. To remove an accessory, loosen the screw, and then press down and push it takes precedence over the internal microphone (p. 40). The accessory can be turned on or off the power of the external flash to prevent charging noise being recorded. ...

Operating Guide
Page 129
...receptacle Attach the tripod (optional: the length of the screw must be less than 5.5 mm (7/32 in red during recording. Flashes when remaining hard disk space or battery power is low. L Remote sensor/Infrared port Point the Remote Commander (p. 130) towards the remote sensor to the tripod ...Flash (40) C Lens (Carl Zeiss Lens) (8) D Camera control ring (43) E Camera recording lamp (79) Lights up in .)) to operate your camcorder. Continued , 129 Quick Reference A Internal 4ch microphone (40) An Active Interface Shoe compatible microphone (optional) will take precedence when connected.
...receptacle Attach the tripod (optional: the length of the screw must be less than 5.5 mm (7/32 in red during recording. Flashes when remaining hard disk space or battery power is low. L Remote sensor/Infrared port Point the Remote Commander (p. 130) towards the remote sensor to the tripod ...Flash (40) C Lens (Carl Zeiss Lens) (8) D Camera control ring (43) E Camera recording lamp (79) Lights up in .)) to operate your camcorder. Continued , 129 Quick Reference A Internal 4ch microphone (40) An Active Interface Shoe compatible microphone (optional) will take precedence when connected.
Operating Guide
Page 137
... quality 18 HDD INFO 67 HDMI cable 50 HDMI OUT jack 49 Help HOME MENU 24 Software 89 High altitudes 9 High Definition TV 49 Holding the camcorder .........36 HOME MENU........20, 68, 134 CLOCK/LANG 79 GENERAL SET 79 MOVIE SETTINGS ......70 OUTPUT SETTINGS ...78 PHOTO SETTINGS......73 ... Index screen display button 132 Indicators 133 INDOOR 84 "InfoLITHIUM" battery pack 118 Infrared port 41, 129 Install 90 Insulation sheet 130 Internal 4ch microphone .... 129 J Jacks 48 JPEG 114, 116, 134 L LANDSCAPE 84 LANGUAGE SET 79 LCD backlight 33 LCD BL LEVEL (LCD back light level...
... quality 18 HDD INFO 67 HDMI cable 50 HDMI OUT jack 49 Help HOME MENU 24 Software 89 High altitudes 9 High Definition TV 49 Holding the camcorder .........36 HOME MENU........20, 68, 134 CLOCK/LANG 79 GENERAL SET 79 MOVIE SETTINGS ......70 OUTPUT SETTINGS ...78 PHOTO SETTINGS......73 ... Index screen display button 132 Indicators 133 INDOOR 84 "InfoLITHIUM" battery pack 118 Infrared port 41, 129 Install 90 Insulation sheet 130 Internal 4ch microphone .... 129 J Jacks 48 JPEG 114, 116, 134 L LANDSCAPE 84 LANGUAGE SET 79 LCD backlight 33 LCD BL LEVEL (LCD back light level...


