
Operating Instructions
Page 2
... THE RISK OF FIRE OR ELECTRIC SHOCK, CAREFULLY FOLLOW THESE INSTRUCTIONS. • Read these instructions. • Keep these numbers whenever you call your Sony dealer regarding this product. Install in the space provided below. If the provided plug does not fit into your safety. Do not expose the... batteries to excessive heat such as radiators, heat registers, stoves, or other . A polarized plug has two blades with one wider than the other apparatus (...
... THE RISK OF FIRE OR ELECTRIC SHOCK, CAREFULLY FOLLOW THESE INSTRUCTIONS. • Read these instructions. • Keep these numbers whenever you call your Sony dealer regarding this product. Install in the space provided below. If the provided plug does not fit into your safety. Do not expose the... batteries to excessive heat such as radiators, heat registers, stoves, or other . A polarized plug has two blades with one wider than the other apparatus (...
Operating Instructions
Page 3
... disassemble. • Do not crush and do not allow metal objects to come into the apparatus, the apparatus has been exposed to charge the battery pack using a genuine Sony battery charger or a device that can burst, cause a fire or even chemical burns. Even if your camcorder is turned off, AC power source (mains.... • Use only with the cart, stand, tripod, bracket, or table specified by the manufacturer, or sold with the same or equivalent type recommended by Sony. • Dispose of used battery packs promptly as between a wall and furniture.
... disassemble. • Do not crush and do not allow metal objects to come into the apparatus, the apparatus has been exposed to charge the battery pack using a genuine Sony battery charger or a device that can burst, cause a fire or even chemical burns. Even if your camcorder is turned off, AC power source (mains.... • Use only with the cart, stand, tripod, bracket, or table specified by the manufacturer, or sold with the same or equivalent type recommended by Sony. • Dispose of used battery packs promptly as between a wall and furniture.

Operating Instructions
Page 4
For more information regarding recycling of rechargeable batteries, call : Sony Customer Information Center 1-800-222-SONY (7669). Operation is subject to the collection and recycling location nearest you have any interference received, including interference...www.call2recycle.org/ Caution: Do not handle damaged or leaking Lithium-Ion batteries. Battery pack/AC Adaptor This device complies with Part15 of Conformity Trade Name: SONY Model No.: HDR-CX405, HDRCX440, HDR-CX470, HDR-PJ440 Responsible Party: Sony Electronics Inc. This equipment has very low levels of the IC radio ...
For more information regarding recycling of rechargeable batteries, call : Sony Customer Information Center 1-800-222-SONY (7669). Operation is subject to the collection and recycling location nearest you have any interference received, including interference...www.call2recycle.org/ Caution: Do not handle damaged or leaking Lithium-Ion batteries. Battery pack/AC Adaptor This device complies with Part15 of Conformity Trade Name: SONY Model No.: HDR-CX405, HDRCX440, HDR-CX470, HDR-PJ440 Responsible Party: Sony Electronics Inc. This equipment has very low levels of the IC radio ...

Operating Instructions
Page 6
...and sound of this symbol might be replaced by inappropriate waste handling. For all other European countries with an incorporated battery, this product or battery, please contact your local Civic Office, your household waste disposal service or the shop where you will help prevent ... consequences for safety, performance or data integrity reasons require a permanent connection with separate collection systems) This symbol on the product, the battery or on how to the applicable collection point for using connection cables shorter than 0.0005% mercury or 0.004% lead. The recycling ...
...and sound of this symbol might be replaced by inappropriate waste handling. For all other European countries with an incorporated battery, this product or battery, please contact your local Civic Office, your household waste disposal service or the shop where you will help prevent ... consequences for safety, performance or data integrity reasons require a permanent connection with separate collection systems) This symbol on the product, the battery or on how to the applicable collection point for using connection cables shorter than 0.0005% mercury or 0.004% lead. The recycling ...

Operating Instructions
Page 7
... 2 Learning more about the camcorder (Help Guide) .......7 Getting started 8 Supplied items 8 Charging the battery pack ....... 9 Turning the power on 11 Inserting a memory card ......... 12 Recording/Playback ... 14 ...Home 19 Connecting an external media device 20 Using the Wi-Fi function (HDRCX440/PJ410/PJ440 21 Customizing your camera is a 1080 60i-compatible device or 1080 50i compatible device, ...to it for the following functions in -depth instructions on -line manual. Access the Sony support page. To check whether your camcorder 26 Using the menus 26 Others 27 Precautions...
... 2 Learning more about the camcorder (Help Guide) .......7 Getting started 8 Supplied items 8 Charging the battery pack ....... 9 Turning the power on 11 Inserting a memory card ......... 12 Recording/Playback ... 14 ...Home 19 Connecting an external media device 20 Using the Wi-Fi function (HDRCX440/PJ410/PJ440 21 Customizing your camera is a 1080 60i-compatible device or 1080 50i compatible device, ...to it for the following functions in -depth instructions on -line manual. Access the Sony support page. To check whether your camcorder 26 Using the menus 26 Others 27 Precautions...
Operating Instructions
Page 8
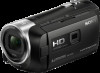
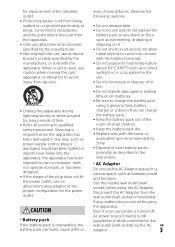
Getting started Supplied items The numbers in USB Cable of the AC Adaptor differs depending on the countries/ regions. • USB connection support cable (1) The USB connection support cable is too short for use with this cable when the Built-in ( ) indicate the supplied quantity. • Camcorder (1) • AC Adaptor (1) The shape of the camcorder is designed for connection. • HDMI cable (1) • Rechargeable battery pack NPBX1 (1) • "Operating Guide" (This manual) 8GB (1) Use this camcorder only.
Getting started Supplied items The numbers in USB Cable of the AC Adaptor differs depending on the countries/ regions. • USB connection support cable (1) The USB connection support cable is too short for use with this cable when the Built-in ( ) indicate the supplied quantity. • Camcorder (1) • AC Adaptor (1) The shape of the camcorder is designed for connection. • HDMI cable (1) • Rechargeable battery pack NPBX1 (1) • "Operating Guide" (This manual) 8GB (1) Use this camcorder only.
Operating Instructions
Page 9
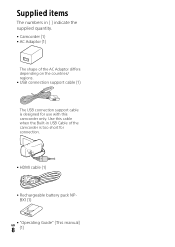
Getting started Charging the battery pack 1 Turn off your camcorder by closing the LCD monitor. 2 Slide the battery cover in the direction of the arrow, and open it back securely. 5 Pull out the Built-in USB Cable. GB 9 Battery pack Battery release lever 4 Close the battery cover and slide it . 3 Insert the battery pack while pressing and holding the battery release lever.
Getting started Charging the battery pack 1 Turn off your camcorder by closing the LCD monitor. 2 Slide the battery cover in the direction of the arrow, and open it back securely. 5 Pull out the Built-in USB Cable. GB 9 Battery pack Battery release lever 4 Close the battery cover and slide it . 3 Insert the battery pack while pressing and holding the battery release lever.
Operating Instructions
Page 10
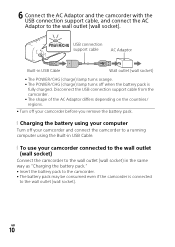
... Connect the AC Adaptor and the camcorder with the USB connection support cable, and connect the AC Adaptor to the camcorder. • The battery pack may be consumed even if the camcorder is fully charged. USB connection support cable AC Adaptor Built-in USB Cable Wall outlet (wall socket...outlet (wall socket) Connect the camcorder to the wall outlet (wall socket) in USB Cable. To use your computer Turn off when the battery pack is connected to the wall outlet (wall socket). Disconnect the USB connection support cable from the camcorder. • The shape of the AC ...
... Connect the AC Adaptor and the camcorder with the USB connection support cable, and connect the AC Adaptor to the camcorder. • The battery pack may be consumed even if the camcorder is fully charged. USB connection support cable AC Adaptor Built-in USB Cable Wall outlet (wall socket...outlet (wall socket) Connect the camcorder to the wall outlet (wall socket) in USB Cable. To use your computer Turn off when the battery pack is connected to the wall outlet (wall socket). Disconnect the USB connection support cable from the camcorder. • The shape of the AC ...
Operating Instructions
Page 13
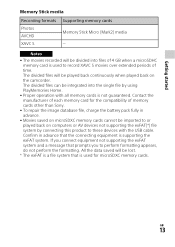
... files will be imported to these devices with all memory cards is used for the compatibility of memory cards other than Sony. • To repair the image database file, charge the battery pack fully in advance that is supporting the exFAT system. The divided files can be integrated into files of time...
... files will be imported to these devices with all memory cards is used for the compatibility of memory cards other than Sony. • To repair the image database file, charge the battery pack fully in advance that is supporting the exFAT system. The divided files can be integrated into files of time...
Operating Instructions
Page 20
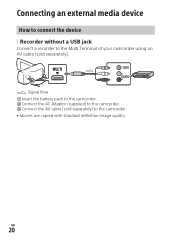
Signal flow Insert the battery pack to the camcorder. Connect the AC Adaptor (supplied) to the camcorder. Connect the AV cable (sold separately) to the Multi Terminal of your camcorder using an AV cable (sold separately). Connecting an external media device How to connect the device Recorder without a USB jack Connect a recorder to the camcorder. • Movies are copied with standard definition image quality. GB 20
Signal flow Insert the battery pack to the camcorder. Connect the AC Adaptor (supplied) to the camcorder. Connect the AV cable (sold separately) to the Multi Terminal of your camcorder using an AV cable (sold separately). Connecting an external media device How to connect the device Recorder without a USB jack Connect a recorder to the camcorder. • Movies are copied with standard definition image quality. GB 20
Operating Instructions
Page 27
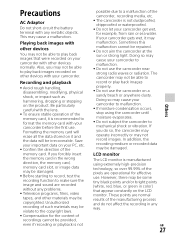
... condensation occurs, stop using extremely high-precision technology, so over 99.99% of the memory card. Others Precautions AC Adaptor Do not short-circuit the battery terminal with your camcorder before the first use. Be particularly careful with the lens. • To ensure stable operation of the camcorder, recording media, etc...
... condensation occurs, stop using extremely high-precision technology, so over 99.99% of the memory card. Others Precautions AC Adaptor Do not short-circuit the battery terminal with your camcorder before the first use. Be particularly careful with the lens. • To ensure stable operation of the camcorder, recording media, etc...

Operating Instructions
Page 28
... monitor before the power turns off and wait until the camcorder and battery temperature goes down. Deactivating wireless LAN (Wi-Fi, NFC, etc.) temporarily (HDR-CX440/PJ410/PJ440) When you board an airplane, you can no longer record movies....battery cool enough, the power may be unable to protect the camcorder. Troubleshooting If you are using a secure wireless LAN to avoid hacking, access by unauthorized access to record movies. Overheat protection Depending on . • Initialize your Sony dealer or local authorized Sony service facility. Wireless LAN (HDR-CX440/ PJ410/PJ440...
... monitor before the power turns off and wait until the camcorder and battery temperature goes down. Deactivating wireless LAN (Wi-Fi, NFC, etc.) temporarily (HDR-CX440/PJ410/PJ440) When you board an airplane, you can no longer record movies....battery cool enough, the power may be unable to protect the camcorder. Troubleshooting If you are using a secure wireless LAN to avoid hacking, access by unauthorized access to record movies. Overheat protection Depending on . • Initialize your Sony dealer or local authorized Sony service facility. Wireless LAN (HDR-CX440/ PJ410/PJ440...

Operating Instructions
Page 30
... the projecting parts 54.0 mm × 59.5 mm × 128.0 mm (2 1/4 in. × 2 3/8 in. × 5 1/8 in.) (w/ h/d) including the projecting parts, and the supplied rechargeable battery pack inserted HDR-PJ410/PJ440: 59.0 mm × 59.5 mm × 128.0 mm (2 3/8 in. × 2 3/8 in. × 5 1/8 in.) (w/h/d) including the projecting parts 59.0 mm × 59.5 mm ×...
... the projecting parts 54.0 mm × 59.5 mm × 128.0 mm (2 1/4 in. × 2 3/8 in. × 5 1/8 in.) (w/ h/d) including the projecting parts, and the supplied rechargeable battery pack inserted HDR-PJ410/PJ440: 59.0 mm × 59.5 mm × 128.0 mm (2 3/8 in. × 2 3/8 in. × 5 1/8 in.) (w/h/d) including the projecting parts 59.0 mm × 59.5 mm ×...

Operating Instructions
Page 31
...charging, recording, and playback using the supplied battery pack HDR-CX405/CX440/CX470 Charging time (minutes) AC Adaptor 155 (supplied) Computer 275 Recording time (minutes) Continuous 115 Typical 55 Playback time (minutes) 210 HDR-PJ410/PJ440 Charging time (minutes) AC Adaptor 155 ... and AVCHD Progressive logotype are trademarks of Panasonic Corporation and Sony Corporation. • XAVC S and are registered trademarks of Sony Corporation. • Memory Stick and are trademarks or registered trademarks of Sony Corporation. • Blu-ray Disc™ and Blu-ray...
...charging, recording, and playback using the supplied battery pack HDR-CX405/CX440/CX470 Charging time (minutes) AC Adaptor 155 (supplied) Computer 275 Recording time (minutes) Continuous 115 Typical 55 Playback time (minutes) 210 HDR-PJ410/PJ440 Charging time (minutes) AC Adaptor 155 ... and AVCHD Progressive logotype are trademarks of Panasonic Corporation and Sony Corporation. • XAVC S and are registered trademarks of Sony Corporation. • Memory Stick and are trademarks or registered trademarks of Sony Corporation. • Blu-ray Disc™ and Blu-ray...

Operating Instructions
Page 34
Tripod receptacle Battery cover (9) Battery release lever Battery pack (9) To fasten the grip belt GB 34
Tripod receptacle Battery cover (9) Battery release lever Battery pack (9) To fasten the grip belt GB 34

Help Guide
Page 2
... using your computer [11] Turning the power on [12] Using this product supplying power from a wall outlet (wall socket) [13] Checking the remaining battery power [14] Initial setup Setting the language, date and time [15] Adjusting the angle of the LCD monitor for easier viewing [16] Displaying items on ...
... using your computer [11] Turning the power on [12] Using this product supplying power from a wall outlet (wall socket) [13] Checking the remaining battery power [14] Initial setup Setting the language, date and time [15] Adjusting the angle of the LCD monitor for easier viewing [16] Displaying items on ...

Help Guide
Page 9
... [149] Charging time/recording time of movies/number of recordable photos Check the charging time Charging time [150] Expected recording and playback times for individual batteries Expected recording time with NP-BX1 [151] Expected playback time with NP-BX1 [152] Expected movie recording time and number of recordable photos for the...
... [149] Charging time/recording time of movies/number of recordable photos Check the charging time Charging time [150] Expected recording and playback times for individual batteries Expected recording time with NP-BX1 [151] Expected playback time with NP-BX1 [152] Expected movie recording time and number of recordable photos for the...

Help Guide
Page 10
... image size of photos Recording pixels and aspect ratio [160] Additional information Precautions About the AVCHD format [161] About the memory card [162] About the battery pack [163] Handling of this product On use and care [164] On connecting to a computer or accessory etc. [165] Notes on optional accessories [166] On...
... image size of photos Recording pixels and aspect ratio [160] Additional information Precautions About the AVCHD format [161] About the memory card [162] About the battery pack [163] Handling of this product On use and care [164] On connecting to a computer or accessory etc. [165] Notes on optional accessories [166] On...

Help Guide
Page 12
... been changed automatically. [181] This product gets warm. [182] A rattling noise is heard when this product is shaken. [183] Intelligent Auto is canceled. [184] Batteries/power sources The power abruptly turns off. [185] The POWER/CHG (charge) lamp does not light while the... battery pack is being charged. [186] The POWER/CHG (charge) lamp flashes while the battery pack is being charged. [187] The remaining battery power is not displayed correctly. [188] The battery pack is quickly discharged. [189] Monitor Menu items are grayed out. ...
... been changed automatically. [181] This product gets warm. [182] A rattling noise is heard when this product is shaken. [183] Intelligent Auto is canceled. [184] Batteries/power sources The power abruptly turns off. [185] The POWER/CHG (charge) lamp does not light while the... battery pack is being charged. [186] The POWER/CHG (charge) lamp flashes while the battery pack is being charged. [187] The remaining battery power is not displayed correctly. [188] The battery pack is quickly discharged. [189] Monitor Menu items are grayed out. ...

Help Guide
Page 19
Battery pack To fasten the grip belt [6] How to Use Before use Screen indicators Screen indicators The following indicators appear when you change the settings. Battery cover 3. Depending on the specifications of the screw must be less than 5.5 mm (7/32 in the proper direction. 2. Battery release lever 4. 1. Tripod receptacle Attach a tripod (sold separately: the length of the tripod, this product may not attach in .)).
Battery pack To fasten the grip belt [6] How to Use Before use Screen indicators Screen indicators The following indicators appear when you change the settings. Battery cover 3. Depending on the specifications of the screw must be less than 5.5 mm (7/32 in the proper direction. 2. Battery release lever 4. 1. Tripod receptacle Attach a tripod (sold separately: the length of the tripod, this product may not attach in .)).


