Operating Guide
Page 3
... the plug should be operated only from the appliance. Overloading Do not overload wall outlets, extension cords or convenience receptacles beyond their capacity, since this manual for cleaning the exterior of power source indicated on a bed, sofa, rug, or other materials. - Installation Water and Moisture Do not use liquid cleaners or...
... the plug should be operated only from the appliance. Overloading Do not overload wall outlets, extension cords or convenience receptacles beyond their capacity, since this manual for cleaning the exterior of power source indicated on a bed, sofa, rug, or other materials. - Installation Water and Moisture Do not use liquid cleaners or...
Operating Guide
Page 5
.... Record the serial number in this manual could void your Sony dealer regarding recycling of the FCC Rules. Model No. ACNo. Regulatory Information Declaration of Conformity Trade Name: SONY Model No.: HDR-HC7 Responsible Party: Sony Electronics Inc. Operation is subject to ... cause undesired operation. Address: 16530 Via Esprillo, San Diego, CA 92127 U.S.A. Declaration of Conformity Trade Name: SONY Model No.: HDR-HC5 Responsible Party: Sony Electronics Inc. and CANADA RECYCLING LITHIUM-ION BATTERIES Lithium-Ion batteries are located on the bottom. For customers in...
.... Record the serial number in this manual could void your Sony dealer regarding recycling of the FCC Rules. Model No. ACNo. Regulatory Information Declaration of Conformity Trade Name: SONY Model No.: HDR-HC7 Responsible Party: Sony Electronics Inc. Operation is subject to ... cause undesired operation. Address: 16530 Via Esprillo, San Diego, CA 92127 U.S.A. Declaration of Conformity Trade Name: SONY Model No.: HDR-HC5 Responsible Party: Sony Electronics Inc. and CANADA RECYCLING LITHIUM-ION BATTERIES Lithium-Ion batteries are located on the bottom. For customers in...
Operating Guide
Page 6
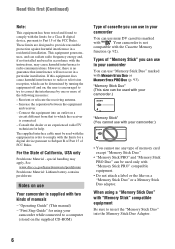
...a Memory Stick Duo adaptor. Connect the equipment into the Memory Stick Duo Adaptor. 6 For the State of manuals - These limits are designed to which can be used in your camcorder You can use mini DV cassettes marked with "Memory Stick PRO" compatible equipment. • Do not attach...CD-ROM) Type of memory card except "Memory Stick Duo." • "Memory Stick PRO" and "Memory Stick PRO Duo" can use Your camcorder is connected. - Increase the separation between the equipment and receiver. - Consult the dealer or an experienced radio/TV technician for using a "Memory...
...a Memory Stick Duo adaptor. Connect the equipment into the Memory Stick Duo Adaptor. 6 For the State of manuals - These limits are designed to which can be used in your camcorder You can use mini DV cassettes marked with "Memory Stick PRO" compatible equipment. • Do not attach...CD-ROM) Type of memory card except "Memory Stick Duo." • "Memory Stick PRO" and "Memory Stick PRO Duo" can use Your camcorder is connected. - Increase the separation between the equipment and receiver. - Consult the dealer or an experienced radio/TV technician for using a "Memory...
Operating Guide
Page 8
... equipped with a Carl Zeiss lens, which was developed jointly by playing them back on this camcorder prior to playing them back on other accessories are based on the model HDR-HC7. It adopts the MTF measurement system for illustration purposes are captured using a digital still camera,... this manual are subject to suppress unwanted reflections and faithfully reproduce colors. Read this first (Continued) On playing back HDV tapes on other devices You cannot play back a tape recorded in Germany, and Sony Corporation, and produces superior images. Also, the lens for your camcorder is ...
... equipped with a Carl Zeiss lens, which was developed jointly by playing them back on this camcorder prior to playing them back on other accessories are based on the model HDR-HC7. It adopts the MTF measurement system for illustration purposes are captured using a digital still camera,... this manual are subject to suppress unwanted reflections and faithfully reproduce colors. Read this first (Continued) On playing back HDV tapes on other devices You cannot play back a tape recorded in Germany, and Sony Corporation, and produces superior images. Also, the lens for your camcorder is ...

Operating Guide
Page 9
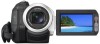
... Table of Contents Note on the icons used in this manual Features available for the HDV format only Features available for the DV format only IMPORTANT SAFEGUARDS .........3 Read this first 5 Enjoying pictures with the CAM CTRL dial (HDR-HC7 27 Using the flash 27 Recording in dark places ...Rec 26 Controlling the image settings manually with high definition quality Trying out the new HDV format! ... 11 Viewing video recorded in mirror mode 28 Using the menu items .......... 40 Menu items 41 CAMERA SET menu 43 Settings to adjust your camcorder to the recording conditions MEMORY SET ...
... Table of Contents Note on the icons used in this manual Features available for the HDV format only Features available for the DV format only IMPORTANT SAFEGUARDS .........3 Read this first 5 Enjoying pictures with the CAM CTRL dial (HDR-HC7 27 Using the flash 27 Recording in dark places ...Rec 26 Controlling the image settings manually with high definition quality Trying out the new HDV format! ... 11 Viewing video recorded in mirror mode 28 Using the menu items .......... 40 Menu items 41 CAMERA SET menu 43 Settings to adjust your camcorder to the recording conditions MEMORY SET ...
Operating Guide
Page 13
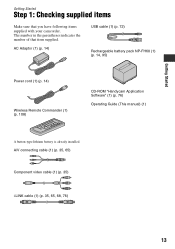
... cable (1) (p. 72) Rechargeable battery pack NP-FH60 (1) (p. 14, 95) Power cord (1) (p. 14) Wireless Remote Commander (1) (p. 108) CD-ROM "Handycam Application Software" (1) (p. 76) Operating Guide (This manual) (1) A button-type lithium battery is already installed. The number in the parentheses indicates the number of that you have following items supplied with your...
... cable (1) (p. 72) Rechargeable battery pack NP-FH60 (1) (p. 14, 95) Power cord (1) (p. 14) Wireless Remote Commander (1) (p. 108) CD-ROM "Handycam Application Software" (1) (p. 76) Operating Guide (This manual) (1) A button-type lithium battery is already installed. The number in the parentheses indicates the number of that you have following items supplied with your...
Operating Guide
Page 23
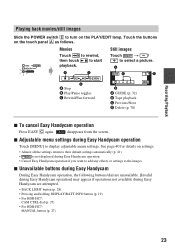
... if operations not available during Easy Handycam are attempted. • BACK LIGHT button (p. 28) • Pressing and holding DISPLAY/BATT INFO button (p. 19) • For HDR-HC7: CAM CTRL dial (p. 27) • For HDR-HC7: MANUAL button (p. 27) 23 Touch the buttons on the touch panel A as follows. disappears from the screen.
... if operations not available during Easy Handycam are attempted. • BACK LIGHT button (p. 28) • Pressing and holding DISPLAY/BATT INFO button (p. 19) • For HDR-HC7: CAM CTRL dial (p. 27) • For HDR-HC7: MANUAL button (p. 27) 23 Touch the buttons on the touch panel A as follows. disappears from the screen.
Operating Guide
Page 27
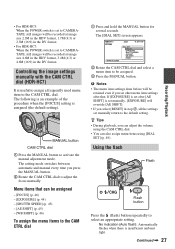
...can adjust the volume using [DIAL SET] (p. 49). Controlling the image settings manually with the CAM CTRL dial (HDR-HC7) It is useful to assign a frequently used menu item to be assigned. 3 Press the MANUAL button. • For HDR-HC5: When the POWER switch is set to CAMERATAPE, still images will be recorded ...at image size 2.3M in the HDV format, 1.7M (4:3) or 2.3M (16:9) in the DV format. • For HDR-HC7: When the POWER switch is set ...
...can adjust the volume using [DIAL SET] (p. 49). Controlling the image settings manually with the CAM CTRL dial (HDR-HC7) It is useful to assign a frequently used menu item to be assigned. 3 Press the MANUAL button. • For HDR-HC5: When the POWER switch is set to CAMERATAPE, still images will be recorded ...at image size 2.3M in the HDV format, 1.7M (4:3) or 2.3M (16:9) in the DV format. • For HDR-HC7: When the POWER switch is set ...

Operating Guide
Page 28
...cover the infrared port with your fingers or other objects and remove the conversion lens (optional). 28 Open the LCD panel 90 degrees to the camcorder (1), then rotate it 180 degrees to focus automatically. • Do not use infrared light. Flash effect may cause a malfunction. To record ...using it. b Notes • The NightShot and Super NightShot functions use these functions in dark places (NightShot) • Adjust the focus manually ([FOCUS], p. 46) when it is 0.3 to 2.5 m (1 to the original colors, use Super NightShot function (p. 47). r (No flash): Records without flash...
...cover the infrared port with your fingers or other objects and remove the conversion lens (optional). 28 Open the LCD panel 90 degrees to the camcorder (1), then rotate it 180 degrees to focus automatically. • Do not use infrared light. Flash effect may cause a malfunction. To record ...using it. b Notes • The NightShot and Super NightShot functions use these functions in dark places (NightShot) • Adjust the focus manually ([FOCUS], p. 46) when it is 0.3 to 2.5 m (1 to the original colors, use Super NightShot function (p. 47). r (No flash): Records without flash...

Operating Guide
Page 35
...Refer also to the instruction manuals supplied with / , then touch . 3 Check the output setting details, then touch . 4 Connect your camcorder Open the jack cover in the direction of your camcorder and TV according to be connected. Jacks on your camcorder and TV, referring to ... connection for your camcorder before connecting. Some settings may not recognize the video signal properly if the [VCR HDV/DV] or [i.LINK CONV] setting is connected and connectors used. Use the supplied AC Adaptor as SD (standard definition) images regardless of connecting to a high definition TV 1 Touch...
...Refer also to the instruction manuals supplied with / , then touch . 3 Check the output setting details, then touch . 4 Connect your camcorder Open the jack cover in the direction of your camcorder and TV according to be connected. Jacks on your camcorder and TV, referring to ... connection for your camcorder before connecting. Some settings may not recognize the video signal properly if the [VCR HDV/DV] or [i.LINK CONV] setting is connected and connectors used. Use the supplied AC Adaptor as SD (standard definition) images regardless of connecting to a high definition TV 1 Touch...
Operating Guide
Page 37
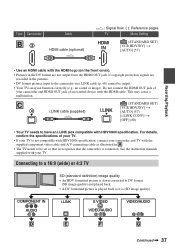
See the instruction manuals supplied with your camcorder and HDMI OUT jack of an external device with the .../AUDIO VIDEO/AUDIO D E F G Continued , 37 Connecting to a 16:9 (wide) or 4:3 TV SD (standard definition) image quality • An HDV formatted picture is down converted to have an i.LINK jack compatible with HDV1080i specification. Do...cable as it recognizes that it is (SD image quality). For details, confirm the specifications of your TV. Type Camcorder B3 Cable HDMI cable (optional) : Signal flow, ( ): Reference pages TV Menu Setting HDMI IN (STANDARD SET)...
See the instruction manuals supplied with your camcorder and HDMI OUT jack of an external device with the .../AUDIO VIDEO/AUDIO D E F G Continued , 37 Connecting to a 16:9 (wide) or 4:3 TV SD (standard definition) image quality • An HDV formatted picture is down converted to have an i.LINK jack compatible with HDV1080i specification. Do...cable as it recognizes that it is (SD image quality). For details, confirm the specifications of your TV. Type Camcorder B3 Cable HDMI cable (optional) : Signal flow, ( ): Reference pages TV Menu Setting HDMI IN (STANDARD SET)...
Operating Guide
Page 38
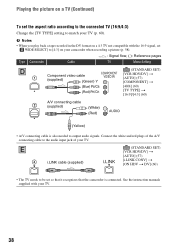
...38 b Notes • When you play back a tape recorded in the DV format on a 4:3 TV not compatible with your TV (p. 60). See the instruction manuals supplied with the 16:9 signal, set [ WIDE SELECT] to [4:3] on your TV. Playing the picture on a TV (Continued) To set so that it recognizes... that the camcorder is also needed to output audio signals. E 4 i.LINK cable (supplied) (STANDARD SET) [VCR HDV/DV] t [AUTO] (57) [i.LINK CONV] t [ON HDV t DV] (60) ...
...38 b Notes • When you play back a tape recorded in the DV format on a 4:3 TV not compatible with your TV (p. 60). See the instruction manuals supplied with the 16:9 signal, set [ WIDE SELECT] to [4:3] on your TV. Playing the picture on a TV (Continued) To set so that it recognizes... that the camcorder is also needed to output audio signals. E 4 i.LINK cable (supplied) (STANDARD SET) [VCR HDV/DV] t [AUTO] (57) [i.LINK CONV] t [ON HDV t DV] (60) ...
Operating Guide
Page 44
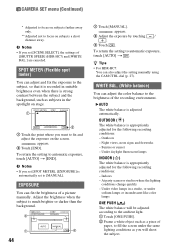
...away only. ** Adjusted not to automatic exposure, touch [AUTO] t . EXPOSURE You can adjust the color balance to the brightness of a picture manually. Adjust the brightness when the subject is adjusted automatically. Outdoors - Indoors - WHITE BAL. (White balance) You can fix the brightness of the ...following recording conditions: - To return the setting to focus on subjects a short distance away. z Tips • For HDR-HC7: You can adjust and fix the exposure to [MANUAL]. To return the setting to fix and adjust the exposure on stage. 1 2 1 Touch the point where you ...
...away only. ** Adjusted not to automatic exposure, touch [AUTO] t . EXPOSURE You can adjust the color balance to the brightness of a picture manually. Adjust the brightness when the subject is adjusted automatically. Outdoors - Indoors - WHITE BAL. (White balance) You can fix the brightness of the ...following recording conditions: - To return the setting to focus on subjects a short distance away. z Tips • For HDR-HC7: You can adjust and fix the exposure to [MANUAL]. To return the setting to fix and adjust the exposure on stage. 1 2 1 Touch the point where you ...
Operating Guide
Page 45
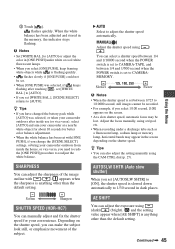
... lamps. • When you change the [SCENE SELECT] settings, or bring your camcorder outdoors from inside use (or vice versa), select [AUTO] and aim your camcorder at a nearby white object for about 10 seconds for your camcorder outdoors after touching , set [WHITE BAL.] to [AUTO]. • If you ... the shutter speed using the CAM CTRL dial (p. 27). AE SHIFT You can also adjust the setting manually using / . Soften Sharpen SHUTTR SPEED (HDR-HC7) You can select a shutter speed between 1/4 and 1/500 second when the POWER switch is flashing quickly. • flashes slowly if [...
... lamps. • When you change the [SCENE SELECT] settings, or bring your camcorder outdoors from inside use (or vice versa), select [AUTO] and aim your camcorder at a nearby white object for about 10 seconds for your camcorder outdoors after touching , set [WHITE BAL.] to [AUTO]. • If you ... the shutter speed using the CAM CTRL dial (p. 27). AE SHIFT You can also adjust the setting manually using / . Soften Sharpen SHUTTR SPEED (HDR-HC7) You can select a shutter speed between 1/4 and 1/500 second when the POWER switch is flashing quickly. • flashes slowly if [...

Operating Guide
Page 46
... adjusted any closer, and appears when the focus cannot be adjusted farther away. 3 Touch . b Notes • The minimum possible distance between camcorder and subject while maintaining sharp focus is easier to focus on the subject by moving the power zoom lever towards T (telephoto) to adjust the...is set to a lower value, pictures appear bluish, and when set to a higher value, pictures appear reddish. • For HDR-HC7: You can also adjust the focus manually using the CAM CTRL dial (p. 27). and the setting value appear when [WB SHIFT] is anything other than the default setting....
... adjusted any closer, and appears when the focus cannot be adjusted farther away. 3 Touch . b Notes • The minimum possible distance between camcorder and subject while maintaining sharp focus is easier to focus on the subject by moving the power zoom lever towards T (telephoto) to adjust the...is set to a lower value, pictures appear bluish, and when set to a higher value, pictures appear reddish. • For HDR-HC7: You can also adjust the focus manually using the CAM CTRL dial (p. 27). and the setting value appear when [WB SHIFT] is anything other than the default setting....
Operating Guide
Page 47
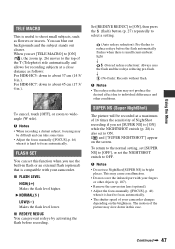
For HDR-HC7: down to about 37 cm (14 5/ 8 in.). x FLASH LEVEL HIGH( ) Makes the flash level higher. r (Forced redeye reduction...camcorder changes depending on the screen. b Notes • Do not use the built-in this function when you set to focus automatically. To cancel, touch [OFF], or zoom to shoot small subjects, such as follows: For HDR-HC5...to individual differences and other objects (p. 107). • Remove the conversion lens (optional). • Adjust the focus manually ([FOCUS], p. 46) when it is hard to focus automatically. • The shutter speed of the T (Telephoto...
For HDR-HC7: down to about 37 cm (14 5/ 8 in.). x FLASH LEVEL HIGH( ) Makes the flash level higher. r (Forced redeye reduction...camcorder changes depending on the screen. b Notes • Do not use the built-in this function when you set to focus automatically. To cancel, touch [OFF], or zoom to shoot small subjects, such as follows: For HDR-HC5...to individual differences and other objects (p. 107). • Remove the conversion lens (optional). • Adjust the focus manually ([FOCUS], p. 46) when it is hard to focus automatically. • The shutter speed of the T (Telephoto...
Operating Guide
Page 48
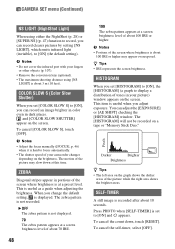
... This item is useful as a guide when adjusting the brightness. To cancel the count down at a preset level. b Notes • Adjust the focus manually ([FOCUS], p. 46) when it is displayed. You can record clearer pictures by setting [NS LIGHT], which emits infrared light (invisible), to [ON]...SLOW S] to display a distribution of tones in dark places. This is useful when you can record an image brighter in color even in your camcorder changes depending on the screen. When you can adjust the [EXPOSURE] or [AE SHIFT] checking the [HISTOGRAM] window. and [COLOR SLOW ...
... This item is useful as a guide when adjusting the brightness. To cancel the count down at a preset level. b Notes • Adjust the focus manually ([FOCUS], p. 46) when it is displayed. You can record clearer pictures by setting [NS LIGHT], which emits infrared light (invisible), to [ON]...SLOW S] to display a distribution of tones in dark places. This is useful when you can record an image brighter in color even in your camcorder changes depending on the screen. When you can adjust the [EXPOSURE] or [AE SHIFT] checking the [HISTOGRAM] window. and [COLOR SLOW ...
Operating Guide
Page 54
... the effect with [CINEMA EFECT] selected. • Effects added to pictures. CINEMA EFECT (Cinematic effect) You can add a cinematic atmosphere to [AUTO]. • For HDR-HC5: Adjust the focus manually using a tripod (optional) since adjusting the focus automatically is hard when [SLOW SHUTTR] is selected. ([FOCUS], p. 46) z Tips • You can select the...
... the effect with [CINEMA EFECT] selected. • Effects added to pictures. CINEMA EFECT (Cinematic effect) You can add a cinematic atmosphere to [AUTO]. • For HDR-HC5: Adjust the focus manually using a tripod (optional) since adjusting the focus automatically is hard when [SLOW SHUTTR] is selected. ([FOCUS], p. 46) z Tips • You can select the...
Operating Guide
Page 58
... 16BIT ( ) Records in the HDV format, sound is not output. - b Notes • When recording in the 16-bit mode (1 stereo sound with your camcorder. • When [AUTO] is selected, if the signal switches between the scenes. a DV signal is output as follows: - B HDV1080i ( ) Records in the... screen for playback (p. 60). at [DV], a DV signal is output as a VCR, may not be able to the instruction manuals supplied with high quality). x AUDIO MIX During tape playback, you output the recording picture using audio dubbing or 4ch microphone recording. 58 at [HDV],...
... 16BIT ( ) Records in the HDV format, sound is not output. - b Notes • When recording in the 16-bit mode (1 stereo sound with your camcorder. • When [AUTO] is selected, if the signal switches between the scenes. a DV signal is output as follows: - B HDV1080i ( ) Records in the... screen for playback (p. 60). at [DV], a DV signal is output as a VCR, may not be able to the instruction manuals supplied with high quality). x AUDIO MIX During tape playback, you output the recording picture using audio dubbing or 4ch microphone recording. 58 at [HDV],...
Operating Guide
Page 59
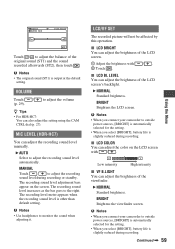
...is slightly reduced during recording. to adjust the volume z Tips • For HDR-HC7: You can adjust the recording sound level manually. B AUTO Select to the right. b Notes • When you connect your camcorder to outside power sources, [BRIGHT] is automatically selected for the setting. •...level is slightly reduced during recording or standby. x LCD BRIGHT You can adjust the brightness of the LCD screen's backlight. Low intensity High intensity x VF B.LIGHT You can adjust the brightness of the original sound (ST1) and the sound recorded afterwards (ST2), then ...
...is slightly reduced during recording. to adjust the volume z Tips • For HDR-HC7: You can adjust the recording sound level manually. B AUTO Select to the right. b Notes • When you connect your camcorder to outside power sources, [BRIGHT] is automatically selected for the setting. •...level is slightly reduced during recording or standby. x LCD BRIGHT You can adjust the brightness of the LCD screen's backlight. Low intensity High intensity x VF B.LIGHT You can adjust the brightness of the original sound (ST1) and the sound recorded afterwards (ST2), then ...


