Operating Guide
Page 6
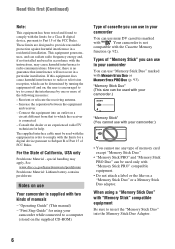
... Perchlorate Material - "First Step Guide" for a Class B digital device, pursuant to Part 15 of FCC Rules. When using your camcorder while connected to a computer (stored on the supplied CD-ROM) Type of the following measures: - Consult the dealer or an experienced radio/TV...like on use "Memory Stick Duo" marked with or (p. 93). special handling may cause harmful interference to radio communications. Your camcorder is not compatible with the instructions, may apply, See www.dtsc.ca.gov/hazardouswaste/perchlorate Perchlorate Material: Lithium battery contains perchlorate...
... Perchlorate Material - "First Step Guide" for a Class B digital device, pursuant to Part 15 of FCC Rules. When using your camcorder while connected to a computer (stored on the supplied CD-ROM) Type of the following measures: - Consult the dealer or an experienced radio/TV...like on use "Memory Stick Duo" marked with or (p. 93). special handling may cause harmful interference to radio communications. Your camcorder is not compatible with the instructions, may apply, See www.dtsc.ca.gov/hazardouswaste/perchlorate Perchlorate Material: Lithium battery contains perchlorate...
Operating Guide
Page 7
...any way. Doing so might cause your recordings on -screen displays in low light conditions, such as at the sun. To view your camcorder to avoid damaging the terminal or cause a malfunction of such materials may be copyrighted. Unauthorized recording of your... not available under the current recording or playback conditions. • The LCD screen and the viewfinder are manufactured using your camcorder" (p. 97). • Before connecting your camcorder to another device with an HDMI cable, component video cable, USB or i.LINK cable, be sure to insert the connector plug the correct ...
...any way. Doing so might cause your recordings on -screen displays in low light conditions, such as at the sun. To view your camcorder to avoid damaging the terminal or cause a malfunction of such materials may be copyrighted. Unauthorized recording of your... not available under the current recording or playback conditions. • The LCD screen and the viewfinder are manufactured using your camcorder" (p. 97). • Before connecting your camcorder to another device with an HDMI cable, component video cable, USB or i.LINK cable, be sure to insert the connector plug the correct ...

Operating Guide
Page 9
... SET menu 43 Settings to adjust your camcorder to the recording conditions MEMORY SET menu 50 Settings for backlit subjects 28 Recording in various modes STANDARD SET menu .........57 Settings while recording on a TV ...........35 Selecting the appropriate connection method (CNNECT GUIDE 35 Connecting to a high definition TV 36 Connecting to a 16:9 (wide) or 4:3 TV 37...
... SET menu 43 Settings to adjust your camcorder to the recording conditions MEMORY SET menu 50 Settings for backlit subjects 28 Recording in various modes STANDARD SET menu .........57 Settings while recording on a TV ...........35 Selecting the appropriate connection method (CNNECT GUIDE 35 Connecting to a high definition TV 36 Connecting to a 16:9 (wide) or 4:3 TV 37...
Operating Guide
Page 11
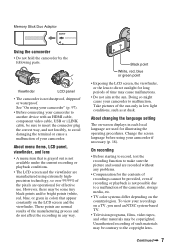
..., your camcorder is connected to a TV or VCR that is a need to SD (standard definition) image quality for the future. Your camcorder's down convert function converts HDV format video to shoot crystal clear, high-definition images. The resulting image is ready to DV for shooting and playing back high definition images on 4:3 aspect ratio TVs when a high definition TV set...
..., your camcorder is connected to a TV or VCR that is a need to SD (standard definition) image quality for the future. Your camcorder's down convert function converts HDV format video to shoot crystal clear, high-definition images. The resulting image is ready to DV for shooting and playing back high definition images on 4:3 aspect ratio TVs when a high definition TV set...

Operating Guide
Page 12
... definition) image quality to the computer. Connecting to a computer (p. 74) Using the supplied software, you to SD (standard definition) image quality for playback on a 16:9 (wide)/4:3 TV (p. 37) Your camcorder can down convert video recorded in the HDV format to copy pictures in HD (high definition)... image quality. Viewing on a conventional TV. Dubbing to VCR or DVD/HDD recorders (p. 65) Connecting to an HDV1080i device A supplied i.LINK ...
... definition) image quality to the computer. Connecting to a computer (p. 74) Using the supplied software, you to SD (standard definition) image quality for playback on a 16:9 (wide)/4:3 TV (p. 37) Your camcorder can down convert video recorded in the HDV format to copy pictures in HD (high definition)... image quality. Viewing on a conventional TV. Dubbing to VCR or DVD/HDD recorders (p. 65) Connecting to an HDV1080i device A supplied i.LINK ...
Operating Guide
Page 13
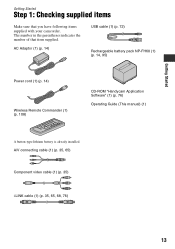
The number in the parentheses indicates the number of that you have following items supplied with your camcorder. A/V connecting cable (1) (p. 35, 65) Component video cable (1) (p. 35) i.LINK cable (1) (p. 35, 65, 68, 76) 13 AC Adaptor (1) (p. 14) USB cable (1) (p. 72) Rechargeable battery pack NP-FH60 (1) (p. ...
The number in the parentheses indicates the number of that you have following items supplied with your camcorder. A/V connecting cable (1) (p. 35, 65) Component video cable (1) (p. 35) i.LINK cable (1) (p. 35, 65, 68, 76) 13 AC Adaptor (1) (p. 14) USB cable (1) (p. 72) Rechargeable battery pack NP-FH60 (1) (p. ...
Operating Guide
Page 14
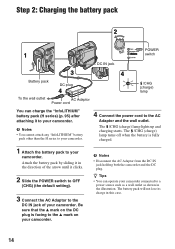
.... 2 Slide the POWER switch to OFF (CHG) (the default setting). 3 Connect the AC Adaptor to a power source such as a wall outlet as shown in this case. 14 Attach the battery pack by sliding it in the direction of your camcorder. Step 2: Charging the battery pack 2 POWER 1 switch DC IN jack 3 ...Battery pack DC plug 4 To the wall outlet AC Adaptor Power cord 4 /CHG (charge) lamp You can operate your camcorder connected to the DC IN jack of the arrow until it to the AC Adaptor and the wall outlet. The battery pack will not lose its...
.... 2 Slide the POWER switch to OFF (CHG) (the default setting). 3 Connect the AC Adaptor to a power source such as a wall outlet as shown in this case. 14 Attach the battery pack by sliding it in the direction of your camcorder. Step 2: Charging the battery pack 2 POWER 1 switch DC IN jack 3 ...Battery pack DC plug 4 To the wall outlet AC Adaptor Power cord 4 /CHG (charge) lamp You can operate your camcorder connected to the DC IN jack of the arrow until it to the AC Adaptor and the wall outlet. The battery pack will not lose its...

Operating Guide
Page 16
... 170 230 245 255 280 525 565 590 635 * When the LCD backlight turns on . HDR-HC5 Battery pack Recorded Format NP-FH50 NP-FH60 (supplied) NP-FH70 NP-FH100 LCD panel LCD panel...pack • Before changing the battery pack, slide the POWER switch to the DC IN jack of your camcorder, even when the power cord is damaged. - Step2: Charging the battery pack (Continued) Battery pack ... fully charged battery pack. The battery pack is disconnected from the battery as long as the AC Adaptor is connected to OFF (CHG). • The /CHG (charge) lamp flashes during charging, or Battery Info (p. 15...
... 170 230 245 255 280 525 565 590 635 * When the LCD backlight turns on . HDR-HC5 Battery pack Recorded Format NP-FH50 NP-FH60 (supplied) NP-FH70 NP-FH100 LCD panel LCD panel...pack • Before changing the battery pack, slide the POWER switch to the DC IN jack of your camcorder, even when the power cord is damaged. - Step2: Charging the battery pack (Continued) Battery pack ... fully charged battery pack. The battery pack is disconnected from the battery as long as the AC Adaptor is connected to OFF (CHG). • The /CHG (charge) lamp flashes during charging, or Battery Info (p. 15...
Operating Guide
Page 17
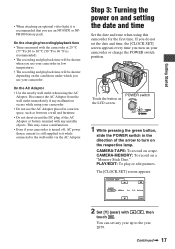
... Use the nearby wall outlet when using this camcorder for the first time. CAMERA-MEMORY: To... using your camcorder. Continued , 17 On the charging/recording/playback time • Times measured with the camcorder at 25... is recommended that you turn on your camcorder is turned off, AC power (house...SET] screen appears every time you use your camcorder. • Do not use the AC Adaptor...may cause a malfunction. • Even if your camcorder or change the POWER switch position. POWER switch Touch...on the conditions under which you use your camcorder in the direction of the AC Adaptor or...
... Use the nearby wall outlet when using this camcorder for the first time. CAMERA-MEMORY: To... using your camcorder. Continued , 17 On the charging/recording/playback time • Times measured with the camcorder at 25... is recommended that you turn on your camcorder is turned off, AC power (house...SET] screen appears every time you use your camcorder. • Do not use the AC Adaptor...may cause a malfunction. • Even if your camcorder or change the POWER switch position. POWER switch Touch...on the conditions under which you use your camcorder in the direction of the AC Adaptor or...

Operating Guide
Page 32
...GUIDE) You can easily select the desired setting screens by using the guide functions (USAGE GUIDE). 60min STBY GUIDE P-MENU Your camcorder has 4 guide functions as shown below. Takes you to the setting screens related to your device. See page 112 for ...the LCD screen. Enables you to the basic operations. Unavailable settings during Easy Handycam During Easy Handycam operation, some items are unavailable. Recommends the appropriate connection method for details. 1 Touch [GUIDE]. 2 Select the desired item. For details, see page 35. e.g., to record night views Touch [SHOOT...
...GUIDE) You can easily select the desired setting screens by using the guide functions (USAGE GUIDE). 60min STBY GUIDE P-MENU Your camcorder has 4 guide functions as shown below. Takes you to the setting screens related to your device. See page 112 for ...the LCD screen. Enables you to the basic operations. Unavailable settings during Easy Handycam During Easy Handycam operation, some items are unavailable. Recommends the appropriate connection method for details. 1 Touch [GUIDE]. 2 Select the desired item. For details, see page 35. e.g., to record night views Touch [SHOOT...

Operating Guide
Page 35
... arrow. Jacks on the screen. Selecting the appropriate connection method (CNNECT GUIDE) Your camcorder helps you select the appropriate connection for your camcorder before connecting. The TV may need to the precautions on connecting. 5 Touch t [END]. Use the supplied AC Adaptor as SD (standard definition) images regardless of connecting to a high definition TV 1 Touch [TV] t [HD TV]. 2 Select the TV...
... arrow. Jacks on the screen. Selecting the appropriate connection method (CNNECT GUIDE) Your camcorder helps you select the appropriate connection for your camcorder before connecting. The TV may need to the precautions on connecting. 5 Touch t [END]. Use the supplied AC Adaptor as SD (standard definition) images regardless of connecting to a high definition TV 1 Touch [TV] t [HD TV]. 2 Select the TV...
Operating Guide
Page 36
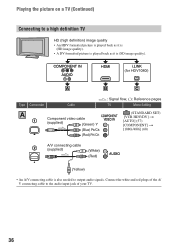
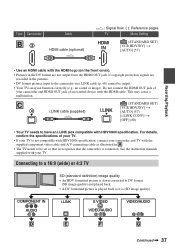
...Connecting to a high definition TV HD (high definition) image quality • An HDV formatted picture is played back as it is (HD image quality). • A DV formatted picture is played back as it is also needed to the audio input jack of your TV. 36 COMPONENT IN AUDIO HDMI i.LINK (for HDV1080i) A B C Type Camcorder... Cable A 1 Component video cable (supplied) (Green) Y (Blue) PB/CB (Red) PR/CR : Signal flow, ( ): Reference pages TV Menu Setting (STANDARD SET) [VCR HDV/DV] t [AUTO] (57) [COMPONENT] t [1080i/480i] (60) 2 A/V connecting cable (supplied)...
...Connecting to a high definition TV HD (high definition) image quality • An HDV formatted picture is played back as it is (HD image quality). • A DV formatted picture is played back as it is also needed to the audio input jack of your TV. 36 COMPONENT IN AUDIO HDMI i.LINK (for HDV1080i) A B C Type Camcorder... Cable A 1 Component video cable (supplied) (Green) Y (Blue) PB/CB (Red) PR/CR : Signal flow, ( ): Reference pages TV Menu Setting (STANDARD SET) [VCR HDV/DV] t [AUTO] (57) [COMPONENT] t [1080i/480i] (60) 2 A/V connecting cable (supplied)...
Operating Guide
Page 37
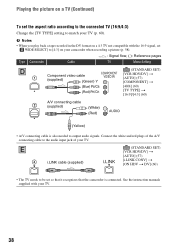
... details, confirm the specifications of an external device with your camcorder and TV with the supplied component video cable and A/V connecting cable as it recognizes that the camcorder is not compatible with HDV1080i specification, connect your TV. Connecting to a 16:9 (wide) or 4:3 TV SD (standard definition) image quality • An HDV formatted picture is (SD image...
... details, confirm the specifications of an external device with your camcorder and TV with the supplied component video cable and A/V connecting cable as it recognizes that the camcorder is not compatible with HDV1080i specification, connect your TV. Connecting to a 16:9 (wide) or 4:3 TV SD (standard definition) image quality • An HDV formatted picture is (SD image...
Operating Guide
Page 38
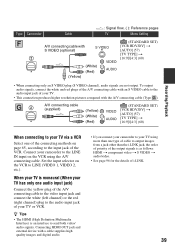
...Continued) To set the aspect ratio according to the connected TV (16:9/4:3) Change the [TV TYPE] setting to output audio signals. See the instruction manuals supplied with the 16:9 signal, set so that it recognizes that the camcorder is also needed to match your TV. 38 ...to be set [ WIDE SELECT] to [4:3] on a 4:3 TV not compatible with your TV (p. 60). Connect the white and red plugs of your camcorder when recording a picture (p. 58). : Signal flow, ( ): Reference pages Type Camcorder Cable TV Menu Setting D 1 Component video cable (supplied) (Green) Y (Blue) PB/CB (Red...
...Continued) To set the aspect ratio according to the connected TV (16:9/4:3) Change the [TV TYPE] setting to output audio signals. See the instruction manuals supplied with the 16:9 signal, set so that it recognizes that the camcorder is also needed to match your TV. 38 ...to be set [ WIDE SELECT] to [4:3] on a 4:3 TV not compatible with your TV (p. 60). Connect the white and red plugs of your camcorder when recording a picture (p. 58). : Signal flow, ( ): Reference pages Type Camcorder Cable TV Menu Setting D 1 Component video cable (supplied) (Green) Y (Blue) PB/CB (Red...
Operating Guide
Page 39
... to the video input jack and connect the white (left channel) or the red (right channel) plug to the audio input jack of your camcorder to the LINE IN input on the VCR to the input jack of i.LINK. 39 z Tips • The HDMI (High Definition Multimedia Interface) is as follows: HDMI t component video...
... to the video input jack and connect the white (left channel) or the red (right channel) plug to the audio input jack of your camcorder to the LINE IN input on the VCR to the input jack of i.LINK. 39 z Tips • The HDMI (High Definition Multimedia Interface) is as follows: HDMI t component video...
Operating Guide
Page 56
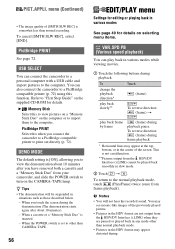
... is somewhat less than normal recording. menu (Continued) • The image quality of the screen. B Memory Stick Select this when you connect the camcorder to a PictBridge compatible printer to other than CAMERA-TAPE. 56 EDIT/PLAY menu Settings for editing or playing back in slow mode. 2 Touch t...output from frame playback). DEMO MODE The default setting is inserted. - PictBridge PRINT See page 72. USB SELECT You can also connect the camcorder to turn on the supplied CD-ROM for details on selecting menu items. VAR.SPD PB (Various speed playback) You can play...
... is somewhat less than normal recording. menu (Continued) • The image quality of the screen. B Memory Stick Select this when you connect the camcorder to a PictBridge compatible printer to other than CAMERA-TAPE. 56 EDIT/PLAY menu Settings for editing or playing back in slow mode. 2 Touch t...output from frame playback). DEMO MODE The default setting is inserted. - PictBridge PRINT See page 72. USB SELECT You can also connect the camcorder to turn on the supplied CD-ROM for details on selecting menu items. VAR.SPD PB (Various speed playback) You can play...
Operating Guide
Page 57
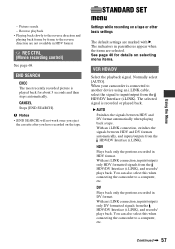
...the reverse direction are selected. HDV Plays back only the portions recorded in DV format. You can also select this when connecting the camcorder to a computer, etc. END SEARCH EXEC The most recently recorded picture is recorded or played back. The indicators in ... when playing back a tape. Picture search - CANCEL Stops [END SEARCH]. You can also select this when connecting the camcorder to a computer, etc. Continued , 57 With an i.LINK connection, inputs/outputs only HDV formatted signals from the HDV/DV Interface (i.LINK), and records/ plays back. b Notes...
...the reverse direction are selected. HDV Plays back only the portions recorded in DV format. You can also select this when connecting the camcorder to a computer, etc. END SEARCH EXEC The most recently recorded picture is recorded or played back. The indicators in ... when playing back a tape. Picture search - CANCEL Stops [END SEARCH]. You can also select this when connecting the camcorder to a computer, etc. Continued , 57 With an i.LINK connection, inputs/outputs only HDV formatted signals from the HDV/DV Interface (i.LINK), and records/ plays back. b Notes...
Operating Guide
Page 58
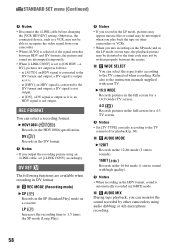
... scenes. at [AUTO], an HDV signal is converted to 1.5 times the SP mode (Long Play). at [HDV], an HDV signal is converted to the TV connected when recording. B HDV1080i ( ) Records in the DV format. x REC MODE (Recording mode) B SP (SP) Records in DV format. Refer also to [ON HDV... t DV], pictures are available when recording in the SP (Standard Play) mode on other camcorders using an i.LINK cable, set to the instruction manuals supplied with high quality). b Notes • When recording in the HDV format, sound is ; at [DV], a DV signal is output...
... scenes. at [AUTO], an HDV signal is converted to 1.5 times the SP mode (Long Play). at [HDV], an HDV signal is converted to the TV connected when recording. B HDV1080i ( ) Records in the DV format. x REC MODE (Recording mode) B SP (SP) Records in DV format. Refer also to [ON HDV... t DV], pictures are available when recording in the SP (Standard Play) mode on other camcorders using an i.LINK cable, set to the instruction manuals supplied with high quality). b Notes • When recording in the HDV format, sound is ; at [DV], a DV signal is output...
Operating Guide
Page 59
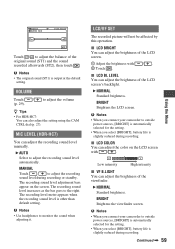
...during recording. x LCD BL LEVEL You can adjust the brightness of the LCD screen's backlight. BRIGHT Brightens the LCD screen. Low intensity High intensity x VF B.LIGHT You can adjust the brightness of the viewfinder. Continued , 59 Using the Menu B AUTO Select to adjust ...The recording level meter appears when the recording sound level is output at the default setting. b Notes • When you connect your camcorder to adjust the volume z Tips • For HDR-HC7: You can adjust the brightness of the original sound (ST1) and the sound recorded afterwards (ST2), then touch ...
...during recording. x LCD BL LEVEL You can adjust the brightness of the LCD screen's backlight. BRIGHT Brightens the LCD screen. Low intensity High intensity x VF B.LIGHT You can adjust the brightness of the viewfinder. Continued , 59 Using the Menu B AUTO Select to adjust ...The recording level meter appears when the recording sound level is output at the default setting. b Notes • When you connect your camcorder to adjust the volume z Tips • For HDR-HC7: You can adjust the brightness of the original sound (ST1) and the sound recorded afterwards (ST2), then touch ...
Operating Guide
Page 60
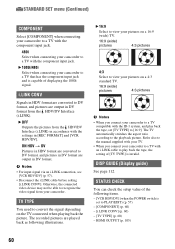
... ratio according to convert the signal depending on a 4:3 standard TV. 16:9 (wide) pictures 4:3 pictures b Notes • When you connect your camcorder. B 1080i/480i Select when connecting your camcorder to a TV compatible with an i.LINK cable to play back the tape, set to [16:9]. HDMI OUTPUT (p. 105) 60 Refer also... to the manual supplied with your TV. • When you connect your camcorder to a TV that has the component input jack and is capable of [TV TYPE] is set [TV TYPE] to PLAY/EDIT) (p. 57) -...
... ratio according to convert the signal depending on a 4:3 standard TV. 16:9 (wide) pictures 4:3 pictures b Notes • When you connect your camcorder. B 1080i/480i Select when connecting your camcorder to a TV compatible with an i.LINK cable to play back the tape, set to [16:9]. HDMI OUTPUT (p. 105) 60 Refer also... to the manual supplied with your TV. • When you connect your camcorder to a TV that has the component input jack and is capable of [TV TYPE] is set [TV TYPE] to PLAY/EDIT) (p. 57) -...


