Operating Guide
Page 6
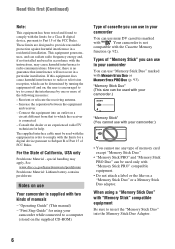
...) Type of memory card except "Memory Stick Duo." • "Memory Stick PRO" and "Memory Stick PRO Duo" can be used with your camcorder.) "Memory Stick" (You cannot use "Memory Stick Duo" marked with or (p. 93). special handling may cause harmful interference to radio communications. ..."Operating Guide" (This manual) - These limits are designed to provide reasonable protection against harmful interference in your camcorder You can be used only with "Memory Stick PRO" compatible equipment. • Do not attach a label or the like on use...
...) Type of memory card except "Memory Stick Duo." • "Memory Stick PRO" and "Memory Stick PRO Duo" can be used with your camcorder.) "Memory Stick" (You cannot use "Memory Stick Duo" marked with or (p. 93). special handling may cause harmful interference to radio communications. ..."Operating Guide" (This manual) - These limits are designed to provide reasonable protection against harmful interference in your camcorder You can be used only with "Memory Stick PRO" compatible equipment. • Do not attach a label or the like on use...
Operating Guide
Page 7
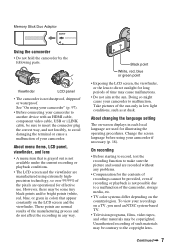
...may be sure to insert the connector plug the correct way, and not forcibly, to avoid damaging the terminal or cause a malfunction of your camcorder to another device with an HDMI cable, component video cable, USB or i.LINK cable, be some tiny black points and/or bright points ...on -screen displays in each local language are normal results of the sun only in any problems. • Compensation for long periods of the camcorder, storage media, etc. • TV color systems differ depending on the country/region. Change the screen language before using extremely highprecision technology, ...
...may be sure to insert the connector plug the correct way, and not forcibly, to avoid damaging the terminal or cause a malfunction of your camcorder to another device with an HDMI cable, component video cable, USB or i.LINK cable, be some tiny black points and/or bright points ...on -screen displays in each local language are normal results of the sun only in any problems. • Compensation for long periods of the camcorder, storage media, etc. • TV color systems differ depending on the country/region. Change the screen language before using extremely highprecision technology, ...
Operating Guide
Page 8
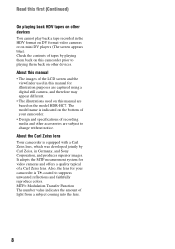
...; Design and specifications of your camcorder is equipped with a Carl Zeiss lens, which was developed jointly by playing them back on other devices You cannot play back a tape recorded in Germany, and Sony Corporation, and produces superior images. MTF= Modulation Transfer Function The number value indicates the amount of a ...by Carl Zeiss, in the HDV format on DV format video cameras or on other devices. Read this manual are based on the model HDR-HC7. Check the contents of the LCD screen and the viewfinder used on this first (Continued) On playing back HDV tapes on mini DV...
...; Design and specifications of your camcorder is equipped with a Carl Zeiss lens, which was developed jointly by playing them back on other devices You cannot play back a tape recorded in Germany, and Sony Corporation, and produces superior images. MTF= Modulation Transfer Function The number value indicates the amount of a ...by Carl Zeiss, in the HDV format on DV format video cameras or on other devices. Read this manual are based on the model HDR-HC7. Check the contents of the LCD screen and the viewfinder used on this first (Continued) On playing back HDV tapes on mini DV...

Operating Guide
Page 9
...manual Features available for the HDV format only Features available for the DV format only IMPORTANT SAFEGUARDS .........3 Read this first 5 Enjoying pictures with high definition quality Trying out the new HDV format! ... 11 Viewing video recorded in the HDV format 12 Getting Started Step 1: Checking supplied items 13...CTRL dial (HDR-HC7 27 Using the flash 27 Recording in dark places (NightShot 28 Adjusting the exposure for backlit subjects 28 Recording in mirror mode 28 Using the menu items .......... 40 Menu items 41 CAMERA SET menu 43 Settings to adjust your camcorder to the ...
...manual Features available for the HDV format only Features available for the DV format only IMPORTANT SAFEGUARDS .........3 Read this first 5 Enjoying pictures with high definition quality Trying out the new HDV format! ... 11 Viewing video recorded in the HDV format 12 Getting Started Step 1: Checking supplied items 13...CTRL dial (HDR-HC7 27 Using the flash 27 Recording in dark places (NightShot 28 Adjusting the exposure for backlit subjects 28 Recording in mirror mode 28 Using the menu items .......... 40 Menu items 41 CAMERA SET menu 43 Settings to adjust your camcorder to the ...
Operating Guide
Page 10
...First Step Guide 78 Using a Macintosh computer ........ 78 Troubleshooting Troubleshooting 79 Warning indicators and messages 88 Additional Information Using your camcorder abroad ...... 91 Maintenance and precautions ...... 92 Usable cassette tapes 92 About the "Memory Stick 93 About the "InfoLITHIUM" ...battery pack 95 About i.LINK 96 About x.v.Color 97 On using your camcorder 97 Specifications 100 Quick Reference Identifying parts and controls ..... 105 Indicators displayed during recording/ playback 109 Index 113 Spanish Quick ...
...First Step Guide 78 Using a Macintosh computer ........ 78 Troubleshooting Troubleshooting 79 Warning indicators and messages 88 Additional Information Using your camcorder abroad ...... 91 Maintenance and precautions ...... 92 Usable cassette tapes 92 About the "Memory Stick 93 About the "InfoLITHIUM" ...battery pack 95 About i.LINK 96 About x.v.Color 97 On using your camcorder 97 Specifications 100 Quick Reference Identifying parts and controls ..... 105 Indicators displayed during recording/ playback 109 Index 113 Spanish Quick ...
Operating Guide
Page 11
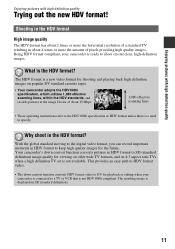
... specification as HDV format unless there is not HDV1080i compliant. Your camcorder's down convert function converts HDV format video to specify. Enjoying pictures with high definition quality Enjoying pictures with high definition quality Trying out the new HDV format! The HDV format is not...TV resulting in HDV format to SD (standard definition) image quality for playback or editing when your camcorder is ready to keep high quality images for shooting and playing back high definition images on 4:3 aspect ratio TVs when a high definition TV set is a new video format for ...
... specification as HDV format unless there is not HDV1080i compliant. Your camcorder's down convert function converts HDV format video to specify. Enjoying pictures with high definition quality Enjoying pictures with high definition quality Trying out the new HDV format! The HDV format is not...TV resulting in HDV format to SD (standard definition) image quality for playback or editing when your camcorder is ready to keep high quality images for shooting and playing back high definition images on 4:3 aspect ratio TVs when a high definition TV set is a new video format for ...

Operating Guide
Page 12
...to an HDV1080i non-compliant device Your camcorder can also edit the imported movies and create a DVD-video in HD (high definition) image quality. Connecting to a computer (p. 74) Using the supplied software, you to copy pictures in SD (standard definition) image quality. 12 You can ...HDV1080i compliant TVs, see page 35. Viewing on a 16:9 (wide)/4:3 TV (p. 37) Your camcorder can be played back as crisp HD (high definition) pictures on a high definition TV. • For details on a high definition TV (p. 35) Pictures recorded in the HDV format can down convert HDV format video to SD...
...to an HDV1080i non-compliant device Your camcorder can also edit the imported movies and create a DVD-video in HD (high definition) image quality. Connecting to a computer (p. 74) Using the supplied software, you to copy pictures in SD (standard definition) image quality. 12 You can ...HDV1080i compliant TVs, see page 35. Viewing on a 16:9 (wide)/4:3 TV (p. 37) Your camcorder can be played back as crisp HD (high definition) pictures on a high definition TV. • For details on a high definition TV (p. 35) Pictures recorded in the HDV format can down convert HDV format video to SD...
Operating Guide
Page 13
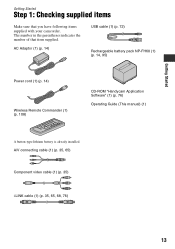
The number in the parentheses indicates the number of that you have following items supplied with your camcorder. AC Adaptor (1) (p. 14) USB cable (1) (p. 72) Rechargeable battery pack NP-FH60 (1) (p. 14, 95) Power cord (1) (p. 14) Wireless Remote Commander (1) (p. 108) CD-ROM "Handycam Application Software" (1) (p. ...
The number in the parentheses indicates the number of that you have following items supplied with your camcorder. AC Adaptor (1) (p. 14) USB cable (1) (p. 72) Rechargeable battery pack NP-FH60 (1) (p. 14, 95) Power cord (1) (p. 14) Wireless Remote Commander (1) (p. 108) CD-ROM "Handycam Application Software" (1) (p. ...
Operating Guide
Page 14
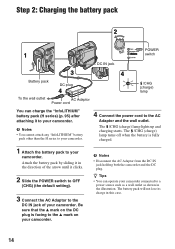
...the default setting). 3 Connect the AC Adaptor to the DC IN jack of the arrow until it to your camcorder. Attach the battery pack by sliding it in the direction of your camcorder connected to a power source such as a wall outlet as shown in this case. 14 The battery pack will...the v mark on the DC plug is fully charged. 1 Attach the battery pack to your camcorder. 4 Connect the power cord to your camcorder. b Notes • Disconnect the AC Adaptor from the DC IN jack holding both the camcorder and the DC plug. Step 2: Charging the battery pack 2 POWER 1 switch DC IN ...
...the default setting). 3 Connect the AC Adaptor to the DC IN jack of the arrow until it to your camcorder. Attach the battery pack by sliding it in the direction of your camcorder connected to a power source such as a wall outlet as shown in this case. 14 The battery pack will...the v mark on the DC plug is fully charged. 1 Attach the battery pack to your camcorder. 4 Connect the power cord to your camcorder. b Notes • Disconnect the AC Adaptor from the DC IN jack holding both the camcorder and the DC plug. Step 2: Charging the battery pack 2 POWER 1 switch DC IN ...

Operating Guide
Page 16
...HDR-HC5 Battery pack Recorded Format NP-FH50 NP-FH60 (supplied) NP-FH70 NP-FH100 LCD panel LCD panel opened* closed HDV DV HDV DV 110 120 125 135 145 160 165 180 235 255 270 290 545 590 615 660 HDR...be supplied from the battery as long as the AC Adaptor is connected to the DC IN jack of your camcorder, even when the power cord is closed HDV DV HDV DV 105 115 120 130 140 150 160 170 230...175 190 95 105 180 195 95 105 385 415 210 225 405 440 220 240 415 450 225 245 HDR-HC7 Battery pack Recording Format NP-FH50 NP-FH60 (supplied) NP-FH70 NP-FH100 Continuous Typical recording recording time...
...HDR-HC5 Battery pack Recorded Format NP-FH50 NP-FH60 (supplied) NP-FH70 NP-FH100 LCD panel LCD panel opened* closed HDV DV HDV DV 110 120 125 135 145 160 165 180 235 255 270 290 545 590 615 660 HDR...be supplied from the battery as long as the AC Adaptor is connected to the DC IN jack of your camcorder, even when the power cord is closed HDV DV HDV DV 105 115 120 130 140 150 160 170 230...175 190 95 105 180 195 95 105 385 415 210 225 405 440 220 240 415 450 225 245 HDR-HC7 Battery pack Recording Format NP-FH50 NP-FH60 (supplied) NP-FH70 NP-FH100 Continuous Typical recording recording time...
Operating Guide
Page 17
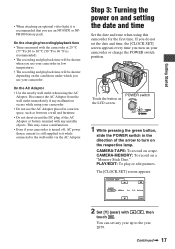
... to the wall outlet via the AC Adaptor. CAMERA-TAPE: To record on the respective lamp. This may cause a malfunction. • Even if your camcorder. • Do not use the AC Adaptor placed in low temperatures. • The recording and playback time will be shorter depending on and setting the... [CLOCK SET] screen appears. On the charging/recording/playback time • Times measured with any year up to it is recommended that you use your camcorder in a narrow space, such as between a wall and furniture. • Do not short-circuit the DC plug of the arrow to turn on a "...
... to the wall outlet via the AC Adaptor. CAMERA-TAPE: To record on the respective lamp. This may cause a malfunction. • Even if your camcorder. • Do not use the AC Adaptor placed in low temperatures. • The recording and playback time will be shorter depending on and setting the... [CLOCK SET] screen appears. On the charging/recording/playback time • Times measured with any year up to it is recommended that you use your camcorder in a narrow space, such as between a wall and furniture. • Do not short-circuit the DC plug of the arrow to turn on a "...
Operating Guide
Page 18
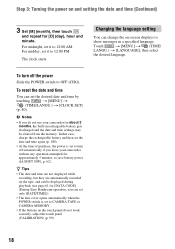
...z Tips • The date and time are not displayed while recording, but they are automatically recorded on the touch panel do not use your camcorder without any operation attempted for [DATA CODE] (During Easy Handycam operation, you can set only [DATE/TIME])). • The lens cover opens automatically... time settings may be displayed during playback (see page 61 for approximately 5 minutes, to 12:00 PM. b Notes • If you leave your camcorder for [D] (day), hour and minute. Changing the language setting You can set it to save battery power ([A.SHUT OFF], p. 62). To reset the...
...z Tips • The date and time are not displayed while recording, but they are automatically recorded on the touch panel do not use your camcorder without any operation attempted for [DATA CODE] (During Easy Handycam operation, you can set only [DATE/TIME])). • The lens cover opens automatically... time settings may be displayed during playback (see page 61 for approximately 5 minutes, to 12:00 PM. b Notes • If you leave your camcorder for [D] (day), hour and minute. Changing the language setting You can set it to save battery power ([A.SHUT OFF], p. 62). To reset the...
Operating Guide
Page 19
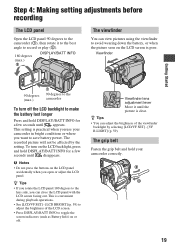
... will not be affected by selecting [LCD/VF SET] - [VF B.LIGHT] (p. 59). Viewfinder Getting Started 90 degrees (max.) 1 90 degrees to the camcorder To turn on the LCD panel accidentally when you can close the LCD panel with the LCD screen facing out. Step 4: Making setting adjustments before... recording The LCD panel Open the LCD panel 90 degrees to the camcorder (1), then rotate it until the picture is convenient during playback operations. • See [LCD/VF SET] - [LCD BRIGHT] (p. 59) to ...
... will not be affected by selecting [LCD/VF SET] - [VF B.LIGHT] (p. 59). Viewfinder Getting Started 90 degrees (max.) 1 90 degrees to the camcorder To turn on the LCD panel accidentally when you can close the LCD panel with the LCD screen facing out. Step 4: Making setting adjustments before... recording The LCD panel Open the LCD panel 90 degrees to the camcorder (1), then rotate it until the picture is convenient during playback operations. • See [LCD/VF SET] - [LCD BRIGHT] (p. 59) to ...
Operating Guide
Page 21
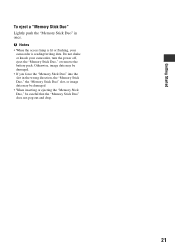
... damaged. • If you force the "Memory Stick Duo" into the slot in once. b Notes • When the access lamp is lit or flashing, your camcorder, turn the power off, eject the "Memory Stick Duo," or remove the battery pack. Do not shake or knock your...
... damaged. • If you force the "Memory Stick Duo" into the slot in once. b Notes • When the access lamp is lit or flashing, your camcorder, turn the power off, eject the "Memory Stick Duo," or remove the battery pack. Do not shake or knock your...
Operating Guide
Page 26
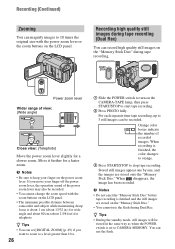
...; You cannot change the zoom speed with the power zoom lever or the zoom buttons on the LCD panel. Recording high quality still images during tape recording (Dual Rec) You can record high quality still images on the "Memory Stick Duo" during Dual Rec. Orange color boxes indicate the number of recorded...) Zooming You can magnify images to 10 times the original size with the zoom buttons on the LCD panel. • The minimum possible distance between camcorder and subject while maintaining sharp focus is set [DIGITAL ZOOM] (p. 49) if you move your finger on the power zoom lever.
...; You cannot change the zoom speed with the power zoom lever or the zoom buttons on the LCD panel. Recording high quality still images during tape recording (Dual Rec) You can record high quality still images on the "Memory Stick Duo" during Dual Rec. Orange color boxes indicate the number of recorded...) Zooming You can magnify images to 10 times the original size with the zoom buttons on the LCD panel. • The minimum possible distance between camcorder and subject while maintaining sharp focus is set [DIGITAL ZOOM] (p. 49) if you move your finger on the power zoom lever.

Operating Guide
Page 28
... cover the infrared port with your fingers or other objects and remove the conversion lens (optional). 28 Open the LCD panel 90 degrees to the camcorder (1), then rotate it takes a while to ON ( and ["NIGHTSHOT"] appear). Recording in flash is hard to the lens side (2). b Notes • The recommended distance to...
... cover the infrared port with your fingers or other objects and remove the conversion lens (optional). 28 Open the LCD panel 90 degrees to the camcorder (1), then rotate it takes a while to ON ( and ["NIGHTSHOT"] appear). Recording in flash is hard to the lens side (2). b Notes • The recommended distance to...

Operating Guide
Page 32
... the guide functions (USAGE GUIDE) You can easily select the desired setting screens by using the guide functions (USAGE GUIDE). 60min STBY GUIDE P-MENU Your camcorder has 4 guide functions as shown below. e.g., to record night views Touch [SHOOT GUIDE] t [SELECT SCENE] t / to recording. Unavailable settings during Easy Handycam During Easy Handycam...
... the guide functions (USAGE GUIDE) You can easily select the desired setting screens by using the guide functions (USAGE GUIDE). 60min STBY GUIDE P-MENU Your camcorder has 4 guide functions as shown below. e.g., to record night views Touch [SHOOT GUIDE] t [SELECT SCENE] t / to recording. Unavailable settings during Easy Handycam During Easy Handycam...
Operating Guide
Page 33
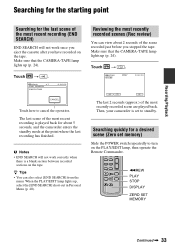
... for about 2 seconds of the scene recorded just before you have recorded on the tape. z Tips • You can view about 5 seconds, and the camcorder enters the standby mode at the point where the last recording has finished. Touch t . 6 0 min STBY 0:00:00 The last 2 seconds (approx.)... sections on the tape. When the PLAY/EDIT lamp lights up (p. 24). Make sure that the CAMERA-TAPE lamp lights up (p. 24). Then, your camcorder is set memory) Slide the POWER switch repeatedly to cancel the operation. Touch t . 6 0 min 1 END SEARCH EXECUTING 0:00:00 CANCEL Touch here...
... for about 2 seconds of the scene recorded just before you have recorded on the tape. z Tips • You can view about 5 seconds, and the camcorder enters the standby mode at the point where the last recording has finished. Touch t . 6 0 min STBY 0:00:00 The last 2 seconds (approx.)... sections on the tape. When the PLAY/EDIT lamp lights up (p. 24). Make sure that the CAMERA-TAPE lamp lights up (p. 24). Then, your camcorder is set memory) Slide the POWER switch repeatedly to cancel the operation. Touch t . 6 0 min 1 END SEARCH EXECUTING 0:00:00 CANCEL Touch here...

Operating Guide
Page 35
Jacks on connecting. 5 Touch t [END]. Selecting the appropriate connection method (CNNECT GUIDE) Your camcorder helps you select the appropriate connection for your device. An example of connecting to a high definition TV 1 Touch [TV] t [HD TV]. 2 Select the TV input jacks with the device to be adjusted on... the screen. Use the supplied AC Adaptor as SD (standard definition) images regardless of the arrow. Some settings may...
Jacks on connecting. 5 Touch t [END]. Selecting the appropriate connection method (CNNECT GUIDE) Your camcorder helps you select the appropriate connection for your device. An example of connecting to a high definition TV 1 Touch [TV] t [HD TV]. 2 Select the TV input jacks with the device to be adjusted on... the screen. Use the supplied AC Adaptor as SD (standard definition) images regardless of the arrow. Some settings may...
Operating Guide
Page 36
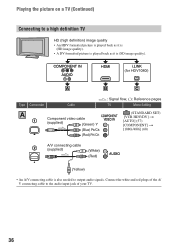
... the white and red plugs of the A/ V connecting cable to output audio signals. COMPONENT IN AUDIO HDMI i.LINK (for HDV1080i) A B C Type Camcorder Cable A 1 Component video cable (supplied) (Green) Y (Blue) PB/CB (Red) PR/CR : Signal flow, ( ): Reference pages TV Menu...White) (Red) (Yellow) • An A/V connecting cable is (SD image quality). Playing the picture on a TV (Continued) Connecting to a high definition TV HD (high definition) image quality • An HDV formatted picture is played back as it is (HD image quality). • A DV formatted picture is played ...
... the white and red plugs of the A/ V connecting cable to output audio signals. COMPONENT IN AUDIO HDMI i.LINK (for HDV1080i) A B C Type Camcorder Cable A 1 Component video cable (supplied) (Green) Y (Blue) PB/CB (Red) PR/CR : Signal flow, ( ): Reference pages TV Menu...White) (Red) (Yellow) • An A/V connecting cable is (SD image quality). Playing the picture on a TV (Continued) Connecting to a high definition TV HD (high definition) image quality • An HDV formatted picture is played back as it is (HD image quality). • A DV formatted picture is played ...


