
Operating Guide
Page 6
... charger or a device that can help preserve our environment by Sony. Dispose of used battery packs promptly as between a wall and furniture. Use the nearby wall outlet (wall socket) when using your camcorder is turned off, AC power source (mains) is mishandled, the battery pack can ...mains lead) The power cord (mains lead) is designed specifically for future reference. Read this first Before operating the unit, please read this camcorder only, and should not be used with other electrical equipment. Observe the following cautions. Do not disassemble. Do not ...
... charger or a device that can help preserve our environment by Sony. Dispose of used battery packs promptly as between a wall and furniture. Use the nearby wall outlet (wall socket) when using your camcorder is turned off, AC power source (mains) is mishandled, the battery pack can ...mains lead) The power cord (mains lead) is designed specifically for future reference. Read this first Before operating the unit, please read this camcorder only, and should not be used with other electrical equipment. Observe the following cautions. Do not disassemble. Do not ...
Operating Guide
Page 8
...58320; Do not do not close the LCD panel. However, there is no guarantee that has been recorded may be lost . Use the camcorder in accordance with local regulations. Notes on -screen displays in each local language are used for a digital device pursuant to Subpart B of Part 15 ... be determined by turning the equipment off and on, the user is encouraged to try to correct the interference by one or more of the camcorder, recording media, etc. TV color systems differ depending on the country/region. On recording Before starting to record, test the ...
...58320; Do not do not close the LCD panel. However, there is no guarantee that has been recorded may be lost . Use the camcorder in accordance with local regulations. Notes on -screen displays in each local language are used for a digital device pursuant to Subpart B of Part 15 ... be determined by turning the equipment off and on, the user is encouraged to try to correct the interference by one or more of the camcorder, recording media, etc. TV color systems differ depending on the country/region. On recording Before starting to record, test the ...
Operating Guide
Page 9
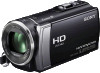
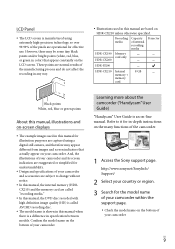
...the model name on the LCD screen. Learning more about the camcorder ("Handycam" User Guide) "Handycam" User Guide is a difference in color) that actually appear on HDR-CX210 unless otherwise specified. LCD Panel The LCD screen ...camcorder. http://www.sony.net/SonyInfo/ Support/ 2 Select your country or region. 3 Search for the model name of your camcorder within the support page. Check the model name on the bottom of internal recording media Projector HDR-CX190 Memory card only HDR-CX200 HDR-PJ200 HDR-CX210...
...the model name on the LCD screen. Learning more about the camcorder ("Handycam" User Guide) "Handycam" User Guide is a difference in color) that actually appear on HDR-CX210 unless otherwise specified. LCD Panel The LCD screen ...camcorder. http://www.sony.net/SonyInfo/ Support/ 2 Select your country or region. 3 Search for the model name of your camcorder within the support page. Check the model name on the bottom of internal recording media Projector HDR-CX190 Memory card only HDR-CX200 HDR-PJ200 HDR-CX210...
Operating Guide
Page 11
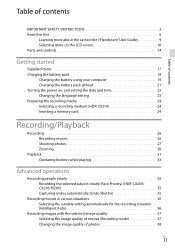
Table of contents Table of contents IMPORTANT SAFETY INSTRUCTIONS 3 Read this first 6 Learning more about the camcorder ("Handycam" User Guide 9 Selecting items on the LCD screen 10 Parts and controls 14 Getting started Supplied Items 17 Charging the battery pack... the power on, and setting the date and time 22 Changing the language setting 23 Preparing the recording media 24 Selecting a recording medium (HDR-CX210 24 Inserting a memory card 24 Recording/Playback Recording 26 Recording movies 26 Shooting photos 27 Zooming 30 Playback 31 Operating buttons while playing 33 ...
Table of contents Table of contents IMPORTANT SAFETY INSTRUCTIONS 3 Read this first 6 Learning more about the camcorder ("Handycam" User Guide 9 Selecting items on the LCD screen 10 Parts and controls 14 Getting started Supplied Items 17 Charging the battery pack... the power on, and setting the date and time 22 Changing the language setting 23 Preparing the recording media 24 Selecting a recording medium (HDR-CX210 24 Inserting a memory card 24 Recording/Playback Recording 26 Recording movies 26 Shooting photos 27 Zooming 30 Playback 31 Operating buttons while playing 33 ...
Operating Guide
Page 12
... the data format to STD image quality (Highlight Movie 40 Playing images on a TV 41 Using the built-in projector (HDR-PJ200 43 Editing Editing on your camcorder 45 Deleting movies and photos 45 Dividing a movie 45 Capturing a photo from a movie 46 Saving movies and photos with ...a computer Useful functions available when connecting the camcorder to your computer.. . . . 47 For Windows 47 For Mac 47 Preparing a computer (Windows 48 Step 1 Checking the computer system 48 Step 2...
... the data format to STD image quality (Highlight Movie 40 Playing images on a TV 41 Using the built-in projector (HDR-PJ200 43 Editing Editing on your camcorder 45 Deleting movies and photos 45 Dividing a movie 45 Capturing a photo from a movie 46 Saving movies and photos with ...a computer Useful functions available when connecting the camcorder to your computer.. . . . 47 For Windows 47 For Mac 47 Preparing a computer (Windows 48 Step 1 Checking the computer system 48 Step 2...
Operating Guide
Page 13
Table of contents Customizing your camcorder Using menus 59 Menu lists 61 Others/Index Troubleshooting 64 Self-diagnosis display/Warning indicators 66 Recording time of movies/number of recordable photos 67 Expected time of recording and playback with each battery pack 67 Expected recording time of movies 67 Expected number of recordable photos 68 About handling of your camcorder 69 Specifications 73 Screen indicators 76 Index 78 US 13
Table of contents Customizing your camcorder Using menus 59 Menu lists 61 Others/Index Troubleshooting 64 Self-diagnosis display/Warning indicators 66 Recording time of movies/number of recordable photos 67 Expected time of recording and playback with each battery pack 67 Expected recording time of movies 67 Expected number of recordable photos 68 About handling of your camcorder 69 Specifications 73 Screen indicators 76 Index 78 US 13
Operating Guide
Page 17
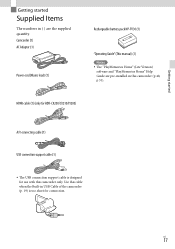
US 17 HDMI cable (1) (only for HDR-CX200/CX210/PJ200) A/V connecting cable (1) USB connection support cable (1) The USB connection support cable is too short for use with this camcorder (p 48, p 51). Use this cable when the Built-in this camcorder only. Camcorder (1) AC Adaptor (1) Power cord (Mains lead) (1) Rechargeable battery pack NP-FV30 (1) "Operating ..."PlayMemories Home" Help Guide are the supplied quantity. Getting started Getting started Supplied Items The numbers in ( ) are pre-installed in USB Cable of the camcorder (p. 19) is designed for connection.
US 17 HDMI cable (1) (only for HDR-CX200/CX210/PJ200) A/V connecting cable (1) USB connection support cable (1) The USB connection support cable is too short for use with this camcorder (p 48, p 51). Use this cable when the Built-in this camcorder only. Camcorder (1) AC Adaptor (1) Power cord (Mains lead) (1) Rechargeable battery pack NP-FV30 (1) "Operating ..."PlayMemories Home" Help Guide are the supplied quantity. Getting started Getting started Supplied Items The numbers in ( ) are pre-installed in USB Cable of the camcorder (p. 19) is designed for connection.
Operating Guide
Page 18
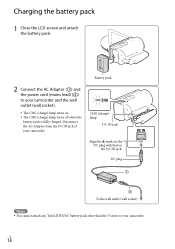
... To the wall outlet (wall socket) Notes You cannot attach any "InfoLITHIUM" battery pack other than the V series to your camcorder and the wall outlet (wall socket). The CHG (charge) lamp turns on the DC IN jack. Disconnect the AC Adaptor from the DC IN ...jack of your camcorder. Battery pack 2 Connect the AC Adaptor () and the power cord (mains lead) () to your camcorder. Charging the battery pack 1 Close the LCD screen and attach the battery pack. CHG (charge)...
... To the wall outlet (wall socket) Notes You cannot attach any "InfoLITHIUM" battery pack other than the V series to your camcorder and the wall outlet (wall socket). The CHG (charge) lamp turns on the DC IN jack. Disconnect the AC Adaptor from the DC IN ...jack of your camcorder. Battery pack 2 Connect the AC Adaptor () and the power cord (mains lead) () to your camcorder. Charging the battery pack 1 Close the LCD screen and attach the battery pack. CHG (charge)...
Operating Guide
Page 19
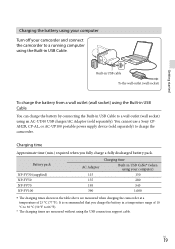
... cannot use a Sony CPAH2R, CP-AL, or AC-UP100 portable power supply device (sold separately). Battery pack NP-FV30 (supplied) NP-FV50 NP-FV70 NP-FV100 AC Adaptor 115 155 195 390 Charging time Built-in USB Cable* (when using your camcorder and connect the camcorder to a running ...outlet (wall socket) using an AC-UD10 USB charger/AC Adaptor (sold separately) to 86 °F). * The charging times are measured when charging the camcorder at a temperature of 25 °C (77 °F). It is recommended that you fully charge a fully discharged battery pack. Getting started Charging the ...
... cannot use a Sony CPAH2R, CP-AL, or AC-UP100 portable power supply device (sold separately). Battery pack NP-FV30 (supplied) NP-FV50 NP-FV70 NP-FV100 AC Adaptor 115 155 195 390 Charging time Built-in USB Cable* (when using your camcorder and connect the camcorder to a running ...outlet (wall socket) using an AC-UD10 USB charger/AC Adaptor (sold separately) to 86 °F). * The charging times are measured when charging the camcorder at a temperature of 25 °C (77 °F). It is recommended that you fully charge a fully discharged battery pack. Getting started Charging the ...
Operating Guide
Page 20
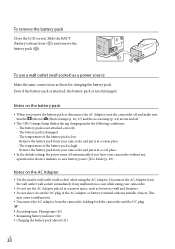
...in a narrow space, such as those for about 2 minutes, to save battery power ([Eco Mode] p. 63). Remove the battery pack from your camcorder without any malfunction occurs while using the AC Adaptor. Slide the BATT (battery) release lever () and remove the battery pack (). Notes ...on the AC Adaptor Use the nearby wall outlet (wall socket) when using your camcorder. Do not use a wall outlet (wall socket) as a power source Make the same connections as between a wall and furniture. ...
...in a narrow space, such as those for about 2 minutes, to save battery power ([Eco Mode] p. 63). Remove the battery pack from your camcorder without any malfunction occurs while using the AC Adaptor. Slide the BATT (battery) release lever () and remove the battery pack (). Notes ...on the AC Adaptor Use the nearby wall outlet (wall socket) when using your camcorder. Do not use a wall outlet (wall socket) as a power source Make the same connections as between a wall and furniture. ...
Operating Guide
Page 21
Getting started Charging the battery pack abroad You can charge the battery pack in any countries/regions using the AC Adaptor supplied with your camcorder within the AC 100 V - 240 V, 50 Hz/60 Hz range. US 21 Do not use an electronic voltage transformer.
Getting started Charging the battery pack abroad You can charge the battery pack in any countries/regions using the AC Adaptor supplied with your camcorder within the AC 100 V - 240 V, 50 Hz/60 Hz range. US 21 Do not use an electronic voltage transformer.
Operating Guide
Page 22
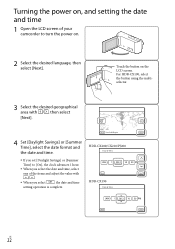
Touch the button on the LCD screen. For HDR-CX190, select the button using the multiselector. 3 Select the desired geographical area with / , then select [Next]. 4 Set [Daylight Savings] or [Summer Time], select the date ... [Summer Time] to turn the power on. 2 Select the desired language, then select [Next]. HDR-CX200/CX210/PJ200 HDR-CX190 US 22 Turning the power on, and setting the date and time 1 Open the LCD screen of your camcorder to [On], the clock advances 1 hour. When you select the date and time, select...
Touch the button on the LCD screen. For HDR-CX190, select the button using the multiselector. 3 Select the desired geographical area with / , then select [Next]. 4 Set [Daylight Savings] or [Summer Time], select the date ... [Summer Time] to turn the power on. 2 Select the desired language, then select [Next]. HDR-CX200/CX210/PJ200 HDR-CX190 US 22 Turning the power on, and setting the date and time 1 Open the LCD screen of your camcorder to [On], the clock advances 1 hour. When you select the date and time, select...
Operating Guide
Page 23
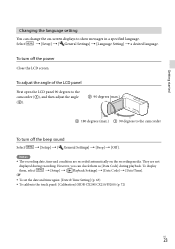
...]. To set the date and time again: [Date & Time Setting] (p. 63) To calibrate the touch panel: [Calibration] (HDR-CX200/CX210/PJ200) (p. 72) US 23 Notes The recording date, time and condition are not displayed during playback. To turn off the power Close the LCD..., you can change the on the recording media. To adjust the angle of the LCD panel First open the LCD panel 90 degrees to the camcorder (), and then adjust the angle (). 90 degrees (max.) 180 degrees (max.) 90 degrees to show ...
...]. To set the date and time again: [Date & Time Setting] (p. 63) To calibrate the touch panel: [Calibration] (HDR-CX200/CX210/PJ200) (p. 72) US 23 Notes The recording date, time and condition are not displayed during playback. To turn off the power Close the LCD..., you can change the on the recording media. To adjust the angle of the LCD panel First open the LCD panel 90 degrees to the camcorder (), and then adjust the angle (). 90 degrees (max.) 180 degrees (max.) 90 degrees to show ...
Operating Guide
Page 24
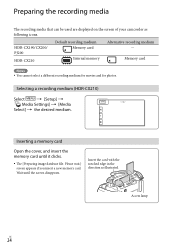
Preparing the recording media The recording media that can be used are displayed on the screen of your camcorder as illustrated. Please wait.] screen appears if you insert a new memory card. Memory card Notes You cannot select a different... The [Preparing image database file. Inserting a memory card Open the cover, and insert the memory card until the screen disappears. Selecting a recording medium (HDR-CX210) Select [Setup] [ Media Settings] [Media Select] the desired medium. Insert the card with the notched edge in ...
Preparing the recording media The recording media that can be used are displayed on the screen of your camcorder as illustrated. Please wait.] screen appears if you insert a new memory card. Memory card Notes You cannot select a different... The [Preparing image database file. Inserting a memory card Open the cover, and insert the memory card until the screen disappears. Selecting a recording medium (HDR-CX210) Select [Setup] [ Media Settings] [Media Select] the desired medium. Insert the card with the notched edge in ...

Operating Guide
Page 25
... imported to or played back on computers or AV devices not supporting the exFAT* file system by connecting the camcorder to create a new Image Database File. If you can use (p. 62). Notes To ensure stable...the memory card, be careful so that is recommended to format the memory card with your camcorder before the first use with your PC, etc. If [Failed to these devices with all the ...data stored on your camcorder "Memory Stick PRO Duo" media (Mark2) "Memory Stick PRO-HG Duo" media SD memory card ...
... imported to or played back on computers or AV devices not supporting the exFAT* file system by connecting the camcorder to create a new Image Database File. If you can use (p. 62). Notes To ensure stable...the memory card, be careful so that is recommended to format the memory card with your camcorder before the first use with your PC, etc. If [Failed to these devices with all the ...data stored on your camcorder "Memory Stick PRO Duo" media (Mark2) "Memory Stick PRO-HG Duo" media SD memory card ...
Operating Guide
Page 27
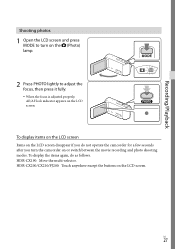
... the LCD screen and press MODE to turn the camcorder on the LCD screen disappear if you do as follows. HDR-CX200/CX210/PJ200: Touch anywhere except the buttons on the LCD screen. US 27 To display the items again, do not operate the camcorder for a few seconds after you turn on the (...Photo) lamp. 2 Press PHOTO lightly to adjust the focus, then press it fully. When the focus is adjusted properly, AE/AF lock indicator appears on the LCD screen. HDR-CX190: Move the multi-selector. To...
... the LCD screen and press MODE to turn the camcorder on the LCD screen disappear if you do as follows. HDR-CX200/CX210/PJ200: Touch anywhere except the buttons on the LCD screen. US 27 To display the items again, do not operate the camcorder for a few seconds after you turn on the (...Photo) lamp. 2 Press PHOTO lightly to adjust the focus, then press it fully. When the focus is adjusted properly, AE/AF lock indicator appears on the LCD screen. HDR-CX190: Move the multi-selector. To...
Operating Guide
Page 29
... to [On] and using the outer frame of [Guide Frame] (p. 61) as a guide. Recording time, recordable number of your camcorder can display recording images across the entire screen (full pixel display). A mirror-image of images when played back on the LCD screen, but the image... top, bottom, right, and left edges of the subject appears on a TV which is recommended you close the LCD screen while recording movies, the camcorder stops recording. The maximum continuous recordable time of movies is about 13 hours. When a movie file exceeds 2 GB, the next...
... to [On] and using the outer frame of [Guide Frame] (p. 61) as a guide. Recording time, recordable number of your camcorder can display recording images across the entire screen (full pixel display). A mirror-image of images when played back on the LCD screen, but the image... top, bottom, right, and left edges of the subject appears on a TV which is recommended you close the LCD screen while recording movies, the camcorder stops recording. The maximum continuous recordable time of movies is about 13 hours. When a movie file exceeds 2 GB, the next...
Operating Guide
Page 30
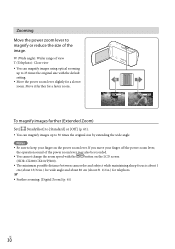
If you move your finger on the LCD screen (HDR-CX200/CX210/PJ200). The minimum possible distance between camcorder and subject while maintaining sharp focus is about 1 cm (about 13/32 in.) for wide angle and about 80 cm (about 31 1/2 in.) for telephoto. &#...
If you move your finger on the LCD screen (HDR-CX200/CX210/PJ200). The minimum possible distance between camcorder and subject while maintaining sharp focus is about 1 cm (about 13/32 in.) for wide angle and about 80 cm (about 31 1/2 in.) for telephoto. &#...
Operating Guide
Page 31
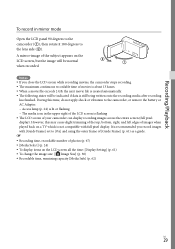
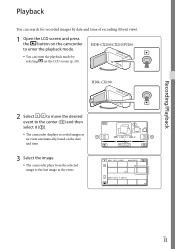
US 31 HDR-CX200/CX210/PJ200 HDR-CX190 2 Select / to move the desired event to the last image in the event. Recording/Playback Playback You can search for recorded images by date and time of recording (Event view). 1 Open the LCD screen and press the button on the camcorder to enter... can enter the playback mode by selecting on the date and time. 3 Select the image. The camcorder plays from the selected image to the center () and then select it (). The camcorder displays recorded images as an event automatically, based on the LCD screen (p. 28).
US 31 HDR-CX200/CX210/PJ200 HDR-CX190 2 Select / to move the desired event to the last image in the event. Recording/Playback Playback You can search for recorded images by date and time of recording (Event view). 1 Open the LCD screen and press the button on the camcorder to enter... can enter the playback mode by selecting on the date and time. 3 Select the image. The camcorder plays from the selected image to the center () and then select it (). The camcorder displays recorded images as an event automatically, based on the LCD screen (p. 28).

Operating Guide
Page 33
..., do not attempt to operate the camcorder for a few seconds. HDR-CX190: Move the multi-selector. While playing a movie Volume Delete Context To stop Previous To fast-reverse Next To fast-forward To pause/play /pause movies and photos in the order recorded US 33 HDR-CX200/CX210/PJ200: Touch the LCD screen. Recording...
..., do not attempt to operate the camcorder for a few seconds. HDR-CX190: Move the multi-selector. While playing a movie Volume Delete Context To stop Previous To fast-reverse Next To fast-forward To pause/play /pause movies and photos in the order recorded US 33 HDR-CX200/CX210/PJ200: Touch the LCD screen. Recording...


