Handycam® Handbook
Page 2
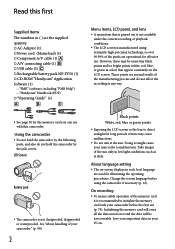
...) (1) Component A/V cable (1) A/V connecting cable (1) USB cable (1) Rechargeable battery pack NP-FV50 (1) CD-ROM "Handycam" Application Software (1) "PMB" (software, including "PMB Help") "Handycam" Handbook (PDF) "Operating Guide" (1) Menu items, LCD panel, and lens A menu item that appear constantly on your camcorder before using extremely high-precision technology...
...) (1) Component A/V cable (1) A/V connecting cable (1) USB cable (1) Rechargeable battery pack NP-FV50 (1) CD-ROM "Handycam" Application Software (1) "PMB" (software, including "PMB Help") "Handycam" Handbook (PDF) "Operating Guide" (1) Menu items, LCD panel, and lens A menu item that appear constantly on your camcorder before using extremely high-precision technology...

Handycam® Handbook
Page 35
...the screen at the factory will be deleted too. The screen is transferred to the camcorder, if you cannot play them using [EMPTY MUSIC], the music data recorded on the camcorder screen. (If the [USB SELECT] screen does not appear, touch (MENU) [Show others ] &#... ERASE] (under [EDIT] category) [ERASE] and select a scenario you want to erase with "PMB." Turn on your camcorder and computer, connect them with the supplied USB cable, then touch [DOWNLOAD MUSIC] on your computer. To start Music Transfer, click [Start] [All Programs] [PMB...
...the screen at the factory will be deleted too. The screen is transferred to the camcorder, if you cannot play them using [EMPTY MUSIC], the music data recorded on the camcorder screen. (If the [USB SELECT] screen does not appear, touch (MENU) [Show others ] &#... ERASE] (under [EDIT] category) [ERASE] and select a scenario you want to erase with "PMB." Turn on your camcorder and computer, connect them with the supplied USB cable, then touch [DOWNLOAD MUSIC] on your computer. To start Music Transfer, click [Start] [All Programs] [PMB...
Handycam® Handbook
Page 52
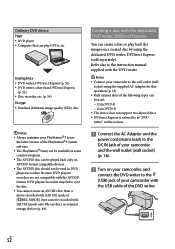
... referred to the DC IN jack of your camcorder and the wall outlet (wall socket) (p. 14). Turn on a created disc by using the dedicated DVD writer, DVDirect Express (sold separately). Save a movie recorded with the USB cable of [ REC MODE]. Refer also to the... Express (p. 52) DVD writer, other than DVDirect Express (p. 55) Disc recorder, etc. (p. 56) Disc type Standard definition image quality (STD) disc Notes Always maintain your PlayStation3 to use the latest version of the PlayStation3 system software. ...
... referred to the DC IN jack of your camcorder and the wall outlet (wall socket) (p. 14). Turn on a created disc by using the dedicated DVD writer, DVDirect Express (sold separately). Save a movie recorded with the USB cable of [ REC MODE]. Refer also to the... Express (p. 52) DVD writer, other than DVDirect Express (p. 55) Disc recorder, etc. (p. 56) Disc type Standard definition image quality (STD) disc Notes Always maintain your PlayStation3 to use the latest version of the PlayStation3 system software. ...
Handycam® Handbook
Page 53
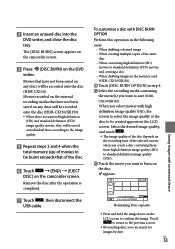
... BURN] screen appears on the camcorder screen. Press (DISC BURN) on the LCD screen to confirm the image. Remove the disc after the operation is completed. Touch , then disconnect the USB cable. Touch to return to the previous screen. By touching date, you select movies with high definition image quality (HD), the...
... BURN] screen appears on the camcorder screen. Press (DISC BURN) on the LCD screen to confirm the image. Remove the disc after the operation is completed. Touch , then disconnect the USB cable. Touch to return to the previous screen. By touching date, you select movies with high definition image quality (HD), the...
Handycam® Handbook
Page 54
... again. Tips If the total memory size of movies to be cut off the camcorder Disconnect the USB cable or the AC adaptor Subject the camcorder to mechanical shock or vibration Eject the memory card from your camcorder. Notes Do not do any ... limit of the disc is about 20 to 60 minutes. It may be burnt by the camcorder screen. Touch [END] [EJECT DISC] on the recording mode or the number of scenes. Also, if high definition image quality (HD) is completed. Touch and disconnect the USB cable.
... again. Tips If the total memory size of movies to be cut off the camcorder Disconnect the USB cable or the AC adaptor Subject the camcorder to mechanical shock or vibration Eject the memory card from your camcorder. Notes Do not do any ... limit of the disc is about 20 to 60 minutes. It may be burnt by the camcorder screen. Touch [END] [EJECT DISC] on the recording mode or the number of scenes. Also, if high definition image quality (HD) is completed. Touch and disconnect the USB cable.
Handycam® Handbook
Page 55
... DVDirect Express Use USB cable to connect your camcorder to the (USB) jack of your camcorder with an external device US 55 to the wall outlet (wall socket) using the supplied AC Adaptor for this operation (p. 14). Sony DVD writer may not be connected. After the operation is compatible with high definition image quality (HD...
... DVDirect Express Use USB cable to connect your camcorder to the (USB) jack of your camcorder with an external device US 55 to the wall outlet (wall socket) using the supplied AC Adaptor for this operation (p. 14). Sony DVD writer may not be connected. After the operation is compatible with high definition image quality (HD...
Handycam® Handbook
Page 56
...connected. Notes Connect your camcorder to the wall outlet (wall socket) using the supplied AC Adaptor for this operation (p. 14). Sony DVD writer may not be available in some countries/regions. High definition image quality (HD) movies will hear no...mode. Connect your camcorder to the recording device (a disc recorder, etc.) with an A/V connecting cable. The yellow plug (video) US connection is not necessary. 56 ** Input S VIDEO (Yellow) VIDEO (Yellow) (White) AUDIO (Red) Signal flow * HDR-CX110/CX150 ** HDR-XR150 Insert the...
...connected. Notes Connect your camcorder to the wall outlet (wall socket) using the supplied AC Adaptor for this operation (p. 14). Sony DVD writer may not be available in some countries/regions. High definition image quality (HD) movies will hear no...mode. Connect your camcorder to the recording device (a disc recorder, etc.) with an A/V connecting cable. The yellow plug (video) US connection is not necessary. 56 ** Input S VIDEO (Yellow) VIDEO (Yellow) (White) AUDIO (Red) Signal flow * HDR-CX110/CX150 ** HDR-XR150 Insert the...
Handycam® Handbook
Page 85
... recognized by the computer. Disconnect devices from the computer and your camcorder, and restart the computer, then connect the computer and your camcorder. Disconnect the USB cable from the USB jack of another device (p. 56). Make sure to connect the cable to the input jack of the computer other devices Images are connected (p. 39...
... recognized by the computer. Disconnect devices from the computer and your camcorder, and restart the computer, then connect the computer and your camcorder. Disconnect the USB cable from the USB jack of another device (p. 56). Make sure to connect the cable to the input jack of the computer other devices Images are connected (p. 39...
Handycam® Handbook
Page 108
... 66 Telephoto 25 Thumbnail 40 Tripod 106 Troubleshooting 80 TV 37 TV color systems 93 TV CONNECT Guide 37 TV TYPE 77 TWILIGHT 63 U USB cable 52, 55 USB CONNECT 52, 55 V VBR 90 VIEW IMAGES 29, 32 VISUAL INDEX 29 Volume 31, 76 W Wall outlet (wall socket 12 Warning messages 88 WHITE...
... 66 Telephoto 25 Thumbnail 40 Tripod 106 Troubleshooting 80 TV 37 TV color systems 93 TV CONNECT Guide 37 TV TYPE 77 TWILIGHT 63 U USB cable 52, 55 USB CONNECT 52, 55 V VBR 90 VIEW IMAGES 29, 32 VISUAL INDEX 29 Volume 31, 76 W Wall outlet (wall socket 12 Warning messages 88 WHITE...
Operating Guide
Page 8
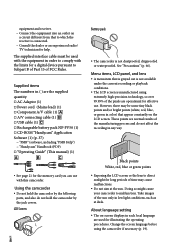
... lead) (1) Component A/V cable (1) A/V connecting cable (1) USB cable (1) Rechargeable battery pack NP-FV50 (1) CD-ROM "Handycam" Application Software (1) (p. 37) "PMB" (software, including "PMB Help") "Handycam" Handbook (PDF) "Operating Guide" (This manual) (1) See page 21 for the memory card you can use . Using the camcorder Do not...
... lead) (1) Component A/V cable (1) A/V connecting cable (1) USB cable (1) Rechargeable battery pack NP-FV50 (1) CD-ROM "Handycam" Application Software (1) (p. 37) "PMB" (software, including "PMB Help") "Handycam" Handbook (PDF) "Operating Guide" (This manual) (1) See page 21 for the memory card you can use . Using the camcorder Do not...
Operating Guide
Page 38
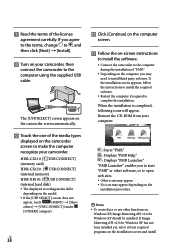
Remove the CD-ROM from required programs on the camcorder screen to the computer using the supplied USB cable. "PMB Launcher" enables you to start "PMB" or other software, or to open web sites. Other icons ...the on-screen instructions to install the software. Connect the camcorder to the computer during the installation of the media types displayed on the installation screen and install HDR-CX110: [ USB CONNECT] (memory card) HDR-CX150 : [ USB CONNECT] (internal memory) HDR-XR150: [ USB CONNECT] (internal hard disk) The displayed recording media differ...
Remove the CD-ROM from required programs on the camcorder screen to the computer using the supplied USB cable. "PMB Launcher" enables you to start "PMB" or other software, or to open web sites. Other icons ...the on-screen instructions to install the software. Connect the camcorder to the computer during the installation of the media types displayed on the installation screen and install HDR-CX110: [ USB CONNECT] (memory card) HDR-CX150 : [ USB CONNECT] (internal memory) HDR-XR150: [ USB CONNECT] (internal hard disk) The displayed recording media differ...
Operating Guide
Page 39
... files on the recording media from [Help] of the computer [Safely remove USB Mass Storage Device]. Touch [END] [YES] on the camcorder screen. Disconnect the USB cable. Notes Access from the computer. To disconnect your camcorder from the computer Click the icon at the bottom right of the...
... files on the recording media from [Help] of the computer [Safely remove USB Mass Storage Device]. Touch [END] [YES] on the camcorder screen. Disconnect the USB cable. Notes Access from the computer. To disconnect your camcorder from the computer Click the icon at the bottom right of the...

Operating Guide
Page 42
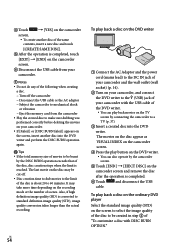
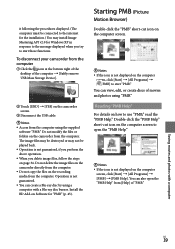
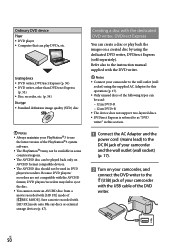
...supplied for this operation (p. 17). With One Touch Disc Burn function on your camcorder, you can save movies and photos recorded on the internal recording media only (HDR-CX150/XR150). 1 Turn on your computer, and place an unused disc on the DVD drive... from high definition image quality (HD) movies, import movies to a computer first (p. 43), and then create a standard definition image quality (STD) disc (p. 45). Install "PMB" beforehand (p. 37), however, do not start "PMB." Connect your camcorder to the wall outlet (wall socket) using the supplied USB cable. 3...
...supplied for this operation (p. 17). With One Touch Disc Burn function on your camcorder, you can save movies and photos recorded on the internal recording media only (HDR-CX150/XR150). 1 Turn on your computer, and place an unused disc on the DVD drive... from high definition image quality (HD) movies, import movies to a computer first (p. 43), and then create a standard definition image quality (STD) disc (p. 45). Install "PMB" beforehand (p. 37), however, do not start "PMB." Connect your camcorder to the wall outlet (wall socket) using the supplied USB cable. 3...

Operating Guide
Page 43
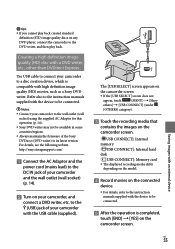
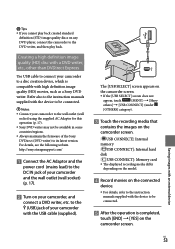
...to a computer Movies and photos recorded on your camcorder can export high definition image quality (HD) movies from your computer to your camcorder. Movies and photos are imported to your camcorder, then connect the camcorder to the computer using the supplied AC Adaptor for... USB cable. 3 Click [Import]. Refer to a computer. The [USB SELECT] screen appears on the camcorder screen. 2 Touch the recording media that contains the images you want to save on the camcorder screen. [ USB CONNECT]: Internal memory [ USB CONNECT]: Internal hard disk [ USB CONNECT]: Memory ...
...to a computer Movies and photos recorded on your camcorder can export high definition image quality (HD) movies from your computer to your camcorder. Movies and photos are imported to your camcorder, then connect the camcorder to the computer using the supplied AC Adaptor for... USB cable. 3 Click [Import]. Refer to a computer. The [USB SELECT] screen appears on the camcorder screen. 2 Touch the recording media that contains the images you want to save on the camcorder screen. [ USB CONNECT]: Internal memory [ USB CONNECT]: Internal hard disk [ USB CONNECT]: Memory ...
Operating Guide
Page 50
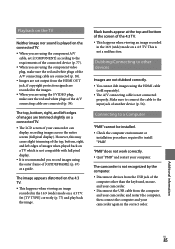
... other than DVDirect Express (p. 53) Disc recorder, etc. (p. 54) Disc type Standard definition image quality (STD) disc Notes Always maintain your camcorder with the dedicated DVD writer, DVDirect Express You can be played back only on AVCHD format compatible devices. ... a disc with the USB cable of [ REC MODE]. US 50 Refer also to the wall outlet (wall socket) using the dedicated DVD writer, DVDirect Express (sold separately). Save a movie recorded with the DVD writer. Notes Connect your camcorder to the instruction manual...
... other than DVDirect Express (p. 53) Disc recorder, etc. (p. 54) Disc type Standard definition image quality (STD) disc Notes Always maintain your camcorder with the dedicated DVD writer, DVDirect Express You can be played back only on AVCHD format compatible devices. ... a disc with the USB cable of [ REC MODE]. US 50 Refer also to the wall outlet (wall socket) using the dedicated DVD writer, DVDirect Express (sold separately). Save a movie recorded with the DVD writer. Notes Connect your camcorder to the instruction manual...
Operating Guide
Page 51
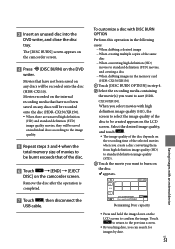
... Touch , then disconnect the USB cable. Select the desired image quality, and touch . The image quality of the disc depends on the recording time of the disc. Touch [END] [EJECT DISC] on the camcorder screen. Insert an unused ... quality. Repeat steps 3 and 4 when the total memory size of the same disc When converting high definition (HD) movies to standard definition (STD) movies, and creating a disc When dubbing images in the memory card (HDR-CX150/XR150) Touch [DISC BURN OPTION] in the following...
... Touch , then disconnect the USB cable. Select the desired image quality, and touch . The image quality of the disc depends on the recording time of the disc. Touch [END] [EJECT DISC] on the camcorder screen. Insert an unused ... quality. Repeat steps 3 and 4 when the total memory size of the same disc When converting high definition (HD) movies to standard definition (STD) movies, and creating a disc When dubbing images in the memory card (HDR-CX150/XR150) Touch [DISC BURN OPTION] in the following...

Operating Guide
Page 52
... more time depending on the disc may be cut off the camcorder Disconnect the USB cable or the AC adaptor Subject the camcorder to mechanical shock or vibration Eject the memory card from the camcorder Play the created disc to make sure dubbing was ...58341; (USB) jack of your camcorder with the USB cable of the DVD writer. You can also operate by the DISC BURN operation exceeds that of the disc, disc creation stops when the limit is reached. Also, if high definition image quality (HD) is converted to standard definition image quality ...
... more time depending on the disc may be cut off the camcorder Disconnect the USB cable or the AC adaptor Subject the camcorder to mechanical shock or vibration Eject the memory card from the camcorder Play the created disc to make sure dubbing was ...58341; (USB) jack of your camcorder with the USB cable of the DVD writer. You can also operate by the DISC BURN operation exceeds that of the disc, disc creation stops when the limit is reached. Also, if high definition image quality (HD) is converted to standard definition image quality ...
Operating Guide
Page 53
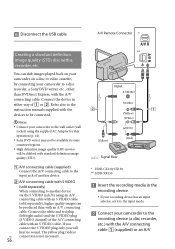
... connected. Notes Connect your camcorder to the instruction manuals supplied with an external device US 53 Creating a high definition image quality (HD) disc with the USB cable (supplied). Refer also to the wall outlet (wall socket) using the supplied AC Adaptor for this operation (p. 17). Sony DVD writer may not be connected. ...
... connected. Notes Connect your camcorder to the instruction manuals supplied with an external device US 53 Creating a high definition image quality (HD) disc with the USB cable (supplied). Refer also to the wall outlet (wall socket) using the supplied AC Adaptor for this operation (p. 17). Sony DVD writer may not be connected. ...
Operating Guide
Page 54
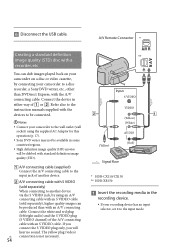
...Connect your camcorder to the wall outlet (wall socket) using an A/V connecting cable with an S VIDEO cable (sold separately), higher quality images can be available in some countries/regions. High definition image ...HDR-CX110/CX150 ** HDR-XR150 Insert the recording media in either way of another device via the S VIDEO jack, by connecting your recording device has an input selector, set it to a disc recorder, a Sony DVD writer, etc., other than with the A/V connecting cable. Disconnect the USB cable. A/V Remote Connector * Creating a standard definition...
...Connect your camcorder to the wall outlet (wall socket) using an A/V connecting cable with an S VIDEO cable (sold separately), higher quality images can be available in some countries/regions. High definition image ...HDR-CX110/CX150 ** HDR-XR150 Insert the recording media in either way of another device via the S VIDEO jack, by connecting your recording device has an input selector, set it to a disc recorder, a Sony DVD writer, etc., other than with the A/V connecting cable. Disconnect the USB cable. A/V Remote Connector * Creating a standard definition...
Operating Guide
Page 65
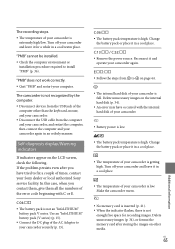
...camcorder and leave it in a cool place. "PMB" cannot be installed. Check the computer environment or installation procedure required to fix a couple of times, contact your Sony dealer or local authorized Sony...is full. Make the camcorder warm. No memory card is inserted (p. 21). When the indicator flashes, there is not ...high. The recording stops. The temperature of your camcorder is low. Self-diagnosis display/Warning indicators If indicators appear on other than the keyboard, mouse, and your camcorder. Disconnect the USB cable from the USB...
...camcorder and leave it in a cool place. "PMB" cannot be installed. Check the computer environment or installation procedure required to fix a couple of times, contact your Sony dealer or local authorized Sony...is full. Make the camcorder warm. No memory card is inserted (p. 21). When the indicator flashes, there is not ...high. The recording stops. The temperature of your camcorder is low. Self-diagnosis display/Warning indicators If indicators appear on other than the keyboard, mouse, and your camcorder. Disconnect the USB cable from the USB...


