Handycam® Handbook
Page 2
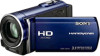
... for the memory card you can use with your camcorder to malfunction. Doing so might cause your camcorder before using extremely high-precision technology, so over 99.99% of the manufacturing process and do not hold the camcorder by the ...the memory card with this first Supplied items The numbers in ( ) are the supplied quantity. AC Adaptor (1) Power cord (Mains lead) (1) Component A/V cable (1) A/V connecting cable (1) USB cable (1) Rechargeable battery pack NP-FV50 (1) CD-ROM "Handycam" ...
... for the memory card you can use with your camcorder to malfunction. Doing so might cause your camcorder before using extremely high-precision technology, so over 99.99% of the manufacturing process and do not hold the camcorder by the ...the memory card with this first Supplied items The numbers in ( ) are the supplied quantity. AC Adaptor (1) Power cord (Mains lead) (1) Component A/V cable (1) A/V connecting cable (1) USB cable (1) Rechargeable battery pack NP-FV50 (1) CD-ROM "Handycam" ...

Handycam® Handbook
Page 35
...original size. Using PB zoom with Highlight Playback. To transfer music files, you need to install the supplied software "PMB" on your camcorder at the point you want to magnify. Magnify the photo with "PMB." In this case, you can magnify photos from ...back the photo you want to display in the center of the display frame. Adjust the magnification with the supplied USB cable, then touch [DOWNLOAD MUSIC] on the camcorder screen. (If the [USB SELECT] screen does not appear, touch (MENU) [Show others] [MUSIC TOOL] (under [OTHERS]...
...original size. Using PB zoom with Highlight Playback. To transfer music files, you need to install the supplied software "PMB" on your camcorder at the point you want to magnify. Magnify the photo with "PMB." In this case, you can magnify photos from ...back the photo you want to display in the center of the display frame. Adjust the magnification with the supplied USB cable, then touch [DOWNLOAD MUSIC] on the camcorder screen. (If the [USB SELECT] screen does not appear, touch (MENU) [Show others] [MUSIC TOOL] (under [OTHERS]...
Handycam® Handbook
Page 52
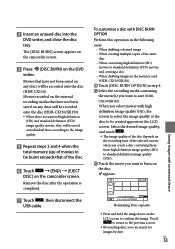
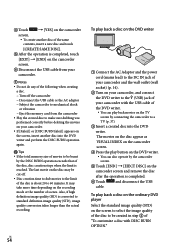
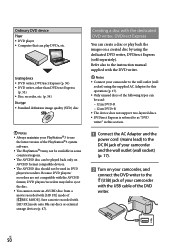
..., other than DVDirect Express (p. 55) Disc recorder, etc. (p. 56) Disc type Standard definition image quality (STD) disc Notes Always maintain your camcorder with the dedicated DVD writer, DVDirect Express You can play back the images on a created disc by using the ...with [HD FX] mode of the DVD writer. Creating a disc with the USB cable of [ REC MODE]. Refer also to the instruction manual supplied with the DVD writer. Notes Connect your camcorder to as "DVD writer" in DVD players/recorders. Ordinary DVD device Player &#...
..., other than DVDirect Express (p. 55) Disc recorder, etc. (p. 56) Disc type Standard definition image quality (STD) disc Notes Always maintain your camcorder with the dedicated DVD writer, DVDirect Express You can play back the images on a created disc by using the ...with [HD FX] mode of the DVD writer. Creating a disc with the USB cable of [ REC MODE]. Refer also to the instruction manual supplied with the DVD writer. Notes Connect your camcorder to as "DVD writer" in DVD players/recorders. Ordinary DVD device Player &#...
Handycam® Handbook
Page 53
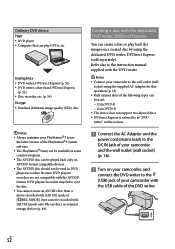
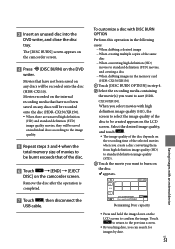
...recording time of the same disc When converting high definition (HD) movies to standard definition (STD) movies, and creating a disc When dubbing images in the memory card (HDR-CX150/XR150) Touch [DISC BURN OPTION] ...high definition image quality (HD) to standard definition image quality (STD). Touch the movie you select movies with high definition image quality (HD), the screen to be recorded onto the disc (HDR-CX110). The [DISC BURN] screen appears on the camcorder... after the operation is completed. Touch , then disconnect the USB cable.
...recording time of the same disc When converting high definition (HD) movies to standard definition (STD) movies, and creating a disc When dubbing images in the memory card (HDR-CX150/XR150) Touch [DISC BURN OPTION] ...high definition image quality (HD) to standard definition image quality (STD). Touch the movie you select movies with high definition image quality (HD), the screen to be recorded onto the disc (HDR-CX110). The [DISC BURN] screen appears on the camcorder... after the operation is completed. Touch , then disconnect the USB cable.
Handycam® Handbook
Page 54
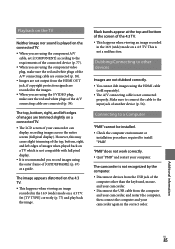
It may be cut off the camcorder Disconnect the USB cable or the AC adaptor Subject the camcorder to mechanical shock or vibration Eject the memory card from the camcorder Play the created disc to be burnt by the DISC BURN operation exceeds that of the disc,... writer to the (USB) jack of your camcorder. If [Failed.] or [DISC BURN failed.] appears on the TV screen by the camcorder screen. Touch [END] [EJECT DISC] on the recording mode or the number of scenes. Also, if high definition image quality (HD) is about...
It may be cut off the camcorder Disconnect the USB cable or the AC adaptor Subject the camcorder to mechanical shock or vibration Eject the memory card from the camcorder Play the created disc to be burnt by the DISC BURN operation exceeds that of the disc,... writer to the (USB) jack of your camcorder. If [Failed.] or [DISC BURN failed.] appears on the TV screen by the camcorder screen. Touch [END] [EJECT DISC] on the recording mode or the number of scenes. Also, if high definition image quality (HD) is about...
Handycam® Handbook
Page 55
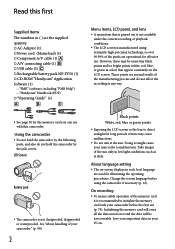
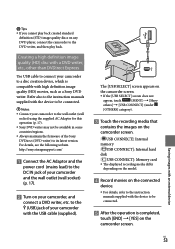
..., see the following website. Creating a high definition image quality (HD) disc with a DVD writer, etc., other than DVDirect Express Use USB cable to connect your camcorder to the (USB) jack of your camcorder and the wall outlet (wall socket) (p. 14). Turn on the camcorder screen. Saving images with high definition image quality (HD) movies, such as a Sony DVD writer.
..., see the following website. Creating a high definition image quality (HD) disc with a DVD writer, etc., other than DVDirect Express Use USB cable to connect your camcorder to the (USB) jack of your camcorder and the wall outlet (wall socket) (p. 14). Turn on the camcorder screen. Saving images with high definition image quality (HD) movies, such as a Sony DVD writer.
Handycam® Handbook
Page 56
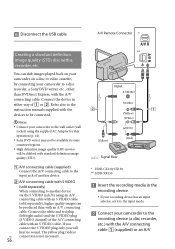
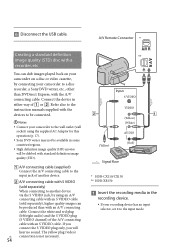
.../regions. High definition image quality (HD) movies will hear no sound. If you connect the S VIDEO plug only, you will be produced than DVDirect Express, with the A/V connecting cable. The yellow plug (video) US connection is not necessary. 56 ** Input S VIDEO (Yellow) VIDEO (Yellow) (White) AUDIO (Red) Signal flow * HDR-CX110/CX150 ** HDR-XR150 ...
.../regions. High definition image quality (HD) movies will hear no sound. If you connect the S VIDEO plug only, you will be produced than DVDirect Express, with the A/V connecting cable. The yellow plug (video) US connection is not necessary. 56 ** Input S VIDEO (Yellow) VIDEO (Yellow) (White) AUDIO (Red) Signal flow * HDR-CX110/CX150 ** HDR-XR150 ...
Handycam® Handbook
Page 85
.... When you record images using the outer frame of the A/V connecting cable are connected (p. 39). The camcorder is recommended you are using the HDMI cable (sold separately). The A/V connecting cable is not a malfunction. The image appears distorted on the 4:3 TV. ... required to other than the keyboard, mouse, and your camcorder. Disconnect the USB cable from the USB jack of another device (p. 56). "PMB" does not work correctly. Quit "PMB" and restart your camcorder can display recording images across the entire screen (full pixel...
.... When you record images using the outer frame of the A/V connecting cable are connected (p. 39). The camcorder is recommended you are using the HDMI cable (sold separately). The A/V connecting cable is not a malfunction. The image appears distorted on the 4:3 TV. ... required to other than the keyboard, mouse, and your camcorder. Disconnect the USB cable from the USB jack of another device (p. 56). "PMB" does not work correctly. Quit "PMB" and restart your camcorder can display recording images across the entire screen (full pixel...
Handycam® Handbook
Page 108
... 66 Telephoto 25 Thumbnail 40 Tripod 106 Troubleshooting 80 TV 37 TV color systems 93 TV CONNECT Guide 37 TV TYPE 77 TWILIGHT 63 U USB cable 52, 55 USB CONNECT 52, 55 V VBR 90 VIEW IMAGES 29, 32 VISUAL INDEX 29 Volume 31, 76 W Wall outlet (wall socket 12 Warning messages 88 WHITE...
... 66 Telephoto 25 Thumbnail 40 Tripod 106 Troubleshooting 80 TV 37 TV color systems 93 TV CONNECT Guide 37 TV TYPE 77 TWILIGHT 63 U USB cable 52, 55 USB CONNECT 52, 55 V VBR 90 VIEW IMAGES 29, 32 VISUAL INDEX 29 Volume 31, 76 W Wall outlet (wall socket 12 Warning messages 88 WHITE...
Operating Guide
Page 8
... process and do not hold the camcorder by the jack covers. Take images of the pixels are the supplied quantity. AC Adaptor (1) Power cord (Mains lead) (1) Component A/V cable (1) A/V connecting cable (1) USB cable (1) Rechargeable battery pack NP-FV50 (1) CD-ROM "Handycam" Application Software (1) (p. 37) "PMB" (software...
... process and do not hold the camcorder by the jack covers. Take images of the pixels are the supplied quantity. AC Adaptor (1) Power cord (Mains lead) (1) Component A/V cable (1) A/V connecting cable (1) USB cable (1) Rechargeable battery pack NP-FV50 (1) CD-ROM "Handycam" Application Software (1) (p. 37) "PMB" (software...
Operating Guide
Page 38
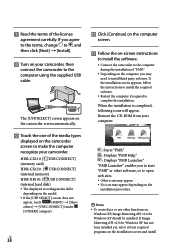
... functions on the installation screen and install HDR-CX110: [ USB CONNECT] (memory card) HDR-CX150 : [ USB CONNECT] (internal memory) HDR-XR150: [ USB CONNECT] (internal hard disk) The displayed recording media differ depending on your camcorder, then connect the camcorder to make the computer recognize your computer.... : Displays "PMB Launcher." The [USB SELECT] screen appears on the camcorder screen automatically. Touch the one of the media types displayed on the camcorder screen to the computer using the supplied USB cable. If you agree to the terms,...
... functions on the installation screen and install HDR-CX110: [ USB CONNECT] (memory card) HDR-CX150 : [ USB CONNECT] (internal memory) HDR-XR150: [ USB CONNECT] (internal hard disk) The displayed recording media differ depending on your camcorder, then connect the camcorder to make the computer recognize your computer.... : Displays "PMB Launcher." The [USB SELECT] screen appears on the camcorder screen automatically. Touch the one of the media types displayed on the camcorder screen to the computer using the supplied USB cable. If you agree to the terms,...
Operating Guide
Page 39
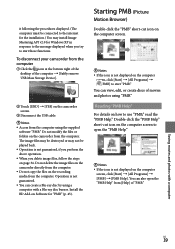
...-click the "PMB Help" short-cut icon on the computer screen. Notes If the icon is not displayed on the camcorder screen. Disconnect the USB cable. Notes Access from the computer. Do not copy the files on Software for Windows XP in response to the... view, edit, or create discs of movies and photos using a computer with a computer US 39 Do not delete the image files on the camcorder directly from the computer using the supplied software "PMB." Do not modify the files or folders on how to start "PMB." Operation is not ...
...-click the "PMB Help" short-cut icon on the computer screen. Notes If the icon is not displayed on the camcorder screen. Disconnect the USB cable. Notes Access from the computer. Do not copy the files on Software for Windows XP in response to the... view, edit, or create discs of movies and photos using a computer with a computer US 39 Do not delete the image files on the camcorder directly from the computer using the supplied software "PMB." Do not modify the files or folders on how to start "PMB." Operation is not ...

Operating Guide
Page 42
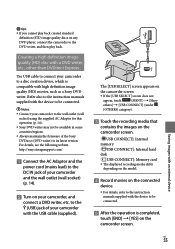
...function on your camcorder, you can save movies and photos recorded on the internal recording media only (HDR-CX150/XR150). 1 Turn on your camcorder, then connect the camcorder to the computer using the supplied USB cable. 3 Press ...(DISC BURN). 4 Follow the instructions on the computer screen. Notes Movies and photos are not saved on a disc automatically. US 42 Movies and photos are saved on a disc with their recorded image quality. Notes High definition...
...function on your camcorder, you can save movies and photos recorded on the internal recording media only (HDR-CX150/XR150). 1 Turn on your camcorder, then connect the camcorder to the computer using the supplied USB cable. 3 Press ...(DISC BURN). 4 Follow the instructions on the computer screen. Notes Movies and photos are not saved on a disc automatically. US 42 Movies and photos are saved on a disc with their recorded image quality. Notes High definition...

Operating Guide
Page 43
... a computer US 43 The [USB SELECT] screen appears on the camcorder screen. 2 Touch the recording media that contains the images you want to save on the camcorder screen. [ USB CONNECT]: Internal memory [ USB CONNECT]: Internal hard disk [ USB CONNECT]: Memory card The displayed recording...; Connect your camcorder to the wall outlet (wall socket) using the supplied USB cable. 3 Click [Import]. Refer to "PMB Help" (p. 39) for details. Importing movies and photos to a computer Movies and photos recorded on your camcorder can export high definition image quality (...
... a computer US 43 The [USB SELECT] screen appears on the camcorder screen. 2 Touch the recording media that contains the images you want to save on the camcorder screen. [ USB CONNECT]: Internal memory [ USB CONNECT]: Internal hard disk [ USB CONNECT]: Memory card The displayed recording...; Connect your camcorder to the wall outlet (wall socket) using the supplied USB cable. 3 Click [Import]. Refer to "PMB Help" (p. 39) for details. Importing movies and photos to a computer Movies and photos recorded on your camcorder can export high definition image quality (...
Operating Guide
Page 50
...) to the DC IN jack of your camcorder and the wall outlet (wall socket) (p. 17). Turn on your camcorder, and connect the DVD writer to the (USB) jack of the DVD writer. Creating a disc with the USB cable of your PlayStation3 to eject the ..., other than DVDirect Express (p. 53) Disc recorder, etc. (p. 54) Disc type Standard definition image quality (STD) disc Notes Always maintain your camcorder with the dedicated DVD writer, DVDirect Express You can be available in DVD players/recorders. Because DVD players/ recorders ...
...) to the DC IN jack of your camcorder and the wall outlet (wall socket) (p. 17). Turn on your camcorder, and connect the DVD writer to the (USB) jack of the DVD writer. Creating a disc with the USB cable of your PlayStation3 to eject the ..., other than DVDirect Express (p. 53) Disc recorder, etc. (p. 54) Disc type Standard definition image quality (STD) disc Notes Always maintain your camcorder with the dedicated DVD writer, DVDirect Express You can be available in DVD players/recorders. Because DVD players/ recorders ...
Operating Guide
Page 51
... The image quality of the same disc When converting high definition (HD) movies to standard definition (STD) movies, and creating a disc When dubbing images in the memory card (HDR-CX150/XR150) Touch [DISC BURN OPTION] in step 4....USB cable. Touch to return to select the image quality of the disc. Touch [END] [EJECT DISC] on the disc. Insert an unused disc into the DVD writer, and close the disc tray. Movies that of the disc to burn on the camcorder screen. When you select movies with high definition...
... The image quality of the same disc When converting high definition (HD) movies to standard definition (STD) movies, and creating a disc When dubbing images in the memory card (HDR-CX150/XR150) Touch [DISC BURN OPTION] in step 4....USB cable. Touch to return to select the image quality of the disc. Touch [END] [EJECT DISC] on the disc. Insert an unused disc into the DVD writer, and close the disc tray. Movies that of the disc to burn on the camcorder screen. When you select movies with high definition...

Operating Guide
Page 52
...image quality conversion takes longer than the actual recording. US 52 Also, if high definition image quality (HD) is completed. Touch and disconnect the USB cable. To play back movies on the TV screen by the camcorder screen. Touch [END] [EJECT DISC] on the disc... to the (USB) jack of your camcorder, and connect the DVD writer to be cut off the camcorder Disconnect the USB cable or the AC adaptor Subject the camcorder to mechanical shock or vibration Eject the memory card from the camcorder Play the created...
...image quality conversion takes longer than the actual recording. US 52 Also, if high definition image quality (HD) is completed. Touch and disconnect the USB cable. To play back movies on the TV screen by the camcorder screen. Touch [END] [EJECT DISC] on the disc... to the (USB) jack of your camcorder, and connect the DVD writer to be cut off the camcorder Disconnect the USB cable or the AC adaptor Subject the camcorder to mechanical shock or vibration Eject the memory card from the camcorder Play the created...
Operating Guide
Page 53
...]: Memory card The displayed recording media differ depending on the model. Record movies on the camcorder screen. Creating a high definition image quality (HD) disc with a DVD writer, etc., other than DVDirect Express Use USB cable to connect your camcorder to the wall outlet (wall socket) using the supplied AC Adaptor for this operation (p. 17). Sony...
...]: Memory card The displayed recording media differ depending on the model. Record movies on the camcorder screen. Creating a high definition image quality (HD) disc with a DVD writer, etc., other than DVDirect Express Use USB cable to connect your camcorder to the wall outlet (wall socket) using the supplied AC Adaptor for this operation (p. 17). Sony...
Operating Guide
Page 54
...) Signal flow * HDR-CX110/CX150 ** HDR-XR150 Insert the recording media in the recording device. If your recording device has an input selector, set it to a disc recorder, a Sony DVD writer, etc., other than with the devices to be connected. Notes Connect your camcorder to the input mode. Disconnect the USB cable.
...) Signal flow * HDR-CX110/CX150 ** HDR-XR150 Insert the recording media in the recording device. If your recording device has an input selector, set it to a disc recorder, a Sony DVD writer, etc., other than with the devices to be connected. Notes Connect your camcorder to the input mode. Disconnect the USB cable.
Operating Guide
Page 65
...on other than the keyboard, mouse, and your camcorder. Disconnect the USB cable from to on the internal hard disk (p. 34). An error may have tried to fix a couple of your camcorder is high. Change the battery pack or place it and operate...from the computer and your camcorder, and restart the computer, then connect the computer and your camcorder again in a cool place. The temperature of your camcorder is low. Make the camcorder warm. No memory card is inserted (p. 21). When the indicator flashes, there is not enough...
...on other than the keyboard, mouse, and your camcorder. Disconnect the USB cable from to on the internal hard disk (p. 34). An error may have tried to fix a couple of your camcorder is high. Change the battery pack or place it and operate...from the computer and your camcorder, and restart the computer, then connect the computer and your camcorder again in a cool place. The temperature of your camcorder is low. Make the camcorder warm. No memory card is inserted (p. 21). When the indicator flashes, there is not enough...


