
Help Guide
Page 1
Help Guide Digital HD Video Camera Recorder HDR-AZ1/RM-LVR2V How to Use Read This First Identifying Parts Identifying Parts of the Camera [1] Identifying Parts of the Remote Control [2] Display Camera Display [3] Live-... (Multi Connection) [5] Getting Started Checking the Bundled Items Checking the Bundled Items [6] Preparing to Use Preparing to Use [7] Preparing the Camera Inserting/Removing the Battery Pack of the Camera [8] Charging the Battery Pack of the Camera [9] file:///E|/%8E%CC%82%C4/ActionCam_PXC14/4548273132_GB/en/print.html[2017/04/03 13:56:27]
Help Guide Digital HD Video Camera Recorder HDR-AZ1/RM-LVR2V How to Use Read This First Identifying Parts Identifying Parts of the Camera [1] Identifying Parts of the Remote Control [2] Display Camera Display [3] Live-... (Multi Connection) [5] Getting Started Checking the Bundled Items Checking the Bundled Items [6] Preparing to Use Preparing to Use [7] Preparing the Camera Inserting/Removing the Battery Pack of the Camera [8] Charging the Battery Pack of the Camera [9] file:///E|/%8E%CC%82%C4/ActionCam_PXC14/4548273132_GB/en/print.html[2017/04/03 13:56:27]
Help Guide
Page 5
... Assist Data GPS Assist Data [81] Others Estimated Duration of Recording and Playback for the Battery Pack of the Camera Estimated Duration of Recording for the Battery Pack of the Camera [82] Estimated Duration of Playback for the Battery Pack of the Camera [83] file:///E|/%8E%CC%82%C4/ActionCam_PXC14/4548273132_GB/en/print...
... Assist Data GPS Assist Data [81] Others Estimated Duration of Recording and Playback for the Battery Pack of the Camera Estimated Duration of Recording for the Battery Pack of the Camera [82] Estimated Duration of Playback for the Battery Pack of the Camera [83] file:///E|/%8E%CC%82%C4/ActionCam_PXC14/4548273132_GB/en/print...
Help Guide
Page 6
...-View Remote [86] On Moisture Condensation [87] Care and Storage [88] Notes on Optional Accessories [89] Notes on Disposal/Transfer of the Memory Card [90] Battery Packs of the Camera and the Live-View Remote [91] The Limitations to Live Streaming of the Camera [92] GPS and Wi-Fi Function in...
...-View Remote [86] On Moisture Condensation [87] Care and Storage [88] Notes on Optional Accessories [89] Notes on Disposal/Transfer of the Memory Card [90] Battery Packs of the Camera and the Live-View Remote [91] The Limitations to Live Streaming of the Camera [92] GPS and Wi-Fi Function in...

Help Guide
Page 7
... and Power of the Camera Cannot Turn On the Camera [111] The Power of the Camera Turns Off Suddenly [112] Battery Life of the Camera Is Short [113] Cannot Charge the Camera [114] The Remaining Charge Indicator of the Camera Is Incorrect [115] Memory Card Operations ...
... and Power of the Camera Cannot Turn On the Camera [111] The Power of the Camera Turns Off Suddenly [112] Battery Life of the Camera Is Short [113] Cannot Charge the Camera [114] The Remaining Charge Indicator of the Camera Is Incorrect [115] Memory Card Operations ...

Help Guide
Page 8
... on Your Computer [124] Wi-Fi It Takes Too Much Time to Transfer an Image [125] Others The Lens Gets Fogged [126] The Camera and Battery Become Warm [127] The Date or Time Is Incorrect [128] Live-View Remote Cannot Turn On the Live-View Remote [129] Cannot Charge the Live... Triangulate although the GPS Assist Data is Taken In [134] The Location Information Has Not Been Recorded [135] Q & A Camera Cannot Turn On the Camera [136] Battery Life of the Camera is Short [137] Live-View Remote file:///E|/%8E%CC%82%C4/ActionCam_PXC14/4548273132_GB/en/print.html[2017/04/03 13:56...
... on Your Computer [124] Wi-Fi It Takes Too Much Time to Transfer an Image [125] Others The Lens Gets Fogged [126] The Camera and Battery Become Warm [127] The Date or Time Is Incorrect [128] Live-View Remote Cannot Turn On the Live-View Remote [129] Cannot Charge the Live... Triangulate although the GPS Assist Data is Taken In [134] The Location Information Has Not Been Recorded [135] Q & A Camera Cannot Turn On the Camera [136] Battery Life of the Camera is Short [137] Live-View Remote file:///E|/%8E%CC%82%C4/ActionCam_PXC14/4548273132_GB/en/print.html[2017/04/03 13:56...

Help Guide
Page 11
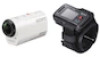
Help Guide 16. REC/Access lamp 20. REC/ENTER button 5. DOWN button 8. SSID label [2] How to Use Read This First Identifying Parts Identifying Parts of the Remote Control 1. GPS antenna 4. Battery storage area 23. Battery pack cover 24. Battery ejection sheet 22. Memory card cover 19. MENU button 2. REC/Wi-Fi lamp 6. LCD screen 7. UP button 9. Battery cover lock lever 21. RESET button 17. DISP button 3. CHG (Charge) lamp file:///E|/%8E%CC%82%C4/ActionCam_PXC14/4548273132_GB/en/print.html[2017/04/03 13:56:27] Memory card insertion slot 18.
Help Guide 16. REC/Access lamp 20. REC/ENTER button 5. DOWN button 8. SSID label [2] How to Use Read This First Identifying Parts Identifying Parts of the Remote Control 1. GPS antenna 4. Battery storage area 23. Battery pack cover 24. Battery ejection sheet 22. Memory card cover 19. MENU button 2. REC/Wi-Fi lamp 6. LCD screen 7. UP button 9. Battery cover lock lever 21. RESET button 17. DISP button 3. CHG (Charge) lamp file:///E|/%8E%CC%82%C4/ActionCam_PXC14/4548273132_GB/en/print.html[2017/04/03 13:56:27] Memory card insertion slot 18.

Help Guide
Page 12
... The memory card is dirty. Lock lever 13. Help Guide 10. Connector cover (USB) 14. Loop for a belt [3] How to , the lower the battery level is. 2. The memory card is inserted. file:///E|/%8E%CC%82%C4/ActionCam_PXC14/4548273132_GB/en/print.html[2017/04/03 13:56:27] Memory card... full capacity (Light up) The memory card error (Blink): The memory card incompatible with the camera is damaged. Multi/Micro USB Terminal 12. Battery level indicator The further right the indicator goes to Use Read This First Display Camera Display The following describes the icons displayed on the display...
... The memory card is dirty. Lock lever 13. Help Guide 10. Connector cover (USB) 14. Loop for a belt [3] How to , the lower the battery level is. 2. The memory card is inserted. file:///E|/%8E%CC%82%C4/ActionCam_PXC14/4548273132_GB/en/print.html[2017/04/03 13:56:27] Memory card... full capacity (Light up) The memory card error (Blink): The memory card incompatible with the camera is damaged. Multi/Micro USB Terminal 12. Battery level indicator The further right the indicator goes to Use Read This First Display Camera Display The following describes the icons displayed on the display...

Help Guide
Page 13
... to Use Read This First Display Live-View Remote Display (Single Connection) The following describes the icons displayed on the strength of GPS signal reception. 3 Battery level indicator of the remote control file:///E|/%8E%CC%82%C4/ActionCam_PXC14/4548273132_GB/en/print.html[2017/04/03 13:56:27] The GPS icon...
... to Use Read This First Display Live-View Remote Display (Single Connection) The following describes the icons displayed on the strength of GPS signal reception. 3 Battery level indicator of the remote control file:///E|/%8E%CC%82%C4/ActionCam_PXC14/4548273132_GB/en/print.html[2017/04/03 13:56:27] The GPS icon...

Help Guide
Page 14
..., leave it for several minutes with the power turned off . Start recording after the temperature inside the camera drops fully. 3 Battery level indicator of the connected camera will be displayed. Help Guide The further right the indicator goes to, the lower the... battery level is. 4 Clock display Live-View display 5 Shooting mode display 6 Battery level indicator 7 Memory card warning indicator/ Rising temperature icon When is selected. REC icon will be displayed ...
..., leave it for several minutes with the power turned off . Start recording after the temperature inside the camera drops fully. 3 Battery level indicator of the connected camera will be displayed. Help Guide The further right the indicator goes to, the lower the... battery level is. 4 Clock display Live-View display 5 Shooting mode display 6 Battery level indicator 7 Memory card warning indicator/ Rising temperature icon When is selected. REC icon will be displayed ...

Help Guide
Page 15
Help Guide The further right the indicator goes to, the lower the battery level is. [6] How to Use Getting Started Checking the Bundled Items Checking the Bundled Items Make sure that you have the following bundled items. The number in parentheses indicates the quantity of each item bundled. Camera (1) Micro USB cable (1) Live-View Remote (RM-LVR2V) (1) Rechargeable battery pack (NP-BY1) (1) Waterproof Case (SPK-AZ1) (1) file:///E|/%8E%CC%82%C4/ActionCam_PXC14/4548273132_GB/en/print.html[2017/04/03 13:56:27]
Help Guide The further right the indicator goes to, the lower the battery level is. [6] How to Use Getting Started Checking the Bundled Items Checking the Bundled Items Make sure that you have the following bundled items. The number in parentheses indicates the quantity of each item bundled. Camera (1) Micro USB cable (1) Live-View Remote (RM-LVR2V) (1) Rechargeable battery pack (NP-BY1) (1) Waterproof Case (SPK-AZ1) (1) file:///E|/%8E%CC%82%C4/ActionCam_PXC14/4548273132_GB/en/print.html[2017/04/03 13:56:27]

Help Guide
Page 16
file:///E|/%8E%CC%82%C4/ActionCam_PXC14/4548273132_GB/en/print.html[2017/04/03 13:56:27] Help Guide Attachment Buckle (1) Flat Adhesive Mount (1) Curved Adhesive Mount (1) Tripod Adaptor (1) Set of printed documentation [7] How to Use Getting Started Preparing to Use Preparing to be prepared in advance is correctly oriented. The camera Inserting the battery pack of what needs to Use The flow of the camera Insert the battery pack confirming that the battery is summarized. Check each item for further details.
file:///E|/%8E%CC%82%C4/ActionCam_PXC14/4548273132_GB/en/print.html[2017/04/03 13:56:27] Help Guide Attachment Buckle (1) Flat Adhesive Mount (1) Curved Adhesive Mount (1) Tripod Adaptor (1) Set of printed documentation [7] How to Use Getting Started Preparing to Use Preparing to be prepared in advance is correctly oriented. The camera Inserting the battery pack of what needs to Use The flow of the camera Insert the battery pack confirming that the battery is summarized. Check each item for further details.

Help Guide
Page 17
...-View Remote through Wi-Fi file:///E|/%8E%CC%82%C4/ActionCam_PXC14/4548273132_GB/en/print.html[2017/04/03 13:56:27] Help Guide Charging the battery pack of the camera Check the power of the camera is off and connect the micro USB cable (supplied) to a computer that is turned on...
...-View Remote through Wi-Fi file:///E|/%8E%CC%82%C4/ActionCam_PXC14/4548273132_GB/en/print.html[2017/04/03 13:56:27] Help Guide Charging the battery pack of the camera Check the power of the camera is off and connect the micro USB cable (supplied) to a computer that is turned on...

Help Guide
Page 18
... be ejected if the battery ejection sheet is securely closed. Inserting the battery pack 1. Insert the battery pack There are chances that the battery may cause water leakage. 1 Align the mark of the battery with that of the camera 2 Place the battery on the battery ejection sheet and insert the battery pack 3 Insert the battery pack, aligning the mark...
... be ejected if the battery ejection sheet is securely closed. Inserting the battery pack 1. Insert the battery pack There are chances that the battery may cause water leakage. 1 Align the mark of the battery with that of the camera 2 Place the battery on the battery ejection sheet and insert the battery pack 3 Insert the battery pack, aligning the mark...

Help Guide
Page 19
... 3. To turn off the camera, press the ON/OFF button until the POWER lamp turns off. 2. Remove the battery pack Open the battery cover and pull out the battery ejection sheet to remove the battery. [9] How to an activated computer with a computer. 1. Disconnect the camera from the computer when the... battery is turned on. Connect the camera to Use Getting Started Preparing the Camera Charging the Battery Pack of the camera. 4. If any foreign matter such as sand gets inside the cover,...
... 3. To turn off the camera, press the ON/OFF button until the POWER lamp turns off. 2. Remove the battery pack Open the battery cover and pull out the battery ejection sheet to remove the battery. [9] How to an activated computer with a computer. 1. Disconnect the camera from the computer when the... battery is turned on. Connect the camera to Use Getting Started Preparing the Camera Charging the Battery Pack of the camera. 4. If any foreign matter such as sand gets inside the cover,...

Help Guide
Page 20
...connected to the computer for an extended period, charge the camera once every 6 to 12 months to an AC power source, the battery of the notebook computer may be correct under certain circumstances or conditions. *2 Rapid charging is not assured. The displayed remaining charge indicator... time*1 of the display panel. Charging via a computer: Approx. 2 h 25 min. Turn off the camera while charging the battery. To connect to the charger, use only a type Y battery with all computers is possible using the USB charger AC-UD10 (sold separately): Approx. 2 h 05 min. *1 Time required to...
...connected to the computer for an extended period, charge the camera once every 6 to 12 months to an AC power source, the battery of the notebook computer may be correct under certain circumstances or conditions. *2 Rapid charging is not assured. The displayed remaining charge indicator... time*1 of the display panel. Charging via a computer: Approx. 2 h 25 min. Turn off the camera while charging the battery. To connect to the charger, use only a type Y battery with all computers is possible using the USB charger AC-UD10 (sold separately): Approx. 2 h 05 min. *1 Time required to...

Help Guide
Page 22
... 104°F). Be sure to back up any of the camera is not exFAT*-compatible (via USB connection). That the terminal cover, memory card and battery pack cover are securely closed or any foreign matter gets inside any of the covers, it may result in any of the covers If any...
... 104°F). Be sure to back up any of the camera is not exFAT*-compatible (via USB connection). That the terminal cover, memory card and battery pack cover are securely closed or any foreign matter gets inside any of the covers, it may result in any of the covers If any...

Help Guide
Page 24
...may not be displayed correctly. Via an AC-UD10*2: Approx. 2 h 55 min. *1 Time required to the charger, use the partial charge capacity of the battery pack on the remote control is as is possible using the USB charger AC-UD10 (sold separately). To connect to charge a fully depleted... Help Guide The CHG (Charge) lamp goes out when charging is high, fully charge the remote control, again. The charging time*1 of the battery pack as follows. Charging may take longer under certain circumstances. Also, even if the remote control is not fully charged, you can charge the remote...
...may not be displayed correctly. Via an AC-UD10*2: Approx. 2 h 55 min. *1 Time required to the charger, use the partial charge capacity of the battery pack on the remote control is as is possible using the USB charger AC-UD10 (sold separately). To connect to charge a fully depleted... Help Guide The CHG (Charge) lamp goes out when charging is high, fully charge the remote control, again. The charging time*1 of the battery pack as follows. Charging may take longer under certain circumstances. Also, even if the remote control is not fully charged, you can charge the remote...

Help Guide
Page 29
... can easily operate all the functions of the camera is set the setting of the camera when you want to the back side of the battery pack cover of the camera 2. Turn on the sticker attached to connect with the UP button or DOWN button and press the REC/ENTER button...
... can easily operate all the functions of the camera is set the setting of the camera when you want to the back side of the battery pack cover of the camera 2. Turn on the sticker attached to connect with the UP button or DOWN button and press the REC/ENTER button...

Help Guide
Page 33
... label) attached to the back side of the camera to a computer with all smartphones and tablets. Press the ON/OFF button of the battery pack cover. The operation methods and display screens for one-touch connect by the following procedure. 1. Note An NFC-enabled smartphone or tablet is... not guaranteed to be read, you can recall your smartphone. Insert a charged battery pack into the camera 2. Help Guide When using One-touch functions (NFC) of the camera. The Wi-Fi function described in this Help Guide...
... label) attached to the back side of the camera to a computer with all smartphones and tablets. Press the ON/OFF button of the battery pack cover. The operation methods and display screens for one-touch connect by the following procedure. 1. Note An NFC-enabled smartphone or tablet is... not guaranteed to be read, you can recall your smartphone. Insert a charged battery pack into the camera 2. Help Guide When using One-touch functions (NFC) of the camera. The Wi-Fi function described in this Help Guide...

Help Guide
Page 36
... tag etc. Data communication is achieved by simply touching a specific point. Help Guide NFC is a technology for the settings. 1. Turn on the power of the battery pack cover file:///E|/%8E%CC%82%C4/ActionCam_PXC14/4548273132_GB/en/print.html[2017/04/03 13:56:27]
... tag etc. Data communication is achieved by simply touching a specific point. Help Guide NFC is a technology for the settings. 1. Turn on the power of the battery pack cover file:///E|/%8E%CC%82%C4/ActionCam_PXC14/4548273132_GB/en/print.html[2017/04/03 13:56:27]


