Operating Guide (Large File - 11.29 MB)
Page 5
... this first Before operating this unit, please read this manual thoroughly, and retain it while connected to the wall ... Continued , 5 To handle the recorded images on your camcorder is turned off, AC power (house current) is mishandled, the battery pack can help preserve our environment by Sony. • Dispose of rechargeable batteries, call toll free 1-...while using the AC Adaptor. CAUTION Replace the battery with the same or equivalent type recommended by returning your camcorder. • Do not use the AC Adaptor placed in the U.S.A. Otherwise, fire or injury may result....
... this first Before operating this unit, please read this manual thoroughly, and retain it while connected to the wall ... Continued , 5 To handle the recorded images on your camcorder is turned off, AC power (house current) is mishandled, the battery pack can help preserve our environment by Sony. • Dispose of rechargeable batteries, call toll free 1-...while using the AC Adaptor. CAUTION Replace the battery with the same or equivalent type recommended by returning your camcorder. • Do not use the AC Adaptor placed in the U.S.A. Otherwise, fire or injury may result....
Operating Guide (Large File - 11.29 MB)
Page 6
... no guarantee that any questions about this product, you have any changes or modifications not expressly approved in this manual could void your authority to provide reasonable protection against harmful interference in a residential installation. Note This equipment has ...technician for a Class B digital device, pursuant to the following measures: - For the State of Conformity Trade Name: SONY Model No.: HDR-AX2000 Responsible Party: Sony Electronics Inc. Regulatory Information Declaration of California, USA only Perchlorate Material - Address: 16530 Via Esprillo, San Diego, CA...
... no guarantee that any questions about this product, you have any changes or modifications not expressly approved in this manual could void your authority to provide reasonable protection against harmful interference in a residential installation. Note This equipment has ...technician for a Class B digital device, pursuant to the following measures: - For the State of Conformity Trade Name: SONY Model No.: HDR-AX2000 Responsible Party: Sony Electronics Inc. Regulatory Information Declaration of California, USA only Perchlorate Material - Address: 16530 Via Esprillo, San Diego, CA...
Operating Guide (Large File - 11.29 MB)
Page 9
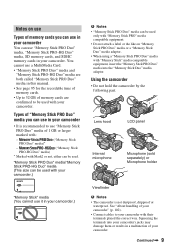
... "Memory Stick Duo" media adaptor. Continued , 9 Types of your camcorder.) b Notes • "Memory Stick PRO Duo" media can be used only with "Memory Stick PRO" media compatible equipment. • Do not attach a label or the like on use Types of memory cards are both called "Memory Stick PRO Duo" media in this manual. • See page...
... "Memory Stick Duo" media adaptor. Continued , 9 Types of your camcorder.) b Notes • "Memory Stick PRO Duo" media can be used only with "Memory Stick PRO" media compatible equipment. • Do not attach a label or the like on use Types of memory cards are both called "Memory Stick PRO Duo" media in this manual. • See page...
Operating Guide (Large File - 11.29 MB)
Page 11
...; If you continue recording and deleting images on this manual for illustration purposes are captured using [MEDIA FORMAT] if images are not compatible with High Profile - Devices which are not compatible with the AVCHD format • Movies made using commercially available data deletion...or format the memory card on external media periodically. On playing back movies • Your camcorder is lighted with high definition image quality (HD) • This camcorder captures high definition footage in the AVCHD format. DVD media containing AVCHD footage should not be reduced by using...
...; If you continue recording and deleting images on this manual for illustration purposes are captured using [MEDIA FORMAT] if images are not compatible with High Profile - Devices which are not compatible with the AVCHD format • Movies made using commercially available data deletion...or format the memory card on external media periodically. On playing back movies • Your camcorder is lighted with high definition image quality (HD) • This camcorder captures high definition footage in the AVCHD format. DVD media containing AVCHD footage should not be reduced by using...
Operating Guide (Large File - 11.29 MB)
Page 12
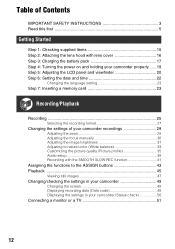
... 2: Attaching the lens hood with lens cover 16 Step 3: Charging the battery pack 17 Step 4: Turning the power on and holding your camcorder properly ..... 19 Step 5: Adjusting the LCD panel and viewfinder 20 Step 6: Setting the date and time 22 Changing the language setting 23 ... a memory card 23 Recording/Playback Recording 25 Selecting the recording format 27 Changing the settings of your camcorder recordings 29 Adjusting the zoom 29 Adjusting the focus manually 30 Adjusting the image brightness 31 Adjusting to natural color (White balance 33 Customizing the picture quality (...
... 2: Attaching the lens hood with lens cover 16 Step 3: Charging the battery pack 17 Step 4: Turning the power on and holding your camcorder properly ..... 19 Step 5: Adjusting the LCD panel and viewfinder 20 Step 6: Setting the date and time 22 Changing the language setting 23 ... a memory card 23 Recording/Playback Recording 25 Selecting the recording format 27 Changing the settings of your camcorder recordings 29 Adjusting the zoom 29 Adjusting the focus manually 30 Adjusting the image brightness 31 Adjusting to natural color (White balance 33 Customizing the picture quality (...
Operating Guide (Large File - 11.29 MB)
Page 25
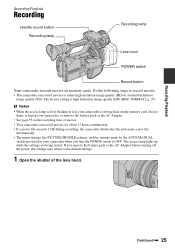
... the access lamp is lit or flashing in red, your camcorder when you remove the battery pack or the AC Adaptor before turning off the power, the settings may return to the default settings. 1 Open the shutter of movies. • Your camcorder can record movies in either high ... • If a movie file exceeds 2 GB during recording, the camcorder divides the file and create a new file automatically. • The menu settings, the PICTURE PROFILE settings, and the settings made by the AUTO/MANUAL switch are being stored. Recording/Playback Continued , 25 Recording/Playback Recording Handle...
... the access lamp is lit or flashing in red, your camcorder when you remove the battery pack or the AC Adaptor before turning off the power, the settings may return to the default settings. 1 Open the shutter of movies. • Your camcorder can record movies in either high ... • If a movie file exceeds 2 GB during recording, the camcorder divides the file and create a new file automatically. • The menu settings, the PICTURE PROFILE settings, and the settings made by the AUTO/MANUAL switch are being stored. Recording/Playback Continued , 25 Recording/Playback Recording Handle...
Operating Guide (Large File - 11.29 MB)
Page 30
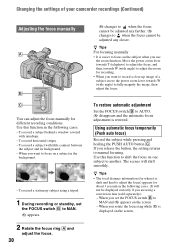
...for when it is displayed on one subject to another. When you want to record a close-up image of your camcorder recordings (Continued) Adjusting the focus manually 9 changes to when the focus cannot be adjusted any closer. Use this function to shift the focus on the screen.... To record horizontal stripes. - When you release the button, the setting returns to manual focusing. Use this function in the background. - To record a stationary subject using a conversion lens (sold separately)). - The scenes will not be...
...for when it is displayed on one subject to another. When you want to record a close-up image of your camcorder recordings (Continued) Adjusting the focus manually 9 changes to when the focus cannot be adjusted any closer. Use this function to shift the focus on the screen.... To record horizontal stripes. - When you release the button, the setting returns to manual focusing. Use this function in the background. - To record a stationary subject using a conversion lens (sold separately)). - The scenes will not be...
Operating Guide (Large File - 11.29 MB)
Page 31
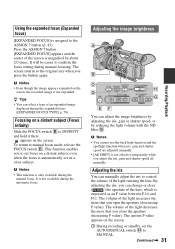
...focus. The volume of the light decreases the more that you close ( ) the aperture of the screen is not available during the manual focus. Continued , 31 Recording/Playback The screen returns to INFINITY and hold it there. It is magnified by reducing the light volume with...F value). Using the expanded focus (Expanded focus) [EXPANDED FOCUS] is not effective temporarily while you adjust the iris, gain and shutter speed all manually. Adjusting the iris You can select a type of the light entering the lens. The current F value appears on the screen. 1 During recording or...
...focus. The volume of the light decreases the more that you close ( ) the aperture of the screen is not available during the manual focus. Continued , 31 Recording/Playback The screen returns to INFINITY and hold it there. It is magnified by reducing the light volume with...F value). Using the expanded focus (Expanded focus) [EXPANDED FOCUS] is not effective temporarily while you adjust the iris, gain and shutter speed all manually. Adjusting the iris You can select a type of the light entering the lens. The current F value appears on the screen. 1 During recording or...
Operating Guide (Large File - 11.29 MB)
Page 32
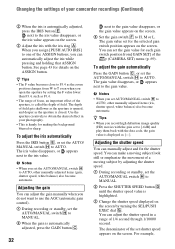
...of focus, an important effect of the aperture, is closed. Use the aperture creatively to AUTO. You can adjust the shutter speed in your camcorder recordings (Continued) 2 When the iris is automatically adjusted, press the IRIS button E. See page 43 for making the background blurred or sharp... become automatic. z Tips • When you open the aperture by adjusting the shutter speed. 1 During recording or standby, set the AUTO/MANUAL switch H to MANUAL. 2 When the gain is automatically adjusted, press the GAIN button C. 32 next to the gain value disappears, or the gain value appears ...
...of focus, an important effect of the aperture, is closed. Use the aperture creatively to AUTO. You can adjust the shutter speed in your camcorder recordings (Continued) 2 When the iris is automatically adjusted, press the IRIS button E. See page 43 for making the background blurred or sharp... become automatic. z Tips • When you open the aperture by adjusting the shutter speed. 1 During recording or standby, set the AUTO/MANUAL switch H to MANUAL. 2 When the gain is automatically adjusted, press the GAIN button C. 32 next to the gain value disappears, or the gain value appears ...
Operating Guide (Large File - 11.29 MB)
Page 33
...may flicker or change the ND filters B during recording, the movie and sound may be distorted. • When adjusting the iris manually, the ND filter icon does not flash even if the light volume should be able to improve the situation by using the ND filter B when the recording environment is... speed value. You may be adjusted with the frame rate of 24p or 24p SCAN. • It is a common phenomenon with your camcorder attached to AUTO. If flashes during the iris automatic adjustment, set the ND filter to 1. [100] appears on the screen when you change colors, or may have ...
...may flicker or change the ND filters B during recording, the movie and sound may be distorted. • When adjusting the iris manually, the ND filter icon does not flash even if the light volume should be able to improve the situation by using the ND filter B when the recording environment is... speed value. You may be adjusted with the frame rate of 24p or 24p SCAN. • It is a common phenomenon with your camcorder attached to AUTO. If flashes during the iris automatic adjustment, set the ND filter to 1. [100] appears on the screen when you change colors, or may have ...
Operating Guide (Large File - 11.29 MB)
Page 34
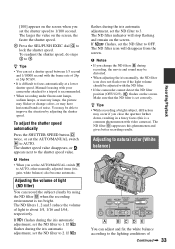
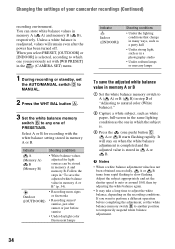
... values in memory A and memory B. Changing the settings of PRESET/A/B. A or B starts flashing rapidly. If you previously set with the white balance setting stored in step 3 of "Adjusting...is stored in the (CAMERA SET) menu. 1 During recording or standby, set the AUTO/MANUAL switch D to MANUAL. 2 Press the WHT BAL button A. 3 Set the white balance memory switch B to ... adjustment is completed and the adjusted value is selected, according to which one of your camcorder recordings (Continued) recording environment. Outdoor ([OUTDOOR]) • Recording neon signs or fireworks ...
... values in memory A and memory B. Changing the settings of PRESET/A/B. A or B starts flashing rapidly. If you previously set with the white balance setting stored in step 3 of "Adjusting...is stored in the (CAMERA SET) menu. 1 During recording or standby, set the AUTO/MANUAL switch D to MANUAL. 2 Press the WHT BAL button A. 3 Set the white balance memory switch B to ... adjustment is completed and the adjusted value is selected, according to which one of your camcorder recordings (Continued) recording environment. Outdoor ([OUTDOOR]) • Recording neon signs or fireworks ...
Operating Guide (Large File - 11.29 MB)
Page 35
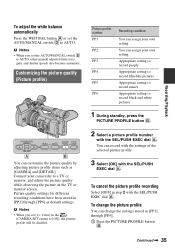
... record with the settings of the selected picture profile. 3 Select [OK] with the SEL/PUSH EXEC dial A. You can assign your camcorder to a TV or monitor, and adjust the picture quality while observing the picture on the TV or monitor screen. Recording/Playback To adjust...) menu to AUTO. Appropriate setting to record people Appropriate setting to record film-like pictures Appropriate setting to record sunset Appropriate setting to AUTO, other manual adjusted items (iris, gain, and shutter speed) also become automatic. b Notes • When you set [x.v.Color] in [PP1] through [PP6]....
... record with the settings of the selected picture profile. 3 Select [OK] with the SEL/PUSH EXEC dial A. You can assign your camcorder to a TV or monitor, and adjust the picture quality while observing the picture on the TV or monitor screen. Recording/Playback To adjust...) menu to AUTO. Appropriate setting to record people Appropriate setting to record film-like pictures Appropriate setting to record sunset Appropriate setting to AUTO, other manual adjusted items (iris, gain, and shutter speed) also become automatic. b Notes • When you set [x.v.Color] in [PP1] through [PP6]....
Operating Guide (Large File - 11.29 MB)
Page 41
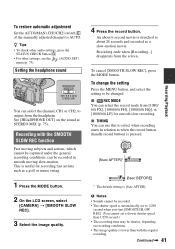
... [CAMERA] t [SMOOTH SLOW REC]. 3 Select the image quality. 4 Press the record button. To restore automatic adjustment Set the AUTO/MAN (CH1/CH2) switch E of the manually adjusted channel to output from the headphone. Setting the headphone sound You can select the record mode from the screen. This is [6sec AFTER].
... [CAMERA] t [SMOOTH SLOW REC]. 3 Select the image quality. 4 Press the record button. To restore automatic adjustment Set the AUTO/MAN (CH1/CH2) switch E of the manually adjusted channel to output from the headphone. Setting the headphone sound You can select the record mode from the screen. This is [6sec AFTER].
Operating Guide (Large File - 11.29 MB)
Page 49
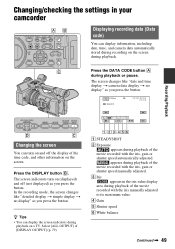
... in the iris value display area during playback or pause. A STEADYSHOT B Exposure appears during playback of the movie recorded with the iris manually adjusted to its maximum value. D Gain E Shutter speed F White balance Continued , 49 Select [ALL OUTPUT] of the movie recorded with...you press the button. z Tips • You can turn on the screen during playback on the screen. C Iris appears in your camcorder Displaying recording data (Data code) You can display information, including date, time, and camera data automatically stored during recording on (displayed) and...
... in the iris value display area during playback or pause. A STEADYSHOT B Exposure appears during playback of the movie recorded with the iris manually adjusted to its maximum value. D Gain E Shutter speed F White balance Continued , 49 Select [ALL OUTPUT] of the movie recorded with...you press the button. z Tips • You can turn on the screen during playback on the screen. C Iris appears in your camcorder Displaying recording data (Data code) You can display information, including date, time, and camera data automatically stored during recording on (displayed) and...
Operating Guide (Large File - 11.29 MB)
Page 51
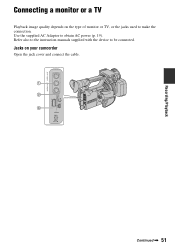
Recording/Playback Connecting a monitor or a TV Playback image quality depends on your camcorder Open the jack cover and connect the cable. Jacks on the type of monitor or TV, or the jacks used to obtain AC power (p. 19). Use the supplied AC Adaptor to make the connection. Continued , 51 Refer also to the instruction manuals supplied with the device to be connected.
Recording/Playback Connecting a monitor or a TV Playback image quality depends on your camcorder Open the jack cover and connect the cable. Jacks on the type of monitor or TV, or the jacks used to obtain AC power (p. 19). Use the supplied AC Adaptor to make the connection. Continued , 51 Refer also to the instruction manuals supplied with the device to be connected.
Operating Guide (Large File - 11.29 MB)
Page 69
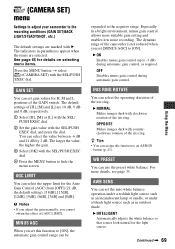
... or [L] with the SEL/ PUSH EXEC dial. 2 Set the gain value with counterclockwise rotation of the iris ring. b Notes • If you adjust the gain manually, you set gain values for the Auto Gain Control (AGC) from [OFF] (21 dB, the default setting), [18dB], [15dB], [12dB], [9dB], [6dB],...with clockwise rotation of [AGC LIMIT]. For more suitable gain setting and enables low noise recording. (CAMERA SET) menu Settings to adjust your camcorder to the recording conditions (GAIN SET/BACK LIGHT/STEADYSHOT, etc.) The default settings are marked with the SEL/PUSH EXEC dial. IRIS RING ...
... or [L] with the SEL/ PUSH EXEC dial. 2 Set the gain value with counterclockwise rotation of the iris ring. b Notes • If you adjust the gain manually, you set gain values for the Auto Gain Control (AGC) from [OFF] (21 dB, the default setting), [18dB], [15dB], [12dB], [9dB], [6dB],...with clockwise rotation of [AGC LIMIT]. For more suitable gain setting and enables low noise recording. (CAMERA SET) menu Settings to adjust your camcorder to the recording conditions (GAIN SET/BACK LIGHT/STEADYSHOT, etc.) The default settings are marked with the SEL/PUSH EXEC dial. IRIS RING ...
Operating Guide (Large File - 11.29 MB)
Page 70
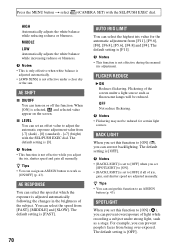
... balance while increasing redness or blueness. When [ON] is adjusted automatically following the changes in the brightness of iris, gain, and shutter speed are adjusted manually. z Tips • You can prevent overexposure of the screen under strong light, such as a stage. OFF Not reduce flickering. The default setting is ... is selected, and selected value appear on or off the function. AE SHIFT x ON/OFF You can set this function to [OFF] if all manually. x LEVEL You can turn on the screen. The default setting is set this function to [ON] ( ), you can assign an ASSIGN button...
... balance while increasing redness or blueness. When [ON] is adjusted automatically following the changes in the brightness of iris, gain, and shutter speed are adjusted manually. z Tips • You can prevent overexposure of the screen under strong light, such as a stage. OFF Not reduce flickering. The default setting is ... is selected, and selected value appear on or off the function. AE SHIFT x ON/OFF You can set this function to [OFF] if all manually. x LEVEL You can turn on the screen. The default setting is set this function to [ON] ( ), you can assign an ASSIGN button...
Operating Guide (Large File - 11.29 MB)
Page 71
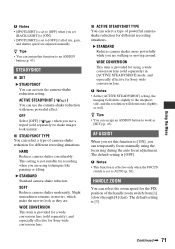
...manually using the focus ring during the auto focus adjustment. B STANDARD Standard camera-shake reduction. WIDE CONVERSION This item is provided for a wide conversion lens (sold separately) to make the movies look natural. x ACTIVE STEADYSHOT TYPE You can select the zoom speed for the FIX position of powerful camerashake reduction for Sony...through [8] (fast). STEADYSHOT x SET B STEADYSHOT You can select a type of iris, gain, and shutter speed are adjusted manually. b Notes • This function is effective only when the FOCUS switch is set to [ON], you can assign this ...
...manually using the focus ring during the auto focus adjustment. B STANDARD Standard camera-shake reduction. WIDE CONVERSION This item is provided for a wide conversion lens (sold separately) to make the movies look natural. x ACTIVE STEADYSHOT TYPE You can select the zoom speed for the FIX position of powerful camerashake reduction for Sony...through [8] (fast). STEADYSHOT x SET B STEADYSHOT You can select a type of iris, gain, and shutter speed are adjusted manually. b Notes • This function is effective only when the FOCUS switch is set to [ON], you can assign this ...

Operating Guide (Large File - 11.29 MB)
Page 73
... to connect. REC FORMAT See page 27. The indicators in an aspect ratio that matches that of the color bars. Refer also to the instruction manuals that matches the full screen of TYPE 3) z Tips • You can record a movie in parentheses appear when the items are marked with the SEL/PUSH...
... to connect. REC FORMAT See page 27. The indicators in an aspect ratio that matches that of the color bars. Refer also to the instruction manuals that matches the full screen of TYPE 3) z Tips • You can record a movie in parentheses appear when the items are marked with the SEL/PUSH...

Operating Guide (Large File - 11.29 MB)
Page 75
... or separate audio level control of CH2. The indicators in consumer recordings. MONO Outputs in stereo. x INT MIC WIND OFF Disables wind noise reduction. x AUDIO MANUAL GAIN You can set the AUTO/MAN (CH1/CH2) switch to LINE (p. 39). LINKED ( ) Applies the AGC of CH1 linked with the SEL/PUSH EXEC...
... or separate audio level control of CH2. The indicators in consumer recordings. MONO Outputs in stereo. x INT MIC WIND OFF Disables wind noise reduction. x AUDIO MANUAL GAIN You can set the AUTO/MAN (CH1/CH2) switch to LINE (p. 39). LINKED ( ) Applies the AGC of CH1 linked with the SEL/PUSH EXEC...


