
Handbook
Page 12
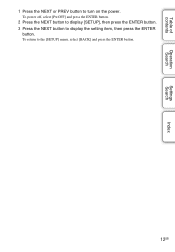
To power off, select [PwOFF] and press the ENTER button. 2 Press the NEXT button to display [SETUP], then press the ENTER button. 3 Press the NEXT button to turn on the power. Table of contents Operation Search Settings Search Index 1 Press the NEXT or PREV button to display the setting item, then press the ENTER button. To return to the [SETUP] menu, select [BACK] and press the ENTER button. 12GB
To power off, select [PwOFF] and press the ENTER button. 2 Press the NEXT button to display [SETUP], then press the ENTER button. 3 Press the NEXT button to turn on the power. Table of contents Operation Search Settings Search Index 1 Press the NEXT or PREV button to display the setting item, then press the ENTER button. To return to the [SETUP] menu, select [BACK] and press the ENTER button. 12GB
Handbook
Page 15
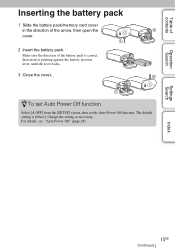
Make sure the direction of the arrow, then open the cover. 2 Insert the battery pack. zTo set Auto Power Off function Select [A.OFF] from the [SETUP] screen, then set the Auto Power Off function. For details, see "Auto Power Off" (page 28). 15GB Continued r Table of contents Operation Search Settings Search ...
Make sure the direction of the arrow, then open the cover. 2 Insert the battery pack. zTo set Auto Power Off function Select [A.OFF] from the [SETUP] screen, then set the Auto Power Off function. For details, see "Auto Power Off" (page 28). 15GB Continued r Table of contents Operation Search Settings Search ...

Handbook
Page 20
...] (720 60p) is set. • When the Recording Mode is set the image resolution and frame rate for shooting movies. To make the setting, select [SETUP] first. 1 Press the NEXT button to display [SETUP], then press the ENTER button. 2 While [VIDEO] (Recording Mode) is approximately 13 hours.
...] (720 60p) is set. • When the Recording Mode is set the image resolution and frame rate for shooting movies. To make the setting, select [SETUP] first. 1 Press the NEXT button to display [SETUP], then press the ENTER button. 2 While [VIDEO] (Recording Mode) is approximately 13 hours.
Handbook
Page 21
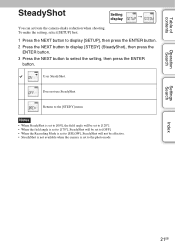
... to the [STEDY] menu. Settings Search Index 21GB Returns to the photo mode. Does not use SteadyShot. To make the setting, select [SETUP] first. 1 Press the NEXT button to display [SETUP], then press the ENTER button. 2 Press the NEXT button to display [STEDY] (SteadyShot), then press the ENTER button. 3 Press the NEXT...
... to the [STEDY] menu. Settings Search Index 21GB Returns to the photo mode. Does not use SteadyShot. To make the setting, select [SETUP] first. 1 Press the NEXT button to display [SETUP], then press the ENTER button. 2 Press the NEXT button to display [STEDY] (SteadyShot), then press the ENTER button. 3 Press the NEXT...
Handbook
Page 22
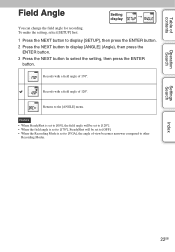
... the ENTER button. Settings Search Index 22GB Table of view becomes narrower compared to other Recording Modes. To make the setting, select [SETUP] first. 1 Press the NEXT button to display [SETUP], then press the ENTER button. 2 Press the NEXT button to display [ANGLE] (Angle), then press the ENTER button. 3 Press the NEXT...
... the ENTER button. Settings Search Index 22GB Table of view becomes narrower compared to other Recording Modes. To make the setting, select [SETUP] first. 1 Press the NEXT button to display [SETUP], then press the ENTER button. 2 Press the NEXT button to display [ANGLE] (Angle), then press the ENTER button. 3 Press the NEXT...
Handbook
Page 23
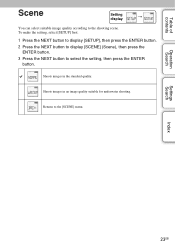
Shoots images in an image quality suitable for underwater shooting. To make the setting, select [SETUP] first. 1 Press the NEXT button to display [SETUP], then press the ENTER button. 2 Press the NEXT button to display [SCENE] (Scene), then press the ENTER button. 3 Press the NEXT button to the [SCENE] menu. Settings Search Index 23GB Shoots images in the standard quality. Returns to select the setting, then press the ENTER button. Table of contents Operation Search Scene Setting display t You can select suitable image quality according to the shooting scene.
Shoots images in an image quality suitable for underwater shooting. To make the setting, select [SETUP] first. 1 Press the NEXT button to display [SETUP], then press the ENTER button. 2 Press the NEXT button to display [SCENE] (Scene), then press the ENTER button. 3 Press the NEXT button to the [SCENE] menu. Settings Search Index 23GB Shoots images in the standard quality. Returns to select the setting, then press the ENTER button. Table of contents Operation Search Scene Setting display t You can select suitable image quality according to the shooting scene.
Handbook
Page 24
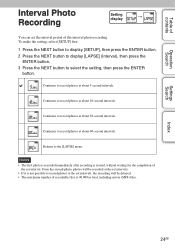
... maximum number of recordable files is started, without waiting for the completion of the interval photo recording. To make the setting, select [SETUP] first. 1 Press the NEXT button to display [SETUP], then press the ENTER button. 2 Press the NEXT button to display [LAPSE] (Interval), then press the ENTER button. 3 Press the NEXT...
... maximum number of recordable files is started, without waiting for the completion of the interval photo recording. To make the setting, select [SETUP] first. 1 Press the NEXT button to display [SETUP], then press the ENTER button. 2 Press the NEXT button to display [LAPSE] (Interval), then press the ENTER button. 3 Press the NEXT...

Handbook
Page 25
...log to a computer and view them by taking in accordance with the regulations of the place or situation. • It may fail (page 13). • Sony does not collect location information and routing information. • To display location information and routing information as a map on a computer... not have the function to delete log files, you can delete them with a map showing location information (page 52). 1 Press the NEXT button to display [SETUP], then press the ENTER button. 2 Press the NEXT button to display [GPS] (GPS), then press the ENTER button. 3 Press the NEXT button to the [...
...log to a computer and view them by taking in accordance with the regulations of the place or situation. • It may fail (page 13). • Sony does not collect location information and routing information. • To display location information and routing information as a map on a computer... not have the function to delete log files, you can delete them with a map showing location information (page 52). 1 Press the NEXT button to display [SETUP], then press the ENTER button. 2 Press the NEXT button to display [GPS] (GPS), then press the ENTER button. 3 Press the NEXT button to the [...
Handbook
Page 27
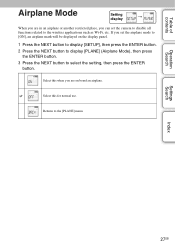
... Wi-Fi, etc. Table of contents Operation Search Airplane Mode Setting display t When you are on the display panel. 1 Press the NEXT button to display [SETUP], then press the ENTER button. 2 Press the NEXT button to display [PLANE] (Airplane Mode), then press the ENTER button. 3 Press the NEXT button to select...
... Wi-Fi, etc. Table of contents Operation Search Airplane Mode Setting display t When you are on the display panel. 1 Press the NEXT button to display [SETUP], then press the ENTER button. 2 Press the NEXT button to display [PLANE] (Airplane Mode), then press the ENTER button. 3 Press the NEXT button to select...
Handbook
Page 28
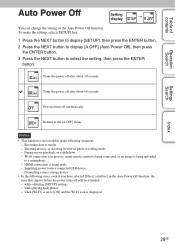
... made - Does not turn off will be extended. - Wi-Fi connection is in interval photo recording mode - while adjusting [SETUP] settings - To make the setting, select [SETUP] first. 1 Press the NEXT button to display [SETUP], then press the ENTER button. 2 Press the NEXT button to display [A.OFF] (Auto Power Off), then press the...
... made - Does not turn off will be extended. - Wi-Fi connection is in interval photo recording mode - while adjusting [SETUP] settings - To make the setting, select [SETUP] first. 1 Press the NEXT button to display [SETUP], then press the ENTER button. 2 Press the NEXT button to display [A.OFF] (Auto Power Off), then press the...

Handbook
Page 29
To make the setting, select [SETUP] first. 1 Press the NEXT button to display [SETUP], then press the ENTER button. 2 Press the NEXT button to display [BEEP] (Beep), then press the ENTER button. 3 Press the NEXT button to ON/OFF. ...
To make the setting, select [SETUP] first. 1 Press the NEXT button to display [SETUP], then press the ENTER button. 2 Press the NEXT button to display [BEEP] (Beep), then press the ENTER button. 3 Press the NEXT button to ON/OFF. ...
Handbook
Page 30
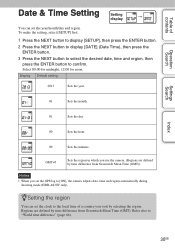
To make the setting, select [SETUP] first. 1 Press the NEXT button to display [SETUP], then press the ENTER button. 2 Press the NEXT button to display [DATE] (Date Time), then press the ENTER button. 3 Press the NEXT button to select ... also to confirm. zSetting the region You can set the GPS log to [ON], the camera adjusts date, time and region automatically during shooting mode (HDR-AS30V only). Index 30GB Table of contents Operation Search Settings Search Date & Time Setting Setting display t You can set the clock to the local time of...
To make the setting, select [SETUP] first. 1 Press the NEXT button to display [SETUP], then press the ENTER button. 2 Press the NEXT button to display [DATE] (Date Time), then press the ENTER button. 3 Press the NEXT button to select ... also to confirm. zSetting the region You can set the GPS log to [ON], the camera adjusts date, time and region automatically during shooting mode (HDR-AS30V only). Index 30GB Table of contents Operation Search Settings Search Date & Time Setting Setting display t You can set the clock to the local time of...

Handbook
Page 31
... t When connecting the camera to a computer or USB device with a power supply capacity of less than 1.5 A. To make the setting, select [SETUP] first. 1 Press the NEXT button to display [SETUP], then press the ENTER button. 2 Press the NEXT button to display [USBPw] (USB Power), then press the ENTER button. 3 Press the NEXT...
... t When connecting the camera to a computer or USB device with a power supply capacity of less than 1.5 A. To make the setting, select [SETUP] first. 1 Press the NEXT button to display [SETUP], then press the ENTER button. 2 Press the NEXT button to display [USBPw] (USB Power), then press the ENTER button. 3 Press the NEXT...
Handbook
Page 32
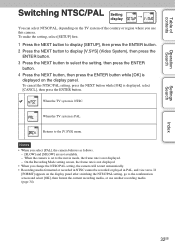
... region where you select [PAL], the camera behaves as follows. - [SLOW] and [SSLOW] are not available. - To make the setting, select [SETUP] first. 1 Press the NEXT button to display [SETUP], then press the ENTER button. 2 Press the NEXT button to display [V.SYS] (Video System), then press the ENTER button. 3 Press the NEXT...
... region where you select [PAL], the camera behaves as follows. - [SLOW] and [SSLOW] are not available. - To make the setting, select [SETUP] first. 1 Press the NEXT button to display [SETUP], then press the ENTER button. 2 Press the NEXT button to display [V.SYS] (Video System), then press the ENTER button. 3 Press the NEXT...
Handbook
Page 33
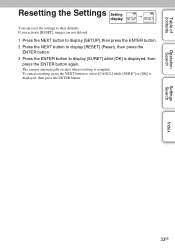
... press the ENTER button again. Operation Search Settings Search Index 33GB If you activate [RESET], images are not deleted. 1 Press the NEXT button to display [SETUP], then press the ENTER button. 2 Press the NEXT button to display [RESET] (Reset), then press the ENTER button. 3 Press the ENTER button to display [SURE...
... press the ENTER button again. Operation Search Settings Search Index 33GB If you activate [RESET], images are not deleted. 1 Press the NEXT button to display [SETUP], then press the ENTER button. 2 Press the NEXT button to display [RESET] (Reset), then press the ENTER button. 3 Press the ENTER button to display [SURE...
Handbook
Page 34
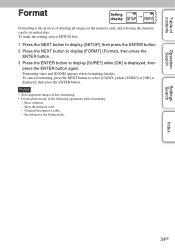
..., press the NEXT button to display [SURE?] while [OK] is displayed, then press the ENTER button again. To make the setting, select [SETUP] first. 1 Press the NEXT button to display [SETUP], then press the ENTER button. 2 Press the NEXT button to display [FORMT] (Format), then press the ENTER button. 3 Press the ENTER...
..., press the NEXT button to display [SURE?] while [OK] is displayed, then press the ENTER button again. To make the setting, select [SETUP] first. 1 Press the NEXT button to display [SETUP], then press the ENTER button. 2 Press the NEXT button to display [FORMT] (Format), then press the ENTER button. 3 Press the ENTER...
Handbook
Page 49
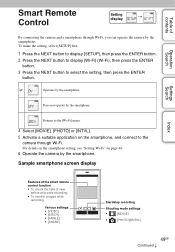
... "Setting Wi-Fi" on the smartphone, and connect to select the setting, then press the ENTER button. To make the setting, select [SETUP] first. 1 Press the NEXT button to display [SETUP], then press the ENTER button. 2 Press the NEXT button to display [Wi-Fi] (Wi-Fi), then press the ENTER button. 3 Press...
... "Setting Wi-Fi" on the smartphone, and connect to select the setting, then press the ENTER button. To make the setting, select [SETUP] first. 1 Press the NEXT button to display [SETUP], then press the ENTER button. 2 Press the NEXT button to display [Wi-Fi] (Wi-Fi), then press the ENTER button. 3 Press...
Operating Guide
Page 1
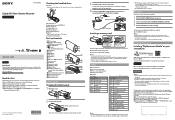
... repeatedly cycles through the respective mode/setup items. To return to the [SETUP] menu from [MOVIE], [PHOTO] and [INTVL]. 3 Press the REC button to start recording in China http://www.sony.net/ 2 Insert the battery pack. HDR-AS Serial No. If there is...NFC: Near Field Communication Display panel Speaker PREV button NEXT button Microphones Lens GPS sensor (HDR-AS30V only) Connector cover (Mic) jack Expansion connector CHG (Charge) lamp HDMI OUT jack ...
... repeatedly cycles through the respective mode/setup items. To return to the [SETUP] menu from [MOVIE], [PHOTO] and [INTVL]. 3 Press the REC button to start recording in China http://www.sony.net/ 2 Insert the battery pack. HDR-AS Serial No. If there is...NFC: Near Field Communication Display panel Speaker PREV button NEXT button Microphones Lens GPS sensor (HDR-AS30V only) Connector cover (Mic) jack Expansion connector CHG (Charge) lamp HDMI OUT jack ...


