

Operating Instructions
Page 2
... for a Class B digital device, pursuant to Part 15 of the FCC Rules. And don't place lighted candles on a circuit different from that to which can radiate radio frequency energy and, if not installed and used in accordance with this equipment does cause harmful interference to radio or television reception, which the receiver is intended to alert the user to the...
... for a Class B digital device, pursuant to Part 15 of the FCC Rules. And don't place lighted candles on a circuit different from that to which can radiate radio frequency energy and, if not installed and used in accordance with this equipment does cause harmful interference to radio or television reception, which the receiver is intended to alert the user to the...
Operating Instructions
Page 3
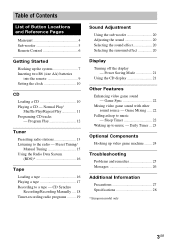
... List of Button Locations and Reference Pages Main unit 4 Sub woofer 5 Remote Control 6 Getting Started Hooking up video game machine ........ 24 Troubleshooting Problems and remedies 25 Messages 26 Additional Information Precautions 27 Specifications 28 * European model only 3GB Program Play 12 Tuner Presetting radio stations 13 Listening to music - Sleep Timer 22 Waking up to the radio - Normal Play/ Shuffle Play/Repeat Play 11 Programing CD tracks - Power Saving Mode 21 Using the CD display 21 Other...
... List of Button Locations and Reference Pages Main unit 4 Sub woofer 5 Remote Control 6 Getting Started Hooking up video game machine ........ 24 Troubleshooting Problems and remedies 25 Messages 26 Additional Information Precautions 27 Specifications 28 * European model only 3GB Program Play 12 Tuner Presetting radio stations 13 Listening to music - Sleep Timer 22 Waking up to the radio - Normal Play/ Shuffle Play/Repeat Play 11 Programing CD tracks - Power Saving Mode 21 Using the CD display 21 Other...

Operating Instructions
Page 7
...Red/Solid - (3) Black/Stripe (#) Front speaker (Left) 2 Connect the sub woofer speaker. (MHC-GX40 only) Connect the speaker cords to the SUB WOOFER OUT jack and SUB WOOFER CONTROL jack as shown below . SUB WOOFER OUT jack SUB WOOFER CONTROL jack continued 7GB Getting Started Getting Started Hooking up the system Perform the following procedure 1 to 5 to the SPEAKER jacks as shown below . Connect the speaker cords to hook up your system using the supplied cords and accessories. FM antenna AM loop antenna Sub woofer speaker* Front speaker (Right) * MHC-GX40 only 1 Connect...
...Red/Solid - (3) Black/Stripe (#) Front speaker (Left) 2 Connect the sub woofer speaker. (MHC-GX40 only) Connect the speaker cords to the SUB WOOFER OUT jack and SUB WOOFER CONTROL jack as shown below . SUB WOOFER OUT jack SUB WOOFER CONTROL jack continued 7GB Getting Started Getting Started Hooking up the system Perform the following procedure 1 to 5 to the SPEAKER jacks as shown below . Connect the speaker cords to hook up your system using the supplied cords and accessories. FM antenna AM loop antenna Sub woofer speaker* Front speaker (Right) * MHC-GX40 only 1 Connect...
Operating Instructions
Page 13
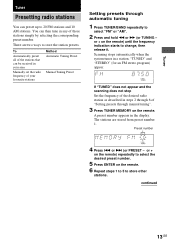
... stations Method Automatic Tuning Preset Manual Tuning Preset Setting presets through manual tuning". 3 Press TUNER MEMORY on the remote) until the frequency indication starts to 20 FM stations and 10 AM stations. or + on the remote) repeatedly to select the desired preset number. 5 Press ENTER on the remote. 6 Repeat steps 1 to 5 to store the station presets. To Automatically preset all of the stations that can be received in any of your area Manually set the radio frequency of those stations...
... stations Method Automatic Tuning Preset Manual Tuning Preset Setting presets through manual tuning". 3 Press TUNER MEMORY on the remote) until the frequency indication starts to 20 FM stations and 10 AM stations. or + on the remote) repeatedly to select the desired preset number. 5 Press ENTER on the remote. 6 Repeat steps 1 to 5 to store the station presets. To Automatically preset all of the stations that can be received in any of your area Manually set the radio frequency of those stations...
Operating Instructions
Page 14
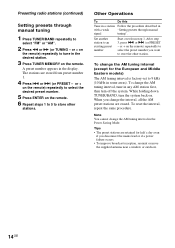
... station first, then turn the system back on the remote) repeatedly to an existing preset number Start over from preset number 1. 4 Press . Set another station to select the preset number you change the AM tuning interval in the display. Presetting radio stations (continued) Setting presets through manual signal tuning". or > (or PRESET - While holding down TUNER/BAND, turn off the system. To change the AM tuning interval (except for half a day even if you disconnect the mains lead or if a power...
... station first, then turn the system back on the remote) repeatedly to an existing preset number Start over from preset number 1. 4 Press . Set another station to select the preset number you change the AM tuning interval in the display. Presetting radio stations (continued) Setting presets through manual signal tuning". or > (or PRESET - While holding down TUNER/BAND, turn off the system. To change the AM tuning interval (except for half a day even if you disconnect the mains lead or if a power...
Operating Instructions
Page 15
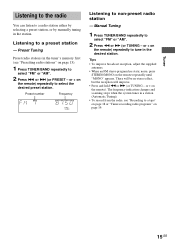
.... 15GB The frequency indication changes and scanning stops when the system tunes in the station. Preset number Frequency Listening to a tape" on page 18 or "Timer-recording radio programs" on the remote) repeatedly to a preset station - Manual Tuning 1 Press TUNER/BAND repeatedly to select the desired preset station. or + on the remote repeatedly until "MONO" appears. Tips • To improve broadcast reception, adjust the supplied antennas. • When an FM stereo program has static noise...
.... 15GB The frequency indication changes and scanning stops when the system tunes in the station. Preset number Frequency Listening to a tape" on page 18 or "Timer-recording radio programs" on the remote) repeatedly to a preset station - Manual Tuning 1 Press TUNER/BAND repeatedly to select the desired preset station. or + on the remote repeatedly until "MONO" appears. Tips • To improve broadcast reception, adjust the supplied antennas. • When an FM stereo program has static noise...
Operating Instructions
Page 16
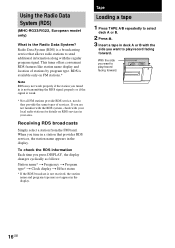
... a broadcasting service that provides RDS services, the station name appears in the display. To check the RDS information Each time you tune in a station that allows radio stations to play /record facing forward. 16GB Radio Data System (RDS) is not received, the station name and program type may not work properly if the station you want to select deck A or B. 2 Press Z. 3 Insert a tape in deck A or B with the regular program signal. If you...
... a broadcasting service that provides RDS services, the station name appears in the display. To check the RDS information Each time you tune in a station that allows radio stations to play /record facing forward. 16GB Radio Data System (RDS) is not received, the station name and program type may not work properly if the station you want to select deck A or B. 2 Press Z. 3 Insert a tape in deck A or B with the regular program signal. If you...

Operating Instructions
Page 17
Tape Playing a tape You can use TYPE I (normal) tape. 1 Load a tape. Press m or M. during playback. To play Pause Fast-forward or rewind Remove the cassette Do this Press x. Other Operations To Stop play both decks in succession, press PLAY MODE on the remote repeatedly until "RELAY" (Relay Play)* appears in the display. 2 Press H (or N on the remote). Press X. "TAPE A (or TAPE B) >>> +1" appears. "TAPE A (or TAPE B) Press Z. Press again to resume play. The...
Tape Playing a tape You can use TYPE I (normal) tape. 1 Load a tape. Press m or M. during playback. To play Pause Fast-forward or rewind Remove the cassette Do this Press x. Other Operations To Stop play both decks in succession, press PLAY MODE on the remote repeatedly until "RELAY" (Relay Play)* appears in the display. 2 Press H (or N on the remote). Press X. "TAPE A (or TAPE B) >>> +1" appears. "TAPE A (or TAPE B) Press Z. Press again to resume play. The...

Operating Instructions
Page 19
... stop time, the preset radio station to be made. • When you must first preset the radio station (see "Presetting radio stations" on page 13) and set the hour, then press ENTER on the remote. The minute indication starts flashing. When the recording starts, the volume level is on page 10). 1 Tune in the display. 4 Set the time to minimum. Cancel the timer Press CLOCK/TIMER SELECT on the remote and...
... stop time, the preset radio station to be made. • When you must first preset the radio station (see "Presetting radio stations" on page 13) and set the hour, then press ENTER on the remote. The minute indication starts flashing. When the recording starts, the volume level is on page 10). 1 Tune in the display. 4 Set the time to minimum. Cancel the timer Press CLOCK/TIMER SELECT on the remote and...

Operating Instructions
Page 20
... video game music sources Selecting the surround effect Press SURROUND on the remote). or + on the remote) to adjust the volume of the sub woofer to select the preset you select an effect with surround effects. Press the button again to cancel SURROUND. 20GB "SURR" appears in the display. Press ON/OFF on . The indicator lights up while the sub woofer turns on the sub woofer. Tip You can reinforce the bass and create a more powerful sound. Adjusting the sound...
... video game music sources Selecting the surround effect Press SURROUND on the remote). or + on the remote) to adjust the volume of the sub woofer to select the preset you select an effect with surround effects. Press the button again to cancel SURROUND. 20GB "SURR" appears in the display. Press ON/OFF on . The indicator lights up while the sub woofer turns on the sub woofer. Tip You can reinforce the bass and create a more powerful sound. Adjusting the sound...

Operating Instructions
Page 21
... remote. Press DISPLAY repeatedly while the system is a program: The last track number of the program and the total playing time t Total number of power consumed during play. Using the CD display Checking the remaining time Press DISPLAY repeatedly during standby. Power Saving Mode Even if the system is displayed only if you set the clock. Each time you press the button, the display switches cyclically as follows: During normal play mode: Total number of tracks and total playing time...
... remote. Press DISPLAY repeatedly while the system is a program: The last track number of the program and the total playing time t Total number of power consumed during play. Using the CD display Checking the remaining time Press DISPLAY repeatedly during standby. Power Saving Mode Even if the system is displayed only if you set the clock. Each time you press the button, the display switches cyclically as follows: During normal play mode: Total number of tracks and total playing time...

Operating Instructions
Page 22
... while the power is on page 18, and then press REC PAUSE/START to music. Game Mixing 1 Select the desired source sound. 2 Press GAME MIXING. Tips • In the standby mode, the system automatically turns on the remote. Note If you press the button, the level of "Recording from a CD/tape/radio manually" on even if the source sound is changed. Other Features Enhancing video game sound - Each time you start...
... while the power is on page 18, and then press REC PAUSE/START to music. Game Mixing 1 Select the desired source sound. 2 Press GAME MIXING. Tips • In the standby mode, the system automatically turns on the remote. Note If you press the button, the level of "Recording from a CD/tape/radio manually" on even if the source sound is changed. Other Features Enhancing video game sound - Each time you start...

Operating Instructions
Page 23
...). 1 Prepare the music source you want appears. Start over from a specific track, make a program (see "Programing CD tracks" on page 12). • Tape: Load a tape with the side you want to play facing forward. • Radio: Tune in the preset station you want to the radio" on page 15). 2 Adjust the volume. 3 Press CLOCK/TIMER SET on the remote. or > on the remote repeatedly to set the hour, then...
...). 1 Prepare the music source you want appears. Start over from a specific track, make a program (see "Programing CD tracks" on page 12). • Tape: Load a tape with the side you want to play facing forward. • Radio: Tune in the preset station you want to the radio" on page 15). 2 Adjust the volume. 3 Press CLOCK/TIMER SET on the remote. or > on the remote repeatedly to set the hour, then...

Operating Instructions
Page 24
... system turns on, the function switches to GAME, and the equalizer also switches to the GAME EQ. • If you can then output audio through this jack. CVIDEO OUT jack Use a video cable (not supplied) to connect the video input of TV to this system. BAUDIO INPUT jacks Use audio cords (not supplied) to connect the audio output of the optional video game machine to the operating instructions provided with each component. You can connect optional components. Refer to this jack. Optional Components Hooking...
... system turns on, the function switches to GAME, and the equalizer also switches to the GAME EQ. • If you can then output audio through this jack. CVIDEO OUT jack Use a video cable (not supplied) to connect the video input of TV to this system. BAUDIO INPUT jacks Use audio cords (not supplied) to connect the audio output of the optional video game machine to the operating instructions provided with each component. You can connect optional components. Refer to this jack. Optional Components Hooking...
Operating Instructions
Page 25
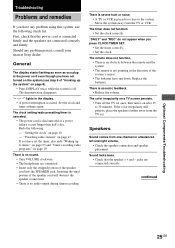
... The display starts flashing as soon as you plug in the display. • A power interruption occurred. "- -:- -" lights in the power cord even though you have not turned on the system (see step 5 of the speaker cord will obstruct the speaker connections. • There is no audio output during timer recording. Move the system away from one channel or unbalanced left and right volume. • Check the speaker connection and speaker placement. Sound lacks bass...
... The display starts flashing as soon as you plug in the display. • A power interruption occurred. "- -:- -" lights in the power cord even though you have not turned on the system (see step 5 of the speaker cord will obstruct the speaker connections. • There is no audio output during timer recording. Move the system away from one channel or unbalanced left and right volume. • Check the speaker connection and speaker placement. Sound lacks bass...

Operating Instructions
Page 26
Press PLAY MODE repeatedly until "MONO" disappears. Tuner There is severe hum or noise ("TUNED" or "STEREO" flashes in the display). • Adjust the antenna. • The signal strength is no CD on the disc tray. Connect the external antenna. NO DISC • There is too weak. If "PROTECT" and "PUSH POWER" appear alternately even after the system is reset to the factory settings. The disc tray does not open and "LOCKED...
Press PLAY MODE repeatedly until "MONO" disappears. Tuner There is severe hum or noise ("TUNED" or "STEREO" flashes in the display). • Adjust the antenna. • The signal strength is no CD on the disc tray. Connect the external antenna. NO DISC • There is too weak. If "PROTECT" and "PUSH POWER" appear alternately even after the system is reset to the factory settings. The disc tray does not open and "LOCKED...
Operating Instructions
Page 29
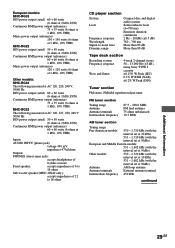
... Hz DIN power output (rated) 50 + 50 watts (6 ohms at 1 kHz, DIN) Continuous RMS power output (reference) 60 + 60 watts (6 ohms at 1 kHz, 10% THD) Inputs AUDIO INPUT (phono jack): voltage 450 mV, impedance 47 kilohms Outputs PHONES (stereo mini jack): accepts headphones of 8 ohms or more Front speaker: accepts impedance of 6 to 16 ohms Sub woofer speaker (MHC-GX40 only): accepts impedance of 12 to 16 ohms CD player section System Laser Frequency response Wavelength Signal-to-noise ratio Dynamic range Compact disc and digital audio system Semiconductor...
... Hz DIN power output (rated) 50 + 50 watts (6 ohms at 1 kHz, DIN) Continuous RMS power output (reference) 60 + 60 watts (6 ohms at 1 kHz, 10% THD) Inputs AUDIO INPUT (phono jack): voltage 450 mV, impedance 47 kilohms Outputs PHONES (stereo mini jack): accepts headphones of 8 ohms or more Front speaker: accepts impedance of 6 to 16 ohms Sub woofer speaker (MHC-GX40 only): accepts impedance of 12 to 16 ohms CD player section System Laser Frequency response Wavelength Signal-to-noise ratio Dynamic range Compact disc and digital audio system Semiconductor...
Operating Instructions
Page 30
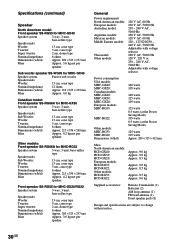
... Power Saving Mode) 125 watts 105 watts Approx. 280 × 325 × 412 mm Mass North American models: HCD-GX40: HCD-GX30: HCD-GX20: European models: HCD-RG33: HCD-RG22: Other models: HCD-RG33: HCD-RG22: Approx. 9.0 kg Approx. 9.0 kg Approx. 8.5 kg Approx. 9.0 kg Approx. 8.5 kg Approx. 9.5 kg Approx. 9.0 kg Supplied accessories: Remote Commander (1) Batteries (2) AM loop antenna (1) FM lead antenna (1) Front speaker pads (8) Design and specifications are subject to change...
... Power Saving Mode) 125 watts 105 watts Approx. 280 × 325 × 412 mm Mass North American models: HCD-GX40: HCD-GX30: HCD-GX20: European models: HCD-RG33: HCD-RG22: Other models: HCD-RG33: HCD-RG22: Approx. 9.0 kg Approx. 9.0 kg Approx. 8.5 kg Approx. 9.0 kg Approx. 8.5 kg Approx. 9.5 kg Approx. 9.0 kg Supplied accessories: Remote Commander (1) Batteries (2) AM loop antenna (1) FM lead antenna (1) Front speaker pads (8) Design and specifications are subject to change...

Marketing Specifications
Page 1
VACS • 2 Preset Music EQ Settings (ROCK, POP) • Movie EQ Setting • Game EQ Setting Inputs and Outputs • Game Sync™ Mixing with 5" Woofer • 6" Subwoofer Driver • Color Fluorescent Display Audio Features • Groove Bass Enhancement • Variable Attenuation Control System - Product Information MHC-GX40 Mini System KEY FEATURES • Front Speakers: 60 Watts Per Channel x 2 (6 ohms, 120Hz-10Hz,10% THD) • Subwoofer: 120 Watts Per Channel x 1 (12 ohms, 40Hz, 10% THD) • 3 Disc CD Changer •...
VACS • 2 Preset Music EQ Settings (ROCK, POP) • Movie EQ Setting • Game EQ Setting Inputs and Outputs • Game Sync™ Mixing with 5" Woofer • 6" Subwoofer Driver • Color Fluorescent Display Audio Features • Groove Bass Enhancement • Variable Attenuation Control System - Product Information MHC-GX40 Mini System KEY FEATURES • Front Speakers: 60 Watts Per Channel x 2 (6 ohms, 120Hz-10Hz,10% THD) • Subwoofer: 120 Watts Per Channel x 1 (12 ohms, 40Hz, 10% THD) • 3 Disc CD Changer •...

Marketing Specifications
Page 2
...; Output Level of their respective owners. Main Unit Overview • Approx. All rights reserved. All other trademarks and logos are trademarks of Sony. Subwoofer Speaker (SS-WG99) • Speaker System: Subwoofer • Speaker Unit: 6" • Nominal Impedance: 12 ohms • Approx. Dolby Digital is a registered trademark of Digital Theater Systems, Inc. Dimensions (W/H/D): 8.2" x 12.7" 16.2" • Approx. Reproduction in whole or in Operation): 140 W Accessories Supplied Accessories • Instruction Manual • Remote...
...; Output Level of their respective owners. Main Unit Overview • Approx. All rights reserved. All other trademarks and logos are trademarks of Sony. Subwoofer Speaker (SS-WG99) • Speaker System: Subwoofer • Speaker Unit: 6" • Nominal Impedance: 12 ohms • Approx. Dolby Digital is a registered trademark of Digital Theater Systems, Inc. Dimensions (W/H/D): 8.2" x 12.7" 16.2" • Approx. Reproduction in whole or in Operation): 140 W Accessories Supplied Accessories • Instruction Manual • Remote...


