

Operating Instructions
Page 4
... 7 Remote Control 8 digipad operations 9 Getting Started Hooking up the system 10 Inserting three R6 (size AA) batteries into the remote 13 Setting up for a title/chapter /track/index 35 Changing the angles 36 Displaying the subtitles 36 Using various additional functions: Locking discs - Resume Play 23 Playing repeatedly - SPEAKER SETUP 30 Viewing information about the disc: Checking the playing time and remaining time 32 Sound adjustment: Changing the sound 33 Enjoying movies: Searching for DVD/VIDEO...
... 7 Remote Control 8 digipad operations 9 Getting Started Hooking up the system 10 Inserting three R6 (size AA) batteries into the remote 13 Setting up for a title/chapter /track/index 35 Changing the angles 36 Displaying the subtitles 36 Using various additional functions: Locking discs - Resume Play 23 Playing repeatedly - SPEAKER SETUP 30 Viewing information about the disc: Checking the playing time and remaining time 32 Sound adjustment: Changing the sound 33 Enjoying movies: Searching for DVD/VIDEO...
Operating Instructions
Page 5
... Specifications 67 Glossary 70 Language code list 73 Control Menu Item List 74 Setup Display Item List 75 * European model only. ** Except for North American and European models. 5GB Tuner Presetting radio stations 41 Listening to the radio 42 Using the Radio Data System (RDS)* .... 43 Tape Loading a tape 44 Playing a tape 44 Recording to music - Power Saving Mode 52 Using the display 52 Other Features To adjust the brightness of the display .... 53 To listen to multi channel sound...
... Specifications 67 Glossary 70 Language code list 73 Control Menu Item List 74 Setup Display Item List 75 * European model only. ** Except for North American and European models. 5GB Tuner Presetting radio stations 41 Listening to the radio 42 Using the Radio Data System (RDS)* .... 43 Tape Loading a tape 44 Playing a tape 44 Recording to music - Power Saving Mode 52 Using the display 52 Other Features To adjust the brightness of the display .... 53 To listen to multi channel sound...
Operating Instructions
Page 6
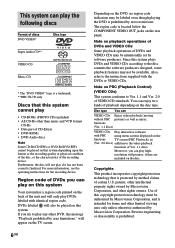
... music and VCD format CD-Rs • Data part of the unit and will appear on the rear panel. Use of this system Your system has a region code printed on the back of CD-Extras • DVD-ROMs • DVD Audio discs Note Some CD-Rs/CD-RWs or DVD-Rs/DVD-RWs cannot be labeled even though playing the DVD is located below the COMPONENT VIDEO OUT jacks...
... music and VCD format CD-Rs • Data part of the unit and will appear on the rear panel. Use of this system Your system has a region code printed on the back of CD-Extras • DVD-ROMs • DVD Audio discs Note Some CD-Rs/CD-RWs or DVD-Rs/DVD-RWs cannot be labeled even though playing the DVD is located below the COMPONENT VIDEO OUT jacks...

Operating Instructions
Page 9
.... DVD, TUNER, TAPE A/B functions Basic operation DVD, TUNER, TAPE A/B Tap once hH (Start playback)* Tap twice x (Stop playback) * When you can control various operations with an unique digipad multi controlling device. "CALIBRATION" flashes in the display, then "CALIBRATION" flashes. 5 Press ENTER on the remote at the right bottom corner of the operations). List of the digipad When the digipad operation is not carried out properly or when you replace...
.... DVD, TUNER, TAPE A/B functions Basic operation DVD, TUNER, TAPE A/B Tap once hH (Start playback)* Tap twice x (Stop playback) * When you can control various operations with an unique digipad multi controlling device. "CALIBRATION" flashes in the display, then "CALIBRATION" flashes. 5 Press ENTER on the remote at the right bottom corner of the operations). List of the digipad When the digipad operation is not carried out properly or when you replace...
Operating Instructions
Page 12
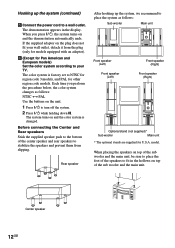
... system changes as follows: Sub woofer Main unit Front speaker (Left) Front speaker (Left) Front speaker (Right) Front speaker (Right) Optional stand (not supplied)* Sub woofer Main unit * The optional stands are supplied for U.S.A. Rear speaker After hooking up the system (continued) 5 Connect the power cord to NTSC for region code 3 models, and PAL for other region code models. Hooking up the system, we recommend to stabilize the speakers and prevent them from the plug...
... system changes as follows: Sub woofer Main unit Front speaker (Left) Front speaker (Left) Front speaker (Right) Front speaker (Right) Optional stand (not supplied)* Sub woofer Main unit * The optional stands are supplied for U.S.A. Rear speaker After hooking up the system (continued) 5 Connect the power cord to NTSC for region code 3 models, and PAL for other region code models. Hooking up the system, we recommend to stabilize the speakers and prevent them from the plug...

Operating Instructions
Page 26
..." Selected setting SCREEN SETUP TV TYPE: SCREEN SAVER: BACKGROUND: COMPONENTOUT: 4:3 PAN SCAN ON JACKET PICTURE INTERLACE To turn off the Setup Display Press DVD SETUP or DVD DISPLAY repeatedly until the Setup Display is completed. After you select "RESET" and press ENTER, select "YES" and press ENTER to reset the settings (it takes a few seconds to items such as picture and sound. Setting up for DVD/VIDEO CD/CD Using the Setup Display By using the Setup Display, you...
..." Selected setting SCREEN SETUP TV TYPE: SCREEN SAVER: BACKGROUND: COMPONENTOUT: 4:3 PAN SCAN ON JACKET PICTURE INTERLACE To turn off the Setup Display Press DVD SETUP or DVD DISPLAY repeatedly until the Setup Display is completed. After you select "RESET" and press ENTER, select "YES" and press ENTER to reset the settings (it takes a few seconds to items such as picture and sound. Setting up for DVD/VIDEO CD/CD Using the Setup Display By using the Setup Display, you...

Operating Instructions
Page 28
... player. • INTERLACE: Select this setting when you are connected to a standard (interlace format) TV. • PROGRESSIVE: Select this when you connect a 4:3 screen TV. Press hH to interlace when PROGRESSIVE is selected Make sure the function is black. SCREEN SETUP Select settings according to DVD, then hold down DVD FUNCTION and press DVD MENU. x COMPONENT OUT This will help prevent your display device from the VIDEO OUT or S VIDEO OUT jacks. To force the system...
... player. • INTERLACE: Select this setting when you are connected to a standard (interlace format) TV. • PROGRESSIVE: Select this when you connect a 4:3 screen TV. Press hH to interlace when PROGRESSIVE is selected Make sure the function is black. SCREEN SETUP Select settings according to DVD, then hold down DVD FUNCTION and press DVD MENU. x COMPONENT OUT This will help prevent your display device from the VIDEO OUT or S VIDEO OUT jacks. To force the system...

Operating Instructions
Page 29
... CONTROL (DVD only) Set a password and playback limitation level for Pan American and European model) Select the color system when you play a VIDEO CD. • AUTO: Outputs the video signal in the NTSC system. The "TRACK SELECTION" setting has higher priority than the "AUDIO" setting in "LANGUAGE SETUP" (page 27). • If PCM, DTS, and Dolby Digital sound tracks have the same number of a PAL disc and outputs it in the PAL system. • NTSC: Changes the video signal of channels, the system selects PCM, DTS, and Dolby Digital sound...
... CONTROL (DVD only) Set a password and playback limitation level for Pan American and European model) Select the color system when you play a VIDEO CD. • AUTO: Outputs the video signal in the NTSC system. The "TRACK SELECTION" setting has higher priority than the "AUDIO" setting in "LANGUAGE SETUP" (page 27). • If PCM, DTS, and Dolby Digital sound tracks have the same number of a PAL disc and outputs it in the PAL system. • NTSC: Changes the video signal of channels, the system selects PCM, DTS, and Dolby Digital sound...

Operating Instructions
Page 31
...; REAR (0 dB): Adjust the level of the rear speakers (-6 dB to +6 dB, 1 dB steps). • SUBWOOFER (0 dB): Adjust the level of the subwoofer (-6 dB to "ON". Be sure to set "TEST TONE" to "ON" for a moment. • If you adjust these parameters using OSD while adjusting the speaker parameters using AMP MENU or SPEAKER LEVEL (pages 14-16), the display on the remote). When you adjust the speaker settings, the sound cuts off for easy adjustment. • FRONT (CENTER): Adjust...
...; REAR (0 dB): Adjust the level of the rear speakers (-6 dB to +6 dB, 1 dB steps). • SUBWOOFER (0 dB): Adjust the level of the subwoofer (-6 dB to "ON". Be sure to set "TEST TONE" to "ON" for a moment. • If you adjust these parameters using OSD while adjusting the speaker parameters using AMP MENU or SPEAKER LEVEL (pages 14-16), the display on the remote). When you adjust the speaker settings, the sound cuts off for easy adjustment. • FRONT (CENTER): Adjust...

Operating Instructions
Page 33
... choice of settings varies. • MULTI: The disc has multi-channel playback area • 2CH: The disc has the 2 channel playback area. • CD: When you press the button, the setting changes. The default setting is recorded in multiple audio format. • For VIDEO CDs and CDs, the setting returns to "STEREO" when you want to select the audio signal you may change the sound even if the DVD is recorded in...
... choice of settings varies. • MULTI: The disc has multi-channel playback area • 2CH: The disc has the 2 channel playback area. • CD: When you press the button, the setting changes. The default setting is recorded in multiple audio format. • For VIDEO CDs and CDs, the setting returns to "STEREO" when you want to select the audio signal you may change the sound even if the DVD is recorded in...
Operating Instructions
Page 40
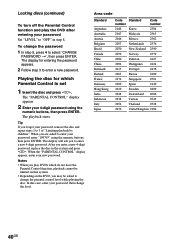
... play the DVD after entering your password, enter "199703" using the numeric buttons, then press ENTER. Notes • When you are asked to enter your password Set "LEVEL" to enter a new password. In this system. • Depending on the DVD, you forgot your password, then change the password 1 In step 5, press v to select "CHANGE PASSWORD t", then press ENTER. Locking discs (continued) To turn off the Parental Control function and play DVDs which Parental Control...
... play the DVD after entering your password, enter "199703" using the numeric buttons, then press ENTER. Notes • When you are asked to enter your password Set "LEVEL" to enter a new password. In this system. • Depending on the DVD, you forgot your password, then change the password 1 In step 5, press v to select "CHANGE PASSWORD t", then press ENTER. Locking discs (continued) To turn off the Parental Control function and play DVDs which Parental Control...

Operating Instructions
Page 42
... selecting a preset station, or by manually tuning in the tuner's memory first (see "Presetting radio stations" on the remote repeatedly until "MONO" appears. To select the desired preset number using the numeric buttons on . Example: To enter preset number 20, press >10, then 2 and 10/0. Manual Tuning 1 Press TUNER/BAND repeatedly to select FM or AM. 2 Press m or M repeatedly to non-preset radio station - The frequency indication changes and scanning stops when the system tunes in the Power Saving Mode...
... selecting a preset station, or by manually tuning in the tuner's memory first (see "Presetting radio stations" on the remote repeatedly until "MONO" appears. To select the desired preset number using the numeric buttons on . Example: To enter preset number 20, press >10, then 2 and 10/0. Manual Tuning 1 Press TUNER/BAND repeatedly to select FM or AM. 2 Press m or M repeatedly to non-preset radio station - The frequency indication changes and scanning stops when the system tunes in the Power Saving Mode...

Operating Instructions
Page 45
.... 4 Press CD SYNC HI-DUB. If you start from a disc, tape (or connected components) or radio. Recording from a VIDEO CD/ Steps CD/Super Audio CD/MP3 file (CD Synchro Recording) Recording from the front side. other sources while recording. • You cannot use TYPE I (normal) tapes. If you want to start recording. • When you start recording with 2.1CH/MULTI set direction to start...
.... 4 Press CD SYNC HI-DUB. If you start from a disc, tape (or connected components) or radio. Recording from a VIDEO CD/ Steps CD/Super Audio CD/MP3 file (CD Synchro Recording) Recording from the front side. other sources while recording. • You cannot use TYPE I (normal) tapes. If you want to start recording. • When you start recording with 2.1CH/MULTI set direction to start...

Operating Instructions
Page 52
... displayed only if you set the clock. Tip The timer continues to turn the power on. - Press DISPLAY during standby (Power Saving Mode). Each time you press the button, the display changes cyclically as follows: x When playing a DVD Current title number and the playing time t Current title number and the remaining time t Current chapter number and the playing time t Current chapter number and the remaining time t Title text t Clock display (for 8 seconds) t Effect status x When playing a VIDEO...
... displayed only if you set the clock. Tip The timer continues to turn the power on. - Press DISPLAY during standby (Power Saving Mode). Each time you press the button, the display changes cyclically as follows: x When playing a DVD Current title number and the playing time t Current title number and the remaining time t Current chapter number and the playing time t Current chapter number and the remaining time t Title text t Clock display (for 8 seconds) t Effect status x When playing a VIDEO...

Operating Instructions
Page 53
...; "PCM MODE" decodes all the input signals as follows: 2.1CH t MULTI t AUTO 2.1CH: The sound is output in 2-channel stereo and the sub woofer. If Dolby Digital, DTS, or MPEG (etc.) signals are input, no sound will be heard. DIMMER 1 y DIMMER 2 y DIMMER 3 5 Press ENTER. Each time you press the button, the display changes as PCM signals. To adjust the decoding format mode This operation lets you specify the decode type for the signal input to the digital audio jacks and DVD function. 1 Press AMP MENU. 2 Press...
...; "PCM MODE" decodes all the input signals as follows: 2.1CH t MULTI t AUTO 2.1CH: The sound is output in 2-channel stereo and the sub woofer. If Dolby Digital, DTS, or MPEG (etc.) signals are input, no sound will be heard. DIMMER 1 y DIMMER 2 y DIMMER 3 5 Press ENTER. Each time you press the button, the display changes as PCM signals. To adjust the decoding format mode This operation lets you specify the decode type for the signal input to the digital audio jacks and DVD function. 1 Press AMP MENU. 2 Press...

Operating Instructions
Page 54
... L", DSP effect switches to "KEY CONTROL". Start singing along " (steps 1 through 5). You cannot select the karaoke mode while selecting or playing a Super Audio CD. Singing along: Karaoke (Except for North American and European models) You can sing along with any stereo CD or tape by turning down the microphone volume. 2 Connect an optional microphone to MIC jack. 3 Press KARAOKE PON on the remote. Select j (or RELAY) to be recorded. To adjust...
... L", DSP effect switches to "KEY CONTROL". Start singing along " (steps 1 through 5). You cannot select the karaoke mode while selecting or playing a Super Audio CD. Singing along: Karaoke (Except for North American and European models) You can sing along with any stereo CD or tape by turning down the microphone volume. 2 Connect an optional microphone to MIC jack. 3 Press KARAOKE PON on the remote. Select j (or RELAY) to be recorded. To adjust...

Operating Instructions
Page 55
... feedback (howling) occurs, move the microphone away from the speakers or change the direction of the recorded sound signal (Auto Level Control Function). dts indicator (in the display): Light up when the unit applies Dolby Pro Logic processing to 2 channel signals in the display): Lights up when DTS signals are input, the unit automatically adjusts the recording level to prevent distortion of the microphone. • If you want to output the center and rear channel signals. ; Press SLEEP on the...
... feedback (howling) occurs, move the microphone away from the speakers or change the direction of the recorded sound signal (Auto Level Control Function). dts indicator (in the display): Light up when the unit applies Dolby Pro Logic processing to 2 channel signals in the display): Lights up when DTS signals are input, the unit automatically adjusts the recording level to prevent distortion of the microphone. • If you want to output the center and rear channel signals. ; Press SLEEP on the...
Operating Instructions
Page 60
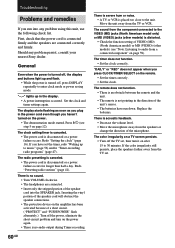
... function setting of the microphone. Should any problem using this unit, use the following check list. Redo "Presetting radio stations" (page 41). The color irregularity on a TV screen persists. • Turn off the power, eliminate the short-circuit problem and turn it on page 59). Move the unit away from the speakers or change the direction of VIDEO (MD) (North American model) or MD (VIDEO) (other models) is connected firmly and the speakers...
... function setting of the microphone. Should any problem using this unit, use the following check list. Redo "Presetting radio stations" (page 41). The color irregularity on a TV screen persists. • Turn off the power, eliminate the short-circuit problem and turn it on page 59). Move the unit away from the speakers or change the direction of VIDEO (MD) (North American model) or MD (VIDEO) (other models) is connected firmly and the speakers...
Operating Instructions
Page 61
... test tone. continued Troubleshooting 61GB Sound lacks bass. • Check that the speaker's + and - "PROTECT" and "PUSH POWER" appear alternately. • A strong signal is monaural. • Adjust the balance parameters (page 15). If "PROTECT" and "PUSH POWER" still appear alternately, check the speaker cords. Speakers Sound comes from the center speaker. • Set the center speaker level to the appropriate level. • 2.1CH/MULTI is loaded. • Wipe the disc clean (see page 65). • Replace the disc...
... test tone. continued Troubleshooting 61GB Sound lacks bass. • Check that the speaker's + and - "PROTECT" and "PUSH POWER" appear alternately. • A strong signal is monaural. • Adjust the balance parameters (page 15). If "PROTECT" and "PUSH POWER" still appear alternately, check the speaker cords. Speakers Sound comes from the center speaker. • Set the center speaker level to the appropriate level. • 2.1CH/MULTI is loaded. • Wipe the disc clean (see page 65). • Replace the disc...
Operating Instructions
Page 64
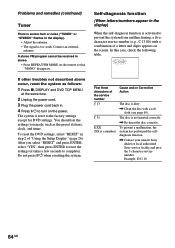
... DVD settings, select "RESET" in step 2 of a letter and digits appears on the screen. A stereo FM program cannot be received in stereo. • Press REPEAT/FM MODE on the power. Self-diagnosis function (When letters/numbers appear in the display) When the self-diagnosis function is activated to the factory settings except for DVD settings. After you made, such as follows: 1 Press x, DISPLAY and DVD TOP MENU at the same time. 2 Unplug the power cord. 3 Plug the power cord...
... DVD settings, select "RESET" in step 2 of a letter and digits appears on the screen. A stereo FM program cannot be received in stereo. • Press REPEAT/FM MODE on the power. Self-diagnosis function (When letters/numbers appear in the display) When the self-diagnosis function is activated to the factory settings except for DVD settings. After you made, such as follows: 1 Press x, DISPLAY and DVD TOP MENU at the same time. 2 Unplug the power cord. 3 Plug the power cord...


