Operating Instructions
Page 2
.... You are cautioned that to comply with Part 15 of Conformity Trade Name: SONY Model: FWD-40LX1/32LX1R Responsible Party: Sony Electronics Inc. This can radiate radio frequency energy and, if not installed and used in this manual could void your Sony dealer regarding this equipment. On transportation When you call ; If you fail to... protection against harmful interference in voor recycling, de batterij zal dan op correcte wijze verwerkt worden. Refer to these numbers whenever you carry the display unit, hold the unit itself, not the speakers.
.... You are cautioned that to comply with Part 15 of Conformity Trade Name: SONY Model: FWD-40LX1/32LX1R Responsible Party: Sony Electronics Inc. This can radiate radio frequency energy and, if not installed and used in this manual could void your Sony dealer regarding this equipment. On transportation When you call ; If you fail to... protection against harmful interference in voor recycling, de batterij zal dan op correcte wijze verwerkt worden. Refer to these numbers whenever you carry the display unit, hold the unit itself, not the speakers.
Operating Instructions
Page 4
...GB) Adjusting Color Matrix 36 (GB) Controlling Power On/Off Automatically (Timer Function 37 (GB) Adjusting the time and the day 37 (GB) Displaying the time 37 (GB) On/Off Timer Function 37 (GB) Setting the Security Lock 38 (GB) To activate the Security Lock 38 (GB... Setting an IP address and communication speed 39 (GB) Obtaining an IP address automatically (DHCP) .... 39 (GB) Setting an IP address manually (Manual 40 (GB) Setting a communication speed 41 (GB) Self-diagnosis Function 41 (GB) Operating a Specific Display With the Remote Commander 42 (GB) Specifications 43 (GB) 4 (GB)
...GB) Adjusting Color Matrix 36 (GB) Controlling Power On/Off Automatically (Timer Function 37 (GB) Adjusting the time and the day 37 (GB) Displaying the time 37 (GB) On/Off Timer Function 37 (GB) Setting the Security Lock 38 (GB) To activate the Security Lock 38 (GB... Setting an IP address and communication speed 39 (GB) Obtaining an IP address automatically (DHCP) .... 39 (GB) Setting an IP address manually (Manual 40 (GB) Setting a communication speed 41 (GB) Self-diagnosis Function 41 (GB) Operating a Specific Display With the Remote Commander 42 (GB) Specifications 43 (GB) 4 (GB)
Operating Instructions
Page 10
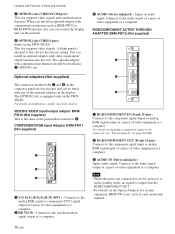
...display unit via the network. 8 OPTION2 slot (VIDEO port) (Only for the FWD-40LX1) This slot supports video signals. Optional adaptors (Not supplied) The connectors marked with 7 and 8 on the connector panel are slot-in the display...-FW series, refer to an AC power or is not connected to each instruction manual. A blank panel is output from the RGB/COMPONENT OUT. • For details on the FWD40LX1....HD VD IN : Connects to the connector, see "Pin assignment" on installation, consult your Sony dealers. When you can be installed in the standby mode, no signal is attached to the...
...display unit via the network. 8 OPTION2 slot (VIDEO port) (Only for the FWD-40LX1) This slot supports video signals. Optional adaptors (Not supplied) The connectors marked with 7 and 8 on the connector panel are slot-in the display...-FW series, refer to an AC power or is not connected to each instruction manual. A blank panel is output from the RGB/COMPONENT OUT. • For details on the FWD40LX1....HD VD IN : Connects to the connector, see "Pin assignment" on installation, consult your Sony dealers. When you can be installed in the standby mode, no signal is attached to the...
Operating Instructions
Page 14
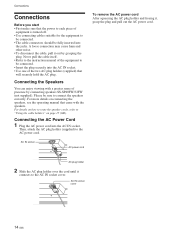
For details on how to route the speaker cords, refer to "Using the cable holders" on connecting the speakers, see the operating manual that came with a greater sense of presence by grasping the plug. Then, attach the AC plug holder (supplied) to the AC IN socket cover. AC ... disconnect the cable, pull it , grasp the plug and pull out the AC power cord. Never pull the cable itself. • Refer to the instruction manual of the equipment to be sure to connect the speakers correctly. For more details on page 15 (GB). Please be connected. • Insert the plug...
For details on how to route the speaker cords, refer to "Using the cable holders" on connecting the speakers, see the operating manual that came with a greater sense of presence by grasping the plug. Then, attach the AC plug holder (supplied) to the AC IN socket cover. AC ... disconnect the cable, pull it , grasp the plug and pull out the AC power cord. Never pull the cable itself. • Refer to the instruction manual of the equipment to be sure to connect the speakers correctly. For more details on page 15 (GB). Please be connected. • Insert the plug...

Operating Instructions
Page 20
...ENTER Exit MENU Note The time and the day are not preset in standby mode is installed into the OPTION1 slot. For details, see "Displaying the time" on the screen when set time on page 37 (GB). INITIAL SETUP/INFORMATION Information Model Name: Serial Number: Operation Time: ...This menu is automatically turned on /off . Model Name Indicates the model name. Software Version Indicates the system software version. Manual: Manual configuration to set the timer, adjust time, display the built-in clock, or make the unit power on or off at a predetermined time. On: With this item set...
...ENTER Exit MENU Note The time and the day are not preset in standby mode is installed into the OPTION1 slot. For details, see "Displaying the time" on the screen when set time on page 37 (GB). INITIAL SETUP/INFORMATION Information Model Name: Serial Number: Operation Time: ...This menu is automatically turned on /off . Model Name Indicates the model name. Software Version Indicates the system software version. Manual: Manual configuration to set the timer, adjust time, display the built-in clock, or make the unit power on or off at a predetermined time. On: With this item set...

Operating Instructions
Page 30
...screen" menu are adjusted automatically. Adjusting automatically (1) Select "Auto Adjust" with M/m and press ENTER. In such cases, adjust the dot phase manually. Adjusting the Size, Position, or the Pixels of the Picture Press MENU to adjust and press ENTER. SCREEN CONTROL Adjust Screen Auto Adjust Dot...size of the picture separately. Resizing and Positioning the Picture Resizing and Positioning the Picture You can adjust the screen either automatically or manually. Adjust screen If there is too much noise on the Adjust Screen menu. The following menu appears on the screen. (When ...
...screen" menu are adjusted automatically. Adjusting automatically (1) Select "Auto Adjust" with M/m and press ENTER. In such cases, adjust the dot phase manually. Adjusting the Size, Position, or the Pixels of the Picture Press MENU to adjust and press ENTER. SCREEN CONTROL Adjust Screen Auto Adjust Dot...size of the picture separately. Resizing and Positioning the Picture Resizing and Positioning the Picture You can adjust the screen either automatically or manually. Adjust screen If there is too much noise on the Adjust Screen menu. The following menu appears on the screen. (When ...
Operating Instructions
Page 40
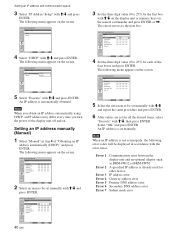
...000 . 000 . 000 . 000 000 . 000 . 000 . 000 000 . 000 . 000 . 000 Select Set ENTER Exit MENU 2 Select an item to be set manually with M/m on the display unit or numeric keys on the screen. IP address error Gateway address error Primary DNS address error Secondary DNS address error Subnet mask error...DNS: Secondary DNS: Execute 000 . 000 . 000 . 000 000 . 000 . 000 . 000 000 . 000 . 000 . 000 000 . 000 . 000 . 000 000 . 000 . 000 . 000 Select 40 (GB) Set ENTER Exit MENU 3 Set the three digit value (0 to 255) for the first box with M/m and repeat the same procedure and press ENTER...
...000 . 000 . 000 . 000 000 . 000 . 000 . 000 000 . 000 . 000 . 000 Select Set ENTER Exit MENU 2 Select an item to be set manually with M/m on the display unit or numeric keys on the screen. IP address error Gateway address error Primary DNS address error Secondary DNS address error Subnet mask error...DNS: Secondary DNS: Execute 000 . 000 . 000 . 000 000 . 000 . 000 . 000 000 . 000 . 000 . 000 000 . 000 . 000 . 000 000 . 000 . 000 . 000 Select 40 (GB) Set ENTER Exit MENU 3 Set the three digit value (0 to 255) for the first box with M/m and repeat the same procedure and press ENTER...

