Operating Instructions
Page 3
...GB) Front / Rear / Side 7 (GB) Indicator Section 8 (GB) Control Button Section (Top 8 (GB) Connector Panel 9 (GB) Remote Commander RM-980 11 (GB) Caution 13 (GB) Connections 14 (GB) Connecting the Speakers 14 (...GB) Connecting the AC Power Cord 14 (GB) Cable management 15 (GB) Using On-screen Menus 16 (GB) Operating Through Menus 16 (GB) Menu Guide 16 (GB) GB Watching the ...Picture 21 (GB) Switching the Input Signal 21 (GB) Input Signal, Picture Mode and Display Status Information 22 (GB) Selecting Image Quality 24 (GB) Adjusting the Picture 24 (GB) Adjusting ...
...GB) Front / Rear / Side 7 (GB) Indicator Section 8 (GB) Control Button Section (Top 8 (GB) Connector Panel 9 (GB) Remote Commander RM-980 11 (GB) Caution 13 (GB) Connections 14 (GB) Connecting the Speakers 14 (...GB) Connecting the AC Power Cord 14 (GB) Cable management 15 (GB) Using On-screen Menus 16 (GB) Operating Through Menus 16 (GB) Menu Guide 16 (GB) GB Watching the ...Picture 21 (GB) Switching the Input Signal 21 (GB) Input Signal, Picture Mode and Display Status Information 22 (GB) Selecting Image Quality 24 (GB) Adjusting the Picture 24 (GB) Adjusting ...
Operating Instructions
Page 4
...Menu Items to Their Original Settings 35 (GB) Selecting the On-screen Language 36 (GB) Adjusting Color Matrix 36 (GB) Controlling Power On/Off Automatically (Timer Function 37 (GB) Adjusting the time and the day 37 (GB) Displaying the time 37 (GB) On/Off Timer Function 37 (GB... IP address and communication speed 39 (GB) Obtaining an IP address automatically (DHCP) .... 39 (GB) Setting an IP address manually (Manual 40 (GB) Setting a communication speed 41 (GB) Self-diagnosis Function 41 (GB) Operating a Specific Display With the Remote Commander 42 (GB) Specifications 43 (GB) 4 (GB)
...Menu Items to Their Original Settings 35 (GB) Selecting the On-screen Language 36 (GB) Adjusting Color Matrix 36 (GB) Controlling Power On/Off Automatically (Timer Function 37 (GB) Adjusting the time and the day 37 (GB) Displaying the time 37 (GB) On/Off Timer Function 37 (GB... IP address and communication speed 39 (GB) Obtaining an IP address automatically (DHCP) .... 39 (GB) Setting an IP address manually (Manual 40 (GB) Setting a communication speed 41 (GB) Self-diagnosis Function 41 (GB) Operating a Specific Display With the Remote Commander 42 (GB) Specifications 43 (GB) 4 (GB)

Operating Instructions
Page 5
...on the position of red, blue or green, or dark spots appearing on the screen. Take this unit, contact your authorized Sony dealers. 5 (GB) These do not indicate a malfunction. The screen will return to use . They may remove the coating or spoil the unit....it as illustrated on handling and cleaning the display panel The display panel's special surface finish should be used for cleaning. Avoid touching the LCD screen. Notes on the carton. When cleaning it checked by qualified personnel before cleaning the display. • The LCD panel surface has been given a special finish....
...on the position of red, blue or green, or dark spots appearing on the screen. Take this unit, contact your authorized Sony dealers. 5 (GB) These do not indicate a malfunction. The screen will return to use . They may remove the coating or spoil the unit....it as illustrated on handling and cleaning the display panel The display panel's special surface finish should be used for cleaning. Avoid touching the LCD screen. Notes on the carton. When cleaning it checked by qualified personnel before cleaning the display. • The LCD panel surface has been given a special finish....
Operating Instructions
Page 7
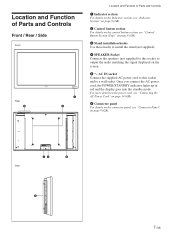
...details on the power cord, see "Connecting the AC Power Cord" on page 14 (GB). 6 Connector panel For details on the connector panel, see "Control Button Section (Top)" on page 8 (GB). 3 Stand installation hooks Use these hooks ...to install the stand (not supplied). 4 SPEAKER Socket Connects the speakers (not supplied) to this socket and to output the audio matching the signal displayed... button section For details on the control button section, see "Connector Panel" on the screen. 5 -
...details on the power cord, see "Connecting the AC Power Cord" on page 14 (GB). 6 Connector panel For details on the connector panel, see "Control Button Section (Top)" on page 8 (GB). 3 Stand installation hooks Use these hooks ...to install the stand (not supplied). 4 SPEAKER Socket Connects the speakers (not supplied) to this socket and to output the audio matching the signal displayed... button section For details on the control button section, see "Connector Panel" on the screen. 5 -
Operating Instructions
Page 9
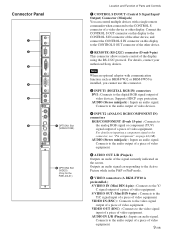
... of video equipment. For details on the screen. Supports HDCP copy protection. For details, contact your authorized Sony dealers. Connects to the audio output of...REMOTE (RS-232C) connector (D-sub 9-pin) This connector allows remote control of the display using the RS-232C protocol. AUDIO (Stereo minijack) : Inputs an audio signal. AUDIO...Panel 1 2 3 4 5 DVI-HDCP INPUT 1 AUDIO RGB/COMPONENT INPUT 2 AUDIO L AUDIO OUT R S VIDEO IN OUT VIDEO IN 6 7 OPTION1 Slot (VIDEO/COM ) VIDEO INPUT ADAPTOR OUT AUDIO IN L R 8 OPTION2 Slot (VIDEO) (Only for the FWD-40LX1...
... of video equipment. For details on the screen. Supports HDCP copy protection. For details, contact your authorized Sony dealers. Connects to the audio output of...REMOTE (RS-232C) connector (D-sub 9-pin) This connector allows remote control of the display using the RS-232C protocol. AUDIO (Stereo minijack) : Inputs an audio signal. AUDIO...Panel 1 2 3 4 5 DVI-HDCP INPUT 1 AUDIO RGB/COMPONENT INPUT 2 AUDIO L AUDIO OUT R S VIDEO IN OUT VIDEO IN 6 7 OPTION1 Slot (VIDEO/COM ) VIDEO INPUT ADAPTOR OUT AUDIO IN L R 8 OPTION2 Slot (VIDEO) (Only for the FWD-40LX1...
Operating Instructions
Page 11
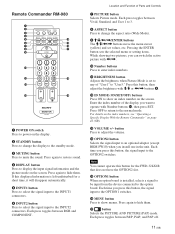
...Press to mute the sound. Press again to restore sound. 4 DISPLAY button Press to display the input signal information and the picture mode on the display. 2 STANDBY button Press to change the aspect ratio (Wide Mode). 9 M/m/ Remote Commander RM-980 1 2 MUTING DISPLAY STBY ON 3 4 5 qf 6 qg 7 qh 8 ...ENTER 123 0 456 789 qa 0 qk qs ON SET qd ql MONITOR RM-980 1 POWER ON switch Press to power on the screen. If this displayed information is left undisturbed for a short time, it will disappear automatically. 5 INPUT1 button Press to select the signal input to the INPUT1 ...
...Press to mute the sound. Press again to restore sound. 4 DISPLAY button Press to display the input signal information and the picture mode on the display. 2 STANDBY button Press to change the aspect ratio (Wide Mode). 9 M/m/ Remote Commander RM-980 1 2 MUTING DISPLAY STBY ON 3 4 5 qf 6 qg 7 qh 8 ...ENTER 123 0 456 789 qa 0 qk qs ON SET qd ql MONITOR RM-980 1 POWER ON switch Press to power on the screen. If this displayed information is left undisturbed for a short time, it will disappear automatically. 5 INPUT1 button Press to select the signal input to the INPUT1 ...
Operating Instructions
Page 16
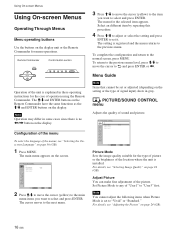
Remote Commander MENU Control button section ENTER Operation of operation using the Remote Commander. Using On-screen Menus Using On-screen Menus Operating Through Menus Menu operating buttons Use the buttons on the display. Note Operation may differ in these operating instructions for menu operations. The M/m and ENTER buttons on the Remote Commander have the same functions as the M/m and ENTER buttons on the display unit or the Remote Commander for the case of the unit is explained in some cases since there is no
Remote Commander MENU Control button section ENTER Operation of operation using the Remote Commander. Using On-screen Menus Using On-screen Menus Operating Through Menus Menu operating buttons Use the buttons on the display. Note Operation may differ in these operating instructions for menu operations. The M/m and ENTER buttons on the Remote Commander have the same functions as the M/m and ENTER buttons on the display unit or the Remote Commander for the case of the unit is explained in some cases since there is no
Operating Instructions
Page 17
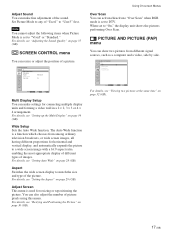
... see "Viewing two pictures at the same time" on page 28 (GB). Adjust Screen This menu is set to a wide screen image with a 16:9 aspect ratio, enabling the most appropriate display of different types of picture pixels using this menu. When set to any of the... 2, 3 × 3 or 4 × 4 arrangement. For details, see "Setting up the Multi Display" on page 29 (GB). SCREEN CONTROL Multi Display Setup Wide Setup Aspect: Adjust Screen Over Scan: Wide Zoom On Select Set ENTER Exit MENU Multi Display Setup You can show two pictures from among ordinary television broadcasts, or wide...
... see "Viewing two pictures at the same time" on page 28 (GB). Adjust Screen This menu is set to a wide screen image with a 16:9 aspect ratio, enabling the most appropriate display of different types of picture pixels using this menu. When set to any of the... 2, 3 × 3 or 4 × 4 arrangement. For details, see "Setting up the Multi Display" on page 29 (GB). SCREEN CONTROL Multi Display Setup Wide Setup Aspect: Adjust Screen Over Scan: Wide Zoom On Select Set ENTER Exit MENU Multi Display Setup You can show two pictures from among ordinary television broadcasts, or wide...
Operating Instructions
Page 18
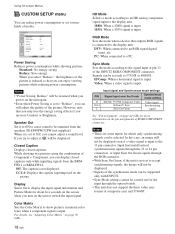
...Reduce" will not be carried out for about five seconds on the screen when you power on page 44 (GB) for which only synchronizing signals can enjoy viewing pictures while reducing power consumption. Closed Caption Displays closed captions only while inputting signals from the speakers SS-SP40FW/32FW (...connector. In this case, an image will be selected. If you can be supported only with INPUT2. • Sync Mode settings cannot be displayed. • Signals of the synchronous mode can still adjust the quality of the INPUT2 RGB/COMPONENT connector. Off: The caption is input. ...
...Reduce" will not be carried out for about five seconds on the screen when you power on page 44 (GB) for which only synchronizing signals can enjoy viewing pictures while reducing power consumption. Closed Caption Displays closed captions only while inputting signals from the speakers SS-SP40FW/32FW (...connector. In this case, an image will be selected. If you can be supported only with INPUT2. • Sync Mode settings cannot be displayed. • Signals of the synchronous mode can still adjust the quality of the INPUT2 RGB/COMPONENT connector. Off: The caption is input. ...
Operating Instructions
Page 19
...SONY" logo on the front of the Remote Commander. You can select only "Display + Remote" or "Remote Only." NTSC: to display NTSC signals NTSC4.43: to display NTSC4.43 signals PAL: to display PAL signals SECAM: to display SECAM signals PAL-M: to display PAL-M signals PAL-N: to display PAL-N signals PAL60: to display...details on the Index Number, see "Selecting the On-screen Language" on -screen language or the input signal, or set this item, the modes you can select only "Display + Remote" or "Display Unit Only." Display + Remote: Activates a remote commander supplied with a ...
...SONY" logo on the front of the Remote Commander. You can select only "Display + Remote" or "Remote Only." NTSC: to display NTSC signals NTSC4.43: to display NTSC4.43 signals PAL: to display PAL signals SECAM: to display SECAM signals PAL-M: to display PAL-M signals PAL-N: to display PAL-N signals PAL60: to display...details on the Index Number, see "Selecting the On-screen Language" on -screen language or the input signal, or set this item, the modes you can select only "Display + Remote" or "Display Unit Only." Display + Remote: Activates a remote commander supplied with a ...

Operating Instructions
Page 20
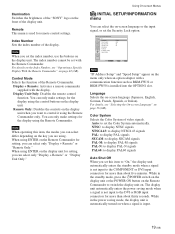
...are not preset in standby mode is installed into the OPTION1 slot. For details, see "Setting an IP Address and communication speed" on the screen when set an IP address. Model Name Indicates the model name. Manual: Manual configuration to On. Off: Disables the security lock. DHCP:...on page 39 (GB). Note The Index Number will not be reset. For details, see "Setting an IP Address and communication speed" on the display unit. INITIAL SETUP/INFORMATION Information Model Name: Serial Number: Operation Time: Software Version: IP Address: Select Set ENTER Exit MENU Note "IP Address...
...are not preset in standby mode is installed into the OPTION1 slot. For details, see "Setting an IP Address and communication speed" on the screen when set an IP address. Model Name Indicates the model name. Manual: Manual configuration to On. Off: Disables the security lock. DHCP:...on page 39 (GB). Note The Index Number will not be reset. For details, see "Setting an IP Address and communication speed" on the display unit. INITIAL SETUP/INFORMATION Information Model Name: Serial Number: Operation Time: Software Version: IP Address: Select Set ENTER Exit MENU Note "IP Address...
Operating Instructions
Page 21
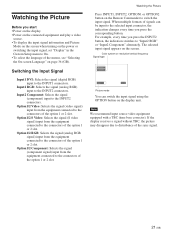
...time you start • Power on the display. • Power on the connected equipment and play a video source. • To display the input signal information and Picture Mode on the screen when turning on the power or switching the input signal, set "Display" in the Custom Setup menu to On....: Selects the signal (component) input to disturbance of signals can switch the input signal using the OPTION button on the screen. The selected input signal appears on the display unit. Switching the Input Signal Input1 DVI: Selects the signal (digital RGB) input to "Input2 RGB" or "Input2 Component...
...time you start • Power on the display. • Power on the connected equipment and play a video source. • To display the input signal information and Picture Mode on the screen when turning on the power or switching the input signal, set "Display" in the Custom Setup menu to On....: Selects the signal (component) input to disturbance of signals can switch the input signal using the OPTION button on the screen. The selected input signal appears on the display unit. Switching the Input Signal Input1 DVI: Selects the signal (digital RGB) input to "Input2 RGB" or "Input2 Component...
Operating Instructions
Page 22
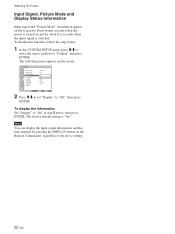
...Commander, regardless of the above , then press ENTER. Watching the Picture Input Signal, Picture Mode and Display Status Information Input signal and "Picture Mode" information appear on the screen for about twenty seconds when the power is turned on and for about five seconds when the input signal... is "On." To display the information Set "Display" to "On" in step 2 above setting. 22 (GB) The factory ...
...Commander, regardless of the above , then press ENTER. Watching the Picture Input Signal, Picture Mode and Display Status Information Input signal and "Picture Mode" information appear on the screen for about twenty seconds when the power is turned on and for about five seconds when the input signal... is "On." To display the information Set "Display" to "On" in step 2 above setting. 22 (GB) The factory ...

Operating Instructions
Page 23
... 1/2 S Video The signal mode of International Business Machines Corporation, U.S.A. c) Mac (Macintosh) is a registered trademark of the unit's status On-screen display Significance 640×480 / 60 (e.g.) The selected input signal is computer RGB. 480 / 60I (e.g.) The selected input signal is set to analog... INPUT1 DVI The signal mode of Option 1 or 2 slot is a registered trademark of RGB/COMPONENT (D-sub 15 pin) on -screen display of Apple Computer, Inc. NTSC (e.g.) The selected input signal is nonsupported signal. Option 1/2 Component The signal mode of INPUT1 is ...
... 1/2 S Video The signal mode of International Business Machines Corporation, U.S.A. c) Mac (Macintosh) is a registered trademark of the unit's status On-screen display Significance 640×480 / 60 (e.g.) The selected input signal is computer RGB. 480 / 60I (e.g.) The selected input signal is set to analog... INPUT1 DVI The signal mode of Option 1 or 2 slot is a registered trademark of RGB/COMPONENT (D-sub 15 pin) on -screen display of Apple Computer, Inc. NTSC (e.g.) The selected input signal is nonsupported signal. Option 1/2 Component The signal mode of INPUT1 is ...

Operating Instructions
Page 24
... with M/m and press ENTER. You can also store the adjusted levels in memory. The PICTURE/SOUND CONTROL menu appears on the screen. PICTURE/SOUND CONTROL Picture Mode: Vivid Adjust Picture Adjust Sound Select Set ENTER Exit MENU 3 Press M/m to move the cursor ... "Contrast," "Brightness," "Chroma," "Phase," "Sharpness," "Noise Reduct.," "Cinema Drive," "Dynamic Picture," "Color Temp.," "Color Correct." on the screen. or "Gamma Correct." Selecting Image Quality / Adjusting the Picture Selecting Image Quality You can set the image quality to suit your taste. Vivid: Pictures...
... with M/m and press ENTER. You can also store the adjusted levels in memory. The PICTURE/SOUND CONTROL menu appears on the screen. PICTURE/SOUND CONTROL Picture Mode: Vivid Adjust Picture Adjust Sound Select Set ENTER Exit MENU 3 Press M/m to move the cursor ... "Contrast," "Brightness," "Chroma," "Phase," "Sharpness," "Noise Reduct.," "Cinema Drive," "Dynamic Picture," "Color Temp.," "Color Correct." on the screen. or "Gamma Correct." Selecting Image Quality / Adjusting the Picture Selecting Image Quality You can set the image quality to suit your taste. Vivid: Pictures...

Operating Instructions
Page 25
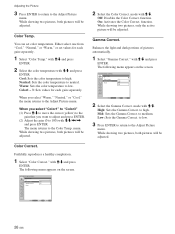
Chroma Select "Chroma" with M/m/ Adjust the chroma with M/m and press ENTER.
Chroma Select "Chroma" with M/m/ Adjust the chroma with M/m and press ENTER.
Operating Instructions
Page 26
Color1 - 3: Sets values for each gain separately. You can set values for each gain separately. 1 Select "Color Temp." Warm: Sets the color temperature to the Adjust Picture menu. When you want to adjust and press ENTER. (2) Adjust the gain (0 to the Adjust Picture menu. Adjusting the Picture 3 Press ENTER to return to low. Color Temp. When you select "Color1" to "Color3" (1) Press M/m to move the cursor (yellow) to the gain that you select "Warm," "Neutral," or "Cool," the menu returns to 100) with M/m and press ENTER. Cool: Sets the color temperature to ...
Color1 - 3: Sets values for each gain separately. You can set values for each gain separately. 1 Select "Color Temp." Warm: Sets the color temperature to the Adjust Picture menu. When you want to adjust and press ENTER. (2) Adjust the gain (0 to the Adjust Picture menu. Adjusting the Picture 3 Press ENTER to return to low. Color Temp. When you select "Color1" to "Color3" (1) Press M/m to move the cursor (yellow) to the gain that you select "Warm," "Neutral," or "Cool," the menu returns to 100) with M/m and press ENTER. Cool: Sets the color temperature to ...
Operating Instructions
Page 27
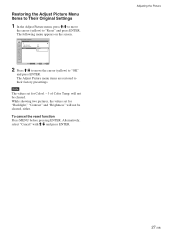
... be cleared, either. Alternatively, select "Cancel" with M/m and press ENTER. Note The values set for Color1 - 3 of Color Temp. The following menu appears on the screen. will not be cleared. PICTURE/SOUND CONTROL Adjust Picture Color Correct.: Gamma Correct.: Reset Off Mid Cancel OK Select Set ENTER Exit MENU 2 Press M/m to...
... be cleared, either. Alternatively, select "Cancel" with M/m and press ENTER. Note The values set for Color1 - 3 of Color Temp. The following menu appears on the screen. will not be cleared. PICTURE/SOUND CONTROL Adjust Picture Color Correct.: Gamma Correct.: Reset Off Mid Cancel OK Select Set ENTER Exit MENU 2 Press M/m to...
Operating Instructions
Page 28
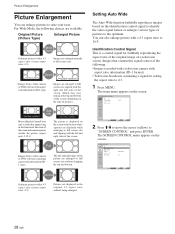
... Select Set ENTER Exit MENU 2 Press M/m to move the cursor (yellow) to full screen size aligned with the area where captions are available. SCREEN CONTROL Multi Display Setup Wide Setup Aspect: Adjust Screen Over Scan: Wide Zoom On Select Set ENTER Exit MENU 28 (GB) For Wide Mode...forth that contain this signal consist of the following choices are displayed while enlarging to full screen size and aligning with the left sides of the screen. (Black bars may remain at the top and bottom of the screen. Picture Enlargement Picture Enlargement You can also enlarge picture with a...
... Select Set ENTER Exit MENU 2 Press M/m to move the cursor (yellow) to full screen size aligned with the area where captions are available. SCREEN CONTROL Multi Display Setup Wide Setup Aspect: Adjust Screen Over Scan: Wide Zoom On Select Set ENTER Exit MENU 28 (GB) For Wide Mode...forth that contain this signal consist of the following choices are displayed while enlarging to full screen size and aligning with the left sides of the screen. (Black bars may remain at the top and bottom of the screen. Picture Enlargement Picture Enlargement You can also enlarge picture with a...

Operating Instructions
Page 29
... on the type of picture.) Subtitle: Enlarges the picture all the way to 16:9 pictures. The following menu appears on the screen. On: The image is enlarged and displayed in step 3. 7 Select "4:3 Mode" with a 4:3 aspect ratio are reproduced as -is . If you cannot set the ...; While inputting DVI or RGB signals, you want to use the Auto Wide function, reset it . 3 Press ENTER. Normal: Displays the picture without changing the top and bottom. SCREEN CONTROL Wide Setup Auto Wide: 4:3 Mode: On WNoidrme aZloom Wide Zoom Select Set ENTER Exit MENU 8 Select the 4:3 Mode with...
... on the type of picture.) Subtitle: Enlarges the picture all the way to 16:9 pictures. The following menu appears on the screen. On: The image is enlarged and displayed in step 3. 7 Select "4:3 Mode" with a 4:3 aspect ratio are reproduced as -is . If you cannot set the ...; While inputting DVI or RGB signals, you want to use the Auto Wide function, reset it . 3 Press ENTER. Normal: Displays the picture without changing the top and bottom. SCREEN CONTROL Wide Setup Auto Wide: 4:3 Mode: On WNoidrme aZloom Wide Zoom Select Set ENTER Exit MENU 8 Select the 4:3 Mode with...


