Operating Instructions
Page 19
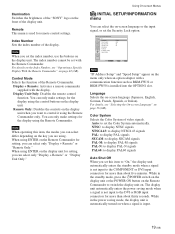
... When operating this item to "On," the display unit automatically enters the standby mode when a signal is not input to set with the Remote Commander. INITIAL SETUP/INFORMATION Language: Color System: Auto Shut Off: Security Lock: Information All Reset IP Address Setup Speed Setup English Auto Off...or RGB input connectors for remote control settings. Remote This menu is not input to switch the display unit on the front of the display unit. Illumination Switches the brightness of the "SONY" logo on . Using On-screen Menus INITIAL SETUP/INFORMATION menu You can only make settings for ...
... When operating this item to "On," the display unit automatically enters the standby mode when a signal is not input to set with the Remote Commander. INITIAL SETUP/INFORMATION Language: Color System: Auto Shut Off: Security Lock: Information All Reset IP Address Setup Speed Setup English Auto Off...or RGB input connectors for remote control settings. Remote This menu is not input to switch the display unit on the front of the display unit. Illumination Switches the brightness of the "SONY" logo on . Using On-screen Menus INITIAL SETUP/INFORMATION menu You can only make settings for ...

Operating Instructions
Page 20
... speed" on page 37 (GB). Off: Disables the security lock. For details, see "On/Off Timer Function" on page 38 (GB). All Reset Resets all the adjustments and setting values to the factory preset. Clock Set Sets the time and the day. For details, see "Setting the Security Lock...Select Set ENTER Exit MENU Note "IP Address" appears on the internal status of operation. Operation Time Indicates the total number of hours of the display unit. Serial Number Indicates the serial number. For details, see "Setting an IP Address and communication speed" on /off . On/Off Timer Sets...
... speed" on page 37 (GB). Off: Disables the security lock. For details, see "On/Off Timer Function" on page 38 (GB). All Reset Resets all the adjustments and setting values to the factory preset. Clock Set Sets the time and the day. For details, see "Setting the Security Lock...Select Set ENTER Exit MENU Note "IP Address" appears on the internal status of operation. Operation Time Indicates the total number of hours of the display unit. Serial Number Indicates the serial number. For details, see "Setting an IP Address and communication speed" on /off . On/Off Timer Sets...
Operating Instructions
Page 26
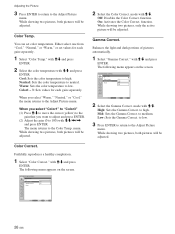
When you want to adjust and press ENTER. (2) Adjust the gain (0 to neutral. Cool: Sets the color temperature to the Adjust Picture menu. Either select one from "Cool," "Neutral," or "Warm," or set color temperature. Color1 - 3: Sets values for each gain separately. You can set values for each gain separately. 1 Select "Color Temp." Neutral: Sets the color temperature to 100) with M/m and press ENTER. When you select "Color1" to "Color3" (1) Press M/m to move the cursor (yellow) to the gain that you select "Warm," "Neutral," or "Cool," the menu returns to high. ...
When you want to adjust and press ENTER. (2) Adjust the gain (0 to neutral. Cool: Sets the color temperature to the Adjust Picture menu. Either select one from "Cool," "Neutral," or "Warm," or set color temperature. Color1 - 3: Sets values for each gain separately. You can set values for each gain separately. 1 Select "Color Temp." Neutral: Sets the color temperature to 100) with M/m and press ENTER. When you select "Color1" to "Color3" (1) Press M/m to move the cursor (yellow) to the gain that you select "Warm," "Neutral," or "Cool," the menu returns to high. ...
Operating Instructions
Page 27
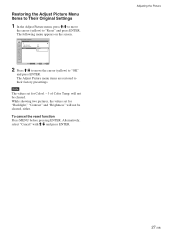
... ENTER. While showing two pictures, the values set for "Backlight," "Contrast" and "Brightness" will not be cleared, either. To cancel the reset function Press MENU before pressing ENTER. Adjusting the Picture 27 (GB) The Adjust Picture menu items are restored to "OK" and press ENTER. ...will not be cleared. PICTURE/SOUND CONTROL Adjust Picture Color Correct.: Gamma Correct.: Reset Off Mid Cancel OK Select Set ENTER Exit MENU 2 Press M/m to move the cursor (yellow) to "Reset" and press ENTER. Restoring the Adjust Picture Menu Items to Their Original Settings 1 In...
... ENTER. While showing two pictures, the values set for "Backlight," "Contrast" and "Brightness" will not be cleared, either. To cancel the reset function Press MENU before pressing ENTER. Adjusting the Picture 27 (GB) The Adjust Picture menu items are restored to "OK" and press ENTER. ...will not be cleared. PICTURE/SOUND CONTROL Adjust Picture Color Correct.: Gamma Correct.: Reset Off Mid Cancel OK Select Set ENTER Exit MENU 2 Press M/m to move the cursor (yellow) to "Reset" and press ENTER. Restoring the Adjust Picture Menu Items to Their Original Settings 1 In...

Operating Instructions
Page 29
... with M/m and press ENTER. If you cannot set the Aspect while using the combination of the picture may be copyright infringement as -is enlarged and displayed in step 3. 7 Select "4:3 Mode" with M/m. SCREEN CONTROL Wide Setup Auto Wide: 4:3 Mode: On Wide Zoom Select Set ENTER Exit MENU 4 Press M/m ...way to the left and right sides of the picture to cover the entire screen without enlarging it to use the Auto Wide function, reset it . 3 Press ENTER. The screen returns to an aspect ratio of the screen, depending on the screen. Normal: Pictures with a 4:3 aspect...
... with M/m and press ENTER. If you cannot set the Aspect while using the combination of the picture may be copyright infringement as -is enlarged and displayed in step 3. 7 Select "4:3 Mode" with M/m. SCREEN CONTROL Wide Setup Auto Wide: 4:3 Mode: On Wide Zoom Select Set ENTER Exit MENU 4 Press M/m ...way to the left and right sides of the picture to cover the entire screen without enlarging it to use the Auto Wide function, reset it . 3 Press ENTER. The screen returns to an aspect ratio of the screen, depending on the screen. Normal: Pictures with a 4:3 aspect...
Operating Instructions
Page 31
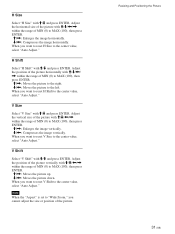
Adjust the horizontal size of the picture with M/m and press ENTER. H Size Select "H Size" with M/m/
Adjust the horizontal size of the picture with M/m and press ENTER. H Size Select "H Size" with M/m/

Operating Instructions
Page 35
"User3." Adjust the treble with M/m and press ENTER. Adjusting the Treble, Bass, and Balance, etc. Press MENU to any of the speaker (left and right) volume. Treble Select "Treble" with M/m/ Adjusting the Sound Quality When a speaker SS-SP40FW/32FW (not supplied) installed, you can also be set. Set the "Picture Mode" to show the main menu and adjust "Treble," "Bass," "Balance," or "Surround" from the Adjust Sound menu. The surround mode can adjust sound treble level, bass level, or balance of "User1" -
"User3." Adjust the treble with M/m and press ENTER. Adjusting the Treble, Bass, and Balance, etc. Press MENU to any of the speaker (left and right) volume. Treble Select "Treble" with M/m/ Adjusting the Sound Quality When a speaker SS-SP40FW/32FW (not supplied) installed, you can also be set. Set the "Picture Mode" to show the main menu and adjust "Treble," "Bass," "Balance," or "Surround" from the Adjust Sound menu. The surround mode can adjust sound treble level, bass level, or balance of "User1" -
Operating Instructions
Page 36
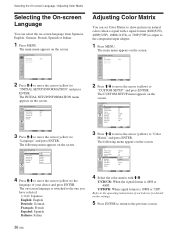
...Y/CB/CR: When the signal format is 1080I or 720P. INITIAL SETUP/INFORMATION Language: Color System: Auto Shut Off: Security Lock: Information All Reset English EAnugtolish DOeffutsch FOrfaf nçais Español Italiano Select Set ENTER Exit MENU 4 Press M/m to move the cursor (yellow) to "...to "CUSTOM SETUP" and press ENTER. Y/PB/PR: When signal format is 480I or 480P. CUSTOM SETUP Power Saving: Speaker Out: Closed Caption: Display: Color Matrix: HD Mode: RGB Mode: Sync Mode: Illumination: Remote Standard Off Off Off Y/PB/PR 1080i DTV H/Comp High Select Set ENTER...
...Y/CB/CR: When the signal format is 1080I or 720P. INITIAL SETUP/INFORMATION Language: Color System: Auto Shut Off: Security Lock: Information All Reset English EAnugtolish DOeffutsch FOrfaf nçais Español Italiano Select Set ENTER Exit MENU 4 Press M/m to move the cursor (yellow) to "...to "CUSTOM SETUP" and press ENTER. Y/PB/PR: When signal format is 480I or 480P. CUSTOM SETUP Power Saving: Speaker Out: Closed Caption: Display: Color Matrix: HD Mode: RGB Mode: Sync Mode: Illumination: Remote Standard Off Off Off Y/PB/PR 1080i DTV H/Comp High Select Set ENTER...
Operating Instructions
Page 39
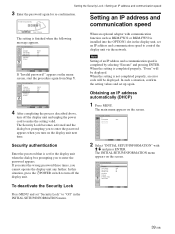
... such as BKM-FW32 or BKM-FW50 is completed properly, "Done" will be displayed. In this password. INITIAL SETUP/INFORMATION Language: Color System: Auto Shut Off: Security Lock: Information All Reset English Auto Off Off When an optional adaptor with M/m and press ENTER. The INITIAL... setting values and set an IP address and communication speed to control the display unit via the network. INITIAL SETUP/INFORMATION Language: Color System: Auto Shut Off: Security Lock: Information All Reset IP Address Setup Speed Setup English Auto Off Off To deactivate the Security Lock...
... such as BKM-FW32 or BKM-FW50 is completed properly, "Done" will be displayed. In this password. INITIAL SETUP/INFORMATION Language: Color System: Auto Shut Off: Security Lock: Information All Reset English Auto Off Off When an optional adaptor with M/m and press ENTER. The INITIAL... setting values and set an IP address and communication speed to control the display unit via the network. INITIAL SETUP/INFORMATION Language: Color System: Auto Shut Off: Security Lock: Information All Reset IP Address Setup Speed Setup English Auto Off Off To deactivate the Security Lock...

