Operating Instructions
Page 47
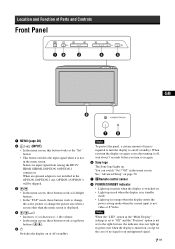
... panel, a certain amount of no signal or an unsupported signal. 7 GB When you turn the display on again, soon after turning it off, wait about 5 seconds before you turn the display to on . • Lights up in the menu screen. Selects an input signal from among the HD15/ HDMI 1/HDMI 2/OPTION 1/OPTION 2 connectors... the "Position" option is not set to the right-bottom, the indicator does not light up in green even when the display is turned on again. 6 Sony logo The Sony logo lights up in orange when the display enters the power saving mode when the current input is not in red when the...
... panel, a certain amount of no signal or an unsupported signal. 7 GB When you turn the display on again, soon after turning it off, wait about 5 seconds before you turn the display to on . • Lights up in the menu screen. Selects an input signal from among the HD15/ HDMI 1/HDMI 2/OPTION 1/OPTION 2 connectors... the "Position" option is not set to the right-bottom, the indicator does not light up in green even when the display is turned on again. 6 Sony logo The Sony logo lights up in orange when the display enters the power saving mode when the current input is not in red when the...
Operating Instructions
Page 48
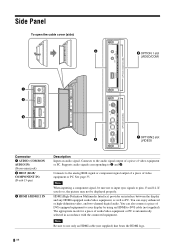
...selected in accordance with the connected equipment. Connects to pins 13 and 14. Note When inputting a component signal, be displayed properly. Side Panel To open the cable cover (side) 4 IN 5 OPTION 1 slot (VIDEO/COM) OPTION 1(VIDEO/COM) MONITOR CONTROL... ADAPTOR CONTROL S OUT REMOTE RGB/COMPONENT IN AUDIO IN COM MON AUDIO HD 15 1 2 3 S VIDEO IN 1 IN OPTION 2(VIDEO) VIDEO INPUT ADAPTOR OUT 2 VIDEO IN IN OUT AUDIO IN L 7 OPTION 2 slot 6 (VIDEO) R Connector...
...selected in accordance with the connected equipment. Connects to pins 13 and 14. Note When inputting a component signal, be displayed properly. Side Panel To open the cable cover (side) 4 IN 5 OPTION 1 slot (VIDEO/COM) OPTION 1(VIDEO/COM) MONITOR CONTROL... ADAPTOR CONTROL S OUT REMOTE RGB/COMPONENT IN AUDIO IN COM MON AUDIO HD 15 1 2 3 S VIDEO IN 1 IN OPTION 2(VIDEO) VIDEO INPUT ADAPTOR OUT 2 VIDEO IN IN OUT AUDIO IN L 7 OPTION 2 slot 6 (VIDEO) R Connector...
Operating Instructions
Page 49
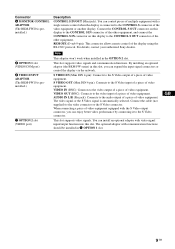
... the other equipment, and connect the CONTROL S IN connector on this display to the CONTROL S IN connector of the other equipment. GB 9 GB The video signal or the S Video signal is automatically selected. For details, contact your authorized Sony dealers. 5 OPTION 1 slot (VIDEO/COM port) 6 VIDEO INPUT ADAPTOR (The BKM-FW10 is preinstalled.) 7 OPTION...
... the other equipment, and connect the CONTROL S IN connector on this display to the CONTROL S IN connector of the other equipment. GB 9 GB The video signal or the S Video signal is automatically selected. For details, contact your authorized Sony dealers. 5 OPTION 1 slot (VIDEO/COM port) 6 VIDEO INPUT ADAPTOR (The BKM-FW10 is preinstalled.) 7 OPTION...
Operating Instructions
Page 50
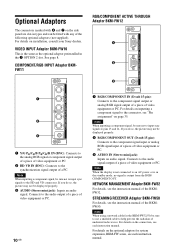
... manual of the following optional adaptors (not supplied). If you do so, the picture may not be displayed properly. 2 RGB/COMPONENT OUT (D-sub 15-pin): Connects to the connector, see each instruction manual. VIDEO INPUT Adaptor BKM-FW10 This is the same as the optional adaptor preinstalled... details, see the instruction manual of video equipment or PC. For details on installation, consult your Sony dealers. See page 8. Optional Adaptors The connectors marked with 5 and 7 on the side panel are slot-in types and can be fitted with any of the BKMFW32. Connects to the audio...
... manual of the following optional adaptors (not supplied). If you do so, the picture may not be displayed properly. 2 RGB/COMPONENT OUT (D-sub 15-pin): Connects to the connector, see each instruction manual. VIDEO INPUT Adaptor BKM-FW10 This is the same as the optional adaptor preinstalled... details, see the instruction manual of video equipment or PC. For details on installation, consult your Sony dealers. See page 8. Optional Adaptors The connectors marked with 5 and 7 on the side panel are slot-in types and can be fitted with any of the BKMFW32. Connects to the audio...
Operating Instructions
Page 52
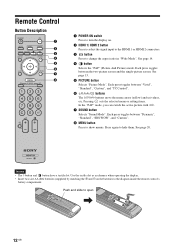
... Selects "Picture Mode". Each press toggles between the two-picture screen and the single-picture screen. Use the tactile dot as a reference when operating the display. • Insert two size AA (R6) batteries (supplied) by matching the 3 and # on . 2 HDMI 1/ HDMI 2 button Press to ...select the signal input to the HDMI 1 or HDMI 2 connectors. 3 button Press to change the aspect ratio in "Wide Mode". Each press toggles between "Vivid", "Standard", "Custom", and "TC Control". 6 F/f/G/g/ buttons The F/f/G/g ...
... Selects "Picture Mode". Each press toggles between the two-picture screen and the single-picture screen. Use the tactile dot as a reference when operating the display. • Insert two size AA (R6) batteries (supplied) by matching the 3 and # on . 2 HDMI 1/ HDMI 2 button Press to ...select the signal input to the HDMI 1 or HDMI 2 connectors. 3 button Press to change the aspect ratio in "Wide Mode". Each press toggles between "Vivid", "Standard", "Custom", and "TC Control". 6 F/f/G/g/ buttons The F/f/G/g ...
Operating Instructions
Page 53
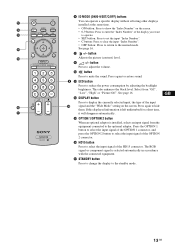
... the "Index Number" of the HD15 connector. qg OPTION 1/OPTION 2 button When an optional adaptor is installed, selects an input signal from "Off", "Low", "High" or "Picture Off". GB 13 GB STANDBY ON HD15 HDMI1 OPTION1 OPTION2 DISPLAY HDMI2 PICTURE ECO SOUND ON ID MODE ... again to select the input signal of the OPTION 1 connector, and press the OPTION 2 button to restore sound. Press the OPTION 1 button to select the input signal of the OPTION 2 connector. qa +/- If this displayed information is selected automatically in accordance with the connected equipment....
... the "Index Number" of the HD15 connector. qg OPTION 1/OPTION 2 button When an optional adaptor is installed, selects an input signal from "Off", "Low", "High" or "Picture Off". GB 13 GB STANDBY ON HD15 HDMI1 OPTION1 OPTION2 DISPLAY HDMI2 PICTURE ECO SOUND ON ID MODE ... again to select the input signal of the OPTION 1 connector, and press the OPTION 2 button to restore sound. Press the OPTION 1 button to select the input signal of the OPTION 2 connector. qa +/- If this displayed information is selected automatically in accordance with the connected equipment....

Operating Instructions
Page 57
... off. • Use cables suitable for the equipment to the AC power cord. Connecting the AC Power Cord 1 Plug the AC power cord into the connectors or jacks.
... off. • Use cables suitable for the equipment to the AC power cord. Connecting the AC Power Cord 1 Plug the AC power cord into the connectors or jacks.
Operating Instructions
Page 64
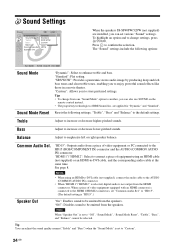
..., you can adjust the sound quality menus ("Treble" and "Bass") when the "Sound Mode" is connected to the HDMI 1/HDMI 2 connectors, set to be selected. are installed, you can also use SOUND on the remote control instead. • The proprietary technologies of BBE Sound... audio is not output from a piece of video equipment equipped with an HDMI connector is set various "Sound" settings. Tip You can set to enjoy powerful sound effects like those in a movie theater. "Standard": Flat setting. Tips • To change settings, press F/f/G/g. "Custom": Allows you ...
..., you can adjust the sound quality menus ("Treble" and "Bass") when the "Sound Mode" is connected to the HDMI 1/HDMI 2 connectors, set to be selected. are installed, you can also use SOUND on the remote control instead. • The proprietary technologies of BBE Sound... audio is not output from a piece of video equipment equipped with an HDMI connector is set various "Sound" settings. Tip You can set to enjoy powerful sound effects like those in a movie theater. "Standard": Flat setting. Tips • To change settings, press F/f/G/g. "Custom": Allows you ...
Operating Instructions
Page 65
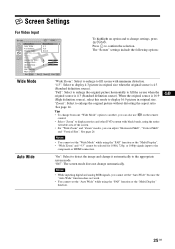
... picture without distorting the aspect ratio. "Zoom": Select to display 16:9 picture in original size when the original source is 4:3 (Standard definition source). GB Auto Wide "On": Select to the component or HDMI connectors. "Full": Select to enlarge the original picture horizontally to confirm... the selection. Notes • While inputting digital and analog RGB signals, you can also use on the remote control. • Select "Zoom" to display movies and other DVD content...
... picture without distorting the aspect ratio. "Zoom": Select to display 16:9 picture in original size when the original source is 4:3 (Standard definition source). GB Auto Wide "On": Select to the component or HDMI connectors. "Full": Select to enlarge the original picture horizontally to confirm... the selection. Notes • While inputting digital and analog RGB signals, you can also use on the remote control. • Select "Zoom" to display movies and other DVD content...
Operating Instructions
Page 69
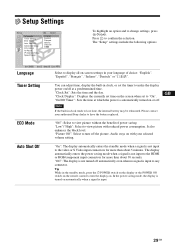
..., press F/f/G/g. Timer Setting You can adjust time, display the built-in the standby mode, press the 1 POWER switch on the display or the POWER ON switch on /off the picture. GB Note If the built-in your authorized Sony dealer to view picture with your selected volume setting.... enters the power saving mode when a signal is input to make the display power on the remote control to the HDMI or RGB/component input connectors for more than about 30 seconds. "Clock Display": Displays the currently set time on . "Picture Off": Select to lose time, the internal battery may ...
..., press F/f/G/g. Timer Setting You can adjust time, display the built-in the standby mode, press the 1 POWER switch on the display or the POWER ON switch on /off the picture. GB Note If the built-in your authorized Sony dealer to view picture with your selected volume setting.... enters the power saving mode when a signal is input to make the display power on the remote control to the HDMI or RGB/component input connectors for more than about 30 seconds. "Clock Display": Displays the currently set time on . "Picture Off": Select to lose time, the internal battery may ...
Operating Instructions
Page 70
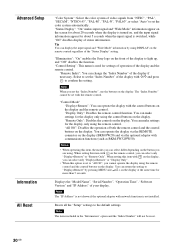
... the "Index Number" will not be set to "All Off", you cannot operate the display using the control buttons on the display (BKM-FW20) and via the REMOTE connector on the display. Resets all the "Setup" settings to the default settings. Note The "IP Address" ... and "Wide Mode" information appear on the screen for about 20 seconds when the display is switched, while "Off" disables display of the "Status Display" setting. "Illumination": "On" enables the Sony logo on the display. "Remote Only": Disables the controls on the front of video signals from "NTSC",...
... the "Index Number" will not be set to "All Off", you cannot operate the display using the control buttons on the display (BKM-FW20) and via the REMOTE connector on the display. Resets all the "Setup" settings to the default settings. Note The "IP Address" ... and "Wide Mode" information appear on the screen for about 20 seconds when the display is switched, while "Off" disables display of the "Status Display" setting. "Illumination": "On" enables the Sony logo on the display. "Remote Only": Disables the controls on the front of video signals from "NTSC",...
Operating Instructions
Page 72
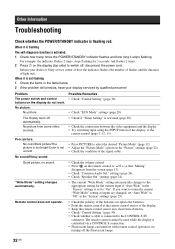
... changes to the appropriate setting for 3 seconds, and flashes 2 times. 2 Press 1 on the display (top side) to the CONTROL S IN connector. The display turns off the fluorescent lamps. 32 GB Good picture, no sound. try turning off automatically. The remote control cannot be used while the... display is set "Auto Wide" to "Off" in the table below. 2 If the problem still persists, have your dealer or Sony...
... changes to the appropriate setting for 3 seconds, and flashes 2 times. 2 Press 1 on the display (top side) to the CONTROL S IN connector. The display turns off the fluorescent lamps. 32 GB Good picture, no sound. try turning off automatically. The remote control cannot be used while the... display is set "Auto Wide" to "Off" in the table below. 2 If the problem still persists, have your dealer or Sony...
Operating Instructions
Page 73
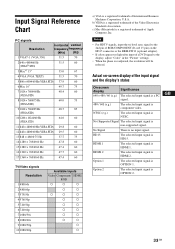
...a a a a a a a) VGA is a registered trademark of Apple Computer, Inc. c) Mac (Macintosh) is a registered trademark of International Business Machines Corporation, U.S.A. Actual on the HD15 connector or the BKM-FW12 (optional adaptor). • If colors appear too light after input of a DVD signal to the 2nd pin of RGB/COMPONENT (D-sub...Option 2 The selected input signal is HDMI 2. b) VESA is a registered trademark of the input signal and the display's status On-screen display Significance 640 × 480 / 60 (e.g.) The selected input signal is a PC signal. 480 / 60I (e.g.) The...
...a a a a a a a) VGA is a registered trademark of Apple Computer, Inc. c) Mac (Macintosh) is a registered trademark of International Business Machines Corporation, U.S.A. Actual on the HD15 connector or the BKM-FW12 (optional adaptor). • If colors appear too light after input of a DVD signal to the 2nd pin of RGB/COMPONENT (D-sub...Option 2 The selected input signal is HDMI 2. b) VESA is a registered trademark of the input signal and the display's status On-screen display Significance 640 × 480 / 60 (e.g.) The selected input signal is a PC signal. 480 / 60I (e.g.) The...
Operating Instructions
Page 75
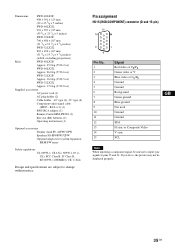
Pin assignment HD15 (RGB/COMPONENT) connector (D-sub 15-pin) Pin No. 1 2 3 4 5 6 7 8 9 10 11 12 13 14 15 Signal Red video or CR/PR Green video or Y Blue video or CB/PB ... 6 oz) FWD-32LX2F: Approx. 16.0 kg (35 lb 5 oz) FWD-32LX2X: Approx. 17.0 kg (37 lb 8 oz) Supplied accessories AC power cord (1) AC plug holder (2) Cable holder 40" type (4), 32" type (6) Component video signal cable (HD15 - RCA × 3) (1) BNC-RCA adaptor (1) Remote Control RM-FW001 (1) Size AA (R6) batteries (2) Operating instructions (1) Optional accessories Display stand...
Pin assignment HD15 (RGB/COMPONENT) connector (D-sub 15-pin) Pin No. 1 2 3 4 5 6 7 8 9 10 11 12 13 14 15 Signal Red video or CR/PR Green video or Y Blue video or CB/PB ... 6 oz) FWD-32LX2F: Approx. 16.0 kg (35 lb 5 oz) FWD-32LX2X: Approx. 17.0 kg (37 lb 8 oz) Supplied accessories AC power cord (1) AC plug holder (2) Cable holder 40" type (4), 32" type (6) Component video signal cable (HD15 - RCA × 3) (1) BNC-RCA adaptor (1) Remote Control RM-FW001 (1) Size AA (R6) batteries (2) Operating instructions (1) Optional accessories Display stand...
Operating Instructions
Page 76
...,211,7 30 AUDIO (COMMON AUDIO IN) connector 8 AAAAuuUutttDooo ISWAOhdiudjIutNesOtL2mf1/fRe,2n2c1t o5,2n12n,9ec2t8or 9 B BBBaarilsgashn2tcn0ee,s2s204,202,422, 23 C Cable Cable cover cover ((sbiodteto) m8,) 18 18 CCainbeleMhootilodner2109, 22 Clock Display 29 Clock Color 2S0et, 29 22 CCCooollmoorrmTSoyenmstAepmu....d2i30o0,S2el2.,2203, 24 Contrast button 13 Control Mode 30 CONTROL S IN/OUT connector 9 Control Custom S2e2t,tin2g3,3204 D DHCP 31 Display Area 21, 26 DISPLAY button 13 Dynamic 24 E ECO ECO button Mode 1163, , 2116, 29 F Full...
...,211,7 30 AUDIO (COMMON AUDIO IN) connector 8 AAAAuuUutttDooo ISWAOhdiudjIutNesOtL2mf1/fRe,2n2c1t o5,2n12n,9ec2t8or 9 B BBBaarilsgashn2tcn0ee,s2s204,202,422, 23 C Cable Cable cover cover ((sbiodteto) m8,) 18 18 CCainbeleMhootilodner2109, 22 Clock Display 29 Clock Color 2S0et, 29 22 CCCooollmoorrmTSoyenmstAepmu....d2i30o0,S2el2.,2203, 24 Contrast button 13 Control Mode 30 CONTROL S IN/OUT connector 9 Control Custom S2e2t,tin2g3,3204 D DHCP 31 Display Area 21, 26 DISPLAY button 13 Dynamic 24 E ECO ECO button Mode 1163, , 2116, 29 F Full...


