Operating Instructions
Page 1
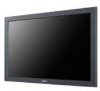
Sony Corporation Printed in China FWD-40LX2F/40LX2X/32LX2F/32LX2X 2-890-214-03(1) Flat Wide Display Monitor JP Operating Instructions GB Mode d'emploi FR Bedienungsanleitung DE Manual de instrucciones ES Istruzioni per l'uso IT CS FWD-40LX2F/40LX2X/32LX2F/32LX2X © 2006 Sony Corporation
Sony Corporation Printed in China FWD-40LX2F/40LX2X/32LX2F/32LX2X 2-890-214-03(1) Flat Wide Display Monitor JP Operating Instructions GB Mode d'emploi FR Bedienungsanleitung DE Manual de instrucciones ES Istruzioni per l'uso IT CS FWD-40LX2F/40LX2X/32LX2F/32LX2X © 2006 Sony Corporation
Operating Instructions
Page 42
...manual could void your Sony dealer regarding this equipment does cause harmful interference to radio or television reception, which the receiver is subject to which can cause injury. Record the model and serial numbers in the U.S.A. To reduce the risk of Conformity Trade Name: SONY Model: FWD-40LX2F/FWD- 40LX2X/FWD-32LX2F/ FWD-32LX2X Responsible Party: Sony... unit may call upon your authority to operate this apparatus to these numbers whenever you carry the display unit, hold the unit itself, not the speakers. For customers in a residential installation. WARNING ...
...manual could void your Sony dealer regarding this equipment does cause harmful interference to radio or television reception, which the receiver is subject to which can cause injury. Record the model and serial numbers in the U.S.A. To reduce the risk of Conformity Trade Name: SONY Model: FWD-40LX2F/FWD- 40LX2X/FWD-32LX2F/ FWD-32LX2X Responsible Party: Sony... unit may call upon your authority to operate this apparatus to these numbers whenever you carry the display unit, hold the unit itself, not the speakers. For customers in a residential installation. WARNING ...
Operating Instructions
Page 50
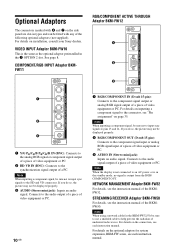
... marked with 5 and 7 on the side panel are slot-in the 7 OPTION 2 slot. See page 8. Note When inputting a component signal, be sure not to input sync signals to the HD and VD connectors. Note When the display is not connected to the audio signal output of...jack): Inputs an audio signal. For details on page 35. STREAMING RECEIVER Adaptor BKM-FW50 For details, see each instruction manual. For details on installation, consult your Sony dealers. COMPONENT/RGB INPUT Adaptor BKMFW11 RGB/COMPONENT ACTIVE THROUGH Adaptor BKM-FW12 1 2 3 OUT IN RGB/COMPONENT ACTIVE THROUGH...
... marked with 5 and 7 on the side panel are slot-in the 7 OPTION 2 slot. See page 8. Note When inputting a component signal, be sure not to input sync signals to the HD and VD connectors. Note When the display is not connected to the audio signal output of...jack): Inputs an audio signal. For details on page 35. STREAMING RECEIVER Adaptor BKM-FW50 For details, see each instruction manual. For details on installation, consult your Sony dealers. COMPONENT/RGB INPUT Adaptor BKMFW11 RGB/COMPONENT ACTIVE THROUGH Adaptor BKM-FW12 1 2 3 OUT IN RGB/COMPONENT ACTIVE THROUGH...

Operating Instructions
Page 51
...to connect the speakers correctly. By connecting the speakers SS-SP40FW/32FW (not supplied) to this socket and to install the display stand SU-42FW/32FW (not supplied). 11 GB Rear Panel GB R L SPEAKER Parts 1 AC IN socket 2 SPEAKER socket 3 Stand installation hooks Description Connect the supplied AC power ... up in red and the display goes into the standby mode. For details on the screen and enjoy viewing with the speakers. For more details on connecting the speakers, see page 19. Please be sure to route the speaker cords, see the operating manual that came with a greater ...
...to connect the speakers correctly. By connecting the speakers SS-SP40FW/32FW (not supplied) to this socket and to install the display stand SU-42FW/32FW (not supplied). 11 GB Rear Panel GB R L SPEAKER Parts 1 AC IN socket 2 SPEAKER socket 3 Stand installation hooks Description Connect the supplied AC power ... up in red and the display goes into the standby mode. For details on the screen and enjoy viewing with the speakers. For more details on connecting the speakers, see page 19. Please be sure to route the speaker cords, see the operating manual that came with a greater ...

Operating Instructions
Page 57
Never pull the cable itself. • See the instruction manual of the equipment to be connected. • Connect the cables, fully inserting them into the connectors or jacks. Then, attach the AC plug holder (supplied) ... AC IN socket AC plug holder 2 Slide the AC plug holder over the cord until it connects to route the speaker cords, see the operating manual of presence by grasping the plug. A loose connection may cause hum and other noise. • To disconnect the cable, pull it , grasp the plug and...
Never pull the cable itself. • See the instruction manual of the equipment to be connected. • Connect the cables, fully inserting them into the connectors or jacks. Then, attach the AC plug holder (supplied) ... AC IN socket AC plug holder 2 Slide the AC plug holder over the cord until it connects to route the speaker cords, see the operating manual of presence by grasping the plug. A loose connection may cause hum and other noise. • To disconnect the cable, pull it , grasp the plug and...
Operating Instructions
Page 67
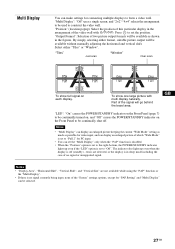
... picture output formats will be available without manually adjusting the horizontal and vertical shift. GB "LED": "On" causes the POWER/STANDBY indicator on the Front Panel (page 7) to be selected. 27 GB "Output Format": Selection of the "Screen" settings options, except for "PAP Setting" and "Multi Display" can be continually turned on, and...
... picture output formats will be available without manually adjusting the horizontal and vertical shift. GB "LED": "On" causes the POWER/STANDBY indicator on the Front Panel (page 7) to be selected. 27 GB "Output Format": Selection of the "Screen" settings options, except for "PAP Setting" and "Multi Display" can be continually turned on, and...

Operating Instructions
Page 68
...ratio. See "PAP Setting" for video input (page 27). Auto Adjustment Select to the default settings. Notes • "Auto Wide", "4:3 Default", "Display Area" and "Vertical Size" are not available for PC input. • If there is no signal currently being input, none of the picture left... and right in the window. In such cases, manually adjust the options below. "Phase", "Pitch", "Horizontal Shift" and "Vertical Shift" to automatically adjust the display position and phase of the picture. "Full 1": Select to enlarge the picture to fill ...
...ratio. See "PAP Setting" for video input (page 27). Auto Adjustment Select to the default settings. Notes • "Auto Wide", "4:3 Default", "Display Area" and "Vertical Size" are not available for PC input. • If there is no signal currently being input, none of the picture left... and right in the window. In such cases, manually adjust the options below. "Phase", "Pitch", "Horizontal Shift" and "Vertical Shift" to automatically adjust the display position and phase of the picture. "Full 1": Select to enlarge the picture to fill ...
Operating Instructions
Page 71
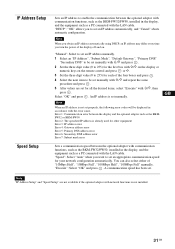
.... "DHCP": "OK" allows you turn the power of the display off and on the remote control and press or g. 3 Set the three digit value (0 to 255) for all the desired items, select "Execute" with the LAN cable. "Manual": Select to set manually with F/f and press . 2 Set the three digit value ... An IP address is not set properly, the following error codes will be set an IP address manually. 1 Select an "IP Address", "Subnet Mask", "Default Gateway", "Primary DNS" "Secondary DNS" to be displayed in accordance with the error cause. You can also select either of the four boxes and press ....
.... "DHCP": "OK" allows you turn the power of the display off and on the remote control and press or g. 3 Set the three digit value (0 to 255) for all the desired items, select "Execute" with the LAN cable. "Manual": Select to set manually with F/f and press . 2 Set the three digit value ... An IP address is not set properly, the following error codes will be set an IP address manually. 1 Select an "IP Address", "Subnet Mask", "Default Gateway", "Primary DNS" "Secondary DNS" to be displayed in accordance with the error cause. You can also select either of the four boxes and press ....
Operating Instructions
Page 76
... button 7 Input signal 33 IP Address Setup 21, 31 L Language 21, 29 LED 27 M Manual MENU b(IuPttoAndd7r,es1s2Setup) 31 MONITOR CONTROL ADAPTOR 9 Multi Display 21, 27, 28 Muting button 13 N NNoorismeaRl e1d4u,ct2i6o,n 20, 28 22 O On/Off Timer...DMobduetto2n0,1224 SSSoopuueannkddeSMr eOottudinteg2Rs0e,2se02t,42204, 24 SSPpeEeAdKSEetRupso2c1k,et3111 SRS WOW 24 SSttaannddairndst2al2l,ati2o3n, hooks 24 11 STANDBY button 13 Status Display 30 Swap 26 T TC Control 22, 23 TTTTiirrmleuebeselrCe2So72el0ott,rinC2g4on2t1r,ol2290, 23 V Vertical Vertical Shift Size 2211, , 26...
... button 7 Input signal 33 IP Address Setup 21, 31 L Language 21, 29 LED 27 M Manual MENU b(IuPttoAndd7r,es1s2Setup) 31 MONITOR CONTROL ADAPTOR 9 Multi Display 21, 27, 28 Muting button 13 N NNoorismeaRl e1d4u,ct2i6o,n 20, 28 22 O On/Off Timer...DMobduetto2n0,1224 SSSoopuueannkddeSMr eOottudinteg2Rs0e,2se02t,42204, 24 SSPpeEeAdKSEetRupso2c1k,et3111 SRS WOW 24 SSttaannddairndst2al2l,ati2o3n, hooks 24 11 STANDBY button 13 Status Display 30 Swap 26 T TC Control 22, 23 TTTTiirrmleuebeselrCe2So72el0ott,rinC2g4on2t1r,ol2290, 23 V Vertical Vertical Shift Size 2211, , 26...
Operating Instructions
Page 250
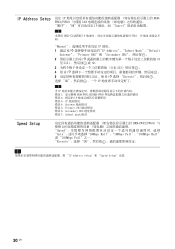
IP Address Setup 设定 IP BKM- FW32/FW50 LAN DHCP":"OK IP Cancel 注 当使用 DHCP IP IP "Manual IP 地址。 1 通过 F/f IP Address"、"Subnet Mask"、"Default Gateway"、"Primary DNS"和 "Secondary DNS 2 F/f 0 至 255 g。 3 0 至 255 4 &#...
IP Address Setup 设定 IP BKM- FW32/FW50 LAN DHCP":"OK IP Cancel 注 当使用 DHCP IP IP "Manual IP 地址。 1 通过 F/f IP Address"、"Subnet Mask"、"Default Gateway"、"Primary DNS"和 "Secondary DNS 2 F/f 0 至 255 g。 3 0 至 255 4 &#...
Operating Instructions
Page 255
...7 IP Address Setup (IP 地址设 定) 20, 30 L Language 20, 28 LED 26 M Manual (IP Address Setup) 30 MENU 键 7, 12 MONITOR CONTROL ADAPTOR 9 Multi Display 20, 26, 27 N Noise Reduction 19, 21 Normal 14, 25, 27 O On/Off Timer 28 OPTION 1/OPTION 2... 20, 25, 27 S S VIDEO IN/OUT 连接器 9 Screen 设定 20, 24 Setup 设定 20, 28 Sharpness 19, 21 32 Sony 标志 7, 29 SOUND 键 12 Sound Mode 19, 23 Sound Mode Reset 设) 19, 23 Sound 设定 19, 23 SPEAKER 插...
...7 IP Address Setup (IP 地址设 定) 20, 30 L Language 20, 28 LED 26 M Manual (IP Address Setup) 30 MENU 键 7, 12 MONITOR CONTROL ADAPTOR 9 Multi Display 20, 26, 27 N Noise Reduction 19, 21 Normal 14, 25, 27 O On/Off Timer 28 OPTION 1/OPTION 2... 20, 25, 27 S S VIDEO IN/OUT 连接器 9 Screen 设定 20, 24 Setup 设定 20, 28 Sharpness 19, 21 32 Sony 标志 7, 29 SOUND 键 12 Sound Mode 19, 23 Sound Mode Reset 设) 19, 23 Sound 设定 19, 23 SPEAKER 插...

