
Operating Instructions
Page 4
...general term for instruction purposes. If you have the same or similar names as those on the remote. • "DVD" may cause the apparatus to a section with the AC plug adaptor ... section is listed under the z icon. In this occur, the player may condense on for 3 models: DVP-NS710H, DVP-NS718H, and DVPNS728H. If you risk permanent damage to a warm location, or is placed in the text,... the supplied AC plug adaptor. NICEto-know information (to this manual describe the controls on your nearest Sony dealer. 4US Should this case, remove the disc and leave the player turned ...
...general term for instruction purposes. If you have the same or similar names as those on the remote. • "DVD" may cause the apparatus to a section with the AC plug adaptor ... section is listed under the z icon. In this occur, the player may condense on for 3 models: DVP-NS710H, DVP-NS718H, and DVPNS728H. If you risk permanent damage to a warm location, or is placed in the text,... the supplied AC plug adaptor. NICEto-know information (to this manual describe the controls on your nearest Sony dealer. 4US Should this case, remove the disc and leave the player turned ...

Operating Instructions
Page 5
... Audio Component 13 Step 3: Connecting the Power Cord 14 Step 4: Preparing the Remote 14 Controlling TVs with the remote 15 Step 5: Quick Setup 15 Connecting a USB Device (DVP-NS728H only 17 Playback 18 Playing Discs 18 Control Menu display 20 List of Control Menu items 21 Guide to the 'BRAVIA Sync' Display 23 'BRAVIA Sync' display...
... Audio Component 13 Step 3: Connecting the Power Cord 14 Step 4: Preparing the Remote 14 Controlling TVs with the remote 15 Step 5: Quick Setup 15 Connecting a USB Device (DVP-NS728H only 17 Playback 18 Playing Discs 18 Control Menu display 20 List of Control Menu items 21 Guide to the 'BRAVIA Sync' Display 23 'BRAVIA Sync' display...
Operating Instructions
Page 7
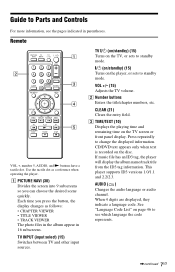
Guide to Parts and Controls For more information, see which language the code represents. ,continued 7US A PICTURE NAVI (30) Divides the screen into 9 subscreens so you press the button, the ... from the ID3 tag information. See "Language Code List" on the TV screen or front panel display. When 4 digits are displayed, they indicate a language code. Remote VOL +, number 5, AUDIO, and N buttons have a tactile dot. This player supports ID3 versions 1.0/1.1 and 2.2/2.3. B Number buttons Enters the title/chapter numbers, etc...
Guide to Parts and Controls For more information, see which language the code represents. ,continued 7US A PICTURE NAVI (30) Divides the screen into 9 subscreens so you press the button, the ... from the ID3 tag information. See "Language Code List" on the TV screen or front panel display. When 4 digits are displayed, they indicate a language code. Remote VOL +, number 5, AUDIO, and N buttons have a tactile dot. This player supports ID3 versions 1.0/1.1 and 2.2/2.3. B Number buttons Enters the title/chapter numbers, etc...
Operating Instructions
Page 9
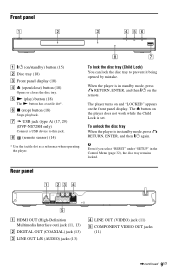
... the disc tray to this jack. To unlock the disc tray When the player is in the Control Menu (page 32), the disc tray remains locked. The player turns on and "LOCKED" appears ... (open/close) button (18) Opens or closes the disc tray. G USB jack (type A) (17, 29) (DVP-NS728H only) Connect a USB device to prevent it being opened by mistake. The Z button on the player does not...Child Lock is in standby mode, press O RETURN, ENTER, and then [/1 on the remote. Front panel A [/1 (on the front panel display. H (remote sensor) (14) * Use the tactile dot as a reference when operating the player....
... the disc tray to this jack. To unlock the disc tray When the player is in the Control Menu (page 32), the disc tray remains locked. The player turns on and "LOCKED" appears ... (open/close) button (18) Opens or closes the disc tray. G USB jack (type A) (17, 29) (DVP-NS728H only) Connect a USB device to prevent it being opened by mistake. The Z button on the player does not...Child Lock is in standby mode, press O RETURN, ENTER, and then [/1 on the remote. Front panel A [/1 (on the front panel display. H (remote sensor) (14) * Use the tactile dot as a reference when operating the player....

Operating Instructions
Page 12
... VCR, you 12US It may damage the HDMI OUT jack or the HDMI cord. • When connecting or disconnecting, do not screw in addition to a Sony TV that is upside down or tilted. To connect to the HDMI OUT jack Follow the steps below. Furthermore, you may not work. Refer to...; Do not apply too much pressure to the cabinet wall, if you place the player on PC displays). b Depending on the TV's remote, the components compatible with the CONTROL FOR HDMI function, see page 33. The DVI jack will not accept any audio signals, so you turn off by checking their shapes...
... VCR, you 12US It may damage the HDMI OUT jack or the HDMI cord. • When connecting or disconnecting, do not screw in addition to a Sony TV that is upside down or tilted. To connect to the HDMI OUT jack Follow the steps below. Furthermore, you may not work. Refer to...; Do not apply too much pressure to the cabinet wall, if you place the player on PC displays). b Depending on the TV's remote, the components compatible with the CONTROL FOR HDMI function, see page 33. The DVI jack will not accept any audio signals, so you turn off by checking their shapes...
Operating Instructions
Page 14
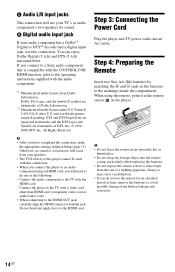
...Inc. © 19962008 DTS, Inc. All Rights Reserved. Otherwise, no sound or a loud noise will come from Dolby Laboratories. Step 4: Preparing the Remote Insert two Size AA (R6) batteries by matching the 3 and # ends on the player. DTS and DTS Digital Out are registered trademarks and the... do one of time, remove the batteries to the markings inside the compartment. b • After you connect to a Sony audio component that is compatible with the CONTROL FOR HDMI function, refer to the operating instructions supplied with this connection. • When you connect the player to an ...
...Inc. © 19962008 DTS, Inc. All Rights Reserved. Otherwise, no sound or a loud noise will come from Dolby Laboratories. Step 4: Preparing the Remote Insert two Size AA (R6) batteries by matching the 3 and # ends on the player. DTS and DTS Digital Out are registered trademarks and the... do one of time, remove the batteries to the markings inside the compartment. b • After you connect to a Sony audio component that is compatible with the CONTROL FOR HDMI function, refer to the operating instructions supplied with this connection. • When you connect the player to an ...
Operating Instructions
Page 15
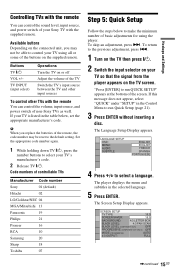
...skip an adjustment, press >. The Language Setup Display appears. The Screen Setup Display appears. Hookups and Settings Controlling TVs with the remote You can control the volume, input source, and power switch of non-Sony TVs as well. To return to the previous adjustment, press .. 1 Turn on the TV then press... [/1. 2 Switch the input selector on your TV is listed in the table below to select your Sony TV with the remote You can control the sound level, input source, and power switch of the buttons on the TV screen. The player displays the menu and...
...skip an adjustment, press >. The Language Setup Display appears. The Screen Setup Display appears. Hookups and Settings Controlling TVs with the remote You can control the volume, input source, and power switch of non-Sony TVs as well. To return to the previous adjustment, press .. 1 Turn on the TV then press... [/1. 2 Switch the input selector on your TV is listed in the table below to select your Sony TV with the remote You can control the sound level, input source, and power switch of the buttons on the TV screen. The player displays the menu and...

Operating Instructions
Page 23
z You can also control these functions on the TV's remote repeatedly. To turn or change the display Press SYNC MENU on the disc type. When the disc's menu appears, you can select an item by selecting the SYNC MENU button on the TV's remote or TV's option menu. 'BRAVIA Sync' display...• For more details of 'BRAVIA Sync', please refer to turn off the display Press RETURN or SYNC MENU button on the player's remote. Playback Guide to the 'BRAVIA Sync' Display You can control the player by pressing X/x. ◆ When playing video, photo, and music files Displays MENU and PICT.
z You can also control these functions on the TV's remote repeatedly. To turn or change the display Press SYNC MENU on the disc type. When the disc's menu appears, you can select an item by selecting the SYNC MENU button on the TV's remote or TV's option menu. 'BRAVIA Sync' display...• For more details of 'BRAVIA Sync', please refer to turn off the display Press RETURN or SYNC MENU button on the player's remote. Playback Guide to the 'BRAVIA Sync' Display You can control the player by pressing X/x. ◆ When playing video, photo, and music files Displays MENU and PICT.
Operating Instructions
Page 40
...the player to "TV MODE" (page 36). The CONTROL FOR HDMI function does not work. , Make sure that contain copy protection signals are obstacles between the remote and the player. , The distance between the remote and the player is too far. , The remote is in "AUDIO SETUP" to operate abnormally, unplug ... Slow Play, Slow-motion Play, Repeat Play, Shuffle Play, or Program Play cannot be able to the one screen mode if your Sony dealer or local authorized Sony service facility. Then, try again. , Please return to do some DVDs. "Copyright lock" appears and the screen turns blue when ...
...the player to "TV MODE" (page 36). The CONTROL FOR HDMI function does not work. , Make sure that contain copy protection signals are obstacles between the remote and the player. , The distance between the remote and the player is too far. , The remote is in "AUDIO SETUP" to operate abnormally, unplug ... Slow Play, Slow-motion Play, Repeat Play, Shuffle Play, or Program Play cannot be able to the one screen mode if your Sony dealer or local authorized Sony service facility. Then, try again. , Please return to do some DVDs. "Copyright lock" appears and the screen turns blue when ...

Operating Instructions
Page 47
...DATA CD 42 DATA DVD 42 DATE 22 DIGITAL OUT 36 Digital output 36 DIMMER 35 Display Control Menu display 20 Front panel display 10 Setup Display 32 DivX® 35 DOLBY DIGITAL 36 ...PLAY 8 FILE 22 Film based software 34 Front panel display 10 H Handling discs 2 HDMI AUDIO (HDMI) 38 CONTROL FOR HDMI 12, 38 HDMI RESOLUTION 37 LANGUAGE FOLLOW 38 HDMI SETUP 37 I ID3 tag 7 INDEX 21 INTERVAL ...CONTROL 21, 28 PAUSE MODE 35 PBC Playback 19 PhotoTV HD 30, 37 PICTURE NAVI 7, 30 PLAY LIST 21 Playable Media 42 PROGRAM 21, 24 Program Play 24 PROGRESSIVE (COMPONENT OUT ONLY) 34 Q QUICK 21 Quick Setup 15 R Remote...
...DATA CD 42 DATA DVD 42 DATE 22 DIGITAL OUT 36 Digital output 36 DIMMER 35 Display Control Menu display 20 Front panel display 10 Setup Display 32 DivX® 35 DOLBY DIGITAL 36 ...PLAY 8 FILE 22 Film based software 34 Front panel display 10 H Handling discs 2 HDMI AUDIO (HDMI) 38 CONTROL FOR HDMI 12, 38 HDMI RESOLUTION 37 LANGUAGE FOLLOW 38 HDMI SETUP 37 I ID3 tag 7 INDEX 21 INTERVAL ...CONTROL 21, 28 PAUSE MODE 35 PBC Playback 19 PhotoTV HD 30, 37 PICTURE NAVI 7, 30 PLAY LIST 21 Playable Media 42 PROGRAM 21, 24 Program Play 24 PROGRESSIVE (COMPONENT OUT ONLY) 34 Q QUICK 21 Quick Setup 15 R Remote...

