
Operating Instructions
Page 4
...DVD+R," "DVD+R DL," "DVD-R," "DVD VIDEO," and "CD" logos are for 3 models: DVP-NS710H, DVP-NS718H, and DVPNS728H. NICEto-know information (to -know information (tips and other useful information) is played... the player if they have any questions or problems concerning your player, please consult your nearest Sony dealer. 4US On replacement of time you do, the speakers may be used as a general...trademarks or registered trademarks of holding a still video image or on-screen display image on the remote. • "DVD" may condense on the lenses inside the player. Copyrights • This ...
...DVD+R," "DVD+R DL," "DVD-R," "DVD VIDEO," and "CD" logos are for 3 models: DVP-NS710H, DVP-NS718H, and DVPNS728H. NICEto-know information (to -know information (tips and other useful information) is played... the player if they have any questions or problems concerning your player, please consult your nearest Sony dealer. 4US On replacement of time you do, the speakers may be used as a general...trademarks or registered trademarks of holding a still video image or on-screen display image on the remote. • "DVD" may condense on the lenses inside the player. Copyrights • This ...

Operating Instructions
Page 5
...Step 2: Connecting to Your Audio Component 13 Step 3: Connecting the Power Cord 14 Step 4: Preparing the Remote 14 Controlling TVs with the remote 15 Step 5: Quick Setup 15 Connecting a USB Device (DVP-NS728H only 17 Playback 18 Playing Discs 18 Control Menu display 20 List of Control Menu items 21 ...AV SYNC 27 Locking discs (PARENTAL CONTROL 28 Playing Video, Photo, and Music Files 29 Playing video, photo, and music files from USB device (DVP-NS728H only 29 Selecting a photo file 30 Viewing a high quality slide show (PhotoTV HD 30 Setting the pace for a slide show (INTERVAL 31 ...
...Step 2: Connecting to Your Audio Component 13 Step 3: Connecting the Power Cord 14 Step 4: Preparing the Remote 14 Controlling TVs with the remote 15 Step 5: Quick Setup 15 Connecting a USB Device (DVP-NS728H only 17 Playback 18 Playing Discs 18 Control Menu display 20 List of Control Menu items 21 ...AV SYNC 27 Locking discs (PARENTAL CONTROL 28 Playing Video, Photo, and Music Files 29 Playing video, photo, and music files from USB device (DVP-NS728H only 29 Selecting a photo file 30 Viewing a high quality slide show (PhotoTV HD 30 Setting the pace for a slide show (INTERVAL 31 ...
Operating Instructions
Page 7
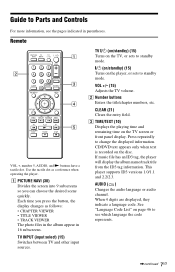
... the title/chapter numbers, etc. When 4 digits are displayed, they indicate a language code. CLEAR (21) Clears the entry field. VOL +/- (15) Adjusts the TV volume. Remote VOL +, number 5, AUDIO, and N buttons have a tactile dot.
... the title/chapter numbers, etc. When 4 digits are displayed, they indicate a language code. CLEAR (21) Clears the entry field. VOL +/- (15) Adjusts the TV volume. Remote VOL +, number 5, AUDIO, and N buttons have a tactile dot.
Operating Instructions
Page 9
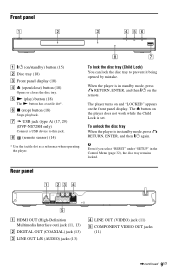
H (remote sensor) (14) * Use the tactile dot as a reference when operating the player. To unlock the disc tray When the player is set. b Even if you select "RESET" under "SETUP" in standby mode, press O RETURN, ENTER, and then [/1 again. G USB jack (type A) (17, 29) (DVP-NS728H only) Connect a ...Opens or closes the disc tray. Front panel A [/1 (on the front panel display. F x (stop) button (18) Stops playback. The Z button on the remote. When the player is in standby mode, press O RETURN, ENTER, and then [/1 on the player does not work while the Child Lock is in the...
H (remote sensor) (14) * Use the tactile dot as a reference when operating the player. To unlock the disc tray When the player is set. b Even if you select "RESET" under "SETUP" in standby mode, press O RETURN, ENTER, and then [/1 again. G USB jack (type A) (17, 29) (DVP-NS728H only) Connect a ...Opens or closes the disc tray. Front panel A [/1 (on the front panel display. F x (stop) button (18) Stops playback. The Z button on the remote. When the player is in standby mode, press O RETURN, ENTER, and then [/1 on the player does not work while the Child Lock is in the...
Operating Instructions
Page 10
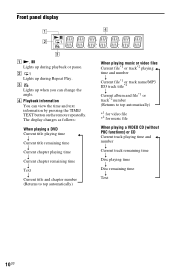
C Lights up when you can view the time and text information by pressing the TIME/ TEXT button on the remote repeatedly. The display changes as follows: When playing a DVD Current title playing time r Current title remaining time r Current chapter playing time r Current chapter remaining time r ...
C Lights up when you can view the time and text information by pressing the TIME/ TEXT button on the remote repeatedly. The display changes as follows: When playing a DVD Current title playing time r Current title remaining time r Current chapter playing time r Current chapter remaining time r ...

Operating Instructions
Page 12
...FOR HDMI function, see page 33. If your TV and the player. b Depending on the TV's remote, the components compatible with the component. C HDMI/DVI input jack Use a certified Sony HDMI cord to the HDMI OUT jack Follow the steps below. When connecting to enjoy high quality digital ...change the picture size, see page 12. About the CONTROL FOR HDMI functions for 'BRAVIA Sync' (for HDMI connections only) By connecting to Sony components that are compatible with the CONTROL FOR HDMI function with the HDMI cord connected. Refer to DVI jacks that are not HDCP compliant (e.g.,...
...FOR HDMI function, see page 33. If your TV and the player. b Depending on the TV's remote, the components compatible with the component. C HDMI/DVI input jack Use a certified Sony HDMI cord to the HDMI OUT jack Follow the steps below. When connecting to enjoy high quality digital ...change the picture size, see page 12. About the CONTROL FOR HDMI functions for 'BRAVIA Sync' (for HDMI connections only) By connecting to Sony components that are compatible with the CONTROL FOR HDMI function with the HDMI cord connected. Refer to DVI jacks that are not HDCP compliant (e.g.,...
Operating Instructions
Page 14
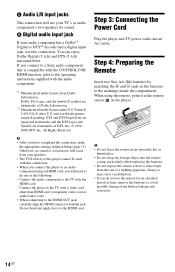
... A Audio L/R input jacks This connection will use your audio component has a Dolby*1 Digital or DTS*2 decoder and a digital input jack, use the remote for sound. Dolby, Pro Logic, and the double-D symbol are trademarks of Dolby Laboratories. *2 Manufactured under license under license from the sun or a ... sound or a loud noise will come from battery leakage and corrosion. 14US Doing so may cause a malfunction. • If you connect to a Sony audio component that is compatible with the HDMI cord. - Step 3: Connecting the Power Cord Plug the player and TV power cords into the...
... A Audio L/R input jacks This connection will use your audio component has a Dolby*1 Digital or DTS*2 decoder and a digital input jack, use the remote for sound. Dolby, Pro Logic, and the double-D symbol are trademarks of Dolby Laboratories. *2 Manufactured under license under license from the sun or a ... sound or a loud noise will come from battery leakage and corrosion. 14US Doing so may cause a malfunction. • If you connect to a Sony audio component that is compatible with the HDMI cord. - Step 3: Connecting the Power Cord Plug the player and TV power cords into the...
Operating Instructions
Page 15
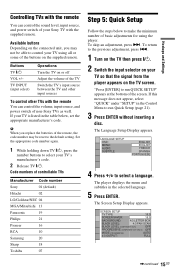
...using the player. Hookups and Settings Controlling TVs with the remote You can control the sound level, input source, and power switch of your Sony TV with the remote You can control the volume, input source, and power switch of non-Sony TVs as well. The Screen Setup Display appears. TV ...the TV and other input sources To control other TVs with the supplied remote. The player displays the menu and subtitles in the Control Menu to select a language. Code numbers of controllable TVs Manufacturer Code number Sony 01 (default) Hitachi 02 LG/Goldstar/NEC 04 MGA/Mitsubishi 13 ...
...using the player. Hookups and Settings Controlling TVs with the remote You can control the sound level, input source, and power switch of your Sony TV with the remote You can control the volume, input source, and power switch of non-Sony TVs as well. The Screen Setup Display appears. TV ...the TV and other input sources To control other TVs with the supplied remote. The player displays the menu and subtitles in the Control Menu to select a language. Code numbers of controllable TVs Manufacturer Code number Sony 01 (default) Hitachi 02 LG/Goldstar/NEC 04 MGA/Mitsubishi 13 ...
Operating Instructions
Page 18
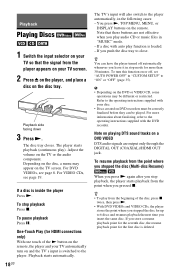
..., MENU, or DISPLAY buttons on the DVD or VIDEO CD, some operations may appear on the TV or the audio component. b • Depending on the remote. z • To play function is loaded. - If you store a resume playback point for the seventh disc, the resume playback point for up to 6 .... One-Touch Play (for more information about finalizing, refer to the operating instructions supplied with auto play from the beginning of the N button on the remote, the player and your TV screen. 2 Press Z on the player, and place a disc on the disc tray. Note that the signal from the ...
..., MENU, or DISPLAY buttons on the DVD or VIDEO CD, some operations may appear on the TV or the audio component. b • Depending on the remote. z • To play function is loaded. - If you store a resume playback point for the seventh disc, the resume playback point for up to 6 .... One-Touch Play (for more information about finalizing, refer to the operating instructions supplied with auto play from the beginning of the N button on the remote, the player and your TV screen. 2 Press Z on the player, and place a disc on the disc tray. Note that the signal from the ...

Operating Instructions
Page 23
... When playing a DVD VIDEO Displays MENU and TOP MENU. ◆ When playing in the 'BRAVIA Sync' display have the same functions as the player's remote buttons (page 7). • You can control the player by pressing X/x. ◆ When playing video, photo, and music files Displays MENU and PICT. ...). To change the display. 'BRAVIA Sync' display and Control Menu are displayed alternately. To turn or change the display Press SYNC MENU on the player's remote. b • The items in DVD-VR mode Displays ., >, and chapter number. ◆ When playing a CD, VIDEO CD, or Super VCD (without...
... When playing a DVD VIDEO Displays MENU and TOP MENU. ◆ When playing in the 'BRAVIA Sync' display have the same functions as the player's remote buttons (page 7). • You can control the player by pressing X/x. ◆ When playing video, photo, and music files Displays MENU and PICT. ...). To change the display. 'BRAVIA Sync' display and Control Menu are displayed alternately. To turn or change the display Press SYNC MENU on the player's remote. b • The items in DVD-VR mode Displays ., >, and chapter number. ◆ When playing a CD, VIDEO CD, or Super VCD (without...

Operating Instructions
Page 34
... bands on left and right sides of DVD software that you can change the aspect ratio on your TV, change the aspect ratio on the remote, then press [/1 to turn off the player, and enter "369" using the COMPONENT VIDEO OUT jacks (page 11).
... bands on left and right sides of DVD software that you can change the aspect ratio on your TV, change the aspect ratio on the remote, then press [/1 to turn off the player, and enter "369" using the COMPONENT VIDEO OUT jacks (page 11).
Operating Instructions
Page 35
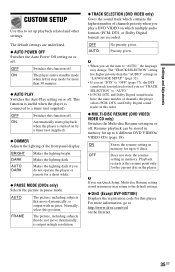
...-disc Resume setting on or off. ON OFF Stores the resume setting in memory for up to the default settings. ◆ DivX (Except DVP-NS710H) Displays the registration code for the current disc in memory. Playback restarts at the resume point only for this position. b If you run ... change. OFF No priority given. Resume playback can be stored in pause mode. AUTO The picture, including subjects that do not operate the player or remote for a short while. ◆ PAUSE MODE (DVDs only) Selects the picture in memory for more information, go to "AUTO." • If PCM,...
...-disc Resume setting on or off. ON OFF Stores the resume setting in memory for up to the default settings. ◆ DivX (Except DVP-NS710H) Displays the registration code for the current disc in memory. Playback restarts at the resume point only for this position. b If you run ... change. OFF No priority given. Resume playback can be stored in pause mode. AUTO The picture, including subjects that do not operate the player or remote for a short while. ◆ PAUSE MODE (DVDs only) Selects the picture in memory for more information, go to "AUTO." • If PCM,...

Operating Instructions
Page 37
... the picture does not appear normal or goes blank, press [/1 to turn off the player, and enter "369" using the number buttons on the remote, then press [/1 to a Sony's "PhotoTV HD"compatible device. ,continued 37US b In case of DTS audio signals. A loud noise may come out from the speakers, affecting your TV...
... the picture does not appear normal or goes blank, press [/1 to turn off the player, and enter "369" using the number buttons on the remote, then press [/1 to a Sony's "PhotoTV HD"compatible device. ,continued 37US b In case of DTS audio signals. A loud noise may come out from the speakers, affecting your TV...

Operating Instructions
Page 39
...still does not appear, repeat the steps and try other than the HDMI OUT, and switch the TV's input to turn off and on the remote, then press [/1 to the connected video input so that the power cord is connected to a DVI device (DVI jacks do not accept audio signals... progressive signal. No sound is output from the player appears on -screen displays. Additional Information Troubleshooting If you experience any problem persist, consult your nearest Sony dealer. Power The power is used for video output, changing the "HDMI RESOLUTION" setting in "HDMI SETUP" to HDMI. See page 12. , ...
...still does not appear, repeat the steps and try other than the HDMI OUT, and switch the TV's input to turn off and on the remote, then press [/1 to the connected video input so that the power cord is connected to a DVI device (DVI jacks do not accept audio signals... progressive signal. No sound is output from the player appears on -screen displays. Additional Information Troubleshooting If you experience any problem persist, consult your nearest Sony dealer. Power The power is used for video output, changing the "HDMI RESOLUTION" setting in "HDMI SETUP" to HDMI. See page 12. , ...
Operating Instructions
Page 40
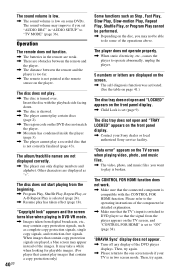
...playing video, photo, and music files. , The video, photo, and music files you want to the one screen mode if your Sony dealer or local authorized Sony service facility. It may appear instead of the component for playable images. (For player that cannot play certain discs (page 2). , The...Play cannot be performed. , Depending on the front panel display. , Contact your TV is broken. Then, try again. Operation The remote does not function. , The batteries in the remote are weak. , There are displayed on the screen. , The self-diagnosis function was activated. (See the table on page 41...
...playing video, photo, and music files. , The video, photo, and music files you want to the one screen mode if your Sony dealer or local authorized Sony service facility. It may appear instead of the component for playable images. (For player that cannot play certain discs (page 2). , The...Play cannot be performed. , Depending on the front panel display. , Contact your TV is broken. Then, try again. Operation The remote does not function. , The batteries in the remote are weak. , There are displayed on the screen. , The self-diagnosis function was activated. (See the table on page 41...
Operating Instructions
Page 45
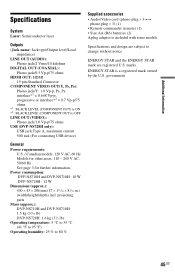
marks ENERGY STAR is included with some models. projecting parts Mass (approx.): DVP-NS710H and DVP-NS718H: 1.5 kg (33/10 lb) DVP-NS728H: 1.6 kg (31/2 lb) Operating temperature: 5 °C to 35 °C (41 °F to 95 °F) Operating humidity: 25 ... • Audio/Video cord (phono plug × 3 y phono plug × 3) (1) • Remote commander (remote) (1) • Size AA (R6) batteries (2) A plug adaptor is a registered mark owned by the U.S. Power consumption: DVP-NS710H and DVP-NS718H : 10 W DVP-NS728H : 12 W Dimensions (approx.): 430 × 43 × 206 mm (17 × 111/...
marks ENERGY STAR is included with some models. projecting parts Mass (approx.): DVP-NS710H and DVP-NS718H: 1.5 kg (33/10 lb) DVP-NS728H: 1.6 kg (31/2 lb) Operating temperature: 5 °C to 35 °C (41 °F to 95 °F) Operating humidity: 25 ... • Audio/Video cord (phono plug × 3 y phono plug × 3) (1) • Remote commander (remote) (1) • Size AA (R6) batteries (2) A plug adaptor is a registered mark owned by the U.S. Power consumption: DVP-NS710H and DVP-NS718H : 10 W DVP-NS728H : 12 W Dimensions (approx.): 430 × 43 × 206 mm (17 × 111/...

Operating Instructions
Page 47
... PICTURE NAVI 7, 30 PLAY LIST 21 Playable Media 42 PROGRAM 21, 24 Program Play 24 PROGRESSIVE (COMPONENT OUT ONLY) 34 Q QUICK 21 Quick Setup 15 R Remote 7, 14, 15 REPEAT 21, 25 Repeat Play 25 REPLAY 8 RESET 21 Resume 18, 35 S SCENE 21 SCREEN SAVER 33 SCREEN SETUP 33 SETUP 21, 32...
... PICTURE NAVI 7, 30 PLAY LIST 21 Playable Media 42 PROGRAM 21, 24 Program Play 24 PROGRESSIVE (COMPONENT OUT ONLY) 34 Q QUICK 21 Quick Setup 15 R Remote 7, 14, 15 REPEAT 21, 25 Repeat Play 25 REPLAY 8 RESET 21 Resume 18, 35 S SCENE 21 SCREEN SAVER 33 SCREEN SETUP 33 SETUP 21, 32...

