Operating Instructions
Page 5
Table of Contents WARNING 2 Precautions 3 About This Manual 6 This Player Can Play the Following Discs 7 Preparations 9 Checking the Accessories 9 Using the Remote 9 Using the LCD Panel 10 Connecting the AC Adaptor 11 Using with the Battery Pack 12 Using with the Car Battery Adaptor 14 Playing Discs ...
Table of Contents WARNING 2 Precautions 3 About This Manual 6 This Player Can Play the Following Discs 7 Preparations 9 Checking the Accessories 9 Using the Remote 9 Using the LCD Panel 10 Connecting the AC Adaptor 11 Using with the Battery Pack 12 Using with the Car Battery Adaptor 14 Playing Discs ...
Operating Instructions
Page 6
...is a standard format defined by ISO (International Organization for music CDs or CD-Rs/CD-RWs in this manual describe the controls on the remote. • "DVD" may be used in music CD format Functions available for DATA CDs (CD-ROMs/CD-Rs/CD-RWs containing MP3* audio tracks, and ... Electrotechnical Commission) MPEG which compresses audio data. 6 You can also use the controls on the player if they have the same or similar names as a general term for DVD VIDEOs, DVD+RWs/DVD+Rs (+VR mode) and DVD-RWs/DVD-Rs (video mode). • The meaning of the icons used as those on the...
...is a standard format defined by ISO (International Organization for music CDs or CD-Rs/CD-RWs in this manual describe the controls on the remote. • "DVD" may be used in music CD format Functions available for DATA CDs (CD-ROMs/CD-Rs/CD-RWs containing MP3* audio tracks, and ... Electrotechnical Commission) MPEG which compresses audio data. 6 You can also use the controls on the player if they have the same or similar names as a general term for DVD VIDEOs, DVD+RWs/DVD+Rs (+VR mode) and DVD-RWs/DVD-Rs (video mode). • The meaning of the icons used as those on the...
Operating Instructions
Page 9
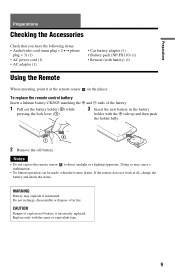
...ends of in the battery pressing the lock lever (1). Notes • Do not expose the remote sensor to direct sunlight or a lighting apparatus. If the remote does not work at the remote sensor on the player. WARNING Battery may cause a malfunction. • No button operation can be made, when ...the battery drains. Replace only with battery) (1) Using the Remote When operating, point it at all, change...
...ends of in the battery pressing the lock lever (1). Notes • Do not expose the remote sensor to direct sunlight or a lighting apparatus. If the remote does not work at the remote sensor on the player. WARNING Battery may cause a malfunction. • No button operation can be made, when ...the battery drains. Replace only with battery) (1) Using the Remote When operating, point it at all, change...
Operating Instructions
Page 15
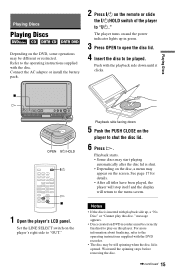
...DVD recorders must be played. For more information about finalizing, refer to play this player. Wait until it clicks. Playing Discs x H VOL DISPLAY MENU RETURN OPTIONS POWER CHARGE POWER CHARGE OPEN HOLD OPEN \/1/HOLD 1 2 3 4 5 6 7 8 9 0 \/1 H x 1 Open the player...'s LCD panel. See page 17 for details. • After all titles have been played, the player will ...DVD recorder. • The disc may appear on and the power indicator lights up , a "No Disc" or "Cannot play on the player...Depending on the player to the operating...DVD, some operations may ...
...DVD recorders must be played. For more information about finalizing, refer to play this player. Wait until it clicks. Playing Discs x H VOL DISPLAY MENU RETURN OPTIONS POWER CHARGE POWER CHARGE OPEN HOLD OPEN \/1/HOLD 1 2 3 4 5 6 7 8 9 0 \/1 H x 1 Open the player...'s LCD panel. See page 17 for details. • After all titles have been played, the player will ...DVD recorder. • The disc may appear on and the power indicator lights up , a "No Disc" or "Cannot play on the player...Depending on the player to the operating...DVD, some operations may ...
Operating Instructions
Page 16
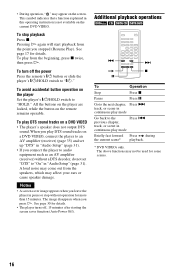
...you play from the beginning, press x twice, then press H. previous chapter, track, or scene in continuous play DTS sound tracks on a DVD VIDEO, connect the player to an AV amplifier (receiver) (page 35) and set "DTS" to "On" in pause or stop playback Press x. To turn off...the button on the current DVD VIDEO. Notes • A screen saver image appears when you connect the player to audio equipment such as an AV amplifier (receiver) without operation for details. • The player turns off the power Press the remote's \/1 button or slide the player's \/1/HOLD switch to the...
...you play from the beginning, press x twice, then press H. previous chapter, track, or scene in continuous play DTS sound tracks on a DVD VIDEO, connect the player to an AV amplifier (receiver) (page 35) and set "DTS" to "On" in pause or stop playback Press x. To turn off...the button on the current DVD VIDEO. Notes • A screen saver image appears when you connect the player to audio equipment such as an AV amplifier (receiver) without operation for details. • The player turns off the power Press the remote's \/1 button or slide the player's \/1/HOLD switch to the...
Operating Instructions
Page 17
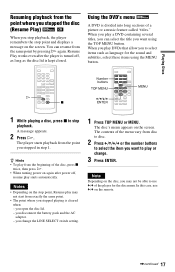
... when: - Notes • Depending on again after the player is kept closed. Note Depending on the remote. ,continued 17 A message appears. 2 Press H. The player starts playback from the same point by pressing H again. The contents of the player for the sound and subtitles, select these items using the... of a picture or a music feature called "titles." z Hints • To play a DVD containing several titles, you can resume from the point you stopped in step 1. When you play DVDs that allow you to select items such as the disc lid is turned off , resume play or...
... when: - Notes • Depending on again after the player is kept closed. Note Depending on the remote. ,continued 17 A message appears. 2 Press H. The player starts playback from the same point by pressing H again. The contents of the player for the sound and subtitles, select these items using the... of a picture or a music feature called "titles." z Hints • To play a DVD containing several titles, you can resume from the point you stopped in step 1. When you play DVDs that allow you to select items such as the disc lid is turned off , resume play or...
Operating Instructions
Page 22
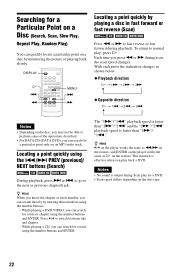
...or . to go to switch between title and chapter. - Press C/c to the next or previous chapter/track. z Hint C/c on the player works the same as m/M on the remote, and ENTER on the player works the same as shown below. ◆ Playback direction H t 1M t 2M t 3M ◆ Opposite direction H t 1m t... 2m t 3m Notes • Depending on the disc, you may not be able to normal play back a DVD. Searching for a Particular Point...
...or . to go to switch between title and chapter. - Press C/c to the next or previous chapter/track. z Hint C/c on the player works the same as m/M on the remote, and ENTER on the player works the same as shown below. ◆ Playback direction H t 1M t 2M t 3M ◆ Opposite direction H t 1m t... 2m t 3m Notes • Depending on the disc, you may not be able to normal play back a DVD. Searching for a Particular Point...
Operating Instructions
Page 37
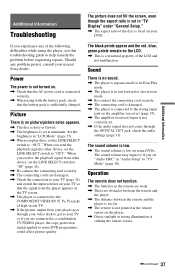
... your TV (page 34) and switch the input selector on the TV screen. , The player is sufficiently charged. The sound volume may improve if you experience any problem persist, consult your nearest Sony dealer. Should any of the following difficulties while using with the battery pack, check that the...is set in "TV Display" under "General Setup." , The aspect ratio of the disc is set at the remote sensor on the player. , Direct sunlight or strong illumination is low on your DVD. If you set the LINE SELECT switch to "TV Mode" (page 30). When you receive the playback signal...
... your TV (page 34) and switch the input selector on the TV screen. , The player is sufficiently charged. The sound volume may improve if you experience any problem persist, consult your nearest Sony dealer. Should any of the following difficulties while using with the battery pack, check that the...is set in "TV Display" under "General Setup." , The aspect ratio of the disc is set at the remote sensor on the player. , Direct sunlight or strong illumination is low on your DVD. If you set the LINE SELECT switch to "TV Mode" (page 30). When you receive the playback signal...
Operating Instructions
Page 38
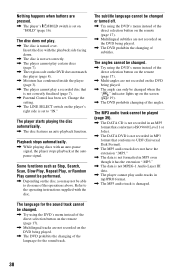
...the " " indicator lights up on the player's right side is set on "HOLD" (page 16). The angles cannot be changed. , Try using the DVD's menu instead of the direct selection button on the remote (page 17). , Multi-angles are not recorded on the DVD being played. , The angle can only... or turned off. , Try using the DVD's menu instead of the direct selection button on the remote (page 17). , Multilingual tracks are not recorded on the DVD being played. , The DVD prohibits the changing of the angles. Nothing happens when buttons are pressed. , The player's \/1/HOLD switch is set to "IN."...
...the " " indicator lights up on the player's right side is set on "HOLD" (page 16). The angles cannot be changed. , Try using the DVD's menu instead of the direct selection button on the remote (page 17). , Multi-angles are not recorded on the DVD being played. , The angle can only... or turned off. , Try using the DVD's menu instead of the direct selection button on the remote (page 17). , Multilingual tracks are not recorded on the DVD being played. , The DVD prohibits the changing of the angles. Nothing happens when buttons are pressed. , The player's \/1/HOLD switch is set to "IN."...

Operating Instructions
Page 42
...) G LCD panel (10) H DISPLAY button (20) I MENU button (17) J RETURN button (20) K (remote sensor) (9) L OPTIONS button (27) M C/X/x/c buttons, ENTER button (17) N Disc lid (15) O PUSH CLOSE (15) P OPEN button (15) * Use the tactile dot as a reference when operating the player. Index to Parts and Controls For more information, see the pages indicated...
...) G LCD panel (10) H DISPLAY button (20) I MENU button (17) J RETURN button (20) K (remote sensor) (9) L OPTIONS button (27) M C/X/x/c buttons, ENTER button (17) N Disc lid (15) O PUSH CLOSE (15) P OPEN button (15) * Use the tactile dot as a reference when operating the player. Index to Parts and Controls For more information, see the pages indicated...

Operating Instructions
Page 43
Front view POWER CHARGE A POWER indicator (15) B CHARGE indicator (13) Right view C (remote sensor) (9) HOLD PHONES AB AUDIO OPTICAL OUT VIDEO LINE SELECT IN OUT DC IN 9.5V A \/1 (on/standby)/HOLD switch (15) B PHONES (headphone) jack A, B C AUDIO (input/output) jack/OPTICAL OUT (optical output) jack (34, 35) D VIDEO (input/output) jack (34) E LINE SELECT (IN/OUT) switch (15) F DC IN 9.5V (AC adaptor input) jack (11) Additional Information ,continued 43
Front view POWER CHARGE A POWER indicator (15) B CHARGE indicator (13) Right view C (remote sensor) (9) HOLD PHONES AB AUDIO OPTICAL OUT VIDEO LINE SELECT IN OUT DC IN 9.5V A \/1 (on/standby)/HOLD switch (15) B PHONES (headphone) jack A, B C AUDIO (input/output) jack/OPTICAL OUT (optical output) jack (34, 35) D VIDEO (input/output) jack (34) E LINE SELECT (IN/OUT) switch (15) F DC IN 9.5V (AC adaptor input) jack (11) Additional Information ,continued 43

Operating Instructions
Page 44
The number 5 button has a tactile dot. 44 Remote 1 2 3 4 5 6 7 8 9 0 A DISPLAY button (20) B Number buttons (17)* C TOP MENU button (17) D C/X/x/c buttons, ENTER button (17) E O RETURN button (20) F ./> PREV (previous)/NEXT buttons (16) G m/M (scan/slow) buttons (... (17) O SUBTITLE button (19) P ANGLE button (19) Q OPTIONS button (27) R H PLAY button (15)* S x STOP button (16) * Use the tactile dot as a reference when operating the player.
The number 5 button has a tactile dot. 44 Remote 1 2 3 4 5 6 7 8 9 0 A DISPLAY button (20) B Number buttons (17)* C TOP MENU button (17) D C/X/x/c buttons, ENTER button (17) E O RETURN button (20) F ./> PREV (previous)/NEXT buttons (16) G m/M (scan/slow) buttons (... (17) O SUBTITLE button (19) P ANGLE button (19) Q OPTIONS button (27) R H PLAY button (15)* S x STOP button (16) * Use the tactile dot as a reference when operating the player.
Operating Instructions
Page 45
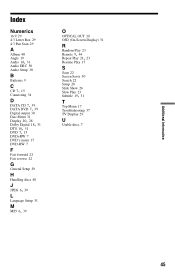
... DRC 30 Audio Setup 30 B Batteries 9 C CD 7, 15 Connecting 34 D DATA CD 7, 39 DATA DVD 7, 39 Digital output 30 Disc Menu 31 Display 20, 28 Dolby Digital 18, 31 DTS 18, 31 DVD 7, 15 DVD+RW 7 DVD's menu 17 DVD-RW 7 F Fast forward 22 Fast reverse 22 G General Setup 29 H Handling discs 40 J JPEG 6, 39... L Language Setup 31 M MP3 6, 39 O OPTICAL OUT 30 OSD (On-Screen Display) 31 R Random Play 23 Remote 9, 44 Repeat Play 21, 23 Resume Play...
... DRC 30 Audio Setup 30 B Batteries 9 C CD 7, 15 Connecting 34 D DATA CD 7, 39 DATA DVD 7, 39 Digital output 30 Disc Menu 31 Display 20, 28 Dolby Digital 18, 31 DTS 18, 31 DVD 7, 15 DVD+RW 7 DVD's menu 17 DVD-RW 7 F Fast forward 22 Fast reverse 22 G General Setup 29 H Handling discs 40 J JPEG 6, 39... L Language Setup 31 M MP3 6, 39 O OPTICAL OUT 30 OSD (On-Screen Display) 31 R Random Play 23 Remote 9, 44 Repeat Play 21, 23 Resume Play...

