Operating Instructions
Page 6
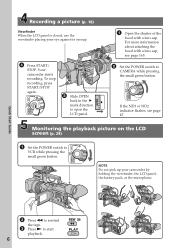
... REW the tape. 3 Press N to open the LCD panel. Recording a picture (p. 18) Viewfinder When the LCD panel is closed, use the viewfinder placing your camcorder by holding the viewfinder, the LCD panel, the battery pack, or the microphone. Monitoring the playback picture on the LCD screen (p. 28) 1 POWER Set the... POWER switch to CAMERA while pressing the small green button. For more information about attaching the hood with a lens cap. Your camcorder starts recording. OPEN MEMORY OFF CAMERA (CHG) VCR 1 Open the shutter of the hood with...
... REW the tape. 3 Press N to open the LCD panel. Recording a picture (p. 18) Viewfinder When the LCD panel is closed, use the viewfinder placing your camcorder by holding the viewfinder, the LCD panel, the battery pack, or the microphone. Monitoring the playback picture on the LCD screen (p. 28) 1 POWER Set the... POWER switch to CAMERA while pressing the small green button. For more information about attaching the hood with a lens cap. Your camcorder starts recording. OPEN MEMORY OFF CAMERA (CHG) VCR 1 Open the shutter of the hood with...

Operating Instructions
Page 8
...TV, you need an NTSC system-based TV. Exposing the LCD screen, the finder or the lens to direct sunlight for effective use. Unauthorized recording of such materials may cause your camcorder to malfunction. Keep your camcorder exposed to temperatures above 60 °C (140 °F), such as dusk. •Do ...periods may be some tiny black points and/or bright points (white, red, blue or green in color) that constantly appear on camcorder care Lens and LCD screen/finder •The LCD screen and the finder are normal in the manufacturing process and do not affect the recording in...
...TV, you need an NTSC system-based TV. Exposing the LCD screen, the finder or the lens to direct sunlight for effective use. Unauthorized recording of such materials may cause your camcorder to malfunction. Keep your camcorder exposed to temperatures above 60 °C (140 °F), such as dusk. •Do ...periods may be some tiny black points and/or bright points (white, red, blue or green in color) that constantly appear on camcorder care Lens and LCD screen/finder •The LCD screen and the finder are normal in the manufacturing process and do not affect the recording in...
Operating Instructions
Page 9
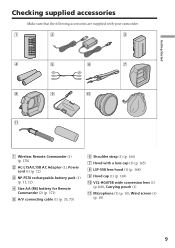
Getting Started Checking supplied accessories Make sure that the following accessories are supplied with your camcorder. 1 2 3 4 5 6 7 8 9 0 qa 1 Wireless Remote Commander (1) (p. 170) 2 AC-L15A/L15B AC Adaptor (1), Power cord (1) (p. 12) 3 NP-F570... Size AA (R6) battery for Remote Commander (2) (p. 171) 5 A/V connecting cable (1) (p. 33, 73) 6 Shoulder strap (1) (p. 166) 7 Hood with a lens cap (1) (p. 165) 8 LSF-S58 lens hood (1) (p. 168) 9 Hood cap (1) (p. 169) 0 VCL-HG0758 wide conversion lens (1) (p.168), Carrying pouch (1) qa Microphone (1) (p. 10), Wind screen (1) (p. 10) 9
Getting Started Checking supplied accessories Make sure that the following accessories are supplied with your camcorder. 1 2 3 4 5 6 7 8 9 0 qa 1 Wireless Remote Commander (1) (p. 170) 2 AC-L15A/L15B AC Adaptor (1), Power cord (1) (p. 12) 3 NP-F570... Size AA (R6) battery for Remote Commander (2) (p. 171) 5 A/V connecting cable (1) (p. 33, 73) 6 Shoulder strap (1) (p. 166) 7 Hood with a lens cap (1) (p. 165) 8 LSF-S58 lens hood (1) (p. 168) 9 Hood cap (1) (p. 169) 0 VCL-HG0758 wide conversion lens (1) (p.168), Carrying pouch (1) qa Microphone (1) (p. 10), Wind screen (1) (p. 10) 9

Operating Instructions
Page 18
...the viewfinder screen. (5) Press START/STOP. Note Fasten the grip strap firmly. 18 Basics - Recording a picture Your camcorder automatically focuses for more information about attaching the hood with a lens cap. The picture now being shot is not a malfunction. To stop recording, press START/STOP again. You can ..."Using the ND filter" on the LCD screen or in the direction of the hood with a lens cap, see page 165. (2) Install the power source and insert a cassette. - Recording - Your camcorder is necessary. The camera recording lamps located on the front and rear of START/STOP on the...
...the viewfinder screen. (5) Press START/STOP. Note Fasten the grip strap firmly. 18 Basics - Recording a picture Your camcorder automatically focuses for more information about attaching the hood with a lens cap. The picture now being shot is not a malfunction. To stop recording, press START/STOP again. You can ..."Using the ND filter" on the LCD screen or in the direction of the hood with a lens cap, see page 165. (2) Install the power source and insert a cassette. - Recording - Your camcorder is necessary. The camera recording lamps located on the front and rear of START/STOP on the...
Operating Instructions
Page 20
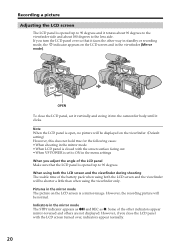
... screen surface facing out •When VF POWER is set it vertically and swing it into the camcorder body until it rotates about 90 degrees to the viewfinder side and about 180 degrees to the lens side. Some of the other way in standby or recording mode, the indicator appears on the...
... screen surface facing out •When VF POWER is set it vertically and swing it into the camcorder body until it rotates about 90 degrees to the viewfinder side and about 180 degrees to the lens side. Some of the other way in standby or recording mode, the indicator appears on the...
Operating Instructions
Page 22
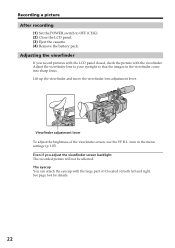
... OFF (CHG). (2) Close the LCD panel. (3) Eject the cassette. (4) Remove the battery pack. Lift up the viewfinder and move the viewfinder lens adjustment lever. See page 164 for details. 22 item in the viewfinder come into sharp focus. Even if you record pictures with the LCD panel ...
... OFF (CHG). (2) Close the LCD panel. (3) Eject the cassette. (4) Remove the battery pack. Lift up the viewfinder and move the viewfinder lens adjustment lever. See page 164 for details. 22 item in the viewfinder come into sharp focus. Even if you record pictures with the LCD panel ...

Operating Instructions
Page 23
... zoom. When you shoot close to a subject If you cannot get a sharp focus, press the "W" side of the camcorder. You can shoot a subject that is at least about 80 cm (about 2 feet 5/8 inch) away from the lens surface in the telephoto position, or about 1 cm (about 1/2 inch) away in better-looking recordings.
... zoom. When you shoot close to a subject If you cannot get a sharp focus, press the "W" side of the camcorder. You can shoot a subject that is at least about 80 cm (about 2 feet 5/8 inch) away from the lens surface in the telephoto position, or about 1 cm (about 1/2 inch) away in better-looking recordings.

Operating Instructions
Page 49
Do not use the SteadyShot function when shooting a stationary object with manual adjustment Releasing the SteadyShot function When the SteadyShot function is working, the camcorder compensates for camerashake. The indicator appears on the SteadyShot function •The SteadyShot function will not correct excessive camera-shake. •If you do..., then press the dial. (4) Turn the SEL/PUSH EXEC dial to select OFF, then press the dial. (5) Press MENU to use a tele conversion lens (optional) or a wide conversion lens (supplied), these lens may influence the SteadyShot function. 49
Do not use the SteadyShot function when shooting a stationary object with manual adjustment Releasing the SteadyShot function When the SteadyShot function is working, the camcorder compensates for camerashake. The indicator appears on the SteadyShot function •The SteadyShot function will not correct excessive camera-shake. •If you do..., then press the dial. (4) Turn the SEL/PUSH EXEC dial to select OFF, then press the dial. (5) Press MENU to use a tele conversion lens (optional) or a wide conversion lens (supplied), these lens may influence the SteadyShot function. 49

Operating Instructions
Page 107
... interval recording (p. 60). Sets the interval time and recording time. This value goes up to 48× (p. 24). - Your camcorder prevents excessive compensation for camera-shake. CAMERA Records with a tripod. This value goes up to 24× (p. 24). Natural MEMORY ...carried out. More than 12× zoom is performed digitally. Records with the SETUP 0 % system. Reduces the sound of a tele conversion lens (optional) or a wide conversion lens (supplied) may influence the SteadyShot function. SCAN z OFF ON SETUP D ZOOM z 0% 7.5 % z OFF 24× 48× ...
... interval recording (p. 60). Sets the interval time and recording time. This value goes up to 48× (p. 24). - Your camcorder prevents excessive compensation for camera-shake. CAMERA Records with a tripod. This value goes up to 24× (p. 24). Natural MEMORY ...carried out. More than 12× zoom is performed digitally. Records with the SETUP 0 % system. Reduces the sound of a tele conversion lens (optional) or a wide conversion lens (supplied) may influence the SteadyShot function. SCAN z OFF ON SETUP D ZOOM z 0% 7.5 % z OFF 24× 48× ...

Operating Instructions
Page 146
...to troubleshoot the problem. c Install a charged battery pack. (p. 11, 12) •The viewfinder lens is working. c Set it to CAMERA. If the problem persists, disconnect the power source and contact your camcorder for at least one . (p. 17, 31) •The write-protect tab on the cassette is... to ON. (p. 105) •The camcorder is dead or nearly dead. Vertical streaks appear when you shoot a subject such as lights or a candle flame against a dark background. c Remove the cassette and leave your Sony dealer or local authorized Sony service facility. This is called the smear ...
...to troubleshoot the problem. c Install a charged battery pack. (p. 11, 12) •The viewfinder lens is working. c Set it to CAMERA. If the problem persists, disconnect the power source and contact your camcorder for at least one . (p. 17, 31) •The write-protect tab on the cassette is... to ON. (p. 105) •The camcorder is dead or nearly dead. Vertical streaks appear when you shoot a subject such as lights or a candle flame against a dark background. c Remove the cassette and leave your Sony dealer or local authorized Sony service facility. This is called the smear ...

Operating Instructions
Page 156
...on again. If moisture condensation occurred None of the tape, or on moisture condensation Moisture may condense when you use your camcorder, and leave it . Note on the lens. When the Z indicator flashes at the same time, the cassette is inserted in a high temperature and humidity place.... versa) or when you bring your camcorder from a cold place into a warm place, put your camcorder, the beep sounds and the % indicator flashes. If there is turned on the lens, the indicator will work. Your camcorder can be damaged or your camcorder. How to the head drum and be...
...on again. If moisture condensation occurred None of the tape, or on moisture condensation Moisture may condense when you use your camcorder, and leave it . Note on the lens. When the Z indicator flashes at the same time, the cassette is inserted in a high temperature and humidity place.... versa) or when you bring your camcorder from a cold place into a warm place, put your camcorder, the beep sounds and the % indicator flashes. If there is turned on the lens, the indicator will work. Your camcorder can be damaged or your camcorder. How to the head drum and be...

Operating Instructions
Page 158
The battery, however, will get inside . •Keep your camcorder away from the lens surface using your camcorder. •Do not wrap your camcorder is in or out. •Do not open the tape protect cover or touch the tape. •Avoid touching or damaging ...heat up inside the casing, unplug your camcorder and have it checked by a Sony dealer before operating it any solid object or liquid get discharged gradually if you do not use your camcorder operation. Maintenance information and precautions Cleaning the wide conversion lens Remove dust from strong magnetic fields or ...
The battery, however, will get inside . •Keep your camcorder away from the lens surface using your camcorder. •Do not wrap your camcorder is in or out. •Do not open the tape protect cover or touch the tape. •Avoid touching or damaging ...heat up inside the casing, unplug your camcorder and have it checked by a Sony dealer before operating it any solid object or liquid get discharged gradually if you do not use your camcorder operation. Maintenance information and precautions Cleaning the wide conversion lens Remove dust from strong magnetic fields or ...

Operating Instructions
Page 159
... to temperatures above 60 °C (140 °F), such as in a car parked in locations that are fingerprints on the lens, remove them with a soft cloth. •Clean the camcorder body with a dry soft cloth, or a soft cloth lightly moistened with a damaged cord or if the unit has been ...battery pack dry. •Do not expose the rechargeable battery pack to any type of the connecting section. Additional Information Maintenance information and precautions Camcorder care •Remove the tape, and periodically turn on the power, operate the CAMERA and VCR sections and play back a tape for ...
... to temperatures above 60 °C (140 °F), such as in a car parked in locations that are fingerprints on the lens, remove them with a soft cloth. •Clean the camcorder body with a dry soft cloth, or a soft cloth lightly moistened with a damaged cord or if the unit has been ...battery pack dry. •Do not expose the rechargeable battery pack to any type of the connecting section. Additional Information Maintenance information and precautions Camcorder care •Remove the tape, and periodically turn on the power, operate the CAMERA and VCR sections and play back a tape for ...

Operating Instructions
Page 161
...40ME) Approx. 2 min and 30 s Viewfinder Electric viewfinder (B&W) Image device 1/3 type CCD (3 Charge Coupled Device) Approx. 380 000 pixels (Effective: Approx. 340 000 pixels) Lens Combined power zoom lens Filter diameter 58 mm (2 3/8 in) 12× (Optical), 48× (Digital) F1.6 - 2.4 Focal length ...70.8 mm (1 9/16 × 13/16 × 2 7/8 in) (w/h/d) Mass (approx.) 100 g (3.5 oz) Type Lithium ion Wide conversion lens VCL-HG0758 Lens power 0.7 Lens structure 3 groups, 3 elements Screw thread for video camera recorder M58 × 0.75 Dimensions Maximum diameter : ø 93 mm (3 3/4 in) ...
...40ME) Approx. 2 min and 30 s Viewfinder Electric viewfinder (B&W) Image device 1/3 type CCD (3 Charge Coupled Device) Approx. 380 000 pixels (Effective: Approx. 340 000 pixels) Lens Combined power zoom lens Filter diameter 58 mm (2 3/8 in) 12× (Optical), 48× (Digital) F1.6 - 2.4 Focal length ...70.8 mm (1 9/16 × 13/16 × 2 7/8 in) (w/h/d) Mass (approx.) 100 g (3.5 oz) Type Lithium ion Wide conversion lens VCL-HG0758 Lens power 0.7 Lens structure 3 groups, 3 elements Screw thread for video camera recorder M58 × 0.75 Dimensions Maximum diameter : ø 93 mm (3 3/4 in) ...

Operating Instructions
Page 164
Hood with a lens cap ra Lens hood fixing screw Attaching/removing the eyecup • When removing the eyecup, pull lightly the upper edge of it . When attaching the eyecup, fit it onto the camcorder and slide it all the way along grooves until it stops. • Do not pull the eyecup inward or with.... Identifying the parts and controls eg eh ej ek el r; eh INPUT2 connector (p. 55) ej INPUT1 connector (p. 10) ek REC START/STOP button (p. 18) el Lens r; Doing so may damage the eyecup. [a] [b] [c] 164
Hood with a lens cap ra Lens hood fixing screw Attaching/removing the eyecup • When removing the eyecup, pull lightly the upper edge of it . When attaching the eyecup, fit it onto the camcorder and slide it all the way along grooves until it stops. • Do not pull the eyecup inward or with.... Identifying the parts and controls eg eh ej ek el r; eh INPUT2 connector (p. 55) ej INPUT1 connector (p. 10) ek REC START/STOP button (p. 18) el Lens r; Doing so may damage the eyecup. [a] [b] [c] 164

Operating Instructions
Page 165
...desired direction according to the corresponding line on the hood to the arrow. OPEN CLOSE To open/close the shutter of the hood with a lens cap counterclockwise. Quick Reference 165 Identifying the parts and controls rs rd rf rg REC CH INPUT SELECT LEVEL +48V INPUT LEVEL +48V CH1... (p. 10) rh INPUT1 +48 V switch (p. 10) rj INPUT2 +48 V switch (p. 10) rk INPUT2 INPUT LEVEL selector (p. 55) Attaching/removing the hood with a lens cap To attach the hood with a lens cap, fit the line on the lens frame, then screw the hood clockwise and tighten the lower hood fixing screw.
...desired direction according to the corresponding line on the hood to the arrow. OPEN CLOSE To open/close the shutter of the hood with a lens cap counterclockwise. Quick Reference 165 Identifying the parts and controls rs rd rf rg REC CH INPUT SELECT LEVEL +48V INPUT LEVEL +48V CH1... (p. 10) rh INPUT1 +48 V switch (p. 10) rj INPUT2 +48 V switch (p. 10) rk INPUT2 INPUT LEVEL selector (p. 55) Attaching/removing the hood with a lens cap To attach the hood with a lens cap, fit the line on the lens frame, then screw the hood clockwise and tighten the lower hood fixing screw.

Operating Instructions
Page 167
...us Remote sensor ud Camera recording lamp (p. 18) uf CUSTOM PRESET button (p. 57) ug Viewfinder lens adjustment lever (p. 22) uh Hook for removing the viewfinder (p. 157) uj EJECT switch (p. ...17) uk DC IN jack (p. 12) ul Tripod receptacle Make sure that the length of Sony Corporation and indicates that this product is in agreement with IEEE 13941995 specifications and their revisions. Accessory...i (headphones) jack When you cannot attach the tripod securely and the screw may damage your camcorder is used for Local Application Control Bus System. ia is i.LINK compatible. i; The DV ...
...us Remote sensor ud Camera recording lamp (p. 18) uf CUSTOM PRESET button (p. 57) ug Viewfinder lens adjustment lever (p. 22) uh Hook for removing the viewfinder (p. 157) uj EJECT switch (p. ...17) uk DC IN jack (p. 12) ul Tripod receptacle Make sure that the length of Sony Corporation and indicates that this product is in agreement with IEEE 13941995 specifications and their revisions. Accessory...i (headphones) jack When you cannot attach the tripod securely and the screw may damage your camcorder is used for Local Application Control Bus System. ia is i.LINK compatible. i; The DV ...

Operating Instructions
Page 168
... for the 58-mm-dia filter of the Sony digital camcorder. •Do not apply impact to the MC protector, then release the protector slowly. 168 Identifying the parts and controls Attaching the lens hood for the wide conversion lens only To attach the hood for a long period... cloth to the digital camcorder. Be careful especially when you put your camcorder with the conversion lens attached on the desk. Lens hood Attaching the wide conversion lens To attach the wide conversion lens, remove the hood, remove the caps of the lens, then attach the wide conversion lens. Be sure to the...
... for the 58-mm-dia filter of the Sony digital camcorder. •Do not apply impact to the MC protector, then release the protector slowly. 168 Identifying the parts and controls Attaching the lens hood for the wide conversion lens only To attach the hood for a long period... cloth to the digital camcorder. Be careful especially when you put your camcorder with the conversion lens attached on the desk. Lens hood Attaching the wide conversion lens To attach the wide conversion lens, remove the hood, remove the caps of the lens, then attach the wide conversion lens. Be sure to the...

Operating Instructions
Page 169
Refer to the illustration below. 2 Pinch the upper and lower part of the hood cap, then attach it to the grip belt. Identifying the parts and controls Attaching the wide conversion lens with the lens hood 1 Attach the base hood for the wide conversion lens and then screw the left lens hood fixing screw. 2 Attach the wide conversion lens. 3 Attach the front hood for the wide conversion lens. 1 2 3 Attaching the hood cap 1 Attach the hood cap strap to the lens hood. 1 2 Quick Reference 169
Refer to the illustration below. 2 Pinch the upper and lower part of the hood cap, then attach it to the grip belt. Identifying the parts and controls Attaching the wide conversion lens with the lens hood 1 Attach the base hood for the wide conversion lens and then screw the left lens hood fixing screw. 2 Attach the wide conversion lens. 3 Attach the front hood for the wide conversion lens. 1 2 3 Attaching the hood cap 1 Attach the hood cap strap to the lens hood. 1 2 Quick Reference 169


