Cyber-shot® Handbook
Page 4
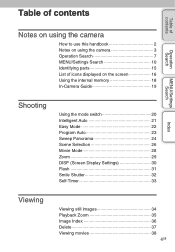
... Notes on using the camera How to use this handbook 2 Notes on using the camera 3 Operation Search 7 MENU/Settings Search 10 Identifying parts 15 List of icons displayed on the screen 16 Using the internal memory 18 In-Camera Guide 19 Shooting Using the mode switch 20 Intelligent Auto 21 Easy Mode 22 Program Auto 23 Sweep Panorama 24 Scene Selection 26 Movie Mode 28 Zoom 29 DISP (Screen Display Settings 30 Flash 31 Smile Shutter 32 Self-Timer 33 Viewing Viewing still images 34 Playback Zoom 35 Image Index 36 Delete 37 Viewing movies 38...
... Notes on using the camera How to use this handbook 2 Notes on using the camera 3 Operation Search 7 MENU/Settings Search 10 Identifying parts 15 List of icons displayed on the screen 16 Using the internal memory 18 In-Camera Guide 19 Shooting Using the mode switch 20 Intelligent Auto 21 Easy Mode 22 Program Auto 23 Sweep Panorama 24 Scene Selection 26 Movie Mode 28 Zoom 29 DISP (Screen Display Settings 30 Flash 31 Smile Shutter 32 Self-Timer 33 Viewing Viewing still images 34 Playback Zoom 35 Image Index 36 Delete 37 Viewing movies 38...
Cyber-shot® Handbook
Page 5
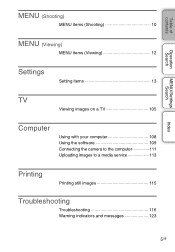
Table of contents Operation Search MENU/Settings Search MENU (Shooting) MENU items (Shooting 10 MENU (Viewing) MENU items (Viewing 12 Settings Setting items 13 TV Viewing images on a TV 105 Computer Using with your computer 108 Using the software 109 Connecting the camera to the computer 111 Uploading images to a media service 113 Printing Printing still images 115 Troubleshooting Troubleshooting 116 Warning indicators and messages 123 Index 5GB
Table of contents Operation Search MENU/Settings Search MENU (Shooting) MENU items (Shooting 10 MENU (Viewing) MENU items (Viewing 12 Settings Setting items 13 TV Viewing images on a TV 105 Computer Using with your computer 108 Using the software 109 Connecting the camera to the computer 111 Uploading images to a media service 113 Printing Printing still images 115 Troubleshooting Troubleshooting 116 Warning indicators and messages 123 Index 5GB
Cyber-shot® Handbook
Page 8
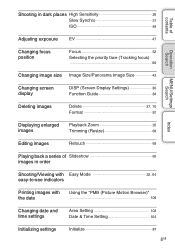
... 48 Adjusting exposure EV 47 Operation Search Changing focus position Focus 52 Selecting the priority face (Tracking focus) 60 Changing image size Image Size/Panorama Image Size 43 MENU/Settings Search Changing screen display DISP (Screen Display Settings 30 Function Guide 84 Deleting images Delete 37, 70 Format 97 Index Displaying enlarged images Playback Zoom 35 Trimming (Resize 69 Editing images Retouch 69 Playing back a series of Slideshow 65 images in order Shooting/Viewing with Easy Mode 22, 64 easy-to-see indicators Printing images with the date Using...
... 48 Adjusting exposure EV 47 Operation Search Changing focus position Focus 52 Selecting the priority face (Tracking focus) 60 Changing image size Image Size/Panorama Image Size 43 MENU/Settings Search Changing screen display DISP (Screen Display Settings 30 Function Guide 84 Deleting images Delete 37, 70 Format 97 Index Displaying enlarged images Playback Zoom 35 Trimming (Resize 69 Editing images Retouch 69 Playing back a series of Slideshow 65 images in order Shooting/Viewing with Easy Mode 22, 64 easy-to-see indicators Printing images with the date Using...
Cyber-shot® Handbook
Page 10
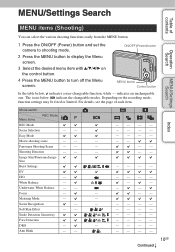
...EV ISO - - - - - White Balance - - - Panorama Shooting Scene - - - - - Anti Blink - - - - - - 10GB Continued r Scene Selection - - - - - - For details, see the page of contents Operation Search MENU/Settings Search Index MENU items (Shooting) You can select the various shooting functions easily from the MENU button. 1 Press the ON/OFF (Power) button and set the camera to shooting mode. 2 Press the MENU button to display the Menu screen. 3 Select the desired menu item with v/V/b/B on the recording mode, function settings may be fixed or...
...EV ISO - - - - - White Balance - - - Panorama Shooting Scene - - - - - Anti Blink - - - - - - 10GB Continued r Scene Selection - - - - - - For details, see the page of contents Operation Search MENU/Settings Search Index MENU items (Shooting) You can select the various shooting functions easily from the MENU button. 1 Press the ON/OFF (Power) button and set the camera to shooting mode. 2 Press the MENU button to display the Menu screen. 3 Select the desired menu item with v/V/b/B on the recording mode, function settings may be fixed or...

Cyber-shot® Handbook
Page 13
...v/V, then press B to display the Menu screen. 2 Select (Settings) with V on the control button, then press z on the (Settings) screen. 1 Press the MENU button to select each item, then z. 4 Select the desired setting, then press z. Folder Delete REC. Folder Change REC. Resolution Digital Zoom Auto Orientation Red Eye Reduction Blink Alert Beep Language Setting Function Guide Display color Demo Mode Initialize COMPONENT Video Out USB Connect LUN Setting Download Music Empty Music Power Save Eye-Fi* Format Create REC. Categories Shooting Settings Main Settings Memory Card Tool Items AF...
...v/V, then press B to display the Menu screen. 2 Select (Settings) with V on the control button, then press z on the (Settings) screen. 1 Press the MENU button to select each item, then z. 4 Select the desired setting, then press z. Folder Delete REC. Folder Change REC. Resolution Digital Zoom Auto Orientation Red Eye Reduction Blink Alert Beep Language Setting Function Guide Display color Demo Mode Initialize COMPONENT Video Out USB Connect LUN Setting Download Music Empty Music Power Save Eye-Fi* Format Create REC. Categories Shooting Settings Main Settings Memory Card Tool Items AF...
Cyber-shot® Handbook
Page 19
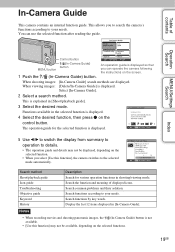
... control button. Search common problems and their solution. Search functions according to details. • The operation guide and details may not be displayed, depending on the selected functions. 19GB Notes • When recording movies and shooting panoramic images, the / (In-Camera Guide) button is explained in [In-Camera Guide]. Display the last 12 items displayed in [Shoot/playback guide]. 3 Select the desired mode. When viewing images: [Delete/In-Camera Guide] is displayed. 4 Select the desired function, then press z on the screen. Select [In-Camera Guide...
... control button. Search common problems and their solution. Search functions according to details. • The operation guide and details may not be displayed, depending on the selected functions. 19GB Notes • When recording movies and shooting panoramic images, the / (In-Camera Guide) button is explained in [In-Camera Guide]. Display the last 12 items displayed in [Shoot/playback guide]. 3 Select the desired mode. When viewing images: [Delete/In-Camera Guide] is displayed. 4 Select the desired function, then press z on the screen. Select [In-Camera Guide...
Cyber-shot® Handbook
Page 21
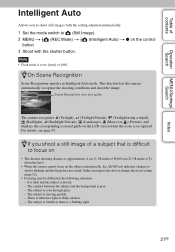
... using a tripod), (Backlight), (Backlight Portrait), (Landscape), (Macro) or (Portrait), and displays the corresponding icon and guide on the LCD screen when the scene is approximately 4 cm (1 5/8 inches) (W)/60 cm (23 5/8 inches) (T) (from the lens). • When the camera cannot focus on the control 3 Shoot with the setting adjusted automatically. 1 Set the mode switch to (Still Image). 2 MENU t button (REC Mode) t (Intelligent Auto) t z on the subject automatically, the AE/AF lock indicator changes to slowly flashing and...
... using a tripod), (Backlight), (Backlight Portrait), (Landscape), (Macro) or (Portrait), and displays the corresponding icon and guide on the LCD screen when the scene is approximately 4 cm (1 5/8 inches) (W)/60 cm (23 5/8 inches) (T) (from the lens). • When the camera cannot focus on the control 3 Shoot with the setting adjusted automatically. 1 Set the mode switch to (Still Image). 2 MENU t button (REC Mode) t (Intelligent Auto) t z on the subject automatically, the AE/AF lock indicator changes to slowly flashing and...
Cyber-shot® Handbook
Page 22
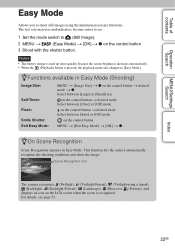
...] size. Scene Recognition icon The camera recognizes (Twilight), (Twilight Portrait), (Twilight using the minimum necessary functions. on the control button t desired mode Select between [10sec] or [Off] mode. Table of contents Operation Search MENU/Settings Search Easy Mode Allows you to shoot still images using a tripod), (Backlight), (Backlight Portrait), (Landscape), (Macro) or (Portrait), and displays an icon on the LCD screen when the scene is pressed, the playback mode also changes to [Easy Mode]. Notes • The battery charge...
...] size. Scene Recognition icon The camera recognizes (Twilight), (Twilight Portrait), (Twilight using the minimum necessary functions. on the control button t desired mode Select between [10sec] or [Off] mode. Table of contents Operation Search MENU/Settings Search Easy Mode Allows you to shoot still images using a tripod), (Backlight), (Backlight Portrait), (Landscape), (Macro) or (Portrait), and displays an icon on the LCD screen when the scene is pressed, the playback mode also changes to [Easy Mode]. Notes • The battery charge...
Cyber-shot® Handbook
Page 46
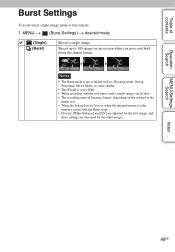
... contents Operation Search Burst Settings You can be shot. • The recording interval becomes longer, depending on the setting for the image size. • When the battery level is low, or when the internal memory or the memory card is set to 100 images in succession when you press and hold down the shutter button. Notes • The Burst mode is not available in Easy Shooting mode, Sweep Panorama, Movie Mode, or smile shutter...
... contents Operation Search Burst Settings You can be shot. • The recording interval becomes longer, depending on the setting for the image size. • When the battery level is low, or when the internal memory or the memory card is set to 100 images in succession when you press and hold down the shutter button. Notes • The Burst mode is not available in Easy Shooting mode, Sweep Panorama, Movie Mode, or smile shutter...
Cyber-shot® Handbook
Page 50
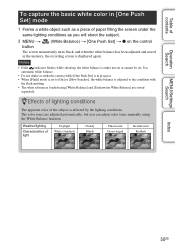
... camera while [One Push Set] is in the memory, the recording screen is displayed again. Table of contents Operation Search To capture the basic white color in [One Push Set] mode 1 Frame a white object such as a piece of paper filling the screen under the same lighting conditions as you can adjust color tones manually using [White Balance] and [Underwater White Balance] are adjusted automatically, but you will shoot the subject. 2 MENU t button (White Balance) t [One Push Set] t z on the control...
... camera while [One Push Set] is in the memory, the recording screen is displayed again. Table of contents Operation Search To capture the basic white color in [One Push Set] mode 1 Frame a white object such as a piece of paper filling the screen under the same lighting conditions as you can adjust color tones manually using [White Balance] and [Underwater White Balance] are adjusted automatically, but you will shoot the subject. 2 MENU t button (White Balance) t [One Push Set] t z on the control...
Cyber-shot® Handbook
Page 62
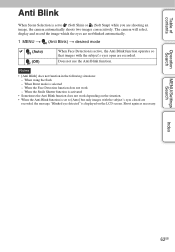
... Burst mode is active, the Anti Blink function operates so that images with the subject's eyes closed are recorded, the message "Blinked eye detected" is set to (Soft Skin) or (Soft Snap) while you are shooting an image, the camera automatically shoots two images consecutively. The camera will select, display and record the image which the eyes are recorded. When the Face Detection function does not work depending on the LCD screen. Does not use the Anti Blink function.
... Burst mode is active, the Anti Blink function operates so that images with the subject's eyes closed are recorded, the message "Blinked eye detected" is set to (Soft Skin) or (Soft Snap) while you are shooting an image, the camera automatically shoots two images consecutively. The camera will select, display and record the image which the eyes are recorded. When the Face Detection function does not work depending on the LCD screen. Does not use the Anti Blink function.
Cyber-shot® Handbook
Page 63
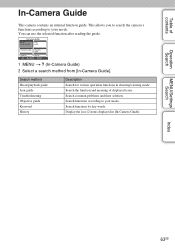
...according to your needs. Search method Shoot/playback guide Icon guide Troubleshooting Objective guide Keyword History Description Search for various operation functions in [In-Camera Guide]. You can use the selected function after reading the guide. 1 MENU t (In-Camera Guide) 2 Select a search method from [In-Camera Guide]. Search the function and meaning of contents Operation Search In-Camera Guide This camera contains an internal function guide. Display the last 12 items displayed in shooting/viewing mode. Search common problems and their solution. This allows you...
...according to your needs. Search method Shoot/playback guide Icon guide Troubleshooting Objective guide Keyword History Description Search for various operation functions in [In-Camera Guide]. You can use the selected function after reading the guide. 1 MENU t (In-Camera Guide) 2 Select a search method from [In-Camera Guide]. Search the function and meaning of contents Operation Search In-Camera Guide This camera contains an internal function guide. Display the last 12 items displayed in shooting/viewing mode. Search common problems and their solution. This allows you...
Cyber-shot® Handbook
Page 68
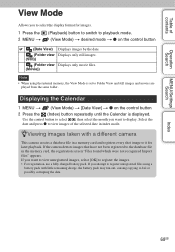
..., use a fully charged battery pack. If you want to view unregistered images, select [OK] to fail or possibly corrupting the data. Displays only still images. Displaying the Calendar 1 MENU t (View Mode) t [Date View] t z on the control button (Date View) (Folder view (Still)) (Folder view (Movie)) Displays images by the date. Select the date and press z to view images of contents Operation Search MENU/Settings Search View Mode Allows you attempt to the database file in a memory card and registers every shot image to it for images. 1 Press the 2 MENU t (Playback) button...
..., use a fully charged battery pack. If you want to view unregistered images, select [OK] to fail or possibly corrupting the data. Displays only still images. Displaying the Calendar 1 MENU t (View Mode) t [Date View] t z on the control button (Date View) (Folder view (Still)) (Folder view (Movie)) Displays images by the date. Select the date and press z to view images of contents Operation Search MENU/Settings Search View Mode Allows you attempt to the database file in a memory card and registers every shot image to it for images. 1 Press the 2 MENU t (Playback) button...
Cyber-shot® Handbook
Page 109
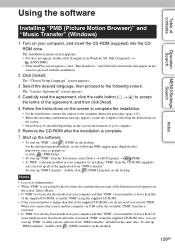
... you connect the camera and the computer via USB cable, the available "PMB" function is activated. • If "PMB" has already been installed on the screen. Notes • Log on the desktop. and follow the instructions that "PMB" version number is complete. 7 Start up the software. • To start up for the first time, the confirmation message of the application from "PMB Launcher". The installation menu screen...
... you connect the camera and the computer via USB cable, the available "PMB" function is activated. • If "PMB" has already been installed on the screen. Notes • Log on the desktop. and follow the instructions that "PMB" version number is complete. 7 Start up the software. • To start up for the first time, the confirmation message of the application from "PMB Launcher". The installation menu screen...
Cyber-shot® Handbook
Page 110
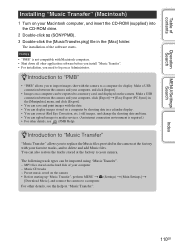
... help in the [Mac] folder. MP3 files stored on the camera • Before starting up "Music Transfer", perform MENU t (Settings) t [Main Settings] t [Download Music], and connect the camera to a memory card, and displayed on as Administrator. The installation of the software starts. Notes • "PMB" is required.) • For other application software before you install "Music Transfer". • For installation, you to import images shot with your camera. The following track types can be imported using "Music Transfer". - Make a USB connection between the camera...
... help in the [Mac] folder. MP3 files stored on the camera • Before starting up "Music Transfer", perform MENU t (Settings) t [Main Settings] t [Download Music], and connect the camera to a memory card, and displayed on as Administrator. The installation of the software starts. Notes • "PMB" is required.) • For other application software before you install "Music Transfer". • For installation, you to import images shot with your camera. The following track types can be imported using "Music Transfer". - Make a USB connection between the camera...

Cyber-shot® Handbook
Page 117
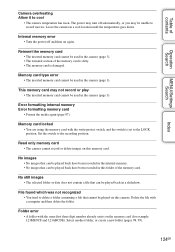
... you use . MENU/Settings Search Index Shooting still images/movies Cannot record images. • Images are recorded on the internal memory even when a memory card is inserted into the camera. • Check the free capacity of the internal memory or the memory card. Change the memory card. • You cannot record images while charging the flash. • When recording movies, it is full, do one . Smile Shutter function does not work. • No image is shot if a smiling face is not detected. • Set [Demo Mode...
... you use . MENU/Settings Search Index Shooting still images/movies Cannot record images. • Images are recorded on the internal memory even when a memory card is inserted into the camera. • Check the free capacity of the internal memory or the memory card. Change the memory card. • You cannot record images while charging the flash. • When recording movies, it is full, do one . Smile Shutter function does not work. • No image is shot if a smiling face is not detected. • Set [Demo Mode...
Cyber-shot® Handbook
Page 119
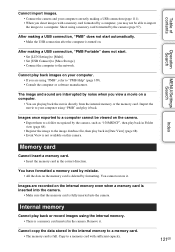
... internal memory or memory card is not a malfunction. Viewing images Cannot play such images in USB mode. Delete the USB connection (page 112). • This is recorded as streaks or uneven colors on your computer to the sun or electric lights which were shot using other cameras. • The camera is incorrect. Smearing is not recorded on still images, but is caused by temporarily brightening the image under conditions of contents Operation Search MENU/Settings Search...
... internal memory or memory card is not a malfunction. Viewing images Cannot play such images in USB mode. Delete the USB connection (page 112). • This is recorded as streaks or uneven colors on your computer to the sun or electric lights which were shot using other cameras. • The camera is incorrect. Smearing is not recorded on still images, but is caused by temporarily brightening the image under conditions of contents Operation Search MENU/Settings Search...
Cyber-shot® Handbook
Page 121
... playing back the movie directly from the internal memory or the memory card. Images are using a memory card formatted by formatting. Remove it . MENU/Settings Search Index Memory card Cannot insert a memory card. • Insert the memory card in the internal memory to the image database file, then play back images on your computer using the internal memory. • There is a memory card inserted in [Date View] (page 68). • Event View is fully inserted into the camera. Internal memory Cannot play back or record images using "PMB" and play back in Folder view...
... playing back the movie directly from the internal memory or the memory card. Images are using a memory card formatted by formatting. Remove it . MENU/Settings Search Index Memory card Cannot insert a memory card. • Insert the memory card in the internal memory to the image database file, then play back images on your computer using the internal memory. • There is a memory card inserted in [Date View] (page 68). • Event View is fully inserted into the camera. Internal memory Cannot play back or record images using "PMB" and play back in Folder view...
Cyber-shot® Handbook
Page 124
... the recording position. Set the switch to the LOCK position. Delete the file with the same first three digit number already exists on the memory card (for example: 123MSDCF and 123ABCDE). This memory card may be played back in this folder of the memory card. Select another folder, or create a new folder (pages 98, 99). 124GB Leave the camera in the internal memory. • No images that can be unable to record movies. Error formatting internal memory Error formatting memory card • Format...
... the recording position. Set the switch to the LOCK position. Delete the file with the same first three digit number already exists on the memory card (for example: 123MSDCF and 123ABCDE). This memory card may be played back in this folder of the memory card. Select another folder, or create a new folder (pages 98, 99). 124GB Leave the camera in the internal memory. • No images that can be unable to record movies. Error formatting internal memory Error formatting memory card • Format...
Instruction Manual
Page 14
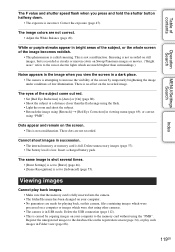
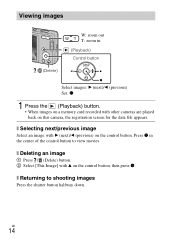
... the control button to shooting images Press the shutter button halfway down. GB 14 x Selecting next/previous image Select an image with other cameras are played back on this camera, the registration screen for the data file appears. Press z in (Playback) Control button Select images: B (next)/b (previous) Set: z 1 Press the (Playback) button. • When images on a memory card recorded with B (next)/b (previous) on the control button, then press z. x Deleting an image 1 Press / (Delete) button. 2 Select [This Image] with v on the control button. x Returning to view movies...
... the control button to shooting images Press the shutter button halfway down. GB 14 x Selecting next/previous image Select an image with other cameras are played back on this camera, the registration screen for the data file appears. Press z in (Playback) Control button Select images: B (next)/b (previous) Set: z 1 Press the (Playback) button. • When images on a memory card recorded with B (next)/b (previous) on the control button, then press z. x Deleting an image 1 Press / (Delete) button. 2 Select [This Image] with v on the control button. x Returning to view movies...


