Instruction Manual
Page 11
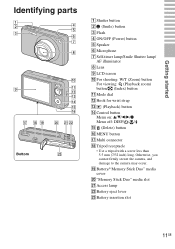
..." media slot U Access lamp V Battery eject lever W Battery insertion slot 11GB Otherwise, you cannot firmly secure the camera, and damage to the camera may occur. Getting started Identifying parts Bottom A Shutter button B (Smile) button C Flash D ON/OFF (Power) button E Speaker F Microphone G Self-timer lamp/Smile Shutter lamp/ AF illuminator H Lens I LCD screen J For shooting: W/T (Zoom...
..." media slot U Access lamp V Battery eject lever W Battery insertion slot 11GB Otherwise, you cannot firmly secure the camera, and damage to the camera may occur. Getting started Identifying parts Bottom A Shutter button B (Smile) button C Flash D ON/OFF (Power) button E Speaker F Microphone G Self-timer lamp/Smile Shutter lamp/ AF illuminator H Lens I LCD screen J For shooting: W/T (Zoom...
Instruction Manual
Page 16
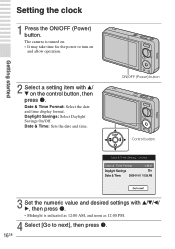
Getting started Setting the clock 1 Press the ON/OFF (Power) button. Date & Time: Sets the date and time. The camera is indicated as 12:00 AM, and noon as 12:00 PM. 4 Select [Go to turn on the control button, then press z. Date & Time Format: Select the date and time display format. ON.../OFF (Power) button Control button 3 Set the numeric value and desired settings ...
Getting started Setting the clock 1 Press the ON/OFF (Power) button. Date & Time: Sets the date and time. The camera is indicated as 12:00 AM, and noon as 12:00 PM. 4 Select [Go to turn on the control button, then press z. Date & Time Format: Select the date and time display format. ON.../OFF (Power) button Control button 3 Set the numeric value and desired settings ...
Instruction Manual
Page 17
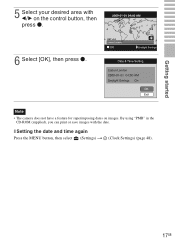
By using "PMB" in the CD-ROM (supplied), you can print or save images with b/B on images. x Setting the date and time again Press the MENU button, then select (Settings) t (Clock Settings) (page 48). 17GB Getting started 5 Select your desired area with the date. Note • The camera does not have a feature for superimposing dates on the control button, then press z. 6 Select [OK], then press z.
By using "PMB" in the CD-ROM (supplied), you can print or save images with b/B on images. x Setting the date and time again Press the MENU button, then select (Settings) t (Clock Settings) (page 48). 17GB Getting started 5 Select your desired area with the date. Note • The camera does not have a feature for superimposing dates on the control button, then press z. 6 Select [OK], then press z.
Instruction Manual
Page 18
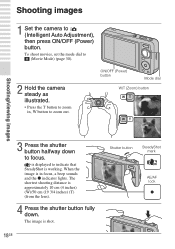
... is shot. 18GB Shutter button SteadyShot mark AE/AF lock The image is approximately 10 cm (4 inches) (W)/50 cm (19 3/4 inches) (T) (from the lens). 4 Press the shutter button fully down to (Intelligent Auto Adjustment), then press ON/OFF (Power) button. To shoot movies, set the mode dial to (Movie Mode) (page 30). 2 Hold the camera...
... is shot. 18GB Shutter button SteadyShot mark AE/AF lock The image is approximately 10 cm (4 inches) (W)/50 cm (19 3/4 inches) (T) (from the lens). 4 Press the shutter button fully down to (Intelligent Auto Adjustment), then press ON/OFF (Power) button. To shoot movies, set the mode dial to (Movie Mode) (page 30). 2 Hold the camera...
Instruction Manual
Page 19
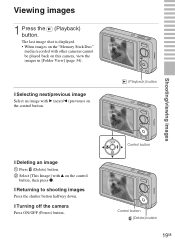
x Turning off the camera Press ON/OFF (Power) button. x Returning to shooting images Press the shutter button halfway down. The last image shot is displayed. • When images on the "Memory Stick Duo" media recorded with v on this camera, view the images in [Folder View] (page 34). Control button Control button (Delete) button 19GB x Selecting next/previous image Select...
x Turning off the camera Press ON/OFF (Power) button. x Returning to shooting images Press the shutter button halfway down. The last image shot is displayed. • When images on the "Memory Stick Duo" media recorded with v on this camera, view the images in [Folder View] (page 34). Control button Control button (Delete) button 19GB x Selecting next/previous image Select...

Instruction Manual
Page 20
...minimum indicators (Easy Shooting) This mode reduces the minimum number of settings. In addition, the functions that can be used are limited. (Delete) button: You can delete the currently displayed image with [Delete Single Image], delete all images in a folder with the mode dial set to (Easy Shooting...Flash How to see . You can delete the currently displayed image. The text size increases and indicators become easier to change Press on the control button t Select [Flash Auto] or [Flash Off]/ Press MENU t [Flash] t Select [Auto] or [Off]. Press MENU t Select [Large] or [Small...
...minimum indicators (Easy Shooting) This mode reduces the minimum number of settings. In addition, the functions that can be used are limited. (Delete) button: You can delete the currently displayed image with [Delete Single Image], delete all images in a folder with the mode dial set to (Easy Shooting...Flash How to see . You can delete the currently displayed image. The text size increases and indicators become easier to change Press on the control button t Select [Flash Auto] or [Flash Off]/ Press MENU t [Flash] t Select [Auto] or [Off]. Press MENU t Select [Large] or [Small...
Instruction Manual
Page 21
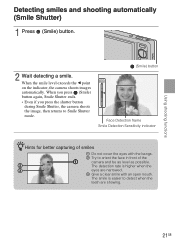
... to orient the face in front of the camera and be as level as possible. Using shooting functions Detecting smiles and shooting automatically (Smile Shutter) 1 Press (Smile) button. 2 Wait detecting a smile. When you press (Smile) button again, Smile Shutter ends. • Even if... you press the shutter button during Smile Shutter, the camera shoots the image, then returns to Smile Shutter mode. (Smile) button Face Detection frame Smile Detection Sensitivity...
... to orient the face in front of the camera and be as level as possible. Using shooting functions Detecting smiles and shooting automatically (Smile Shutter) 1 Press (Smile) button. 2 Wait detecting a smile. When you press (Smile) button again, Smile Shutter ends. • Even if... you press the shutter button during Smile Shutter, the camera shoots the image, then returns to Smile Shutter mode. (Smile) button Face Detection frame Smile Detection Sensitivity...
Instruction Manual
Page 22
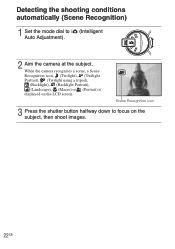
When the camera recognizes a scene, a Scene Recognition icon, (Twilight), (Twilight Portrait), (Twilight using a tripod), (Backlight), (Backlight Portrait), (Landscape), (Macro) or (Portrait) is displayed on the subject, then shoot images. 22GB Detecting the shooting conditions automatically (Scene Recognition) 1 Set the mode dial to focus on the LCD screen. Scene Recognition icon 3 Press the shutter button halfway down to (Intelligent Auto Adjustment). 2 Aim the camera at the subject.
When the camera recognizes a scene, a Scene Recognition icon, (Twilight), (Twilight Portrait), (Twilight using a tripod), (Backlight), (Backlight Portrait), (Landscape), (Macro) or (Portrait) is displayed on the subject, then shoot images. 22GB Detecting the shooting conditions automatically (Scene Recognition) 1 Set the mode dial to focus on the LCD screen. Scene Recognition icon 3 Press the shutter button halfway down to (Intelligent Auto Adjustment). 2 Aim the camera at the subject.
Instruction Manual
Page 23
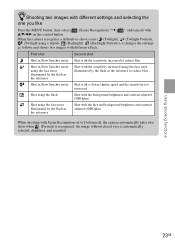
zShooting two images with different settings and selecting the one you like Press the MENU button, then select v/V/b/B on the control button. (Scene Recognition) t (Advanced) with When the camera recognizes a difficult-to-shoot scene ( (Twilight), (Twilight Portrait), (Twilight using the ...face most illuminated by the flash as follows and shoots two images with Scene Recognition set to reduce blur Shot in Slow Synchro mode Shot...
zShooting two images with different settings and selecting the one you like Press the MENU button, then select v/V/b/B on the control button. (Scene Recognition) t (Advanced) with When the camera recognizes a difficult-to-shoot scene ( (Twilight), (Twilight Portrait), (Twilight using the ...face most illuminated by the flash as follows and shoots two images with Scene Recognition set to reduce blur Shot in Slow Synchro mode Shot...
Instruction Manual
Page 24
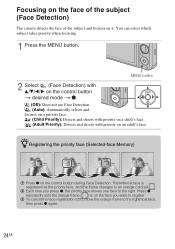
You can select which subject takes priority when focusing. 1 Press the MENU button. Press z repeatedly until the orange frame ( ) is registered as the priority face, and the frame changes to an orange-colored . 2 Each time you want to ... orange frame to the right. Focusing on the face of the subject (Face Detection) The camera detects the face of the subject and focuses on an adult's face. MENU button 2 Select (Face Detection) with v/V/b/B on the control button t desired mode t z. (Off): Does not use Face Detection. (Auto): Automatically selects and focuses on a priority...
You can select which subject takes priority when focusing. 1 Press the MENU button. Press z repeatedly until the orange frame ( ) is registered as the priority face, and the frame changes to an orange-colored . 2 Each time you want to ... orange frame to the right. Focusing on the face of the subject (Face Detection) The camera detects the face of the subject and focuses on an adult's face. MENU button 2 Select (Face Detection) with v/V/b/B on the control button t desired mode t z. (Off): Does not use Face Detection. (Auto): Automatically selects and focuses on a priority...
Instruction Manual
Page 25
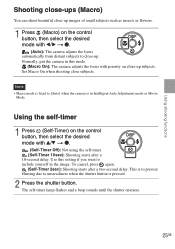
.... The self-timer lamp flashes and a beep sounds until the shutter operates. 25GB Normally, put the camera in this setting if you want to [Auto] when the camera is fixed to include yourself in Intelligent Auto Adjustment mode or Movie Mode. Use this mode. (Macro ... 1 Press (Self-Timer) on the control button, then select the desired mode with priority on the control button, then select the desired mode with b/B t z. (Auto): The camera adjusts the focus automatically from distant subjects to unsteadiness when the shutter button is to prevent blurring due to close subjects....
.... The self-timer lamp flashes and a beep sounds until the shutter operates. 25GB Normally, put the camera in this setting if you want to [Auto] when the camera is fixed to include yourself in Intelligent Auto Adjustment mode or Movie Mode. Use this mode. (Macro ... 1 Press (Self-Timer) on the control button, then select the desired mode with priority on the control button, then select the desired mode with b/B t z. (Auto): The camera adjusts the focus automatically from distant subjects to unsteadiness when the shutter button is to prevent blurring due to close subjects....
Instruction Manual
Page 26
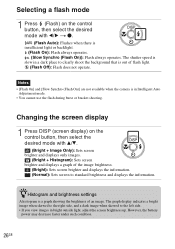
...when the camera is a graph showing the brightness of an image. zHistogram and brightness settings A histogram is in Intelligent Auto Adjustment mode. • You cannot use the flash during burst or bracket shooting. Selecting a flash mode 1 Press (Flash) on the control button, then select... images in a dark place to standard brightness and displays the information. Changing the screen display 1 Press DISP (screen display) on the control button, then select the desired mode with v/V. (Bright + Image Only): Sets screen brighter and displays only images. (Bright + Histogram): Sets screen...
...when the camera is a graph showing the brightness of an image. zHistogram and brightness settings A histogram is in Intelligent Auto Adjustment mode. • You cannot use the flash during burst or bracket shooting. Selecting a flash mode 1 Press (Flash) on the control button, then select... images in a dark place to standard brightness and displays the information. Changing the screen display 1 Press DISP (screen display) on the control button, then select the desired mode with v/V. (Bright + Image Only): Sets screen brighter and displays only images. (Bright + Histogram): Sets screen...

Instruction Manual
Page 27
... TV. (1920×1080) No. The smaller the image size, the more detail will view your images. 1 Press the MENU button. 2 Select (Image Size) with v/V/ b/B on the control button t desired size t z. MENU button Using shooting functions Image size Usage guidelines (4000×3000) For prints up to A3+ size (3264×2448) For...
... TV. (1920×1080) No. The smaller the image size, the more detail will view your images. 1 Press the MENU button. 2 Select (Image Size) with v/V/ b/B on the control button t desired size t z. MENU button Using shooting functions Image size Usage guidelines (4000×3000) For prints up to A3+ size (3264×2448) For...

Instruction Manual
Page 29
... even in low lighting. (Soft Snap): Shoots images with a softer atmosphere for portraits of people, flowers, etc. (Landscape): Shoots with the focus on the control button t z. Note • The flash does not operate in some modes. (Gourmet): Shoots food arrangements in delicious color. (Beach): Shoots seaside or lakeside scenes with the...
... even in low lighting. (Soft Snap): Shoots images with a softer atmosphere for portraits of people, flowers, etc. (Landscape): Shoots with the focus on the control button t z. Note • The flash does not operate in some modes. (Gourmet): Shoots food arrangements in delicious color. (Beach): Shoots seaside or lakeside scenes with the...

Instruction Manual
Page 30
... per second (average bit rate), the smoother the playback image. Adjust the volume with v/V. x Viewing movies 1 Press the (Playback) button and press B (next)/b (previous) on HDTV Shoot at an image size suitable for WEB upload 30GB Movie image size 1280×720(Fine...6 Mbps 3 Mbps Usage guidelines Shoot highest quality movie for display on HDTV Shoot standard quality movie for display on the control button to select a movie to stop recording. Button z B b V Playback feature Pause Fast forward Fast rewind Displays the volume control screen. Shooting movies 1 Set the mode dial...
... per second (average bit rate), the smoother the playback image. Adjust the volume with v/V. x Viewing movies 1 Press the (Playback) button and press B (next)/b (previous) on HDTV Shoot at an image size suitable for WEB upload 30GB Movie image size 1280×720(Fine...6 Mbps 3 Mbps Usage guidelines Shoot highest quality movie for display on HDTV Shoot standard quality movie for display on the control button to select a movie to stop recording. Button z B b V Playback feature Pause Fast forward Fast rewind Displays the volume control screen. Shooting movies 1 Set the mode dial...

Instruction Manual
Page 32
...Searching for an image (Image Index) 1 Press the (Playback) button to display an image, then press (Image Index) button. • Press (Image Index) button again to display an image, then press (Playback zoom) button. The image is enlarged at twice the size, with v/V/b/B on ...the control button: Adjusts the position. W button of the W/T (Zoom) button: Zooms out. Using viewing functions ...
...Searching for an image (Image Index) 1 Press the (Playback) button to display an image, then press (Image Index) button. • Press (Image Index) button again to display an image, then press (Playback zoom) button. The image is enlarged at twice the size, with v/V/b/B on ...the control button: Adjusts the position. W button of the W/T (Zoom) button: Zooms out. Using viewing functions ...

Instruction Manual
Page 33
..." software (supplied) to your computer (page 40), then follow the steps below. 1 Press MENU t (Settings) t (Main Settings) t [Download Music] t [OK]. 2 Make a USB connection between the camera and your CDs or MP3 files to the camera to display a still image, then press the MENU button. 2 Select (Slideshow) with v on the control...
..." software (supplied) to your computer (page 40), then follow the steps below. 1 Press MENU t (Settings) t (Main Settings) t [Download Music] t [OK]. 2 Make a USB connection between the camera and your CDs or MP3 files to the camera to display a still image, then press the MENU button. 2 Select (Slideshow) with v on the control...
Instruction Manual
Page 34
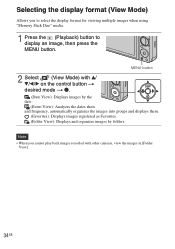
...Mode) Allows you cannot play back images recorded with v/ V/b/B on the control button t desired mode t z. (Date View): Displays images by the date. (Event View): Analyzes the dates shots and frequency, automatically organizes the images into groups and displays them. (Favorites):... Displays images registered as Favorites. (Folder View): Displays and organizes images by folders. MENU button 2 Select (View Mode) with other cameras, view the images in [Folder...
...Mode) Allows you cannot play back images recorded with v/ V/b/B on the control button t desired mode t z. (Date View): Displays images by the date. (Event View): Analyzes the dates shots and frequency, automatically organizes the images into groups and displays them. (Favorites):... Displays images registered as Favorites. (Folder View): Displays and organizes images by folders. MENU button 2 Select (View Mode) with other cameras, view the images in [Folder...

Instruction Manual
Page 35
... date range. All in Event]. According to delete. Exit: Cancels the deletion. 35GB Deleting images MENU button Multiple Images: You can select and delete multiple images. Select the images, press z, and then press the MENU button to the View Mode, this item will be [All in This Folder] or [All in Date...
... date range. All in Event]. According to delete. Exit: Cancels the deletion. 35GB Deleting images MENU button Multiple Images: You can select and delete multiple images. Select the images, press z, and then press the MENU button to the View Mode, this item will be [All in This Folder] or [All in Date...

Instruction Manual
Page 36
... memory. Deleting all images (Format) You can delete all data stored on the "Memory Stick Duo" media are deleted. 1 Press the MENU button. 2 Select (Settings) with v/V/b/B on the control button, then press z. If a "Memory Stick Duo" media is inserted, all data stored in the internal memory are deleted. If no "Memory Stick... Duo" media is inserted, all data, including protected images, and the data cannot be recovered. 36GB MENU button 3 Select ("Memory Stick" Tool) or (Internal Memory Tool) with V on the control...
... memory. Deleting all images (Format) You can delete all data stored on the "Memory Stick Duo" media are deleted. 1 Press the MENU button. 2 Select (Settings) with v/V/b/B on the control button, then press z. If a "Memory Stick Duo" media is inserted, all data stored in the internal memory are deleted. If no "Memory Stick... Duo" media is inserted, all data, including protected images, and the data cannot be recovered. 36GB MENU button 3 Select ("Memory Stick" Tool) or (Internal Memory Tool) with V on the control...


