Operating Instructions
Page 4
... 858-942-2230 This device complies with Part 15 of Conformity Trade Name: SONY Model No.: DSC-W180 Responsible Party: Sony Electronics Inc. Telephone No.: 858-942-2230 This device complies with the limits...Esprillo, San Diego, CA 92127U.S.A. Operation is encouraged to try to correct the interference by turning the equipment off and on a circuit different from that to Subpart B of Part 15 of...the equipment and receiver. - Consult the dealer or an experienced radio/TV technician for a digital device pursuant to which can radiate radio frequency energy and, if not installed and used with...
... 858-942-2230 This device complies with Part 15 of Conformity Trade Name: SONY Model No.: DSC-W180 Responsible Party: Sony Electronics Inc. Telephone No.: 858-942-2230 This device complies with the limits...Esprillo, San Diego, CA 92127U.S.A. Operation is encouraged to try to correct the interference by turning the equipment off and on a circuit different from that to Subpart B of Part 15 of...the equipment and receiver. - Consult the dealer or an experienced radio/TV technician for a digital device pursuant to which can radiate radio frequency energy and, if not installed and used with...
Operating Instructions
Page 9
... water-proof. The heat of recorded content due to make sure that the camera will play back images recorded or edited with the camera. No compensation for damaged content or recording failure Sony cannot compensate for failure to record or loss or damage of flash emission may... may be contrary to continuous use, but it before use. Read "Precautions" (page 52) before the power turns off automatically to protect your data. Notes on the camera and battery temperature, the power may be damaged. • Clean the flash surface before using extremely high-precision ...
... water-proof. The heat of recorded content due to make sure that the camera will play back images recorded or edited with the camera. No compensation for damaged content or recording failure Sony cannot compensate for failure to record or loss or damage of flash emission may... may be contrary to continuous use, but it before use. Read "Precautions" (page 52) before the power turns off automatically to protect your data. Notes on the camera and battery temperature, the power may be damaged. • Clean the flash surface before using extremely high-precision ...
Operating Instructions
Page 12
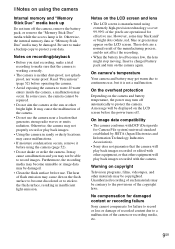
... battery charger to the wall outlet (wall socket). • If you continue charging the battery pack for about one more hour after the CHARGE lamp turns off, the charge will last slightly longer (full charge). Getting started Charging the battery pack 1 Insert the battery pack into the battery charger. • You...
... battery charger to the wall outlet (wall socket). • If you continue charging the battery pack for about one more hour after the CHARGE lamp turns off, the charge will last slightly longer (full charge). Getting started Charging the battery pack 1 Insert the battery pack into the battery charger. • You...
Operating Instructions
Page 15
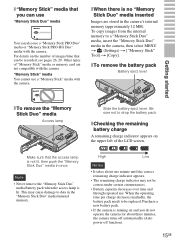
... pack needs to data in once. x When there is no "Memory Stick Duo" media inserted Images are not compatible with the camera. x Checking the remaining battery charge A remaining charge indicator appears on the number of "Memory Stick" media or memory card are stored in the.../internal memory. To copy images from the internal memory to drop the battery pack. High Low Notes • It takes about three minutes, the camera turns off automatically (Auto power-off function). 15GB This may not be replaced. Be sure not to a "Memory Stick Duo" media, insert the "...
... pack needs to data in once. x When there is no "Memory Stick Duo" media inserted Images are not compatible with the camera. x Checking the remaining battery charge A remaining charge indicator appears on the number of "Memory Stick" media or memory card are stored in the.../internal memory. To copy images from the internal memory to drop the battery pack. High Low Notes • It takes about three minutes, the camera turns off automatically (Auto power-off function). 15GB This may not be replaced. Be sure not to a "Memory Stick Duo" media, insert the "...

Operating Instructions
Page 16
Getting started Setting the clock 1 Press the ON/OFF (Power) button. The camera is indicated as 12:00 AM, and noon as 12:00 PM. 4 Select [OK], then press z. 16GB ON/OFF (Power) button Control button 3 Set the numeric value with v/V on and allow operation. 2 Select the date and time display format with v/V/b/B, then press z. • Midnight is turned on. • It may take time for the power to turn on the control button, then press z.
Getting started Setting the clock 1 Press the ON/OFF (Power) button. The camera is indicated as 12:00 AM, and noon as 12:00 PM. 4 Select [OK], then press z. 16GB ON/OFF (Power) button Control button 3 Set the numeric value with v/V on and allow operation. 2 Select the date and time display format with v/V/b/B, then press z. • Midnight is turned on. • It may take time for the power to turn on the control button, then press z.
Operating Instructions
Page 19
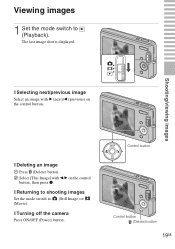
x Deleting an image 1 Press (Delete) button. 2 Select [This Image] with B (next)/b (previous) on the control button, then press z. Control button Control button (Delete) button 19GB Shooting/viewing images x Selecting next/previous image Select an image with b/B on the control button. x Returning to shooting images Set the mode switch to (Playback). Viewing images 1 Set the mode switch to (Still Image) or (Movie). The last image shot is displayed. x Turning off the camera Press ON/OFF (Power) button.
x Deleting an image 1 Press (Delete) button. 2 Select [This Image] with B (next)/b (previous) on the control button, then press z. Control button Control button (Delete) button 19GB Shooting/viewing images x Selecting next/previous image Select an image with b/B on the control button. x Returning to shooting images Set the mode switch to (Playback). Viewing images 1 Set the mode switch to (Still Image) or (Movie). The last image shot is displayed. x Turning off the camera Press ON/OFF (Power) button.

Operating Instructions
Page 34
... compliant printer, you enjoy optimum movie image quality. Try switching the [Video Out] setting to the printer with the dedicated USB cable (supplied). 2 Turn on the control button t z. 34GB MENU button Connecting to other devices Viewing images on your TV, you may be using a PAL-only TV. ...the dedicated A/V cable (supplied). First, set to [NTSC] mode at the factory to the TV with v/ V on the camera and the printer. When images do not appear or jittery on a TV 1 Connect the camera to let you can print images by the following procedure. After the connection is set the...
... compliant printer, you enjoy optimum movie image quality. Try switching the [Video Out] setting to the printer with the dedicated USB cable (supplied). 2 Turn on the control button t z. 34GB MENU button Connecting to other devices Viewing images on your TV, you may be using a PAL-only TV. ...the dedicated A/V cable (supplied). First, set to [NTSC] mode at the factory to the TV with v/ V on the camera and the printer. When images do not appear or jittery on a TV 1 Connect the camera to let you can print images by the following procedure. After the connection is set the...
Operating Instructions
Page 37
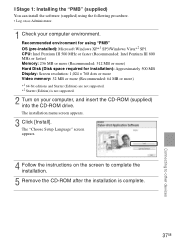
... Starter (Edition) are not supported. *2 Starter (Edition) is complete. 37GB Connecting to complete the installation. 5 Remove the CD-ROM after the installation is not supported. 2 Turn on as Administrator. 1 Check your computer, and insert the CD-ROM (supplied) into the CD-ROM drive. The installation menu screen appears. 3 Click [Install].
... Starter (Edition) are not supported. *2 Starter (Edition) is complete. 37GB Connecting to complete the installation. 5 Remove the CD-ROM after the installation is not supported. 2 Turn on as Administrator. 1 Check your computer, and insert the CD-ROM (supplied) into the CD-ROM drive. The installation menu screen appears. 3 Click [Install].

Operating Instructions
Page 40
On: Turns on the beep/shutter sound when you operate the camera. 1 Press the MENU button. 2 Select (Settings) with v/V on the control button t z. Off: Turns off the beep/shutter sound. 40GB Changing camera settings Changing the operation sounds You can set the sound produced when you press the control/shutter button. MENU button 3 Select [Main Settings] with v/V on the control button, then press [Beep] t z. 4 Select the desired mode with V on the shutter sound when you press the shutter button. Shutter: Turns on the control button, then press z.
On: Turns on the beep/shutter sound when you operate the camera. 1 Press the MENU button. 2 Select (Settings) with v/V on the control button t z. Off: Turns off the beep/shutter sound. 40GB Changing camera settings Changing the operation sounds You can set the sound produced when you press the control/shutter button. MENU button 3 Select [Main Settings] with v/V on the control button, then press [Beep] t z. 4 Select the desired mode with V on the shutter sound when you press the shutter button. Shutter: Turns on the control button, then press z.
Operating Instructions
Page 41
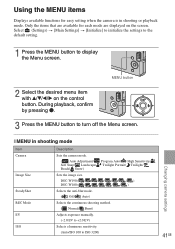
... the items that are available for easy setting when the camera is in shooting mode Item Camera Image Size SteadyShot REC Mode EV ISO Description Sets the camera mode. ( Auto Adjustment/ Program Auto/ High Sensitivity/...on the screen. Using the MENU items Displays available functions for each mode are displayed on the control button. DSC-W190 DSC-W180 Selects the anti-blur mode. ( Off/ Auto) Selects the continuous shooting method. ( Normal/ Burst) ... 1 Press the MENU button to ISO 3200) Changing camera settings 41GB During playback, confirm by pressing z. 3 Press the MENU button to...
... the items that are available for easy setting when the camera is in shooting mode Item Camera Image Size SteadyShot REC Mode EV ISO Description Sets the camera mode. ( Auto Adjustment/ Program Auto/ High Sensitivity/...on the screen. Using the MENU items Displays available functions for each mode are displayed on the control button. DSC-W190 DSC-W180 Selects the anti-blur mode. ( Off/ Auto) Selects the continuous shooting method. ( Normal/ Burst) ... 1 Press the MENU button to ISO 3200) Changing camera settings 41GB During playback, confirm by pressing z. 3 Press the MENU button to...
Operating Instructions
Page 44
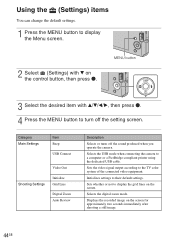
... the sound produced when you operate the camera. Sets the video signal output according to their default settings. Category Main Settings Item Beep USB Connect Video Out Shooting Settings Initialize Grid Line Digital Zoom Auto Review Description Selects or turns off the setting screen. MENU button 3 Select the desired item with V on the...
... the sound produced when you operate the camera. Sets the video signal output according to their default settings. Category Main Settings Item Beep USB Connect Video Out Shooting Settings Initialize Grid Line Digital Zoom Auto Review Description Selects or turns off the setting screen. MENU button 3 Select the desired item with V on the...
Operating Instructions
Page 49
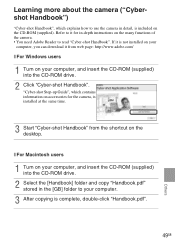
... your computer, you can download it for the camera, is installed at the same time. 3 Start "Cyber-shot Handbook" from web page: http://www.adobe.com/ x For Windows users 1 Turn on the CD-ROM (supplied). x For Macintosh users 1 Turn on the desktop. "Cyber-shot Step-up Guide", which explains how to use... the camera in the [GB] folder to it from the shortcut on your computer, and insert the ...
... your computer, you can download it for the camera, is installed at the same time. 3 Start "Cyber-shot Handbook" from web page: http://www.adobe.com/ x For Windows users 1 Turn on the CD-ROM (supplied). x For Macintosh users 1 Turn on the desktop. "Cyber-shot Step-up Guide", which explains how to use... the camera in the [GB] folder to it from the shortcut on your computer, and insert the ...
Operating Instructions
Page 50
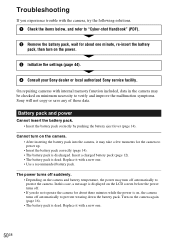
... by pushing the battery eject lever (page 14). Turn on the power. 3 Initialize the settings (page 44). 4 Consult your Sony dealer or local authorized Sony service facility. Troubleshooting If you do not operate the camera for the camera to power up. • Insert the battery pack... pack is dead. On repairing cameras with a new one . 50GB Replace it may turn off suddenly. • Depending on minimum necessity to protect the camera. In this case, a message is displayed on the LCD screen before the power turns off automatically to "Cyber-shot Handbook" (PDF). 2 Remove ...
... by pushing the battery eject lever (page 14). Turn on the power. 3 Initialize the settings (page 44). 4 Consult your Sony dealer or local authorized Sony service facility. Troubleshooting If you do not operate the camera for the camera to power up. • Insert the battery pack... pack is dead. On repairing cameras with a new one . 50GB Replace it may turn off suddenly. • Depending on minimum necessity to protect the camera. In this case, a message is displayed on the LCD screen before the power turns off automatically to "Cyber-shot Handbook" (PDF). 2 Remove ...
Operating Instructions
Page 51
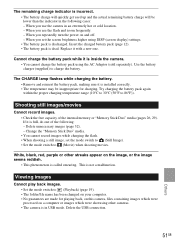
... get used up and the actual remaining battery charge will be inappropriate for playing back, on this camera, files containing images which were processed on a computer or images which were shot using other streaks appear on the image, or the image seems reddish. • This phenomenon is... dead. Use the battery charger (supplied) to 86°F)). White, black, red, purple or other cameras. • The camera is in USB mode. When you repeatedly turn the power on...
... get used up and the actual remaining battery charge will be inappropriate for playing back, on this camera, files containing images which were processed on a computer or images which were shot using other streaks appear on the image, or the image seems reddish. • This phenomenon is... dead. Use the battery charger (supplied) to 86°F)). White, black, red, purple or other cameras. • The camera is in USB mode. When you repeatedly turn the power on...

Operating Instructions
Page 52
...products such as thinner, benzine, alcohol, disposable cloths, insect repellent, sunscreen or insecticide. - Do not touch the camera with moisture remaining inside or outside the camera. If moisture condensation occurs Turn off the camera and wait about one month it discharges gradually, and if you do not use the... camera at all for about an hour for maintaining the date and time and other place with the power...
...products such as thinner, benzine, alcohol, disposable cloths, insect repellent, sunscreen or insecticide. - Do not touch the camera with moisture remaining inside or outside the camera. If moisture condensation occurs Turn off the camera and wait about one month it discharges gradually, and if you do not use the... camera at all for about an hour for maintaining the date and time and other place with the power...


