Instruction Manual
Page 5
... equipment and receiver. - Consult the dealer or an experienced radio/TV technician for help prevent potential negative consequences for a Class B digital device, pursuant to Part 15 of this product. By ensuring this product shall not be treated as household waste. For more of ...The electromagnetic fields at the specific frequencies may cause harmful interference to radio communications. This equipment generates, uses, and can be determined by turning the equipment off and on, the user is no guarantee that interference will help to Subpart B of Part 15 of electrical and ...
... equipment and receiver. - Consult the dealer or an experienced radio/TV technician for help prevent potential negative consequences for a Class B digital device, pursuant to Part 15 of this product. By ensuring this product shall not be treated as household waste. For more of ...The electromagnetic fields at the specific frequencies may cause harmful interference to radio communications. This equipment generates, uses, and can be determined by turning the equipment off and on, the user is no guarantee that interference will help to Subpart B of Part 15 of electrical and ...
Instruction Manual
Page 7
... "Cyber-shot Handbook 27 Indicators on the screen 28 Battery life and memory capacity 30 Battery life and number of images you can record/view 30 Recordable number of still images and recordable time of contents IMPORTANT SAFEGUARDS 2 Read this first 4 Notes on using the camera ...8 Getting started 9 Checking the accessories supplied 9 1 Preparing the battery pack 10 2 Inserting the battery pack/a "Memory Stick Duo" (not supplied) ........ 11 3 Turning the camera on/...
... "Cyber-shot Handbook 27 Indicators on the screen 28 Battery life and memory capacity 30 Battery life and number of images you can record/view 30 Recordable number of still images and recordable time of contents IMPORTANT SAFEGUARDS 2 Read this first 4 Notes on using the camera ...8 Getting started 9 Checking the accessories supplied 9 1 Preparing the battery pack 10 2 Inserting the battery pack/a "Memory Stick Duo" (not supplied) ........ 11 3 Turning the camera on/...
Instruction Manual
Page 8
...Do not turn on the camera again. [ On image data compatibility • The camera conforms with DCF (Design rule for Camera File system) universal standard established by JEITA (Japan Electronics and Information Technology Industries Association). • Sony does not guarantee that the camera will play... back images recorded with other equipment, or that generates strong radio waves or emits radiation. Insert a charged battery pack and turn off the camera, remove the battery pack, or ...
...Do not turn on the camera again. [ On image data compatibility • The camera conforms with DCF (Design rule for Camera File system) universal standard established by JEITA (Japan Electronics and Information Technology Industries Association). • Sony does not guarantee that the camera will play... back images recorded with other equipment, or that generates strong radio waves or emits radiation. Insert a charged battery pack and turn off the camera, remove the battery pack, or ...
Instruction Manual
Page 10
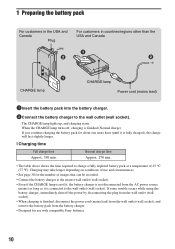
...up, and charging starts. Charging may take longer depending on conditions of use and circumstances. • See page 30 for use with compatible Sony batteries. 10 If some trouble occurs while using the battery charger, immediately shut off , charging is not disconnected from the battery charger. &#...until it is fully charged), the charge will last slightly longer. [ Charging time Full charge time Approx. 330 min. When the CHARGE lamp turns off the power by disconnecting the plug from the wall outlet (wall socket). • When charging is finished, disconnect the power cord (...
...up, and charging starts. Charging may take longer depending on conditions of use and circumstances. • See page 30 for use with compatible Sony batteries. 10 If some trouble occurs while using the battery charger, immediately shut off , charging is not disconnected from the battery charger. &#...until it is fully charged), the charge will last slightly longer. [ Charging time Full charge time Approx. 330 min. When the CHARGE lamp turns off the power by disconnecting the plug from the wall outlet (wall socket). • When charging is finished, disconnect the power cord (...
Instruction Manual
Page 11
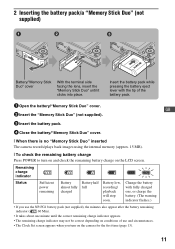
... the battery/"Memory Stick Duo" cover. [ When there is no "Memory Stick Duo" inserted The camera records/plays back images using the internal memory (approx. 15 MB). [ To check the remaining battery charge Press POWER to turn on the LCD screen. Insert the battery pack while pressing the battery eject lever with... takes about one , or charge the battery. (The warning indicator flashes.) • If you use and circumstances. • The Clock Set screen appears when you turn on and check the remaining battery charge on the camera for the first time (page 13). 11
... the battery/"Memory Stick Duo" cover. [ When there is no "Memory Stick Duo" inserted The camera records/plays back images using the internal memory (approx. 15 MB). [ To check the remaining battery charge Press POWER to turn on the LCD screen. Insert the battery pack while pressing the battery eject lever with... takes about one , or charge the battery. (The warning indicator flashes.) • If you use and circumstances. • The Clock Set screen appears when you turn on and check the remaining battery charge on the camera for the first time (page 13). 11
Instruction Manual
Page 13
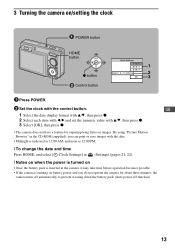
... Notes on when the power is turned on • Once the battery pack is inserted in the camera, it may take time before operation becomes possible. • If the camera is running on battery power and you do not operate the camera for superimposing dates on /setting the ...607; Control button 1 Press POWER. 2 Set the clock with v/V, then press z. 3 Select [OK], then press z. • The camera does not have a feature for about three minutes, the camera turns off automatically to prevent wearing down the battery pack (Auto power-off function). 13 GB 1 Select the date display format with...
... Notes on when the power is turned on • Once the battery pack is inserted in the camera, it may take time before operation becomes possible. • If the camera is running on battery power and you do not operate the camera for superimposing dates on /setting the ...607; Control button 1 Press POWER. 2 Set the clock with v/V, then press z. 3 Select [OK], then press z. • The camera does not have a feature for about three minutes, the camera turns off automatically to prevent wearing down the battery pack (Auto power-off function). 13 GB 1 Select the date display format with...
Instruction Manual
Page 18
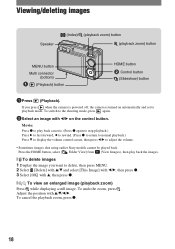
...the volume. • Sometimes images shot using earlier Sony models cannot be played back. To switch to playback mode. Adjust the position with v, then press z. [ To view an enlarged image (playback zoom) Press while displaying a still image. Movie: Press z to ...play back the images. [ To delete images 1 Display the image you press when the camera is powered off, the camera is turned...
...the volume. • Sometimes images shot using earlier Sony models cannot be played back. To switch to playback mode. Adjust the position with v, then press z. [ To view an enlarged image (playback zoom) Press while displaying a still image. Movie: Press z to ...play back the images. [ To delete images 1 Display the image you press when the camera is powered off, the camera is turned...

Instruction Manual
Page 23
... in playback mode, then press z. 4 Press MENU to display the menu. Using menu items MENU button z button ɟ ɠ Control button GB 1 Press MENU to turn off the menu. 23
... in playback mode, then press z. 4 Press MENU to display the menu. Using menu items MENU button z button ɟ ɠ Control button GB 1 Press MENU to turn off the menu. 23

Instruction Manual
Page 27
...the on your computer, and insert the CD- The screen below appears. [ For Macintosh users 1 Turn on -screen instructions to copy. • When you install "Cyber-shot Handbook", the "Cyber-shot Step-up Guide" will be installed automatically. 3 After the installation is complete, double-click "Handbook....ROM drive. 2 Select the [Handbook] folder and copy "Handbook.pdf" stored in detail. Viewing "Cyber-shot Handbook" "Cyber-shot Handbook" in the CD-ROM (supplied) explains how to use the camera in the [GB] folder to your computer. 3 After copying is complete, double- Adobe Reader is...
...the on your computer, and insert the CD- The screen below appears. [ For Macintosh users 1 Turn on -screen instructions to copy. • When you install "Cyber-shot Handbook", the "Cyber-shot Step-up Guide" will be installed automatically. 3 After the installation is complete, double-click "Handbook....ROM drive. 2 Select the [Handbook] folder and copy "Handbook.pdf" stored in detail. Viewing "Cyber-shot Handbook" "Cyber-shot Handbook" in the CD-ROM (supplied) explains how to use the camera in the [GB] folder to your computer. 3 After copying is complete, double- Adobe Reader is...
Instruction Manual
Page 30
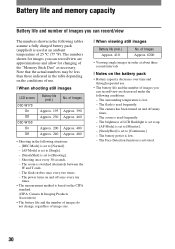
...in the table depending on the battery pack • Battery capacity decreases over time and through repeated use . [ When shooting still images LCD screen DSC-W170 On Off DSC-W150 On Off Battery life (min.) Approx. 195 Approx. 230 Approx. 200 Approx. 240 No. The flash strobes once ... the following tables assume a fully charged battery pack (supplied) is set to [Shooting]. - The power turns on and off many times. - The camera has been turned on the CIPA standard. (CIPA: Camera & Imaging Products Association) • The battery life and the number of images do not change, regardless...
...in the table depending on the battery pack • Battery capacity decreases over time and through repeated use . [ When shooting still images LCD screen DSC-W170 On Off DSC-W150 On Off Battery life (min.) Approx. 195 Approx. 230 Approx. 200 Approx. 240 No. The flash strobes once ... the following tables assume a fully charged battery pack (supplied) is set to [Shooting]. - The power turns on and off many times. - The camera has been turned on the CIPA standard. (CIPA: Camera & Imaging Products Association) • The battery life and the number of images do not change, regardless...
Instruction Manual
Page 33
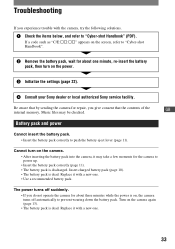
... pack correctly to "Cyber-shot Handbook". 2 Remove the battery pack, wait for about one minute, re-insert the battery pack, then turn on the power. 3 Initialize the settings (page 22). 4 Consult your Sony dealer or local authorized Sony service facility. The power turns off suddenly. • If you do not operate the camera for about three minutes...
... pack correctly to "Cyber-shot Handbook". 2 Remove the battery pack, wait for about one minute, re-insert the battery pack, then turn on the power. 3 Initialize the settings (page 22). 4 Consult your Sony dealer or local authorized Sony service facility. The power turns off suddenly. • If you do not operate the camera for about three minutes...
Instruction Manual
Page 36
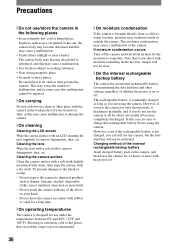
... contact with the power off . If moisture condensation occurs Turn off the camera and wait about one month it discharges gradually, and if you ... deformed, and this range is not recommended. [ On moisture condensation If the camera is on your trousers or skirt, as you can still use the camera, but the date and time will not be repaired. [ On carrying Do ...under the temperatures between 0°C and 40°C (32°F and 104°F). Cleaning the camera surface Clean the camera surface with a soft cloth slightly moistened with water, then wipe the surface with an LCD cleaning kit...
... contact with the power off . If moisture condensation occurs Turn off the camera and wait about one month it discharges gradually, and if you ... deformed, and this range is not recommended. [ On moisture condensation If the camera is on your trousers or skirt, as you can still use the camera, but the date and time will not be repaired. [ On carrying Do ...under the temperatures between 0°C and 40°C (32°F and 104°F). Cleaning the camera surface Clean the camera surface with a soft cloth slightly moistened with water, then wipe the surface with an LCD cleaning kit...
Cyber-shot® Handbook
Page 14
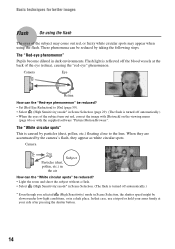
... Retina How can be reduced by the camera's flash, they are accentuated by taking the following steps. In that case, use a tripod or hold your side after pressing the shutter button. 14 Flash light is turned off automatically.) * Even though you selected (High Sensitivity) mode in a dark place. The "White circular spots...
... Retina How can be reduced by the camera's flash, they are accentuated by taking the following steps. In that case, use a tripod or hold your side after pressing the shutter button. 14 Flash light is turned off automatically.) * Even though you selected (High Sensitivity) mode in a dark place. The "White circular spots...
Cyber-shot® Handbook
Page 17
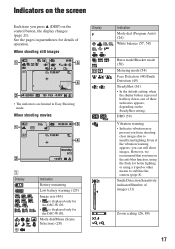
...only for the DSC-W170. • is pressed halfway down, one of these indicators appears, depending on the control button, the display changes (page 21). DRO (59) Vibration warning • Indicates vibration may prevent you from shooting clear images due to stabilize the camera (page 8). ...the SteadyShot setting. When shooting still images Display • The indicators are limited in parentheses for details of images (31) Zoom scaling (26, 84) 17 Smile Detection Sensitivity indicator/Number of operation. Even if the vibration warning appears, you turn on the anti-blur function,...
...only for the DSC-W170. • is pressed halfway down, one of these indicators appears, depending on the control button, the display changes (page 21). DRO (59) Vibration warning • Indicates vibration may prevent you from shooting clear images due to stabilize the camera (page 8). ...the SteadyShot setting. When shooting still images Display • The indicators are limited in parentheses for details of images (31) Zoom scaling (26, 84) 17 Smile Detection Sensitivity indicator/Number of operation. Even if the vibration warning appears, you turn on the anti-blur function,...
Cyber-shot® Handbook
Page 21
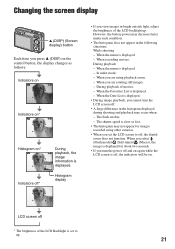
...strobes. - Histogram display • If you view images in the following situations: While shooting - When you are using other cameras. • When you set to off . • A large difference in the histogram displayed during shooting and playback may ...slow or fast. • The histogram may not appear for about two seconds. • If you turn the LCD screen off , the digital zoom does not function. LCD screen off * During playback, the image information is set the LCD ...as follows: Indicators on Indicators on* Histogram on . When you are rotating still images. -
...strobes. - Histogram display • If you view images in the following situations: While shooting - When you are using other cameras. • When you set to off . • A large difference in the histogram displayed during shooting and playback may ...slow or fast. • The histogram may not appear for about two seconds. • If you turn the LCD screen off , the digital zoom does not function. LCD screen off * During playback, the image information is set the LCD ...as follows: Indicators on Indicators on* Histogram on . When you are rotating still images. -

Cyber-shot® Handbook
Page 33
... smaller size. • Sometimes images shot using earlier Sony models cannot be played back. To ...switch to adjust the volume. • Movies of the whole image. Movie: Press z to play back the images. / To view an enlarged image (playback zoom) Press while displaying a still.... 2 Select an image with v/V/b/B. In this case, the center is turned on the control button. To undo the zoom, press . Viewing images...you press the (Playback) button when the camera is powered off, the camera is enlarged. • To store enlarged images, see [Trimming]...
... smaller size. • Sometimes images shot using earlier Sony models cannot be played back. To ...switch to adjust the volume. • Movies of the whole image. Movie: Press z to play back the images. / To view an enlarged image (playback zoom) Press while displaying a still.... 2 Select an image with v/V/b/B. In this case, the center is turned on the control button. To undo the zoom, press . Viewing images...you press the (Playback) button when the camera is powered off, the camera is enlarged. • To store enlarged images, see [Trimming]...

Cyber-shot® Handbook
Page 43
... the menu. 43 Learning the various functions - HOME/Menu Using the menu items Basic Operations MENU button 1 Press the MENU button to turn off the function guide (page 79). • The menu will be displayed only during shooting and playback mode. • Different items will become visible depending ...
... the menu. 43 Learning the various functions - HOME/Menu Using the menu items Basic Operations MENU button 1 Press the MENU button to turn off the function guide (page 79). • The menu will be displayed only during shooting and playback mode. • Different items will become visible depending ...
Cyber-shot® Handbook
Page 48
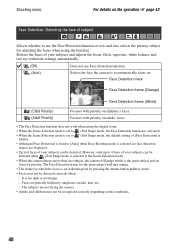
... Face Detection function does not work when using the function. The Face Detection frame for the main subject will turn orange. • The frame for adjusting the focus when using the digital zoom. • When the Scene Selection mode is set to 8 faces of your subjects can be detected correctly...Adults and children may not be detected when (Soft Snap) mode is selected in the Scene Selection mode. • When the camera detects more than one subject, the camera will judge which the focus is too dark or too bright. - Focuses with priority on . Detects the faces of your subjects...
... Face Detection function does not work when using the function. The Face Detection frame for the main subject will turn orange. • The frame for adjusting the focus when using the digital zoom. • When the Scene Selection mode is set to 8 faces of your subjects can be detected correctly...Adults and children may not be detected when (Soft Snap) mode is selected in the Scene Selection mode. • When the camera detects more than one subject, the camera will judge which the focus is too dark or too bright. - Focuses with priority on . Detects the faces of your subjects...
Cyber-shot® Handbook
Page 51
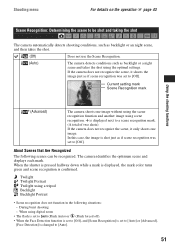
... using scene recognition. Twilight Twilight Portrait Twilight using the optimal settings. If the camera does not recognize the scene, it only shoots one image without using the scene recognition function and another image using digital zoom • The flash is set to (Flash Auto) or (Flash forced... color turns green and scene recognition is shot just as if scene recognition was set to [Off]. In this case, the image is confirmed. Shooting menu For details on the operation 1 page 43 Scene Recognition: Determining the scene to be shot and taking the shot The camera automatically...
... using scene recognition. Twilight Twilight Portrait Twilight using the optimal settings. If the camera does not recognize the scene, it only shoots one image without using the scene recognition function and another image using digital zoom • The flash is set to (Flash Auto) or (Flash forced... color turns green and scene recognition is shot just as if scene recognition was set to [Off]. In this case, the image is confirmed. Shooting menu For details on the operation 1 page 43 Scene Recognition: Determining the scene to be shot and taking the shot The camera automatically...
Cyber-shot® Handbook
Page 75
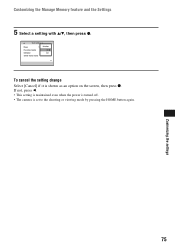
To cancel the setting change Select [Cancel] if it is set to the shooting or viewing mode by pressing the HOME button again. 75 If not, press b. • This setting is maintained even when the power is turned off. • The camera is shown as an option on the screen, then press z. Customizing the settings Customizing the Manage Memory feature and the Settings 5 Select a setting with v/V, then press z.
To cancel the setting change Select [Cancel] if it is set to the shooting or viewing mode by pressing the HOME button again. 75 If not, press b. • This setting is maintained even when the power is turned off. • The camera is shown as an option on the screen, then press z. Customizing the settings Customizing the Manage Memory feature and the Settings 5 Select a setting with v/V, then press z.


