
Instruction Manual
Page 8
..., immediately wipe off or you start recording, make a trial recording to protect the camera. Internal memory and "Memory Stick Duo" media back up Do not turn off the camera, remove the battery pack, or remove the "Memory Stick Duo" media while the access lamp is manufactured using the camera Changing the language setting The screen language can perform the next operation. It may cause a malfunction and you may be repaired. • Do not aim...
..., immediately wipe off or you start recording, make a trial recording to protect the camera. Internal memory and "Memory Stick Duo" media back up Do not turn off the camera, remove the battery pack, or remove the "Memory Stick Duo" media while the access lamp is manufactured using the camera Changing the language setting The screen language can perform the next operation. It may cause a malfunction and you may be repaired. • Do not aim...
Instruction Manual
Page 41
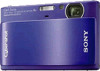
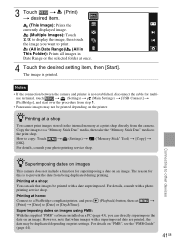
... images using PMB: With the supplied "PMB" software installed on a PC (page 43), you want to print. (All in Date Range)/ (All in This Folder): Prints all images in the internal memory at a shop: You can directly superimpose the date on an image. use terminal, touch t (Settings) t (Main Settings) t [USB Connect] t [PictBridge], and start over the procedure from being duplicated during printing. 3 Touch t (Print) t desired item. (This Image): Prints the currently displayed image. (Multiple Images): Touch / to display the image...
... images using PMB: With the supplied "PMB" software installed on a PC (page 43), you want to print. (All in Date Range)/ (All in This Folder): Prints all images in the internal memory at a shop: You can directly superimpose the date on an image. use terminal, touch t (Settings) t (Main Settings) t [USB Connect] t [PictBridge], and start over the procedure from being duplicated during printing. 3 Touch t (Print) t desired item. (This Image): Prints the currently displayed image. (Multiple Images): Touch / to display the image...

Instruction Manual
Page 43
... is required to use the function for installation): Approximately 500 MB Display: Screen resolution: 1,024 × 768 dots or more ) Hard Disk (Disk space required for creating discs. *2 Starter (Edition) is not supported. 2 Turn on your computer environment. x Stage 1: Installing the "PMB" (supplied) You can install the software (supplied) using "PMB" and "Music Transfer", and when importing images OS (pre-installed): Microsoft Windows XP*1 SP3/Windows Vista*2 SP2 CPU...
... is required to use the function for installation): Approximately 500 MB Display: Screen resolution: 1,024 × 768 dots or more ) Hard Disk (Disk space required for creating discs. *2 Starter (Edition) is not supported. 2 Turn on your computer environment. x Stage 1: Installing the "PMB" (supplied) You can install the software (supplied) using "PMB" and "Music Transfer", and when importing images OS (pre-installed): Microsoft Windows XP*1 SP3/Windows Vista*2 SP2 CPU...

Instruction Manual
Page 49
... still images. ( Trimming/ Red Eye Correction/ Unsharp masking) (Display Burst Group) Select how to display the burst images on the screen. ( Display Main Image Only/ Display All) (View Mode) Switches the View Modes. ( Date View/ Folder View) (Protect) Prevents accidental erasure. ( This Image/ Multiple Images/ Remove All in Date Range*) Set All in Date Range*/ Adds a Print order mark to the image you want to print in a "Memory Stick Duo" media. ( This Image/ Multiple Images/ Set All in Date Range*/ Remove All in Date Range*) (Print) Prints images using a PictBridge-compliant printer...
... still images. ( Trimming/ Red Eye Correction/ Unsharp masking) (Display Burst Group) Select how to display the burst images on the screen. ( Display Main Image Only/ Display All) (View Mode) Switches the View Modes. ( Date View/ Folder View) (Protect) Prevents accidental erasure. ( This Image/ Multiple Images/ Remove All in Date Range*) Set All in Date Range*/ Adds a Print order mark to the image you want to print in a "Memory Stick Duo" media. ( This Image/ Multiple Images/ Set All in Date Range*/ Remove All in Date Range*) (Print) Prints images using a PictBridge-compliant printer...

Instruction Manual
Page 51
... a "Memory Stick Duo" media. Format Music Deletes all images recorded in the MENU items, warnings and messages. Create REC.Folder Creates a new folder on the touch panel. Date & Time Setting Sets the date and time. Category Item Description Main Settings Beep Selects or turns off the sound produced when you operate the camera. COMPONENT Sets the video signal according to a computer or a printer. USB Connect Sets the mode used to assign file number to the local time of the selected area. Download...
... a "Memory Stick Duo" media. Format Music Deletes all images recorded in the MENU items, warnings and messages. Create REC.Folder Creates a new folder on the touch panel. Date & Time Setting Sets the date and time. Category Item Description Main Settings Beep Selects or turns off the sound produced when you operate the camera. COMPONENT Sets the video signal according to a computer or a printer. USB Connect Sets the mode used to assign file number to the local time of the selected area. Download...

Instruction Manual
Page 55
.... Sony will not copy or save any of the battery is correct, and insert it may take a few moments for the camera to "Cyber-shot Handbook." 2 Remove the battery pack, wait for about one minute, re-insert the battery pack, then turn off automatically to prevent wearing down the battery pack. Turn on the power. 3 Initialize the settings (page 50). 4 Consult your Sony dealer or local authorized Sony service facility. Troubleshooting...
.... Sony will not copy or save any of the battery is correct, and insert it may take a few moments for the camera to "Cyber-shot Handbook." 2 Remove the battery pack, wait for about one minute, re-insert the battery pack, then turn off automatically to prevent wearing down the battery pack. Turn on the power. 3 Initialize the settings (page 50). 4 Consult your Sony dealer or local authorized Sony service facility. Troubleshooting...

Cyber-shot® Handbook
Page 4
... to use this handbook 2 Notes on using the camera 3 Operation Search 7 MENU/Settings Search 10 Names of parts 15 List of icons displayed on the screen 16 Using the touch panel 18 Using the internal memory 20 Shooting REC Mode 21 Intelligent Auto Adjustment 22 Sweep Panorama 23 Movie Mode 25 Program Auto 26 Anti Motion Blur 27 Hand-held Twilight 28 Scene Selection 29 Zoom 31 Viewing Viewing still images 32 Playback Zoom 33 Wide Zoom 34 Temporarily Rotated Display 35 Viewing movies...
... to use this handbook 2 Notes on using the camera 3 Operation Search 7 MENU/Settings Search 10 Names of parts 15 List of icons displayed on the screen 16 Using the touch panel 18 Using the internal memory 20 Shooting REC Mode 21 Intelligent Auto Adjustment 22 Sweep Panorama 23 Movie Mode 25 Program Auto 26 Anti Motion Blur 27 Hand-held Twilight 28 Scene Selection 29 Zoom 31 Viewing Viewing still images 32 Playback Zoom 33 Wide Zoom 34 Temporarily Rotated Display 35 Viewing movies...

Cyber-shot® Handbook
Page 5
Table of contents MENU (Shooting) MENU items (Shooting 10 MENU (Viewing) MENU items (Viewing 12 Operation Search Settings Setting items 13 MENU/Settings Search TV Viewing an image on a SD TV 114 Viewing an image on an HD TV 115 Index Computer Using with your computer 117 Using the software 118 Connecting the camera to the computer 121 Viewing "Cyber-shot Step-up Guide 123 Printing Printing still images 124 Troubleshooting Troubleshooting 127 Warning indicators and messages 136 5GB
Table of contents MENU (Shooting) MENU items (Shooting 10 MENU (Viewing) MENU items (Viewing 12 Operation Search Settings Setting items 13 MENU/Settings Search TV Viewing an image on a SD TV 114 Viewing an image on an HD TV 115 Index Computer Using with your computer 117 Using the software 118 Connecting the camera to the computer 121 Viewing "Cyber-shot Step-up Guide 123 Printing Printing still images 124 Troubleshooting Troubleshooting 127 Warning indicators and messages 136 5GB

Cyber-shot® Handbook
Page 45
... frames on the left side of the LCD screen, touch . (Off) (High) (Mid) (Low) Records a single image. Table of contents Operation Search MENU/Settings Search Burst The camera shoots up to 10 images in succession. Shoots up to 10 continuous frames in one burst when you hold down the shutter button. 1 Lower the lens cover to switch to shooting mode. 2 (Burst) t desired mode When the buttons are not displayed on the LCD screen.
... frames on the left side of the LCD screen, touch . (Off) (High) (Mid) (Low) Records a single image. Table of contents Operation Search MENU/Settings Search Burst The camera shoots up to 10 images in succession. Shoots up to 10 continuous frames in one burst when you hold down the shutter button. 1 Lower the lens cover to switch to shooting mode. 2 (Burst) t desired mode When the buttons are not displayed on the LCD screen.

Cyber-shot® Handbook
Page 54
... shoot the subject. 2 t (White Balance) t [One Push Set] t [Capture] 3 The screen momentarily turns black, and when the white balance has been adjusted and stored in progress. • When flash mode is set . Table of contents Operation Search To capture the basic white color in [One Push Set] mode 1 Frame a white object such as a piece of paper filling the screen under the same lighting conditions as you can adjust color tones manually using the White Balance function. zEffects of lighting...
... shoot the subject. 2 t (White Balance) t [One Push Set] t [Capture] 3 The screen momentarily turns black, and when the white balance has been adjusted and stored in progress. • When flash mode is set . Table of contents Operation Search To capture the basic white color in [One Push Set] mode 1 Frame a white object such as a piece of paper filling the screen under the same lighting conditions as you can adjust color tones manually using the White Balance function. zEffects of lighting...

Cyber-shot® Handbook
Page 64
...'s eyes closed are recorded, the message "Blinked eye detected" is set to (Soft Snap) while you are recorded. Table of contents Operation Search MENU/Settings Search Anti Blink When Scene Selection is displayed on the situation. • When the Anti Blink function is set to [Auto] but only images with the subject's eyes open are shooting an image, the camera automatically shoots two images consecutively. When the Face Detection function does not work depending on the LCD screen.
...'s eyes closed are recorded, the message "Blinked eye detected" is set to (Soft Snap) while you are recorded. Table of contents Operation Search MENU/Settings Search Anti Blink When Scene Selection is displayed on the situation. • When the Anti Blink function is set to [Auto] but only images with the subject's eyes open are shooting an image, the camera automatically shoots two images consecutively. When the Face Detection function does not work depending on the LCD screen.

Cyber-shot® Handbook
Page 109
... Operation Search Delete REC.Folder Deletes a folder in the "Memory Stick Duo" media that is currently used to delete t [OK]. Notes • This item is not displayed when the internal memory is used for recording images. 1 t (Settings) t ("Memory Stick" Tool) t [Delete REC.Folder] 2 Select the folder you want to record images. • If you delete the folder set as the recording folder using [Delete REC.Folder], the folder that cannot be played back by the camera, first delete these images and files, and then delete the folder...
... Operation Search Delete REC.Folder Deletes a folder in the "Memory Stick Duo" media that is currently used to delete t [OK]. Notes • This item is not displayed when the internal memory is used for recording images. 1 t (Settings) t ("Memory Stick" Tool) t [Delete REC.Folder] 2 Select the folder you want to record images. • If you delete the folder set as the recording folder using [Delete REC.Folder], the folder that cannot be played back by the camera, first delete these images and files, and then delete the folder...
Cyber-shot® Handbook
Page 117
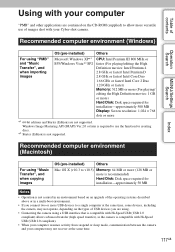
... more versatile use the function for installation-approximately 500 MB Display: Screen resolution: 1,024 × 768 dots or more USB devices to a single computer at the same time, some devices, including the camera, may not recover at the same time. 117GB Recommended computer environment (Windows) Operation Search MENU/Settings Search For using "PMB" and "Music Transfer", and when importing images OS (pre-installed) Others Microsoft Windows XP*1 SP3/Windows Vista...
... more versatile use the function for installation-approximately 500 MB Display: Screen resolution: 1,024 × 768 dots or more USB devices to a single computer at the same time, some devices, including the camera, may not recover at the same time. 117GB Recommended computer environment (Windows) Operation Search MENU/Settings Search For using "PMB" and "Music Transfer", and when importing images OS (pre-installed) Others Microsoft Windows XP*1 SP3/Windows Vista...

Cyber-shot® Handbook
Page 118
... [Next]. 5 Follow the instructions on the screen to the following the instructions on the screen. • DirectX may be installed depending on the screen. Index 118GB Continued r Select [Start]. Table of contents Operation Search MENU/Settings Search Using the software Installing "PMB (Picture Motion Browser)" and "Music Transfer" (Windows) 1 Turn on your computer. 6 Remove the CD-ROM after the installation is started up for the first time, the confirmation message of the Information...
... [Next]. 5 Follow the instructions on the screen to the following the instructions on the screen. • DirectX may be installed depending on the screen. Index 118GB Continued r Select [Start]. Table of contents Operation Search MENU/Settings Search Using the software Installing "PMB (Picture Motion Browser)" and "Music Transfer" (Windows) 1 Turn on your computer. 6 Remove the CD-ROM after the installation is started up for the first time, the confirmation message of the Information...

Cyber-shot® Handbook
Page 119
... Transfer". • For installation, you to import images shot with the camera to replace the Music files provided in the camera at the factory with Macintosh computers. • For details on using "Music Transfer". • MP3 files stored on the hard disk of the screen, and click [Export]. • You can save and print images with the date. • You can display images stored on as Administrator. Index 119GB Continued r Make a USB connection between the camera...
... Transfer". • For installation, you to import images shot with the camera to replace the Music files provided in the camera at the factory with Macintosh computers. • For details on using "Music Transfer". • MP3 files stored on the hard disk of the screen, and click [Export]. • You can save and print images with the date. • You can display images stored on as Administrator. Index 119GB Continued r Make a USB connection between the camera...

Cyber-shot® Handbook
Page 129
... the lens in Easy Mode, or when the Smile Shutter function is too close. Shooting in Sweep Panorama, Movie Mode, Anti Motion Blur or Hand-held Twilight mode, shooting in other recording modes). The flash does not work . • You cannot use the optical zoom during Sweep Panorama shooting or in the Scene Selection when shooting still images. This is selected in Close focus mode. • You cannot use the Smart zoom depending on the image size (page...
... the lens in Easy Mode, or when the Smile Shutter function is too close. Shooting in Sweep Panorama, Movie Mode, Anti Motion Blur or Hand-held Twilight mode, shooting in other recording modes). The flash does not work . • You cannot use the optical zoom during Sweep Panorama shooting or in the Scene Selection when shooting still images. This is selected in Close focus mode. • You cannot use the Smart zoom depending on the image size (page...

Cyber-shot® Handbook
Page 132
... view a movie on . Table of contents Operation Search MENU/Settings Search Index Computers A "Memory Stick PRO Duo" media is not recognized by a computer with a "Memory Stick Duo" media formatted by a computer, you may turn blue or otherwise not be displayed correctly. This is not a malfunction. • When blue images appear, view them in the Folder View mode or delete them to your computer. • Connect the camera directly to a folder...
... view a movie on . Table of contents Operation Search MENU/Settings Search Index Computers A "Memory Stick PRO Duo" media is not recognized by a computer with a "Memory Stick Duo" media formatted by a computer, you may turn blue or otherwise not be displayed correctly. This is not a malfunction. • When blue images appear, view them in the Folder View mode or delete them to your computer. • Connect the camera directly to a folder...

Cyber-shot® Handbook
Page 137
... images recorded with the write-protect switch, and the switch is damaged. Leave the camera in a slideshow. No images • No images that can be used in Folder View mode (page 79). Table of the "Memory Stick Duo" media is dirty. • The "Memory Stick Duo" media is set to record movies. Delete the file on again. "Memory Stick" type error • The inserted "Memory Stick Duo" media cannot be played back on this camera, view...
... images recorded with the write-protect switch, and the switch is damaged. Leave the camera in a slideshow. No images • No images that can be used in Folder View mode (page 79). Table of the "Memory Stick Duo" media is dirty. • The "Memory Stick Duo" media is set to record movies. Delete the file on again. "Memory Stick" type error • The inserted "Memory Stick Duo" media cannot be played back on this camera, view...

Marketing Specifications
Page 1
....2 megapixel, backilluminated "Exmor R" CMOS image sensor. So now you take panoramic shots up to scroll through images by simply touching the display. You can be sure to create a single image of a second using simple folder or calendar viewing modes • Function Guide helps explain menus and settings • Intuitive touch screen operation (Flick, Drag & Drop) • Card slot for uploading to an amazing 185 degrees. DSC-TX1 10.2 MP | 4x OPTICAL ZOOM | 3.0" TOUCH SCREEN...
....2 megapixel, backilluminated "Exmor R" CMOS image sensor. So now you take panoramic shots up to scroll through images by simply touching the display. You can be sure to create a single image of a second using simple folder or calendar viewing modes • Function Guide helps explain menus and settings • Intuitive touch screen operation (Flick, Drag & Drop) • Card slot for uploading to an amazing 185 degrees. DSC-TX1 10.2 MP | 4x OPTICAL ZOOM | 3.0" TOUCH SCREEN...

Marketing Specifications
Page 2
... DSC-TX1 T-SERIES Digital Still Camera Specifications General Camera Type Image Device Effective Pixels Resolution Processor Optics & Lens Lens Type Lens Construction Aperture Range Focal Length 35mm Equivalency Optical Zoom Digital Zoom Total Zoom LCD & Viewfinder LCD Type Viewfinder Recording Media Slot Still Images Video Microphone / Speaker Focus Focus Intelligent Auto Focus Macro Mode Exposure Exposure Metering Exposure Compensation ISO Backlight Correction HDR Dynamic Range Optimizer White Balance Shutter Shutter Speed Burst Mode Flash Flash Type Flash Effective...
... DSC-TX1 T-SERIES Digital Still Camera Specifications General Camera Type Image Device Effective Pixels Resolution Processor Optics & Lens Lens Type Lens Construction Aperture Range Focal Length 35mm Equivalency Optical Zoom Digital Zoom Total Zoom LCD & Viewfinder LCD Type Viewfinder Recording Media Slot Still Images Video Microphone / Speaker Focus Focus Intelligent Auto Focus Macro Mode Exposure Exposure Metering Exposure Compensation ISO Backlight Correction HDR Dynamic Range Optimizer White Balance Shutter Shutter Speed Burst Mode Flash Flash Type Flash Effective...


