
Instruction Manual
Page 1
Operating Instructions Before operating the unit, please read "Cybershot Handbook" (PDF) and "Cyber-shot Step-up Guide" on advanced operations, please read this manual thoroughly, and retain it for future reference. © 2007 Sony Corporation 3-219-483-11(1) Digital Still Camera Instruction Manual GB DSC-T70/T75/T200 For details on the CD-ROM (supplied) using a computer.
Operating Instructions Before operating the unit, please read "Cybershot Handbook" (PDF) and "Cyber-shot Step-up Guide" on advanced operations, please read this manual thoroughly, and retain it for future reference. © 2007 Sony Corporation 3-219-483-11(1) Digital Still Camera Instruction Manual GB DSC-T70/T75/T200 For details on the CD-ROM (supplied) using a computer.
Instruction Manual
Page 7
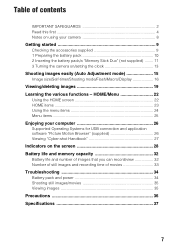
...Learning the various functions - HOME/Menu 22 Using the HOME screen 22 HOME items 23 Using the menu items 24 Menu items 25 Enjoying your camera 8 Getting started 9 Checking the accessories supplied 9 1 Preparing the battery pack 10 2 Inserting the battery pack/a "Memory Stick Duo" (not supplied) ........... 11 3 Turning the camera on the screen 28 Battery life and memory capacity 32 Battery life and number of images that you can record/view 32 Number of still ...
...Learning the various functions - HOME/Menu 22 Using the HOME screen 22 HOME items 23 Using the menu items 24 Menu items 25 Enjoying your camera 8 Getting started 9 Checking the accessories supplied 9 1 Preparing the battery pack 10 2 Inserting the battery pack/a "Memory Stick Duo" (not supplied) ........... 11 3 Turning the camera on the screen 28 Battery life and memory capacity 32 Battery life and number of images that you can record/view 32 Number of still ...
Instruction Manual
Page 8
...and an inability to record images, this manual are of DSC-T200 unless noted otherwise. 8 Always protect your data by JEITA (Japan Electronics and Information Technology Industries Association). • Playback of images recorded with your camera on other equipment and playback of images recorded or edited...recording The contents of the recording cannot be compensated for if recording or playback is not possible due to a malfunction of your camera or recording media, etc. [ On illustrations Illustrations used in this may cause malfunctions. • If moisture condensation occurs, remove ...
...and an inability to record images, this manual are of DSC-T200 unless noted otherwise. 8 Always protect your data by JEITA (Japan Electronics and Information Technology Industries Association). • Playback of images recorded with your camera on other equipment and playback of images recorded or edited...recording The contents of the recording cannot be compensated for if recording or playback is not possible due to a malfunction of your camera or recording media, etc. [ On illustrations Illustrations used in this may cause malfunctions. • If moisture condensation occurs, remove ...
Instruction Manual
Page 9
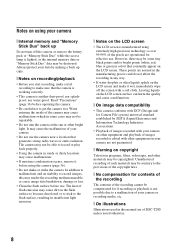
...and Canada) • USB, A/V cable for multi-use terminal (1) • Rechargeable battery pack NP-BD1 (1)/ Battery case (1) • HD Output Adaptor Cable (1) (DSC-T75 only) • Paint pen (1) • Wrist strap (1) • CD-ROM (Cyber-shot application software/ "Cyber-shot Handbook"/"Cyber-shot Step-up Guide") ... still images with the paint pen. • Attach the paint pen to prevent the camera from Hook damage by holding the paint pen. Hook 9 About the wrist strap DSC-T70/T75 DSC-T200 Attach the strap and place your hand through the loop to the wrist strap (shown ...
...and Canada) • USB, A/V cable for multi-use terminal (1) • Rechargeable battery pack NP-BD1 (1)/ Battery case (1) • HD Output Adaptor Cable (1) (DSC-T75 only) • Paint pen (1) • Wrist strap (1) • CD-ROM (Cyber-shot application software/ "Cyber-shot Handbook"/"Cyber-shot Step-up Guide") ... still images with the paint pen. • Attach the paint pen to prevent the camera from Hook damage by holding the paint pen. Hook 9 About the wrist strap DSC-T70/T75 DSC-T200 Attach the strap and place your hand through the loop to the wrist strap (shown ...

Instruction Manual
Page 11
... way in until it clicks. 3 Insert the battery pack. 4 Close the battery/"Memory Stick Duo" cover. [ When there is no "Memory Stick Duo" inserted The camera records/plays back images using the internal memory (approx. 31 MB). 11 Battery eject lever Align the v mark of the battery slot with the terminal...
... way in until it clicks. 3 Insert the battery pack. 4 Close the battery/"Memory Stick Duo" cover. [ When there is no "Memory Stick Duo" inserted The camera records/plays back images using the internal memory (approx. 31 MB). 11 Battery eject lever Align the v mark of the battery slot with the terminal...
Instruction Manual
Page 12
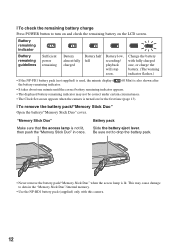
Slide the battery eject lever. This may not be correct under certain circumstances. • The Clock Set screen appears when the camera is turned on the LCD screen. "Memory Stick Duo" Battery pack Make sure that the access lamp is lit. Battery remaining indicator Battery remaining guidelines ... lit, then push the "Memory Stick Duo" in the "Memory Stick Duo"/internal memory. • Use the NP-BD1 battery pack (supplied) only with this camera. 12
Slide the battery eject lever. This may not be correct under certain circumstances. • The Clock Set screen appears when the camera is turned on the LCD screen. "Memory Stick Duo" Battery pack Make sure that the access lamp is lit. Battery remaining indicator Battery remaining guidelines ... lit, then push the "Memory Stick Duo" in the "Memory Stick Duo"/internal memory. • Use the NP-BD1 battery pack (supplied) only with this camera. 12

Instruction Manual
Page 13
..., touch [?] again. • When you want to the previous screen by touching [BACK]. • Touching [?] displays the guide about the touched item. To hide this camera by lightly touching the buttons or icons on the screen with your finger off the screen will momentarily disappear. 3 Turning the... camera on/setting the clock POWER button Touch panel Lens Lens cover 1 Press the POWER button or slide the lens cover downward. 2 Set the clock by ...
..., touch [?] again. • When you want to the previous screen by touching [BACK]. • Touching [?] displays the guide about the touched item. To hide this camera by lightly touching the buttons or icons on the screen with your finger off the screen will momentarily disappear. 3 Turning the... camera on/setting the clock POWER button Touch panel Lens Lens cover 1 Press the POWER button or slide the lens cover downward. 2 Set the clock by ...

Instruction Manual
Page 14
[ To set the date and time again Touch [HOME], then touch (Settings) t [ Clock Settings] (pages 22, 23). [ When you turn on the power • Once the battery is inserted in the camera, it may take time before operation becomes possible. • If the camera is running on battery power and you do not operate the camera for about three minutes, the camera turns off automatically to prevent wearing down the battery pack (Auto power-off function). 14
[ To set the date and time again Touch [HOME], then touch (Settings) t [ Clock Settings] (pages 22, 23). [ When you turn on the power • Once the battery is inserted in the camera, it may take time before operation becomes possible. • If the camera is running on battery power and you do not operate the camera for about three minutes, the camera turns off automatically to prevent wearing down the battery pack (Auto power-off function). 14
Instruction Manual
Page 15
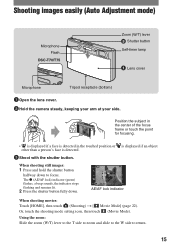
Shooting images easily (Auto Adjustment mode) Microphone Flash DSC-T70/T75 Zoom (W/T) lever Shutter button Self-timer lamp Lens cover Microphone Tripod receptacle (bottom) 1 Open the lens cover. 2 Hold the camera steady, keeping your arm at your side. Position the subject in the center of the focus frame or touch the point for...
Shooting images easily (Auto Adjustment mode) Microphone Flash DSC-T70/T75 Zoom (W/T) lever Shutter button Self-timer lamp Lens cover Microphone Tripod receptacle (bottom) 1 Open the lens cover. 2 Hold the camera steady, keeping your arm at your side. Position the subject in the center of the focus frame or touch the point for...
Instruction Manual
Page 17
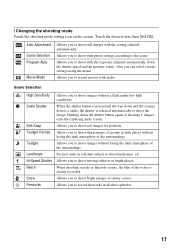
... shoot images without losing the dark atmosphere of snowy scenes. When shooting seaside or lakeside scenes, the blue of the surroundings. Holding down and the camera detects a smile, the shutter is clearly recorded. Focuses only on the screen. [ Changing the shooting mode Touch the shooting mode setting icon on a distant subject...
... shoot images without losing the dark atmosphere of snowy scenes. When shooting seaside or lakeside scenes, the blue of the surroundings. Holding down and the camera detects a smile, the shutter is clearly recorded. Focuses only on the screen. [ Changing the shooting mode Touch the shooting mode setting icon on a distant subject...

Instruction Manual
Page 19
... images DSC-T70/T75 (Playback) button Zoom (W/T) lever Speaker Speaker Multi connector (bottom) 1 Press (Playback) button. To switch to the shooting mode, press (Playback) again. 2 Touch (previous) / (next) on /off , the camera is displayed to zoom 19 Stop: Touch x. [ To delete images 1 Display the image you press (Playback) when the camera is powered...
... images DSC-T70/T75 (Playback) button Zoom (W/T) lever Speaker Speaker Multi connector (bottom) 1 Press (Playback) button. To switch to the shooting mode, press (Playback) again. 2 Touch (previous) / (next) on /off , the camera is displayed to zoom 19 Stop: Touch x. [ To delete images 1 Display the image you press (Playback) when the camera is powered...

Instruction Manual
Page 20
.... To the multi connector To audio/video input jacks Cable for multi-use terminal When viewing on a high definition TV, an HD output adaptor cable (DSC-T75 only) is displayed. 2 Touch the thumbnail images to add a check mark to 16:9, the images will be shown in a full-screen display. &#... images in index mode, you can also access the index screen by selecting [ Image Index] in screen. (View Images) on TV screen Connect the camera to delete. If you shoot with the cable for multi-use terminal (supplied). Touch / to display the index screen. To cancel the deletion, touch ...
.... To the multi connector To audio/video input jacks Cable for multi-use terminal When viewing on a high definition TV, an HD output adaptor cable (DSC-T75 only) is displayed. 2 Touch the thumbnail images to add a check mark to 16:9, the images will be shown in a full-screen display. &#... images in index mode, you can also access the index screen by selecting [ Image Index] in screen. (View Images) on TV screen Connect the camera to delete. If you shoot with the cable for multi-use terminal (supplied). Touch / to display the index screen. To cancel the deletion, touch ...

Instruction Manual
Page 21
COMPONENT VIDEO IN AUDIO To the multi connector Green/Blue/Red White/Red HD Output Adaptor Cable (DSC-T75 only) • The cable for video jacks (Green/Blue/Red) is the same color as the respective jacks. 21 Connect the camera to the HDTV with the HD Output Adaptor Cable (DSC-T75 only).
COMPONENT VIDEO IN AUDIO To the multi connector Green/Blue/Red White/Red HD Output Adaptor Cable (DSC-T75 only) • The cable for video jacks (Green/Blue/Red) is the same color as the respective jacks. 21 Connect the camera to the HDTV with the HD Output Adaptor Cable (DSC-T75 only).

Instruction Manual
Page 22
... screen is functional only when you want to display the HOME screen. Learning the various functions - You can access this screen regardless of whether the camera is in the category you want to set. [ When you select the (Manage Memory) or (Settings) category 1 Touch the category you want to change, ... in shooting mode or playback mode. 1Touch [HOME] to change the settings. • This is the gateway screen for all the functions of your camera. Touch v/V to display the other setting items. 3 Touch the setting item that you select (Settings). 2 Touch the desired setting item.
... screen is functional only when you want to display the HOME screen. Learning the various functions - You can access this screen regardless of whether the camera is in the category you want to set. [ When you select the (Manage Memory) or (Settings) category 1 Touch the category you want to change, ... in shooting mode or playback mode. 1Touch [HOME] to change the settings. • This is the gateway screen for all the functions of your camera. Touch v/V to display the other setting items. 3 Touch the setting item that you select (Settings). 2 Touch the desired setting item.
Instruction Manual
Page 26
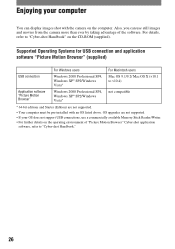
Enjoying your OS does not support USB connections, use still images and movies from the camera more than ever by taking advantage of "Picture Motion Browser" Cyber-shot application software, refer to v10.4) Application software "Picture Motion Browser" Windows ...XP* SP2/Windows Vista* not compatible * 64-bit editions and Starter (Edition) are not supported. • Your computer must be pre-installed with the camera on the computer. For details, refer to "Cyber-shot Handbook" on the operating environment of the software. Supported Operating Systems for USB connection and application...
Enjoying your OS does not support USB connections, use still images and movies from the camera more than ever by taking advantage of "Picture Motion Browser" Cyber-shot application software, refer to v10.4) Application software "Picture Motion Browser" Windows ...XP* SP2/Windows Vista* not compatible * 64-bit editions and Starter (Edition) are not supported. • Your computer must be pre-installed with the camera on the computer. For details, refer to "Cyber-shot Handbook" on the operating environment of the software. Supported Operating Systems for USB connection and application...
Instruction Manual
Page 27
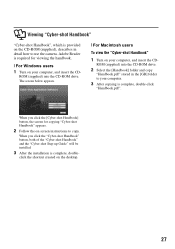
ROM (supplied) into the CD-ROM drive. 2 Select the [Handbook] folder and copy "Handbook.pdf" stored in detail how to use the camera. When you click the "Cyber-shot Handbook" button, both of the "Cyber-shot Handbook" and the "Cyber-shot Step-up Guide" will be installed. 3 After ...
ROM (supplied) into the CD-ROM drive. 2 Select the [Handbook] folder and copy "Handbook.pdf" stored in detail how to use the camera. When you click the "Cyber-shot Handbook" button, both of the "Cyber-shot Handbook" and the "Cyber-shot Step-up Guide" will be installed. 3 After ...

Instruction Manual
Page 32
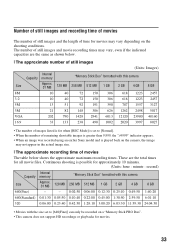
...- of Images Approx. 4200 Approx. 4400 • Viewing single images in order at an ambient temperature of Images DSC-T200 Approx. 125 Approx. 250 DSC-T70/T75 Approx. 135 Approx. 270 • Shooting in the table depending on the battery • Battery capacity...Camera & Imaging Products Association) • The battery life/number of images does not change, regardless of LCD Backlight is set to up. - [AF Mode] is set to [Monitor]. - [SteadyShot] is set to [Shooting]. - The flash strobes once every two times. - The brightness of image size. [ When viewing still images DSC-T200 DSC...
...- of Images Approx. 4200 Approx. 4400 • Viewing single images in order at an ambient temperature of Images DSC-T200 Approx. 125 Approx. 250 DSC-T70/T75 Approx. 135 Approx. 270 • Shooting in the table depending on the battery • Battery capacity...Camera & Imaging Products Association) • The battery life/number of images does not change, regardless of LCD Backlight is set to up. - [AF Mode] is set to [Monitor]. - [SteadyShot] is set to [Shooting]. - The flash strobes once every two times. - The brightness of image size. [ When viewing still images DSC-T200 DSC...
Instruction Manual
Page 33
...on the shooting conditions. Continuous shooting is possible for approximately 10 minutes. (Units: hour : minute : second) Internal Capacity memory "Memory Stick Duo" formatted with this camera Size Approx. 31 MB 128 MB 256 MB 512 MB 1 GB 2 GB 4 GB 8 GB 640(Fine) - - 0:02:50 0:06:00 0:12:...the ">9999" indicator appears. • When an image was recorded using an earlier Sony model and is played back on the camera, the image may vary depending on a "Memory Stick PRO Duo". • This camera does not support HD recordings or playbacks for all movie files. These are the same...
...on the shooting conditions. Continuous shooting is possible for approximately 10 minutes. (Units: hour : minute : second) Internal Capacity memory "Memory Stick Duo" formatted with this camera Size Approx. 31 MB 128 MB 256 MB 512 MB 1 GB 2 GB 4 GB 8 GB 640(Fine) - - 0:02:50 0:06:00 0:12:...the ">9999" indicator appears. • When an image was recorded using an earlier Sony model and is played back on the camera, the image may vary depending on a "Memory Stick PRO Duo". • This camera does not support HD recordings or playbacks for all movie files. These are the same...
Instruction Manual
Page 34
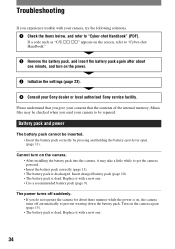
...camera powered. • Insert the battery pack correctly (page 11). • The battery pack is dead. Cannot turn on the camera. • After installing the battery pack into the camera..., it may be checked when you send your consent that you give your camera... settings (page 23). 4 Consult your camera, try the following solutions. 1 Check the... Troubleshooting If you do not operate the camera for about one . • Use a ... The battery pack is discharged. Turn on the camera again (page 13). • The battery pack...
...camera powered. • Insert the battery pack correctly (page 11). • The battery pack is dead. Cannot turn on the camera. • After installing the battery pack into the camera..., it may be checked when you send your consent that you give your camera... settings (page 23). 4 Consult your camera, try the following solutions. 1 Check the... Troubleshooting If you do not operate the camera for about one . • Use a ... The battery pack is discharged. Turn on the camera again (page 13). • The battery pack...
Instruction Manual
Page 35
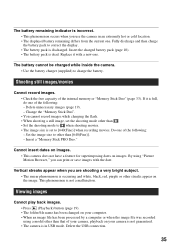
...8226; The smear phenomenon is in an extremely hot or cold location. • The displayed battery remaining differs from the current one of your camera, playback on your computer. • When an image file has been processed by a computer or when the image file was recorded using "Picture... other than . • Set the shooting mode to [640(Fine)] when recording movies. Do one . The battery cannot be charged while inside the camera. • Use the battery charger (supplied) to correct the display. • The battery pack is incorrect. • This phenomenon occurs when you ...
...8226; The smear phenomenon is in an extremely hot or cold location. • The displayed battery remaining differs from the current one of your camera, playback on your computer. • When an image file has been processed by a computer or when the image file was recorded using "Picture... other than . • Set the shooting mode to [640(Fine)] when recording movies. Do one . The battery cannot be charged while inside the camera. • Use the battery charger (supplied) to correct the display. • The battery pack is incorrect. • This phenomenon occurs when you ...


