
Instruction Manual
Page 2
... ac power cord plug (a plug having one blade wider than the other sources, refer to the presence of important operating and maintenance (servicing) instructions in fire or electric shock. [ Object and Liquid Entry Never push objects of any kind on the marking label. For those sets designed to operate from the type of power source indicated on the set through openings as...
... ac power cord plug (a plug having one blade wider than the other sources, refer to the presence of important operating and maintenance (servicing) instructions in fire or electric shock. [ Object and Liquid Entry Never push objects of any kind on the marking label. For those sets designed to operate from the type of power source indicated on the set through openings as...
Instruction Manual
Page 3
.... Improper adjustment of the set may result in safe operating condition. 3 Never block the slots and openings by being dropped, or the cabinet has been damaged. - Do not use power-line operated sets near or over a radiator or heat register, or where it is exposed to qualified service personnel. [ Replacement parts When replacement parts are required, be blocked or covered. - Use a cloth lightly dampened with...
.... Improper adjustment of the set may result in safe operating condition. 3 Never block the slots and openings by being dropped, or the cabinet has been damaged. - Do not use power-line operated sets near or over a radiator or heat register, or where it is exposed to qualified service personnel. [ Replacement parts When replacement parts are required, be blocked or covered. - Use a cloth lightly dampened with...
Instruction Manual
Page 5
... interface cable must be used in accordance with the limits set out in the EMC Directive for using connection cables shorter than 3 meters (9.8 feet). [ Attention The electromagnetic fields at the specific frequencies may influence the picture and sound of this unit. [ Notice If static electricity or electromagnetism causes data transfer to discontinue midway (fail), restart the application or disconnect and connect the communication cable (USB, etc...
... interface cable must be used in accordance with the limits set out in the EMC Directive for using connection cables shorter than 3 meters (9.8 feet). [ Attention The electromagnetic fields at the specific frequencies may influence the picture and sound of this unit. [ Notice If static electricity or electromagnetism causes data transfer to discontinue midway (fail), restart the application or disconnect and connect the communication cable (USB, etc...
Instruction Manual
Page 7
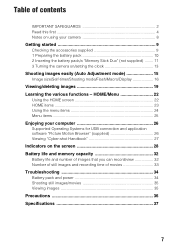
... 11 3 Turning the camera on the screen 28 Battery life and memory capacity 32 Battery life and number of images that you can record/view 32 Number of still images and recording time of contents IMPORTANT SAFEGUARDS 2 Read this first 4 Notes on using your computer 26 Supported Operating Systems for USB connection and application software "Picture Motion Browser" (supplied 26 Viewing "Cyber-shot Handbook 27 Indicators on /setting the clock 13 Shooting images easily (Auto Adjustment mode 15 Image size/Self-timer/Shooting mode/Flash/Macro/Display 16 Viewing/deleting images 19...
... 11 3 Turning the camera on the screen 28 Battery life and memory capacity 32 Battery life and number of images that you can record/view 32 Number of still images and recording time of contents IMPORTANT SAFEGUARDS 2 Read this first 4 Notes on using your computer 26 Supported Operating Systems for USB connection and application software "Picture Motion Browser" (supplied 26 Viewing "Cyber-shot Handbook 27 Indicators on /setting the clock 13 Shooting images easily (Auto Adjustment mode 15 Image size/Self-timer/Shooting mode/Flash/Macro/Display 16 Viewing/deleting images 19...
Instruction Manual
Page 8
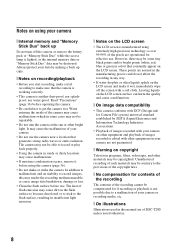
... black points and/or bright points (white, red, blue or green in some cases may not be destroyed. Read "Precautions" (page 36) before operating the camera. • Be careful not to make it before use. Leaving liquids on the LCD screen and make sure that the camera is working correctly. • This camera is lighted, as the internal memory data or "Memory Stick Duo" data may be able to record images, this manual...
... black points and/or bright points (white, red, blue or green in some cases may not be destroyed. Read "Precautions" (page 36) before operating the camera. • Be careful not to make it before use. Leaving liquids on the LCD screen and make sure that the camera is working correctly. • This camera is lighted, as the internal memory data or "Memory Stick Duo" data may be able to record images, this manual...
Instruction Manual
Page 12
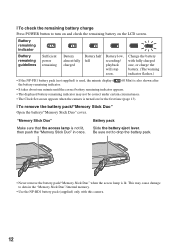
... Clock Set screen appears when the camera is lit. Battery remaining indicator Battery remaining guidelines Sufficient power remaining Battery almost fully charged Battery half full Battery low, recording/ playback will stop soon. [ To check the remaining battery charge Press POWER button to data in once. Be sure not to drop the battery pack. • Never remove the battery pack/"Memory Stick Duo" when the access lamp is turned on the LCD screen. Change the battery with this camera...
... Clock Set screen appears when the camera is lit. Battery remaining indicator Battery remaining guidelines Sufficient power remaining Battery almost fully charged Battery half full Battery low, recording/ playback will stop soon. [ To check the remaining battery charge Press POWER button to data in once. Be sure not to drop the battery pack. • Never remove the battery pack/"Memory Stick Duo" when the access lamp is turned on the LCD screen. Change the battery with this camera...

Instruction Manual
Page 16
... screen display [ Changing the image size Touch the image size setting icon on the screen. Self-Timer Off ( ): Not using the self-timer Self-Timer 10sec ( ): Setting the 10-second delay self-timer Self-Timer 2sec ( ): Setting the 2-second delay self-timer Press the shutter button, the self-timer lamp flashes, and a beep sounds until the shutter operates. 16 Image size/Self-timer/Shooting mode/Flash/Macro/Display A Changing the image size B Using the self-timer C Changing the shooting mode D Selecting a flash mode for e-mail attachments [ Using the self-timer Touch the self-timer setting...
... screen display [ Changing the image size Touch the image size setting icon on the screen. Self-Timer Off ( ): Not using the self-timer Self-Timer 10sec ( ): Setting the 10-second delay self-timer Self-Timer 2sec ( ): Setting the 2-second delay self-timer Press the shutter button, the self-timer lamp flashes, and a beep sounds until the shutter operates. 16 Image size/Self-timer/Shooting mode/Flash/Macro/Display A Changing the image size B Using the self-timer C Changing the shooting mode D Selecting a flash mode for e-mail attachments [ Using the self-timer Touch the self-timer setting...
Instruction Manual
Page 17
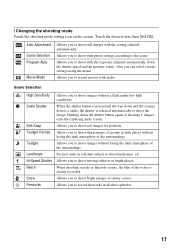
... various settings using the menu. Allows you to shoot bright images of the surroundings. Allows you to shoot images without losing the dark atmosphere of snowy scenes. Allows you to record fireworks in bright places. When the shutter button is clearly recorded. Allows you to shoot still images with audio. Auto Adjustment Scene Selection Program Auto Movie Mode Allows you to record movies with the setting adjusted automatically. [ Changing the shooting mode Touch the shooting mode setting icon on...
... various settings using the menu. Allows you to shoot bright images of the surroundings. Allows you to shoot images without losing the dark atmosphere of snowy scenes. Allows you to record fireworks in bright places. When the shutter button is clearly recorded. Allows you to shoot still images with audio. Auto Adjustment Scene Selection Program Auto Movie Mode Allows you to record movies with the setting adjusted automatically. [ Changing the shooting mode Touch the shooting mode setting icon on...
Instruction Manual
Page 18
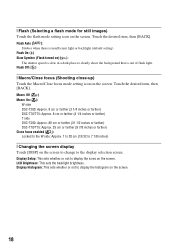
... change to display the histogram on the screen. Flash Off ( ) [ Macro/Close focus (Shooting close-up) Touch the Macro/Close focus mode setting icon on the screen. Touch the desired item, then [BACK]. Display Histogram: This sets whether or not to the display selection screen. Touch the desired item, then [BACK]. Flash Auto ( ): Strobes when there is insufficient light or backlight (default setting) Flash On ( ) Slow Synchro (Flash forced on) ( ): The shutter speed is out of flash light. Display Setup...
... change to display the histogram on the screen. Flash Off ( ) [ Macro/Close focus (Shooting close-up) Touch the Macro/Close focus mode setting icon on the screen. Touch the desired item, then [BACK]. Display Histogram: This sets whether or not to the display selection screen. Touch the desired item, then [BACK]. Flash Auto ( ): Strobes when there is insufficient light or backlight (default setting) Flash On ( ) Slow Synchro (Flash forced on) ( ): The shutter speed is out of flash light. Display Setup...

Instruction Manual
Page 19
... the image with / . To switch to the shooting mode, press (Playback) again. 2 Touch (previous) / (next) on /off , the camera is displayed to playback mode. The volume control bar disappears. Touch out. Movie: Touch B to select an image. Viewing/deleting images DSC-T70/T75 (Playback) button Zoom (W/T) lever Speaker Speaker Multi connector (bottom) 1 Press (Playback) button. Fast forward/Rewind: m/M (Touch B or x to return to zoom 19 to normal playback.) Volume control:Touch , then adjust the volume with the zoom (W/T) lever...
... the image with / . To switch to the shooting mode, press (Playback) again. 2 Touch (previous) / (next) on /off , the camera is displayed to playback mode. The volume control bar disappears. Touch out. Movie: Touch B to select an image. Viewing/deleting images DSC-T70/T75 (Playback) button Zoom (W/T) lever Speaker Speaker Multi connector (bottom) 1 Press (Playback) button. Fast forward/Rewind: m/M (Touch B or x to return to zoom 19 to normal playback.) Volume control:Touch , then adjust the volume with the zoom (W/T) lever...

Instruction Manual
Page 20
... touch [OK]. • To delete all the images in a folder, select (All In This Folder) from (Delete) in a full-screen display. • Movies cannot be shown in the menu screen, then touch [OK]. [ To play back a series of images (Slideshow) Touch . [ To view images on TV screen Connect the camera to the TV with the image size set the number of images displayed in the index screen. [ To delete images in index mode 1 Touch while the index...
... touch [OK]. • To delete all the images in a folder, select (All In This Folder) from (Delete) in a full-screen display. • Movies cannot be shown in the menu screen, then touch [OK]. [ To play back a series of images (Slideshow) Touch . [ To view images on TV screen Connect the camera to the TV with the image size set the number of images displayed in the index screen. [ To delete images in index mode 1 Touch while the index...

Instruction Manual
Page 23
... items are displayed on the screen by the guide. Folder Internal Memory Tool Format Main Settings Main Settings 1 Beep Initialize Housing Main Settings 2 USB Connect Video Out Shooting Settings Shooting Settings 1 AF Illuminator AF Mode Shooting Settings 2 Auto Orientation Smile Level Clock Settings Language Setting Format Music Create REC. Folder Copy Function Guide Calibration COMPONENT TV TYPE Grid Line Digital Zoom Auto Review 23 Category Shooting View Images Printing, Other Manage Memory Settings Items Auto Adjustment Scene Selection Program Auto Movie Mode Single Image Image Index...
... items are displayed on the screen by the guide. Folder Internal Memory Tool Format Main Settings Main Settings 1 Beep Initialize Housing Main Settings 2 USB Connect Video Out Shooting Settings Shooting Settings 1 AF Illuminator AF Mode Shooting Settings 2 Auto Orientation Smile Level Clock Settings Language Setting Format Music Create REC. Folder Copy Function Guide Calibration COMPONENT TV TYPE Grid Line Digital Zoom Auto Review 23 Category Shooting View Images Printing, Other Manage Memory Settings Items Auto Adjustment Scene Selection Program Auto Movie Mode Single Image Image Index...

Instruction Manual
Page 25
...) (Wide Zoom Display) (Slideshow) (Delete) (Protect) (Print) (Rotate) (Select Folder) (Volume Settings) Retouches still images. White Balance Adjusts the color tones. Flash Level Adjusts the amount of images. Setup Selects the shooting settings. Displays still images in 16:9. Plays back a series of flash light. Prints images using a PictBridge compliant printer. Red Eye Reduction Sets to usage. Adjusts the volume. 25 For details on the operation 1 page 24 Menu items The available menu items vary depending on the screen. EV Adjusts Exposure. Face Detection...
...) (Wide Zoom Display) (Slideshow) (Delete) (Protect) (Print) (Rotate) (Select Folder) (Volume Settings) Retouches still images. White Balance Adjusts the color tones. Flash Level Adjusts the amount of images. Setup Selects the shooting settings. Displays still images in 16:9. Plays back a series of flash light. Prints images using a PictBridge compliant printer. Red Eye Reduction Sets to usage. Adjusts the volume. 25 For details on the operation 1 page 24 Menu items The available menu items vary depending on the screen. EV Adjusts Exposure. Face Detection...

Instruction Manual
Page 28
...; Touching an icon displays the guide about the touched item. Displays the MENU screen. Flash mode settings Macro/Close focus settings Changes the screen display. Metering mode settings ISO number settings Exposure Value settings To hide this guide, touch [?] (page 13). Image size settings MENU B Display BACK DISP C Display 0.5m 1.0m 3.0m 7.0m 0EV Self-timer settings Shooting mode settings Shooting mode (Scene Selection) settings • Touch in the DSC-T70/T75 only. Indication AF mode/focus preset settings • [0.5m] is available in the shooting mode settings to select the...
...; Touching an icon displays the guide about the touched item. Displays the MENU screen. Flash mode settings Macro/Close focus settings Changes the screen display. Metering mode settings ISO number settings Exposure Value settings To hide this guide, touch [?] (page 13). Image size settings MENU B Display BACK DISP C Display 0.5m 1.0m 3.0m 7.0m 0EV Self-timer settings Shooting mode settings Shooting mode (Scene Selection) settings • Touch in the DSC-T70/T75 only. Indication AF mode/focus preset settings • [0.5m] is available in the shooting mode settings to select the...

Instruction Manual
Page 30
... Screen indicators 3 to the previous screen. Deletes the image. Displays the MENU screen. MENU Playbacks the slide show the current setting status. Returns to index mode. [ When playing back still images [ When playing back movies B Display BACK x N m M DISP Indication Backs to 5 show . Stop Playback Playback zoom Turns v/V/b/B on/off. C Display Indication Battery remaining Image size C:32:00 Check mark Print order (DPOF) mark Protect Playback zoom Self-diagnosis display 30 Adjusts the volume. Displays the previous/next image. Selects the playback folder...
... Screen indicators 3 to the previous screen. Deletes the image. Displays the MENU screen. MENU Playbacks the slide show the current setting status. Returns to index mode. [ When playing back still images [ When playing back movies B Display BACK x N m M DISP Indication Backs to 5 show . Stop Playback Playback zoom Turns v/V/b/B on/off. C Display Indication Battery remaining Image size C:32:00 Check mark Print order (DPOF) mark Protect Playback zoom Self-diagnosis display 30 Adjusts the volume. Displays the previous/next image. Selects the playback folder...

Instruction Manual
Page 31
D Display 8/8 12/12 E Display 125 F3.5 ISO400 +2.0EV Indication PictBridge connecting Playback Media ("Memory Stick Duo", internal memory) Playback folder Image number/Number of images recorded in selected folder PictBridge connecting Change folder Recording folder Indication Low battery warning Shutter speed Aperture value ISO number Exposure Value Metering mode Flash White balance N 0:00:00 101-0012 2007 1 1 9:30 AM Playback Playback bar Counter Folder-file number Recorded date/time of the playback image Histogram • appears when histogram display is disabled. 31
D Display 8/8 12/12 E Display 125 F3.5 ISO400 +2.0EV Indication PictBridge connecting Playback Media ("Memory Stick Duo", internal memory) Playback folder Image number/Number of images recorded in selected folder PictBridge connecting Change folder Recording folder Indication Low battery warning Shutter speed Aperture value ISO number Exposure Value Metering mode Flash White balance N 0:00:00 101-0012 2007 1 1 9:30 AM Playback Playback bar Counter Folder-file number Recorded date/time of the playback image Histogram • appears when histogram display is disabled. 31

Instruction Manual
Page 32
...: - The Face Detect function is used frequently. - of LCD Backlight is set to up. - [AF Mode] is set to [Monitor]. - [SteadyShot] is set to [Shooting]. - The flash is activated. 32 The numbers of images that can be recorded/ viewed and the battery life are decreased under the following situations: - [REC Mode] is set to [Normal]. - [AF Mode] is set to [Continuous]. - The zoom is used frequently. - The zoom is switched alternately between the...
...: - The Face Detect function is used frequently. - of LCD Backlight is set to up. - [AF Mode] is set to [Monitor]. - [SteadyShot] is set to [Shooting]. - The flash is activated. 32 The numbers of images that can be recorded/ viewed and the battery life are decreased under the following situations: - [REC Mode] is set to [Normal]. - [AF Mode] is set to [Continuous]. - The zoom is used frequently. - The zoom is switched alternately between the...
Instruction Manual
Page 35
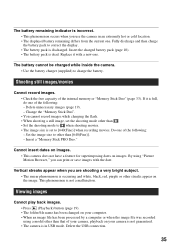
... occurring and white, black, red, purple or other than [640(Fine)]. - Delete the USB connection. 35 Do one of the internal memory or "Memory Stick Duo" (page 33). The battery remaining indicator is incorrect. • This phenomenon occurs when you use the camera in USB mode. Viewing images Cannot play back images. • Press (Playback) button (page 19). • The folder/file name has been changed on your computer. • When an image file has been...
... occurring and white, black, red, purple or other than [640(Fine)]. - Delete the USB connection. 35 Do one of the internal memory or "Memory Stick Duo" (page 33). The battery remaining indicator is incorrect. • This phenomenon occurs when you use the camera in USB mode. Viewing images Cannot play back images. • Press (Playback) button (page 19). • The folder/file name has been changed on your computer. • When an image file has been...
Instruction Manual
Page 36
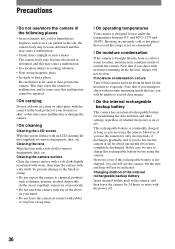
... 24 hours or more with the power off the camera and wait about one month it discharges gradually, and if you shoot with moisture remaining inside the lens, images will not be unable to let sand or dust get into the camera. Charging method of the internal rechargeable backup battery Insert charged battery pack in some cases this rechargeable battery before using the camera.
... 24 hours or more with the power off the camera and wait about one month it discharges gradually, and if you shoot with moisture remaining inside the lens, images will not be unable to let sand or dust get into the camera. Charging method of the internal rechargeable backup battery Insert charged battery pack in some cases this rechargeable battery before using the camera.
Instruction Manual
Page 37
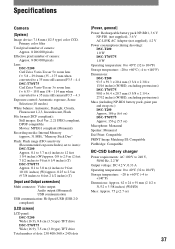
... Vario-Tessar 3× zoom lens f = 6.33 - 19.0 mm (38 - 114 mm when converted to a 35 mm still camera)F3.5 - 4.3 Exposure control: Automatic exposure, Scene Selection (10 modes) White balance: Automatic, Daylight, Cloudy, Fluorescent 1,2,3, Incandescent, Flash File format (DCF compliant): Still images: Exif Ver. 2.21 JPEG compliant, DPOF compatible Movies: MPEG1 compliant (Monaural) Recording media: Internal Memory (approx. 31 MB), "Memory Stick Duo" Flash: Flash range (ISO sensitivity (Recommended exposure Index) set to Auto): DSC-T200 Approx. 0.1 to...
... Vario-Tessar 3× zoom lens f = 6.33 - 19.0 mm (38 - 114 mm when converted to a 35 mm still camera)F3.5 - 4.3 Exposure control: Automatic exposure, Scene Selection (10 modes) White balance: Automatic, Daylight, Cloudy, Fluorescent 1,2,3, Incandescent, Flash File format (DCF compliant): Still images: Exif Ver. 2.21 JPEG compliant, DPOF compatible Movies: MPEG1 compliant (Monaural) Recording media: Internal Memory (approx. 31 MB), "Memory Stick Duo" Flash: Flash range (ISO sensitivity (Recommended exposure Index) set to Auto): DSC-T200 Approx. 0.1 to...


