Instruction Manual
Page 3
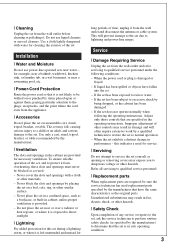
... lightly dampened with a cloth or other materials. - To ensure reliable operation of the set , and to lightning and power-line surges. Service [ Damage Requiring Service Unplug the set due to protect it from overheating, these slots and openings must never be blocked or covered. - Adjust only those controls that are provided for necessary ventilation. Do not use power-line operated sets near a swimming pool, etc. [ Power-Cord Protection...
... lightly dampened with a cloth or other materials. - To ensure reliable operation of the set , and to lightning and power-line surges. Service [ Damage Requiring Service Unplug the set due to protect it from overheating, these slots and openings must never be blocked or covered. - Adjust only those controls that are provided for necessary ventilation. Do not use power-line operated sets near a swimming pool, etc. [ Power-Cord Protection...
Instruction Manual
Page 7
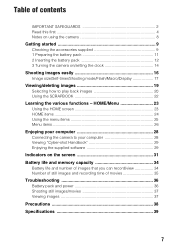
... Viewing "Cyber-shot Handbook 29 Enjoying the supplied software 29 Indicators on the screen 31 Battery life and memory capacity 34 Battery life and number of images that you can record/view 34 Number of still images and recording time of contents IMPORTANT SAFEGUARDS 2 Read this first 4 Notes on using the camera 8 Getting started 9 Checking the accessories supplied 9 1 Preparing the battery pack 11 2 Inserting the battery pack 12 3 Turning the camera on/setting the clock 14 Shooting images easily 16 Image size/Self-timer/Shooting mode/Flash/Macro/Display...
... Viewing "Cyber-shot Handbook 29 Enjoying the supplied software 29 Indicators on the screen 31 Battery life and memory capacity 34 Battery life and number of images that you can record/view 34 Number of still images and recording time of contents IMPORTANT SAFEGUARDS 2 Read this first 4 Notes on using the camera 8 Getting started 9 Checking the accessories supplied 9 1 Preparing the battery pack 11 2 Inserting the battery pack 12 3 Turning the camera on/setting the clock 14 Shooting images easily 16 Image size/Self-timer/Shooting mode/Flash/Macro/Display...

Instruction Manual
Page 8
... record or loss or damage of recorded content due to the flash surface, resulting in sandy or dusty locations may be contrary to record images. It may cause a malfunction and you start recording, make a trial recording to make a backup copy to water. Be sure to make sure that other equipment will play back images. • Using the camera in insufficient light emission. [ Notes on the LCD screen • The LCD screen...
... record or loss or damage of recorded content due to the flash surface, resulting in sandy or dusty locations may be contrary to record images. It may cause a malfunction and you start recording, make a trial recording to make a backup copy to water. Be sure to make sure that other equipment will play back images. • Using the camera in insufficient light emission. [ Notes on the LCD screen • The LCD screen...
Instruction Manual
Page 12
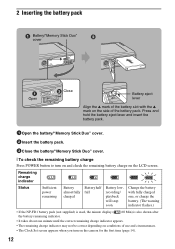
... battery charge Press POWER button to turn on the camera for the first time (page 14). 12 Change the battery with the v mark on the LCD screen. Remaining charge indicator Status Sufficient power remaining Battery almost fully charged Battery half full Battery low, recording/ playback will stop soon. 2 Inserting the battery pack Battery/"Memory Stick Duo" cover Open Close Battery eject lever Align the v mark of the battery slot with fully charged one, or charge the battery. (The warning indicator flashes...
... battery charge Press POWER button to turn on the camera for the first time (page 14). 12 Change the battery with the v mark on the LCD screen. Remaining charge indicator Status Sufficient power remaining Battery almost fully charged Battery half full Battery low, recording/ playback will stop soon. 2 Inserting the battery pack Battery/"Memory Stick Duo" cover Open Close Battery eject lever Align the v mark of the battery slot with fully charged one, or charge the battery. (The warning indicator flashes...

Instruction Manual
Page 17
...; 18 cm (5 × 7") Shoot at a small image size for e-mail attachment Shoot in HDTV aspect ratio Movie (Fine) Shoot high quality movie for display on TV Shoot standard quality movie (Standard) for display on TV Shoot at a small image size for e-mail attachments [ Using the self-timer Touch the self-timer setting icon on the screen. Image size/Self-timer/Shooting mode/Flash/Macro/Display A Changing the image size B Using the self-timer C Changing the shooting mode D Selecting a flash mode for still images E Shooting close-up to shoot images without a flash under low light conditions...
...; 18 cm (5 × 7") Shoot at a small image size for e-mail attachment Shoot in HDTV aspect ratio Movie (Fine) Shoot high quality movie for display on TV Shoot standard quality movie (Standard) for display on TV Shoot at a small image size for e-mail attachments [ Using the self-timer Touch the self-timer setting icon on the screen. Image size/Self-timer/Shooting mode/Flash/Macro/Display A Changing the image size B Using the self-timer C Changing the shooting mode D Selecting a flash mode for still images E Shooting close-up to shoot images without a flash under low light conditions...
Instruction Manual
Page 22
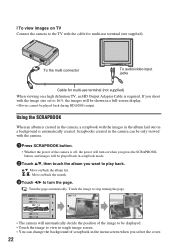
... change the background of scrapbook in the menu screen when you shoot with the image size set to the TV with the camera. 1Press SCRAPBOOK button. • Whether the power of the image to be displayed. • Touch the image to view in single image screen. • You can be only viewed with the cable for multi-use terminal (not supplied). To the multi connector To audio/video input jacks Cable...
... change the background of scrapbook in the menu screen when you shoot with the image size set to the TV with the camera. 1Press SCRAPBOOK button. • Whether the power of the image to be displayed. • Touch the image to view in single image screen. • You can be only viewed with the cable for multi-use terminal (not supplied). To the multi connector To audio/video input jacks Cable...

Instruction Manual
Page 27
...reservation to upload images on the Web. (Remove Sharemark) (Retouch) Retouches still images. (Paint) Paints on a still image and saves as a new image. (Slideshow) Plays back a series of images. (Delete) Deletes images. (Protect) Prevents accidental erasure. (Album View) Returns to Album screen. (Print) Prints images using a PictBridge compliant printer. (Rotate) Rotates a still image. (Import) Imports images from "Memory Stick Duo". (Export) Exports images to "Memory Stick Duo". (Select Folder) Selects the folder for viewing images. (Volume Settings) Adjusts the volume...
...reservation to upload images on the Web. (Remove Sharemark) (Retouch) Retouches still images. (Paint) Paints on a still image and saves as a new image. (Slideshow) Plays back a series of images. (Delete) Deletes images. (Protect) Prevents accidental erasure. (Album View) Returns to Album screen. (Print) Prints images using a PictBridge compliant printer. (Rotate) Rotates a still image. (Import) Imports images from "Memory Stick Duo". (Export) Exports images to "Memory Stick Duo". (Select Folder) Selects the folder for viewing images. (Volume Settings) Adjusts the volume...
Instruction Manual
Page 28
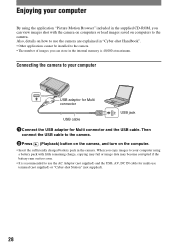
... and the USB cable. Then connect the USB cable to the camera. 2Press (Playback) button on the camera, and turn on computers to your computer USB adaptor for Multi connector USB cable USB jack 1Connect the USB adaptor for multi-use terminal (not supplied) or "Cyber-shot Station" (not supplied). 28 When you copy images to the camera. Enjoying your computer By using a battery pack with the camera on computers or load images saved on the...
... and the USB cable. Then connect the USB cable to the camera. 2Press (Playback) button on the camera, and turn on computers to your computer USB adaptor for Multi connector USB cable USB jack 1Connect the USB adaptor for multi-use terminal (not supplied) or "Cyber-shot Station" (not supplied). 28 When you copy images to the camera. Enjoying your computer By using a battery pack with the camera on computers or load images saved on the...

Instruction Manual
Page 29
... the supplied software [ Recommended environment for using "Picture Motion Browser", you to enjoy the still images and movies shot with the camera by each album and display them on the computer. • You can load images of computers to be installed. 3 After the installation is installed for copying "Cyber-shot Handbook" appears. 2 Follow the on the desktop. click the shortcut created on -screen instructions to install the software. 29 The screen below...
... the supplied software [ Recommended environment for using "Picture Motion Browser", you to enjoy the still images and movies shot with the camera by each album and display them on the computer. • You can load images of computers to be installed. 3 After the installation is installed for copying "Cyber-shot Handbook" appears. 2 Follow the on the desktop. click the shortcut created on -screen instructions to install the software. 29 The screen below...
Instruction Manual
Page 36
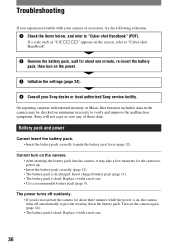
... settings (page 24). 4 Consult your camera or accessory, try the following solutions. 1 Check the items below, and refer to "Cyber-shot Handbook" (PDF). Replace it with a new one. 36 Troubleshooting If you do not operate the camera for about one minute, re-insert the battery pack, then turn on the camera. • After inserting the battery pack into the camera, it may be checked on the screen...
... settings (page 24). 4 Consult your camera or accessory, try the following solutions. 1 Check the items below, and refer to "Cyber-shot Handbook" (PDF). Replace it with a new one. 36 Troubleshooting If you do not operate the camera for about one minute, re-insert the battery pack, then turn on the camera. • After inserting the battery pack into the camera, it may be checked on the screen...
Instruction Manual
Page 37
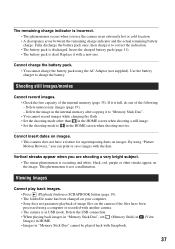
... been processed using "Picture Motion Browser," you can print or save images with another camera. • The camera is in USB mode. By using a computer or recorded with the date. Viewing images Cannot play back images. • Press (Playback) button or SCRAPBOOK button (page 19). • The folder/file name has been changed on your computer. • Sony does not guarantee playback of image files on images. Replace it to in the HOME screen when shooting movies. Insert the charged battery pack (page...
... been processed using "Picture Motion Browser," you can print or save images with another camera. • The camera is in USB mode. By using a computer or recorded with the date. Viewing images Cannot play back images. • Press (Playback) button or SCRAPBOOK button (page 19). • The folder/file name has been changed on your computer. • Sony does not guarantee playback of image files on images. Replace it to in the HOME screen when shooting movies. Insert the charged battery pack (page...
Cyber-shot® Handbook
Page 3
... Notes on using the camera 2 Features of lighting 13 Quality - Sharemark function 9 Basic techniques for better images 10 Focus - Adjusting the light intensity 12 Color - On "image quality" and "image size 14 Flash - Automatic image management 8 Viewing - Focusing on the screen 18 Operate the touch panel 23 Changing the screen display 24 Basic Operations Shooting images easily 26 Setting Image size/Self-timer/Flash mode/Macro recording 28 Setting Focus/Metering Mode/ISO/EV 30 Viewing images 35 Selecting how to play back images 36 Using the SCRAPBOOK 39 Deleting images 41...
... Notes on using the camera 2 Features of lighting 13 Quality - Sharemark function 9 Basic techniques for better images 10 Focus - Adjusting the light intensity 12 Color - On "image quality" and "image size 14 Flash - Automatic image management 8 Viewing - Focusing on the screen 18 Operate the touch panel 23 Changing the screen display 24 Basic Operations Shooting images easily 26 Setting Image size/Self-timer/Flash mode/Macro recording 28 Setting Focus/Metering Mode/ISO/EV 30 Viewing images 35 Selecting how to play back images 36 Using the SCRAPBOOK 39 Deleting images 41...
Cyber-shot® Handbook
Page 18
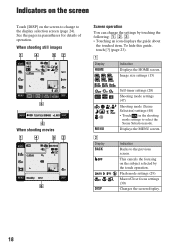
Image size settings (15) When shooting movies MENU B Display BACK DISP Self-timer settings (28) Shooting mode settings (47) Shooting mode (Scene Selection) settings (48) • Touch in parentheses for details of operation. Displays the MENU screen. This cancels the focusing on the screen to change the settings by the touch operation. A Display HOME Indication Displays the HOME screen. To hide this guide, touch [?] (page 23). Indication Backs to the display selection screen (page 24). Indicators on the screen Touch [DISP] on the subject selected by...
Image size settings (15) When shooting movies MENU B Display BACK DISP Self-timer settings (28) Shooting mode settings (47) Shooting mode (Scene Selection) settings (48) • Touch in parentheses for details of operation. Displays the MENU screen. This cancels the focusing on the screen to change the settings by the touch operation. A Display HOME Indication Displays the HOME screen. To hide this guide, touch [?] (page 23). Indication Backs to the display selection screen (page 24). Indicators on the screen Touch [DISP] on the subject selected by...

Cyber-shot® Handbook
Page 44
... Main Settings 2 (page 80) USB Connect Video Out Function Guide Calibration COMPONENT Shooting Settings Shooting Settings 1 (page 81) AF Illuminator AF Mode Shooting Settings 2 (page 83) Auto Orientation Smile Level Grid Line Digital Zoom Auto Review Clock Settings (page 84) Language Setting (page 85) 44 Folder Change REC. HOME/Menu HOME items Touching [HOME] displays the following items. Details on the items are displayed on the screen by the guide. Learning the various functions - Categories Shooting View Images Printing, Other Manage Memory Settings Items Auto Adjustment...
... Main Settings 2 (page 80) USB Connect Video Out Function Guide Calibration COMPONENT Shooting Settings Shooting Settings 1 (page 81) AF Illuminator AF Mode Shooting Settings 2 (page 83) Auto Orientation Smile Level Grid Line Digital Zoom Auto Review Clock Settings (page 84) Language Setting (page 85) 44 Folder Change REC. HOME/Menu HOME items Touching [HOME] displays the following items. Details on the items are displayed on the screen by the guide. Learning the various functions - Categories Shooting View Images Printing, Other Manage Memory Settings Items Auto Adjustment...

Cyber-shot® Handbook
Page 95
... shooting date to the camera. • Retouch (Red Eye Correction, etc.), print, and send still images as software updates. This function informs you can: • Import images shot with the camera and display them on the computer. • Organize images on the computer on a calendar by taking advantage of the Information tool appears on the screen when starting the "Picture Motion Browser" for the first time. Exiting the "Picture Motion Browser" Click button in Windows...
... shooting date to the camera. • Retouch (Red Eye Correction, etc.), print, and send still images as software updates. This function informs you can: • Import images shot with the camera and display them on the computer. • Organize images on the computer on a calendar by taking advantage of the Information tool appears on the screen when starting the "Picture Motion Browser" for the first time. Exiting the "Picture Motion Browser" Click button in Windows...
Cyber-shot® Handbook
Page 101
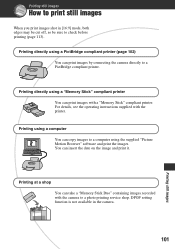
... can copy images to check before printing (page 113). Printing using the supplied "Picture Motion Browser" software and print the images. You can print images with the printer. Printing directly using a PictBridge compliant printer (page 102) You can take a "Memory Stick Duo" containing images recorded with the camera to a PictBridge compliant printer. For details, see the operating instructions supplied with a "Memory Stick" compliant printer. Printing at a shop You can print images by connecting the camera directly to a photo printing service shop. Printing directly using...
... can copy images to check before printing (page 113). Printing using the supplied "Picture Motion Browser" software and print the images. You can print images with the printer. Printing directly using a PictBridge compliant printer (page 102) You can take a "Memory Stick Duo" containing images recorded with the camera to a PictBridge compliant printer. For details, see the operating instructions supplied with a "Memory Stick" compliant printer. Printing at a shop You can print images by connecting the camera directly to a photo printing service shop. Printing directly using...
Cyber-shot® Handbook
Page 109
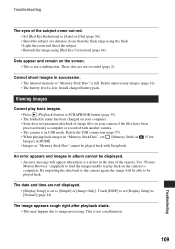
... battery level is in USB mode. Install charged battery pack. Use "Picture Motion Browser" (supplied) to load the images unable to play back images. • Press (Playback) button or SCRAPBOOK button (page 35). • The folder/file name has been changed on your computer. • Sony does not guarantee playback of image files on your camera if the files have been processed using [Red Eye Correction] (page 64). This is full. These dots are not displayed. • [Display Setup...
... battery level is in USB mode. Install charged battery pack. Use "Picture Motion Browser" (supplied) to load the images unable to play back images. • Press (Playback) button or SCRAPBOOK button (page 35). • The folder/file name has been changed on your computer. • Sony does not guarantee playback of image files on your camera if the files have been processed using [Red Eye Correction] (page 64). This is full. These dots are not displayed. • [Display Setup...

Cyber-shot® Handbook
Page 117
... image file was recorded using the "Memory Stick Duo" with the write-protect switch, and the switch is set as a recording folder on your camera is the case. Memory Stick locked • You are using a model other than that cannot be used in internal memory No memory space on this is not guaranteed. Cannot access Memory Stick Access denied • You are using the "Memory Stick Duo" with the access controlled. Warning indicators and messages Memory Stick type error...
... image file was recorded using the "Memory Stick Duo" with the write-protect switch, and the switch is set as a recording folder on your camera is the case. Memory Stick locked • You are using a model other than that cannot be used in internal memory No memory space on this is not guaranteed. Cannot access Memory Stick Access denied • You are using the "Memory Stick Duo" with the access controlled. Warning indicators and messages Memory Stick type error...
Marketing Specifications (Blue Model)
Page 1
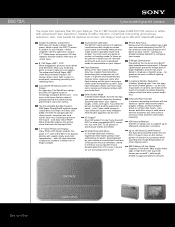
... the mood -- Smile Shutter Mode In Smile Shutter Mode, the DSC-T2 helps you make your lifestyle. HD Output2 Direct HD output2 to display photos with simple on the central portion of the DSC-T2 to your screen -- In-Camera Red-Eye Reduction Irritating "glowing eyes" can ruin low-light shots. 2.7"1 Clear Photo LCD Display Clear Photo LCD design enables the giant 2.7"1 LCD of interest in difficult lighting conditions. DSC-T2/L Cyber-shot® Digital Still Camera The super-slim camera that make camera operation faster and simpler...
... the mood -- Smile Shutter Mode In Smile Shutter Mode, the DSC-T2 helps you make your lifestyle. HD Output2 Direct HD output2 to display photos with simple on the central portion of the DSC-T2 to your screen -- In-Camera Red-Eye Reduction Irritating "glowing eyes" can ruin low-light shots. 2.7"1 Clear Photo LCD Display Clear Photo LCD design enables the giant 2.7"1 LCD of interest in difficult lighting conditions. DSC-T2/L Cyber-shot® Digital Still Camera The super-slim camera that make camera operation faster and simpler...
Marketing Specifications (Blue Model)
Page 2
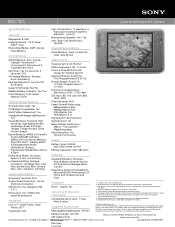
... Sony Electronics, Inc. DSC-T2/L Cyber-shot® Digital Still Camera Specifications General Megapixel: 8.1 MP Imaging Device: 1/2.5" Super HAD™ CCD Recording Media: 4GB9 internal Flash Memory Convenience Lens Construction: 11 elements in part without notice. 8 : Not all modes) Date/Time Stamp: No/ No Media/Battery Indicator: Yes/Yes Color Mode(s): Vivid, Sepia, Natural, B & W Optics/Lens Focal Length: 6.33-19.0mm 35mm Equivalent: 38 - 114 mm Focus: 9 Area Multi-Point AF, Center AF, Flexible Spot AF Aperture Range: Auto...
... Sony Electronics, Inc. DSC-T2/L Cyber-shot® Digital Still Camera Specifications General Megapixel: 8.1 MP Imaging Device: 1/2.5" Super HAD™ CCD Recording Media: 4GB9 internal Flash Memory Convenience Lens Construction: 11 elements in part without notice. 8 : Not all modes) Date/Time Stamp: No/ No Media/Battery Indicator: Yes/Yes Color Mode(s): Vivid, Sepia, Natural, B & W Optics/Lens Focal Length: 6.33-19.0mm 35mm Equivalent: 38 - 114 mm Focus: 9 Area Multi-Point AF, Center AF, Flexible Spot AF Aperture Range: Auto...


