Instruction Manual
Page 2
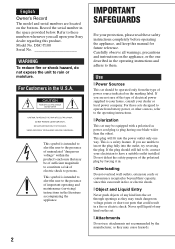
... Liquid Entry Never push objects of important operating and maintenance (servicing) instructions in the literature accompanying the appliance. 2 IMPORTANT SAFEGUARDS For your protection, please read these numbers whenever you call upon your Sony dealer regarding this manual for future reference. Never spill liquid of any kind into the set through openings as they may cause hazards. Model No. This symbol is a safety...
... Liquid Entry Never push objects of important operating and maintenance (servicing) instructions in the literature accompanying the appliance. 2 IMPORTANT SAFEGUARDS For your protection, please read these numbers whenever you call upon your Sony dealer regarding this manual for future reference. Never spill liquid of any kind into the set through openings as they may cause hazards. Model No. This symbol is a safety...
Instruction Manual
Page 3
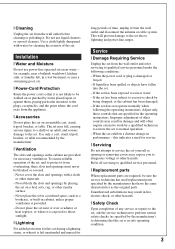
... disconnect the antenna or cable system. Do not use power-line operated sets near a swimming pool, etc. [ Power-Cord Protection Route the power cord so that have fallen into the set has been exposed to perform routine safety checks (as opening or removing covers may result in safe operating condition. 3 To ensure reliable operation of any service or repairs to the set, ask the service technician to rain or...
... disconnect the antenna or cable system. Do not use power-line operated sets near a swimming pool, etc. [ Power-Cord Protection Route the power cord so that have fallen into the set has been exposed to perform routine safety checks (as opening or removing covers may result in safe operating condition. 3 To ensure reliable operation of any service or repairs to the set, ask the service technician to rain or...
Instruction Manual
Page 4
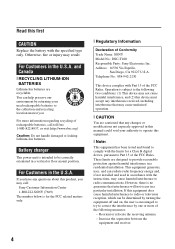
... not installed and used rechargeable batteries to the collection and recycling location nearest you. For Customers in a particular installation. These limits are recyclable. Otherwise, fire or injury may cause undesired operation. [ CAUTION You are cautioned that may result. However, there is for a Class B digital device, pursuant to Part 15 of Conformity Trade Name: SONY Model No.: DSC-T100 Responsible Party: Sony Electronics...
... not installed and used rechargeable batteries to the collection and recycling location nearest you. For Customers in a particular installation. These limits are recyclable. Otherwise, fire or injury may cause undesired operation. [ CAUTION You are cautioned that may result. However, there is for a Class B digital device, pursuant to Part 15 of Conformity Trade Name: SONY Model No.: DSC-T100 Responsible Party: Sony Electronics...

Instruction Manual
Page 5
...influence the picture and sound of this unit. [ Notice If static electricity or electromagnetism causes data transfer to discontinue midway (fail), restart the application or disconnect and connect the communication cable (USB, etc.) ...using connection cables shorter than 3 meters (9.8 feet). [ Attention The electromagnetic fields at the specific frequencies may apply, See www.dtsc.ca.gov/hazardouswaste/perchlorate Perchlorate Material : Lithium battery contains perchlorate. Notice for customers in the plug supplied need to be sure to attach the fuse cover after you will help . - Connect...
...influence the picture and sound of this unit. [ Notice If static electricity or electromagnetism causes data transfer to discontinue midway (fail), restart the application or disconnect and connect the communication cable (USB, etc.) ...using connection cables shorter than 3 meters (9.8 feet). [ Attention The electromagnetic fields at the specific frequencies may apply, See www.dtsc.ca.gov/hazardouswaste/perchlorate Perchlorate Material : Lithium battery contains perchlorate. Notice for customers in the plug supplied need to be sure to attach the fuse cover after you will help . - Connect...
Instruction Manual
Page 6
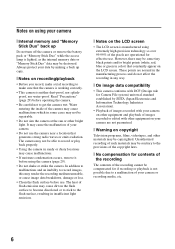
... constantly appear on the LCD screen. It may cause the malfunction of images recorded or edited with other equipment on your camera are operational for if recording or playback is manufactured using extremely high-precision technology so over 99.99% of the camera may cause malfunctions which in some tiny black points and/or bright points (white, red, blue or green in sandy or...
... constantly appear on the LCD screen. It may cause the malfunction of images recorded or edited with other equipment on your camera are operational for if recording or playback is manufactured using extremely high-precision technology so over 99.99% of the camera may cause malfunctions which in some tiny black points and/or bright points (white, red, blue or green in sandy or...
Instruction Manual
Page 7
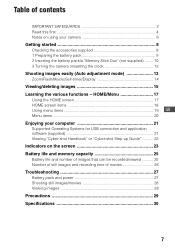
...and recording time of movies 26 Troubleshooting 27 Battery pack and power 27 Shooting still images/movies 28 Viewing images 28 Precautions 29 Specifications 30 7 Table of contents IMPORTANT SAFEGUARDS 2 Read this first 4 Notes on using your computer 21 Supported Operating Systems for USB connection and application software (supplied 21 Viewing "Cyber-shot Handbook" or "Cyber-shot Step-up Guide 22 Indicators on /setting the clock 12 Shooting images easily (Auto adjustment mode 13 Zoom/Flash/Macro/Self-timer/Display 14 Viewing/deleting images 15 Learning the various functions -
...and recording time of movies 26 Troubleshooting 27 Battery pack and power 27 Shooting still images/movies 28 Viewing images 28 Precautions 29 Specifications 30 7 Table of contents IMPORTANT SAFEGUARDS 2 Read this first 4 Notes on using your computer 21 Supported Operating Systems for USB connection and application software (supplied 21 Viewing "Cyber-shot Handbook" or "Cyber-shot Step-up Guide 22 Indicators on /setting the clock 12 Shooting images easily (Auto adjustment mode 13 Zoom/Flash/Macro/Self-timer/Display 14 Viewing/deleting images 15 Learning the various functions -
Instruction Manual
Page 10
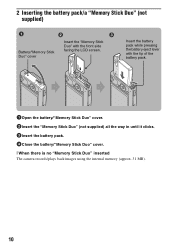
...; Battery/"Memory Stick Duo" cover Insert the "Memory Stick Duo" with the tip of the battery pack. 1Open the battery/"Memory Stick Duo" cover. 2Insert the "Memory Stick Duo" (not supplied) all the way in until it clicks. 3Insert the battery pack. 4Close the battery/"Memory Stick Duo" cover. [ When there is no "Memory Stick Duo" inserted The camera records/plays back images using the internal memory (approx...
...; Battery/"Memory Stick Duo" cover Insert the "Memory Stick Duo" with the tip of the battery pack. 1Open the battery/"Memory Stick Duo" cover. 2Insert the "Memory Stick Duo" (not supplied) all the way in until it clicks. 3Insert the battery pack. 4Close the battery/"Memory Stick Duo" cover. [ When there is no "Memory Stick Duo" inserted The camera records/plays back images using the internal memory (approx...
Instruction Manual
Page 11
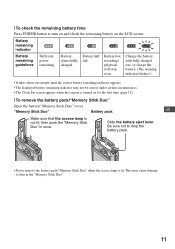
Change the battery with fully charged one, or charge the battery. (The warning indicator flashes.) • It takes about one minute until the correct battery remaining indicator appears. • The displayed battery remaining indicator may cause damage to data in once. This may not be correct under certain circumstances. • The Clock Set screen appears when the camera is turned on the LCD screen. [ To check the remaining battery time Press POWER button to turn on...
Change the battery with fully charged one, or charge the battery. (The warning indicator flashes.) • It takes about one minute until the correct battery remaining indicator appears. • The displayed battery remaining indicator may cause damage to data in once. This may not be correct under certain circumstances. • The Clock Set screen appears when the camera is turned on the LCD screen. [ To check the remaining battery time Press POWER button to turn on...
Instruction Manual
Page 13
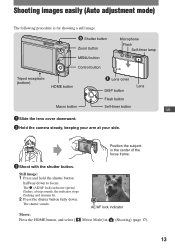
... sounds, the indicator stops flashing and remains lit. 2 Press the shutter button fully down to focus. AE/AF lock indicator Movie: Press the HOME button, and select [ Movie Mode] in the center of the focus frame. 3 Shoot with the shutter button. Position the subject in (Shooting) (page 17). 13 Shooting images easily (Auto adjustment mode) The following procedure is for shooting a still image. ɠ Shutter button Zoom button MENU button Control button Microphone Flash Self-timer lamp Tripod receptacle (bottom) HOME button Lens cover DISP button Lens Flash button Macro button...
... sounds, the indicator stops flashing and remains lit. 2 Press the shutter button fully down to focus. AE/AF lock indicator Movie: Press the HOME button, and select [ Movie Mode] in the center of the focus frame. 3 Shoot with the shutter button. Position the subject in (Shooting) (page 17). 13 Shooting images easily (Auto adjustment mode) The following procedure is for shooting a still image. ɠ Shutter button Zoom button MENU button Control button Microphone Flash Self-timer lamp Tripod receptacle (bottom) HOME button Lens cover DISP button Lens Flash button Macro button...
Instruction Manual
Page 14
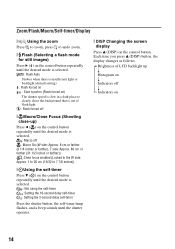
... insufficient light or backlight (default setting) : Flash forced on SL : Slow synchro (Flash forced on) The shutter speed is slow in a dark place to clearly shoot the background that is out of LCD backlight up ) Press b ( ) on the control button repeatedly until the desired mode is selected. : Macro off r Indicators on the control button. Each time you press v (DISP) button, the display changes as follows. Brightness of flash light. : Flash forced off [ Macro/Close Focus (Shooting...
... insufficient light or backlight (default setting) : Flash forced on SL : Slow synchro (Flash forced on) The shutter speed is slow in a dark place to clearly shoot the background that is out of LCD backlight up ) Press b ( ) on the control button repeatedly until the desired mode is selected. : Macro off r Indicators on the control button. Each time you press v (DISP) button, the display changes as follows. Brightness of flash light. : Flash forced off [ Macro/Close Focus (Shooting...
Instruction Manual
Page 17
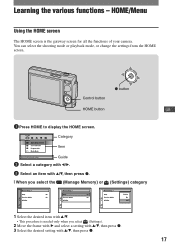
... the shooting mode or playback mode, or change the settings from the HOME screen. Category Item Guide 2 Select a category with b/B. 3 Select an item with v/V, then press z. [ When you select (Settings). 2 Move the frame with B and select a setting with v/V, then press z. 3 Select the desired setting with v/V. • This procedure is the gateway screen for all the functions of your camera. Control button z button HOME button GB 1 Press HOME to display...
... the shooting mode or playback mode, or change the settings from the HOME screen. Category Item Guide 2 Select a category with b/B. 3 Select an item with v/V, then press z. [ When you select (Settings). 2 Move the frame with B and select a setting with v/V, then press z. 3 Select the desired setting with v/V. • This procedure is the gateway screen for all the functions of your camera. Control button z button HOME button GB 1 Press HOME to display...
Instruction Manual
Page 18
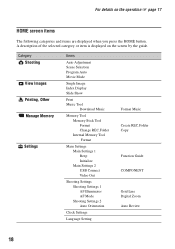
...Category Shooting View Images Printing, Other Manage Memory Settings Items Auto Adjustment Scene Selection Program Auto Movie Mode Single Image Index Display Slide Show Print Music Tool Download Music Memory Tool Memory Stick Tool Format Change REC.Folder Internal Memory Tool Format Main Settings Main Settings 1 Beep Initialize Main Settings 2 USB Connect Video Out Shooting Settings Shooting Settings 1 AF Illuminator AF Mode Shooting Settings 2 Auto Orientation Clock Settings Language Setting Format Music Create REC.Folder Copy Function Guide COMPONENT Grid Line Digital Zoom Auto Review 18...
...Category Shooting View Images Printing, Other Manage Memory Settings Items Auto Adjustment Scene Selection Program Auto Movie Mode Single Image Index Display Slide Show Print Music Tool Download Music Memory Tool Memory Stick Tool Format Change REC.Folder Internal Memory Tool Format Main Settings Main Settings 1 Beep Initialize Main Settings 2 USB Connect Video Out Shooting Settings Shooting Settings 1 AF Illuminator AF Mode Shooting Settings 2 Auto Orientation Clock Settings Language Setting Format Music Create REC.Folder Copy Function Guide COMPONENT Grid Line Digital Zoom Auto Review 18...

Instruction Manual
Page 20
... Mode Selects the metering mode. Color Mode Changes the vividness of images. Prints images using flash. Face Detection Detects the faces and adjusts focus and other setting to the scene. Menu for viewing (Delete) (Slide Show) (Retouch) (Protect) DPOF (Print) (Rotate) (Select Folder) Deletes images. Also, different items are available depending on the selected shooting mode (such as Auto Adjustment, Scene Selection, Program Auto, Movie Mode) on the camera mode. Adds a Print order mark. ISO Selects a luminous sensitivity. Flash Level Adjusts the amount of flash light...
... Mode Selects the metering mode. Color Mode Changes the vividness of images. Prints images using flash. Face Detection Detects the faces and adjusts focus and other setting to the scene. Menu for viewing (Delete) (Slide Show) (Retouch) (Protect) DPOF (Print) (Rotate) (Select Folder) Deletes images. Also, different items are available depending on the selected shooting mode (such as Auto Adjustment, Scene Selection, Program Auto, Movie Mode) on the camera mode. Adds a Print order mark. ISO Selects a luminous sensitivity. Flash Level Adjusts the amount of flash light...

Instruction Manual
Page 24
Folder-file number Recorded date/time of the playback image Guide to play back images Select images Adjust volume Recording/Playback media Recording folder Playback folder Remaining number of recordable images Image number/Number of images recorded in selected folder Remaining recordable time Change folder AF illuminator SL WB C:32:00 ISO400 +2.0EV 500 F3.5 D C:32:00 + Red-eye reduction Metering mode Flash mode Flash charging White balance Self-diagnosis display ISO number Exposure Value Shutter speed Aperture value Self-diagnosis display AF range finder frame Spot metering cross hair ...
Folder-file number Recorded date/time of the playback image Guide to play back images Select images Adjust volume Recording/Playback media Recording folder Playback folder Remaining number of recordable images Image number/Number of images recorded in selected folder Remaining recordable time Change folder AF illuminator SL WB C:32:00 ISO400 +2.0EV 500 F3.5 D C:32:00 + Red-eye reduction Metering mode Flash mode Flash charging White balance Self-diagnosis display ISO number Exposure Value Shutter speed Aperture value Self-diagnosis display AF range finder frame Spot metering cross hair ...
Instruction Manual
Page 25
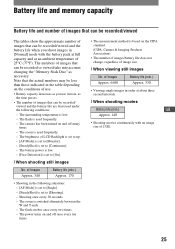
... numbers may be less than those indicated in the table depending on and off many times. - The zoom is low. - The power turns on the conditions of use it more, as the time passes. • The number of images that can be recorded/ viewed and the battery life are decreased under the following situations: - [AF Mode] is set to [Shooting]. - The flash strobes once every two times. - The battery power...
... numbers may be less than those indicated in the table depending on and off many times. - The zoom is low. - The power turns on the conditions of use it more, as the time passes. • The number of images that can be recorded/ viewed and the battery life are decreased under the following situations: - [AF Mode] is set to [Shooting]. - The flash strobes once every two times. - The battery power...
Instruction Manual
Page 26
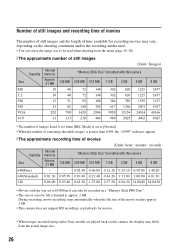
... • The number of images listed is for movies. • When images recorded using earlier Sony models are played back on this camera Size Approx. 31 MB...recording time of movies (Units: hour : minute : second) Internal Capacity memory "Memory Stick Duo" formatted with this camera, the display may vary, depending on a "Memory Stick PRO Duo". • The size of the movie reaches approx. 2 GB. • This camera does not support HD recordings or playbacks for when [REC Mode] is set to [640(Fine)] can only be recorded on the shooting conditions and/or the recording media used...
... • The number of images listed is for movies. • When images recorded using earlier Sony models are played back on this camera Size Approx. 31 MB...recording time of movies (Units: hour : minute : second) Internal Capacity memory "Memory Stick Duo" formatted with this camera, the display may vary, depending on a "Memory Stick PRO Duo". • The size of the movie reaches approx. 2 GB. • This camera does not support HD recordings or playbacks for when [REC Mode] is set to [640(Fine)] can only be recorded on the shooting conditions and/or the recording media used...
Instruction Manual
Page 27
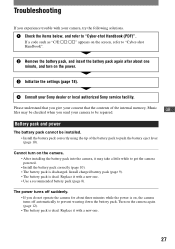
.... Battery pack and power The battery pack cannot be repaired. Replace it with your camera to be installed. • Install the battery pack correctly using the tip of the internal memory, Music GB files may take a little while to push the battery eject lever (page 10). Troubleshooting If you experience trouble with a new one. 27 If a code such as "C/E:ss:ss" appears on the screen, refer to "Cyber-shot Handbook". 2 Remove the battery pack...
.... Battery pack and power The battery pack cannot be repaired. Replace it with your camera to be installed. • Install the battery pack correctly using the tip of the internal memory, Music GB files may take a little while to push the battery eject lever (page 10). Troubleshooting If you experience trouble with a new one. 27 If a code such as "C/E:ss:ss" appears on the screen, refer to "Cyber-shot Handbook". 2 Remove the battery pack...
Instruction Manual
Page 28
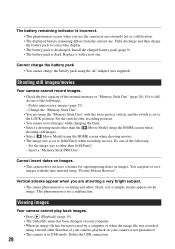
... USB connection. 28 Replace it is full, do one of the internal memory or "Memory Stick Duo" (page 26). Delete unnecessary images (page 15). - Set the switch to the recording position. • You cannot record images while charging the flash. • Select a shooting mode other than the [ Movie Mode] using the HOME screen when shooting still images. • Select [ Movie Mode] using the HOME screen when shooting movies. • The image size is set to other than [640(Fine)]. - You can print or save images...
... USB connection. 28 Replace it is full, do one of the internal memory or "Memory Stick Duo" (page 26). Delete unnecessary images (page 15). - Set the switch to the recording position. • You cannot record images while charging the flash. • Select a shooting mode other than the [ Movie Mode] using the HOME screen when shooting still images. • Select [ Movie Mode] using the HOME screen when shooting movies. • The image size is set to other than [640(Fine)]. - You can print or save images...
Instruction Manual
Page 29
... to record clear images. [ On the internal rechargeable backup battery This camera has an internal rechargeable battery GB for the moisture to let sand or dust get into the camera. However, even if this malfunction cannot be sure to remove fingerprints, dust, etc. Cleaning the lens Wipe the lens with rubber or vinyl for a long time. [ On operating temperatures Your camera is not charged, you...
... to record clear images. [ On the internal rechargeable backup battery This camera has an internal rechargeable battery GB for the moisture to let sand or dust get into the camera. However, even if this malfunction cannot be sure to remove fingerprints, dust, etc. Cleaning the lens Wipe the lens with rubber or vinyl for a long time. [ On operating temperatures Your camera is not charged, you...

Instruction Manual
Page 30
... Vario-Tessar 5× zoom lens f = 5.8 - 29.0 mm (35 - 175 mm when converted to a 35 mm still camera) F3.5 - 4.4 Exposure control: Automatic exposure, Scene Selection (9 modes) White balance: Automatic, Daylight, Cloudy, Fluorescent 1, Fluorescent 2, Fluorescent 3, Incandescent, Flash File format (DCF compliant): Still images: Exif Ver. 2.21 JPEG compliant, DPOF compatible Movies: MPEG1 compliant (Monaural) Recording media: Internal Memory (approx. 31 MB), "Memory Stick Duo" Flash: Flash range (ISO (Recommended Exposure Index) set to Auto): approx. 0.1 to 3.7 m (4 inches...
... Vario-Tessar 5× zoom lens f = 5.8 - 29.0 mm (35 - 175 mm when converted to a 35 mm still camera) F3.5 - 4.4 Exposure control: Automatic exposure, Scene Selection (9 modes) White balance: Automatic, Daylight, Cloudy, Fluorescent 1, Fluorescent 2, Fluorescent 3, Incandescent, Flash File format (DCF compliant): Still images: Exif Ver. 2.21 JPEG compliant, DPOF compatible Movies: MPEG1 compliant (Monaural) Recording media: Internal Memory (approx. 31 MB), "Memory Stick Duo" Flash: Flash range (ISO (Recommended Exposure Index) set to Auto): approx. 0.1 to 3.7 m (4 inches...


