Instruction Manual
Page 6
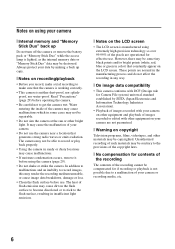
... Stick Duo" data may not be destroyed. In addition to malfunctions and an inability to record images, this may be contrary to get the camera wet. The heat of the recording cannot be copyrighted. These points are normal in the manufacturing process and do not affect the recording in color...Duo" back up copy. [ Notes on recording/playback • Before you record, make a trial recording to record or play back properly. • Using the camera in sandy or dusty locations may cause malfunctions which in some tiny black points and/or bright points (white, red, blue or green in any...
... Stick Duo" data may not be destroyed. In addition to malfunctions and an inability to record images, this may be contrary to get the camera wet. The heat of the recording cannot be copyrighted. These points are normal in the manufacturing process and do not affect the recording in color...Duo" back up copy. [ Notes on recording/playback • Before you record, make a trial recording to record or play back properly. • Using the camera in sandy or dusty locations may cause malfunctions which in some tiny black points and/or bright points (white, red, blue or green in any...
Instruction Manual
Page 7
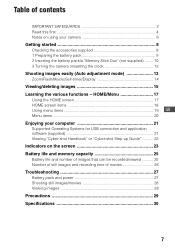
... images that can be recorded/viewed .......... 25 Number of still images and recording time of contents IMPORTANT SAFEGUARDS 2 Read this first 4 Notes on using your camera 6 Getting started 8 Checking the accessories supplied 8 1 Preparing the battery pack 9 2 Inserting the battery pack/a "Memory Stick Duo" (not supplied) ........ 10 3 Turning the...
... images that can be recorded/viewed .......... 25 Number of still images and recording time of contents IMPORTANT SAFEGUARDS 2 Read this first 4 Notes on using your camera 6 Getting started 8 Checking the accessories supplied 8 1 Preparing the battery pack 9 2 Inserting the battery pack/a "Memory Stick Duo" (not supplied) ........ 10 3 Turning the...
Instruction Manual
Page 8
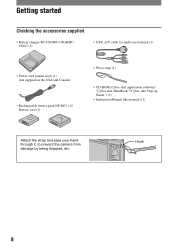
Hook 8 Getting started Checking the accessories supplied • Battery charger BC-CSG/BC-CSGB/BCCSGC (1) • USB, A/V cable for multi-use terminal (1) • Power cord (mains lead) (1) (not supplied in the USA and Canada) • Rechargeable battery pack NP-BG1 (1)/ Battery case (1) • Wrist strap (1) • CD-ROM (Cyber-shot application software/ "Cyber-shot Handbook"/"Cyber-shot Step-up Guide") (1) • Instruction Manual (this manual) (1) Attach the strap and pass your hand through it, to prevent the camera from damage by being dropped, etc.
Hook 8 Getting started Checking the accessories supplied • Battery charger BC-CSG/BC-CSGB/BCCSGC (1) • USB, A/V cable for multi-use terminal (1) • Power cord (mains lead) (1) (not supplied in the USA and Canada) • Rechargeable battery pack NP-BG1 (1)/ Battery case (1) • Wrist strap (1) • CD-ROM (Cyber-shot application software/ "Cyber-shot Handbook"/"Cyber-shot Step-up Guide") (1) • Instruction Manual (this manual) (1) Attach the strap and pass your hand through it, to prevent the camera from damage by being dropped, etc.
Instruction Manual
Page 10
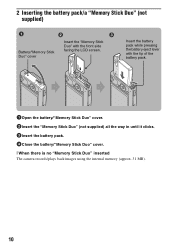
... way in until it clicks. 3Insert the battery pack. 4Close the battery/"Memory Stick Duo" cover. [ When there is no "Memory Stick Duo" inserted The camera records/plays back images using the internal memory (approx. 31 MB). 10 Insert the battery pack while pressing the battery eject lever with the front...
... way in until it clicks. 3Insert the battery pack. 4Close the battery/"Memory Stick Duo" cover. [ When there is no "Memory Stick Duo" inserted The camera records/plays back images using the internal memory (approx. 31 MB). 10 Insert the battery pack while pressing the battery eject lever with the front...
Instruction Manual
Page 11
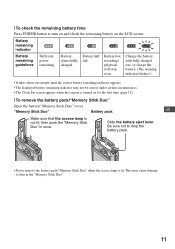
... Duo" cover. Be sure not to data in once. This may not be correct under certain circumstances. • The Clock Set screen appears when the camera is turned on the LCD screen. Slide the battery eject lever. "Memory Stick Duo" Battery pack GB Make sure that the access lamp is lit...
... Duo" cover. Be sure not to data in once. This may not be correct under certain circumstances. • The Clock Set screen appears when the camera is turned on the LCD screen. Slide the battery eject lever. "Memory Stick Duo" Battery pack GB Make sure that the access lamp is lit...
Instruction Manual
Page 12
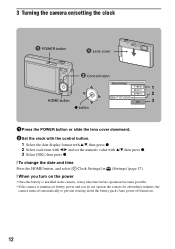
3 Turning the camera on/setting the clock POWER button Lens cover ɟ Control button 1 2 HOME button 3 z button 1Press the POWER button or slide the lens cover downward. 2Set ... on the power • Once the battery is installed in the camera, it may take time before operation becomes possible. • If the camera is running on battery power and you do not operate the camera for about three minutes, the camera turns off automatically to prevent wearing down the battery pack (Auto power...
3 Turning the camera on/setting the clock POWER button Lens cover ɟ Control button 1 2 HOME button 3 z button 1Press the POWER button or slide the lens cover downward. 2Set ... on the power • Once the battery is installed in the camera, it may take time before operation becomes possible. • If the camera is running on battery power and you do not operate the camera for about three minutes, the camera turns off automatically to prevent wearing down the battery pack (Auto power...
Instruction Manual
Page 13
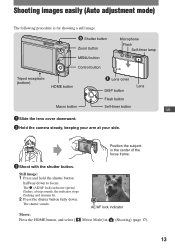
... Tripod receptacle (bottom) HOME button Lens cover DISP button Lens Flash button Macro button Self-timer button GB 1 Slide the lens cover downward. 2 Hold the camera steady, keeping your arm at your side. Still image: 1 Press and hold the shutter button halfway down . AE/AF lock indicator Movie: Press the HOME...
... Tripod receptacle (bottom) HOME button Lens cover DISP button Lens Flash button Macro button Self-timer button GB 1 Slide the lens cover downward. 2 Hold the camera steady, keeping your arm at your side. Still image: 1 Press and hold the shutter button halfway down . AE/AF lock indicator Movie: Press the HOME...
Instruction Manual
Page 15
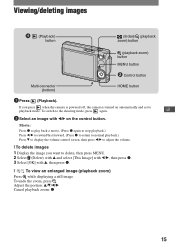
....) Press V to display the volume control screen, then press b/B to adjust the volume. [ To delete images 1 Display the image you press when the camera is powered off, the camera is turned on the control button. To switch to playback mode. To undo the zoom, press . If you want to delete, then press...
....) Press V to display the volume control screen, then press b/B to adjust the volume. [ To delete images 1 Display the image you press when the camera is powered off, the camera is turned on the control button. To switch to playback mode. To undo the zoom, press . If you want to delete, then press...
Instruction Manual
Page 16
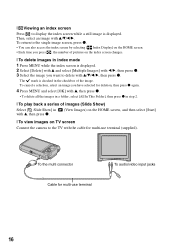
... the index screen by selecting [ Index Display] on the HOME screen. • Each time you press , the number of pictures on TV screen Connect the camera to delete with v/V/b/B, then press z. [ Viewing an index screen Press to display the index screen while a still image is displayed. 2 Select [Delete] with v and select...
... the index screen by selecting [ Index Display] on the HOME screen. • Each time you press , the number of pictures on TV screen Connect the camera to delete with v/V/b/B, then press z. [ Viewing an index screen Press to display the index screen while a still image is displayed. 2 Select [Delete] with v and select...
Instruction Manual
Page 17
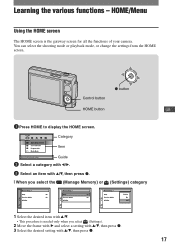
... with B and select a setting with v/V, then press z. 3 Select the desired setting with v/V. • This procedure is the gateway screen for all the functions of your camera. You can select the shooting mode or playback mode, or change the settings from the HOME screen. Control button z button HOME button GB 1 Press HOME...
... with B and select a setting with v/V, then press z. 3 Select the desired setting with v/V. • This procedure is the gateway screen for all the functions of your camera. You can select the shooting mode or playback mode, or change the settings from the HOME screen. Control button z button HOME button GB 1 Press HOME...
Instruction Manual
Page 19
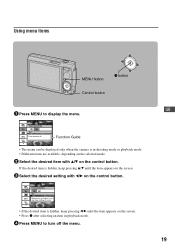
... desired item is hidden, keep pressing v/V until the item appears on the control button. Function Guide • The menu can be displayed only when the camera is in shooting mode or playback mode. • Different items are available, depending on the selected mode. 2 Select the desired item with b/B on the control...
... desired item is hidden, keep pressing v/V until the item appears on the control button. Function Guide • The menu can be displayed only when the camera is in shooting mode or playback mode. • Different items are available, depending on the selected mode. 2 Select the desired item with b/B on the control...

Instruction Manual
Page 20
... shooting settings. Also, different items are available depending on the selected shooting mode (such as Auto Adjustment, Scene Selection, Program Auto, Movie Mode) on the camera mode.
... shooting settings. Also, different items are available depending on the selected shooting mode (such as Auto Adjustment, Scene Selection, Program Auto, Movie Mode) on the camera mode.
Instruction Manual
Page 21
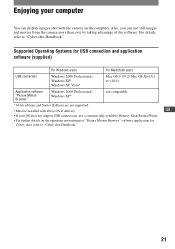
...Motion Browser" Windows 2000 Professional, Windows XP* not compatible * 64-bit editions and Starter (Edition) are not supported. • Must be installed with the camera on the operating environment of the software. For details, refer to "Cyber-shot Handbook." 21 GB • If your computer You can use a commercially available...at delivery. shot, refer to "Cyber-shot Handbook." Enjoying your OS does not support USB connections, use still images and movies from the camera more than ever by taking advantage of "Picture Motion Browser" software application for Cyber-
...Motion Browser" Windows 2000 Professional, Windows XP* not compatible * 64-bit editions and Starter (Edition) are not supported. • Must be installed with the camera on the operating environment of the software. For details, refer to "Cyber-shot Handbook." 21 GB • If your computer You can use a commercially available...at delivery. shot, refer to "Cyber-shot Handbook." Enjoying your OS does not support USB connections, use still images and movies from the camera more than ever by taking advantage of "Picture Motion Browser" software application for Cyber-
Instruction Manual
Page 25
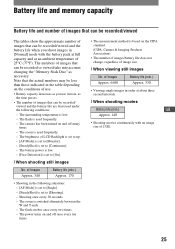
... recorded or viewed take into account changing the "Memory Stick Duo" as necessary. The numbers of 25°C (77°F). The camera has been turned on the CIPA standard. (CIPA: Camera & Imaging Products Association) • The number of images/battery life does not change, regardless of Images Approx. 340 Battery life (min...
... recorded or viewed take into account changing the "Memory Stick Duo" as necessary. The numbers of 25°C (77°F). The camera has been turned on the CIPA standard. (CIPA: Camera & Imaging Products Association) • The number of images/battery life does not change, regardless of Images Approx. 340 Battery life (min...
Instruction Manual
Page 26
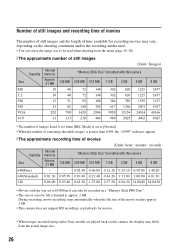
... recording stops automatically when the file size of the movie reaches approx. 2 GB. • This camera does not support HD recordings or playbacks for movies. • When images recorded using earlier Sony models are played back on this camera, the display may vary, depending on a "Memory Stick PRO Duo". • The size of...
... recording stops automatically when the file size of the movie reaches approx. 2 GB. • This camera does not support HD recordings or playbacks for movies. • When images recorded using earlier Sony models are played back on this camera, the display may vary, depending on a "Memory Stick PRO Duo". • The size of...
Instruction Manual
Page 27
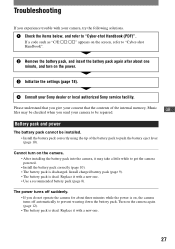
... The power turns off automatically to push the battery eject lever (page 10). Troubleshooting If you experience trouble with your Sony dealer or local authorized Sony service facility. Cannot turn on the camera again (page 12). • The battery pack is dead. Install charged battery pack (page 9). • The battery pack is dead...
... The power turns off automatically to push the battery eject lever (page 10). Troubleshooting If you experience trouble with your Sony dealer or local authorized Sony service facility. Cannot turn on the camera again (page 12). • The battery pack is dead. Install charged battery pack (page 9). • The battery pack is dead...
Instruction Manual
Page 28
...; The image size is set to [640(Fine)] when recording movies. Insert a "Memory Stick PRO Duo". Vertical streaks appear when you use the camera in USB mode. Delete the USB connection. 28 Cannot charge the battery pack • You cannot charge the battery pack using the AC Adapter (not... shooting a very bright subject. • The smear phenomenon is occurring and white, black, red, or purple streaks appear on your camera is not guaranteed. • The camera is in an extremely hot or cold location. • The displayed battery remaining differs from the current one . You can print or...
...; The image size is set to [640(Fine)] when recording movies. Insert a "Memory Stick PRO Duo". Vertical streaks appear when you use the camera in USB mode. Delete the USB connection. 28 Cannot charge the battery pack • You cannot charge the battery pack using the AC Adapter (not... shooting a very bright subject. • The smear phenomenon is occurring and white, black, red, or purple streaks appear on your camera is not guaranteed. • The camera is in an extremely hot or cold location. • The displayed battery remaining differs from the current one . You can print or...
Instruction Manual
Page 29
... casing. • Chemical products such as thinner, benzine, alcohol, disposable cloths, insect repellent, sunscreen or insecticide, etc. • Do not touch the camera with the above on or off . 29 Do not use the following places • In an extremely hot, cold or humid place In places such... and 104°F). Shooting in extremely cold or hot places that if you attempt to let sand or dust get into the camera. Precautions [ Do not use/store the camera in the following as they may cause a malfunction of the internal rechargeable backup battery Insert charged battery pack in the...
... casing. • Chemical products such as thinner, benzine, alcohol, disposable cloths, insect repellent, sunscreen or insecticide, etc. • Do not touch the camera with the above on or off . 29 Do not use the following places • In an extremely hot, cold or humid place In places such... and 104°F). Shooting in extremely cold or hot places that if you attempt to let sand or dust get into the camera. Precautions [ Do not use/store the camera in the following as they may cause a malfunction of the internal rechargeable backup battery Insert charged battery pack in the...

Instruction Manual
Page 30
...pixels Lens: Carl Zeiss Vario-Tessar 5× zoom lens f = 5.8 - 29.0 mm (35 - 175 mm when converted to a 35 mm still camera) F3.5 - 4.4 Exposure control: Automatic exposure, Scene Selection (9 modes) White balance: Automatic, Daylight, Cloudy, Fluorescent 1, Fluorescent 2, Fluorescent 3, Incandescent,... LCD panel: 7.5 cm (3.0 type) TFT drive Total number of their respective developers or manufacturers. Trademarks • is a trademark of Sony Corporation. • "Memory Stick", , "Memory Stick PRO", , "Memory Stick Duo", , "Memory Stick PRO Duo", , "Memory Stick Micro", "...
...pixels Lens: Carl Zeiss Vario-Tessar 5× zoom lens f = 5.8 - 29.0 mm (35 - 175 mm when converted to a 35 mm still camera) F3.5 - 4.4 Exposure control: Automatic exposure, Scene Selection (9 modes) White balance: Automatic, Daylight, Cloudy, Fluorescent 1, Fluorescent 2, Fluorescent 3, Incandescent,... LCD panel: 7.5 cm (3.0 type) TFT drive Total number of their respective developers or manufacturers. Trademarks • is a trademark of Sony Corporation. • "Memory Stick", , "Memory Stick PRO", , "Memory Stick Duo", , "Memory Stick PRO Duo", , "Memory Stick Micro", "...


