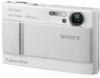
Instruction Manual
Page 1
Operating Instructions Before operating the unit, please read this product. Record the serial number in the space provided below. Refer to "Cyber-shot Handbook." DSC-T10 Serial No © 2006 Sony Corporation 2-691-401-11(1) Digital Still Camera Instruction Manual GB DSC-T10 CD-ROM (supplied) For details on the bottom. Owner's Record The model and serial numbers are located on the advanced operations, please refer to these numbers whenever you call upon your Sony dealer regarding this manual thoroughly, and retain it for future reference. Model No.
Operating Instructions Before operating the unit, please read this product. Record the serial number in the space provided below. Refer to "Cyber-shot Handbook." DSC-T10 Serial No © 2006 Sony Corporation 2-691-401-11(1) Digital Still Camera Instruction Manual GB DSC-T10 CD-ROM (supplied) For details on the bottom. Owner's Record The model and serial numbers are located on the advanced operations, please refer to these numbers whenever you call upon your Sony dealer regarding this manual thoroughly, and retain it for future reference. Model No.
Instruction Manual
Page 3
... protection for this indicates a need for long periods of any service or repairs to the set yourself as the original parts. Use only a cart, stand, tripod, bracket, or table recommended by the manufacturer. [ Ventilation The slots and openings in the operating instructions. If the set from the wall outlet and disconnect the antenna or cable system. Adjust only those controls that have fallen into the set...
... protection for this indicates a need for long periods of any service or repairs to the set yourself as the original parts. Use only a cart, stand, tripod, bracket, or table recommended by the manufacturer. [ Ventilation The slots and openings in the operating instructions. If the set from the wall outlet and disconnect the antenna or cable system. Adjust only those controls that have fallen into the set...
Instruction Manual
Page 5
...turning the equipment off and on its packaging indicates that interference will help prevent potential negative consequences for your nearest Sony service station. 5 Never use the plug without the fuse cover. These limits are designed to provide reasonable protection against harmful interference in a particular installation...with the instructions, may influence the picture and sound of this camera. [ Notice If static electricity or electromagnetism causes data transfer to discontinue midway (fail), restart the application or disconnect and connect the communication cable (USB, etc...
...turning the equipment off and on its packaging indicates that interference will help prevent potential negative consequences for your nearest Sony service station. 5 Never use the plug without the fuse cover. These limits are designed to provide reasonable protection against harmful interference in a particular installation...with the instructions, may influence the picture and sound of this camera. [ Notice If static electricity or electromagnetism causes data transfer to discontinue midway (fail), restart the application or disconnect and connect the communication cable (USB, etc...
Instruction Manual
Page 6
... camera is manufactured using the camera (page 30). • Do not shake or strike the camera. Always protect your data by JEITA (Japan Electronics and Information Technology Industries Association). • Playback of images recorded with your camera on other equipment and playback of your camera are operational for Camera File system) universal standard established by making a back up Do not turn off the camera or remove the battery pack or "Memory...
... camera is manufactured using the camera (page 30). • Do not shake or strike the camera. Always protect your data by JEITA (Japan Electronics and Information Technology Industries Association). • Playback of images recorded with your camera on other equipment and playback of your camera are operational for Camera File system) universal standard established by making a back up Do not turn off the camera or remove the battery pack or "Memory...
Instruction Manual
Page 7
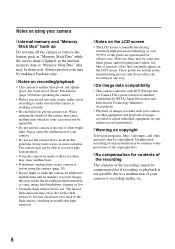
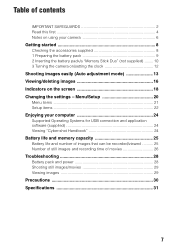
... Turning the camera on/setting the clock 12 Shooting images easily (Auto adjustment mode 13 Viewing/deleting images 16 Indicators on the screen 18 Changing the settings - Table of contents IMPORTANT SAFEGUARDS 2 Read this first 4 Notes on using your computer 24 Supported Operating Systems for USB connection and application software (supplied 24 Viewing "Cyber-shot Handbook 24 Battery life and memory capacity 25 Battery life and number of images that can be recorded/viewed .......... 25 Number of still images and recording time of movies 26 Troubleshooting 28 Battery pack and power...
... Turning the camera on/setting the clock 12 Shooting images easily (Auto adjustment mode 13 Viewing/deleting images 16 Indicators on the screen 18 Changing the settings - Table of contents IMPORTANT SAFEGUARDS 2 Read this first 4 Notes on using your computer 24 Supported Operating Systems for USB connection and application software (supplied 24 Viewing "Cyber-shot Handbook 24 Battery life and memory capacity 25 Battery life and number of images that can be recorded/viewed .......... 25 Number of still images and recording time of movies 26 Troubleshooting 28 Battery pack and power...
Instruction Manual
Page 10
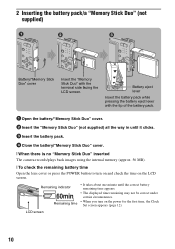
... first time, the Clock Set screen appears (page 12). Remaining indicator Remaining time • It takes about one minute until it clicks. 3 Insert the battery pack. 4 Close the battery/"Memory Stick Duo" cover. [ When there is no "Memory Stick Duo" inserted The camera records/plays back images using the internal memory (approx. 56 MB). [ To check the remaining battery time Open the lens cover or press the POWER button to turn on the LCD screen. LCD screen 10 Battery...
... first time, the Clock Set screen appears (page 12). Remaining indicator Remaining time • It takes about one minute until it clicks. 3 Insert the battery pack. 4 Close the battery/"Memory Stick Duo" cover. [ When there is no "Memory Stick Duo" inserted The camera records/plays back images using the internal memory (approx. 56 MB). [ To check the remaining battery time Open the lens cover or press the POWER button to turn on the LCD screen. LCD screen 10 Battery...
Instruction Manual
Page 12
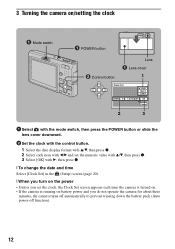
3 Turning the camera on/setting the clock Mode switch POWER button ɟ Control button Lens Lens cover 1 2 3 1 Select with the mode switch, then press the POWER button or slide the lens cover downward. 2 Set the clock with the control button. 1 Select the date display format with v/V, then press z. 2 Select each item with b/B and set the numeric value with v/V, then press z. 3 Select [OK] with B, then press z. [ To change the date and time Select [Clock Set] in the (Setup) screen (page 20...
3 Turning the camera on/setting the clock Mode switch POWER button ɟ Control button Lens Lens cover 1 2 3 1 Select with the mode switch, then press the POWER button or slide the lens cover downward. 2 Set the clock with the control button. 1 Select the date display format with v/V, then press z. 2 Select each item with b/B and set the numeric value with v/V, then press z. 3 Select [OK] with B, then press z. [ To change the date and time Select [Clock Set] in the (Setup) screen (page 20...
Instruction Manual
Page 14
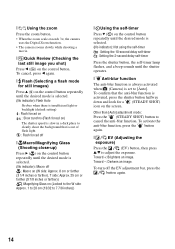
... b again. [ Flash (Selecting a flash mode for a (STEADY SHOT) icon on the control button repeatedly until the desired mode is selected. (No indicator): Not using the self-timer : Setting the 10-second delay self-timer : Setting the 2-second delay self-timer Press the shutter button, the self-timer lamp flashes, and a beep sounds until the shutter operates. [ Anti-blur function The anti-blur function is always activated when (Camera) is set to [Auto]. Other than [Auto] adjustment mode: Press the (STEADY SHOT) button to adjust the exposure. To confirm...
... b again. [ Flash (Selecting a flash mode for a (STEADY SHOT) icon on the control button repeatedly until the desired mode is selected. (No indicator): Not using the self-timer : Setting the 10-second delay self-timer : Setting the 2-second delay self-timer Press the shutter button, the self-timer lamp flashes, and a beep sounds until the shutter operates. [ Anti-blur function The anti-blur function is always activated when (Camera) is set to [Auto]. Other than [Auto] adjustment mode: Press the (STEADY SHOT) button to adjust the exposure. To confirm...
Instruction Manual
Page 18
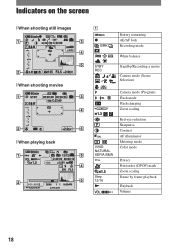
Indicators on the screen [ When shooting still images [ When shooting movies [ When playing back A 60min z M BRK WB STBY REC Battery remaining AE/AF lock Recording mode White balance Standby/Recording a movie Camera mode (Scene Selection) SL 1.3 ON VIVID NATURAL SEPIA B&W - 1.3 Step 12/16 N Camera mode (Program) Flash mode Flash charging Zoom scaling Red-eye reduction Sharpness Contrast AF illuminator Metering mode Color mode Protect Print order (DPOF) mark Zoom scaling Frame by frame playback Playback Volume 18
Indicators on the screen [ When shooting still images [ When shooting movies [ When playing back A 60min z M BRK WB STBY REC Battery remaining AE/AF lock Recording mode White balance Standby/Recording a movie Camera mode (Scene Selection) SL 1.3 ON VIVID NATURAL SEPIA B&W - 1.3 Step 12/16 N Camera mode (Program) Flash mode Flash charging Zoom scaling Red-eye reduction Sharpness Contrast AF illuminator Metering mode Color mode Protect Print order (DPOF) mark Zoom scaling Frame by frame playback Playback Volume 18
Instruction Manual
Page 19
...-file number Playback bar PictBridge connecting Image size Image quality Recording folder Change folder Playback folder Remaining internal memory capacity Remaining "Memory Stick" capacity Recording time [maximum recordable time] Multi Burst interval Remaining number of recordable images Self-timer Self-diagnosis display ISO number Bracket Step value 12/12 00:00:12 D E +2.0EV WB + Image number/Number of the playback image Playing back Multi Burst images in selected folder Counter Vibration warning Low battery warning PictBridge connecting Exposure Value ISO number Metering mode Flash White...
...-file number Playback bar PictBridge connecting Image size Image quality Recording folder Change folder Playback folder Remaining internal memory capacity Remaining "Memory Stick" capacity Recording time [maximum recordable time] Multi Burst interval Remaining number of recordable images Self-timer Self-diagnosis display ISO number Bracket Step value 12/12 00:00:12 D E +2.0EV WB + Image number/Number of the playback image Playing back Multi Burst images in selected folder Counter Vibration warning Low battery warning PictBridge connecting Exposure Value ISO number Metering mode Flash White...
Instruction Manual
Page 20
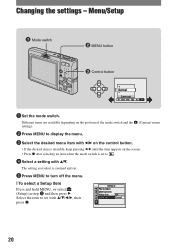
... MENU to display the menu. (Camera) menu 3 Select the desired menu item with b/B on the control button. • If the desired item is invisible, keep pressing b/B until the item appears on the screen. • Press z after selecting an item when the mode switch is zoomed and set with v/V. Changing the settings - Different items are available depending on the position of the mode switch and the settings. 2 Press MENU to turn...
... MENU to display the menu. (Camera) menu 3 Select the desired menu item with b/B on the control button. • If the desired item is invisible, keep pressing b/B until the item appears on the screen. • Press z after selecting an item when the mode switch is zoomed and set with v/V. Changing the settings - Different items are available depending on the position of the mode switch and the settings. 2 Press MENU to turn...
Instruction Manual
Page 21
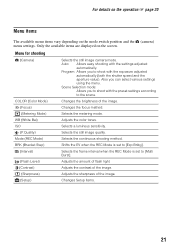
... Adjusts the sharpness of the image. 9 (Focus) Changes the focus method. (Metering Mode) Selects the metering mode. Mode (REC Mode) Selects the continuous shooting method. Adjusts the contrast of flash light. Selects a luminous sensitivity. Menu for shooting (Camera) Selects the still image camera mode. Auto: Allows easy shooting with the exposure adjusted automatically (both the shutter speed and the aperture value). Scene Selection mode: Allows you can select various settings using the menu. For details on the operation 1 page 20 Menu items The available menu...
... Adjusts the sharpness of the image. 9 (Focus) Changes the focus method. (Metering Mode) Selects the metering mode. Mode (REC Mode) Selects the continuous shooting method. Adjusts the contrast of flash light. Selects a luminous sensitivity. Menu for shooting (Camera) Selects the still image camera mode. Auto: Allows easy shooting with the exposure adjusted automatically (both the shutter speed and the aperture value). Scene Selection mode: Allows you can select various settings using the menu. For details on the operation 1 page 20 Menu items The available menu...
Instruction Manual
Page 22
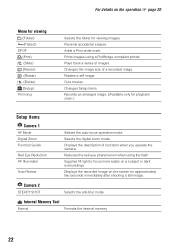
...image. Rotates a still image. Cuts movies. Camera 2 STEADY SHOT Selects the anti-blur mode. Prints images using the flash. Changes the image size of images. Displays the description of functions when you operate the camera. Displays the recorded image on the operation 1 page 20 Menu for viewing (Folder) - (Protect) DPOF (Print) (Slide) (Resize) (Rotate) (Divide) (Setup) Trimming Selects the folder for playback zoom.) Setup items Camera 1 AF Mode Digital Zoom Function Guide Red Eye Reduction AF Illuminator Auto Review Selects the auto focus operation mode. Reduces the red-eye...
...image. Rotates a still image. Cuts movies. Camera 2 STEADY SHOT Selects the anti-blur mode. Prints images using the flash. Changes the image size of images. Displays the description of functions when you operate the camera. Displays the recorded image on the operation 1 page 20 Menu for viewing (Folder) - (Protect) DPOF (Print) (Slide) (Resize) (Rotate) (Divide) (Setup) Trimming Selects the folder for playback zoom.) Setup items Camera 1 AF Mode Digital Zoom Function Guide Red Eye Reduction AF Illuminator Auto Review Selects the auto focus operation mode. Reduces the red-eye...
Instruction Manual
Page 23
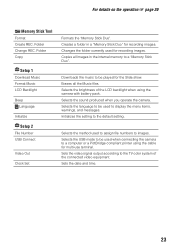
... the USB mode to a computer or a PictBridge compliant printer using the camera with battery pack. Selects the method used to be played for recording images. Folder Copy Setup 1 Download Music Format Music LCD Backlight Beep Language Initialize Setup 2 File Number USB Connect Video Out Clock Set Formats the "Memory Stick Duo". Copies all the Music files. Selects the brightness of the connected video equipment. Initializes the setting to a "Memory Stick Duo". Folder Change REC. Selects the sound produced when you operate the camera. Selects the language to display the menu...
... the USB mode to a computer or a PictBridge compliant printer using the camera with battery pack. Selects the method used to be played for recording images. Folder Copy Setup 1 Download Music Format Music LCD Backlight Beep Language Initialize Setup 2 File Number USB Connect Video Out Clock Set Formats the "Memory Stick Duo". Copies all the Music files. Selects the brightness of the connected video equipment. Initializes the setting to a "Memory Stick Duo". Folder Change REC. Selects the sound produced when you operate the camera. Selects the language to display the menu...
Instruction Manual
Page 24
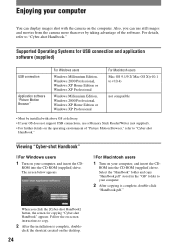
.... 24 Viewing "Cyber-shot Handbook" [ For Windows users 1 Turn on the computer. Select the "Handbook" folder and copy "Handbook.pdf" stored in the "GB" folder to your OS does not support USB connections, use still images and movies from the camera more than ever by taking advantage of "Picture Motion Browser," refer to "Cyber-shot Handbook." ROM into the CD-ROM (supplied) drive. Supported Operating Systems for copying "Cyber-shot Handbook" appears. click the shortcut created on the operating environment of the software.
.... 24 Viewing "Cyber-shot Handbook" [ For Windows users 1 Turn on the computer. Select the "Handbook" folder and copy "Handbook.pdf" stored in the "GB" folder to your OS does not support USB connections, use still images and movies from the camera more than ever by taking advantage of "Picture Motion Browser," refer to "Cyber-shot Handbook." ROM into the CD-ROM (supplied) drive. Supported Operating Systems for copying "Cyber-shot Handbook" appears. click the shortcut created on the operating environment of the software.
Instruction Manual
Page 25
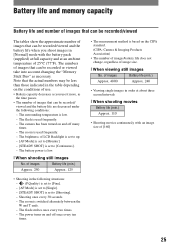
... set to up. - [AF Mode] is set to [Shooting]. - The flash strobes once every two times. - Note that the actual numbers may be less than those indicated in the following conditions: - The camera has been turned on the conditions of image size. [ When viewing still images No. The power turns on the CIPA standard. (CIPA: Camera & Imaging Products Association) • The number of images/battery life does not change, regardless of use. • Battery...
... set to up. - [AF Mode] is set to [Shooting]. - The flash strobes once every two times. - Note that the actual numbers may be less than those indicated in the following conditions: - The camera has been turned on the conditions of image size. [ When viewing still images No. The power turns on the CIPA standard. (CIPA: Camera & Imaging Products Association) • The number of images/battery life does not change, regardless of use. • Battery...
Instruction Manual
Page 28
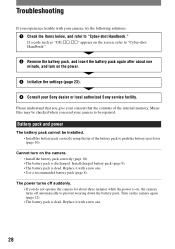
... on the screen, refer to prevent wearing down the battery pack. Battery pack and power The battery pack cannot be repaired. Install charged battery pack (page 9). • The battery pack is dead. Replace it with a new one . • Use a recommended battery pack (page 8). Turn on the power. 3 Initialize the settings (page 23). 4 Consult your Sony dealer or local authorized Sony service facility. Troubleshooting If you do not operate the camera for about...
... on the screen, refer to prevent wearing down the battery pack. Battery pack and power The battery pack cannot be repaired. Install charged battery pack (page 9). • The battery pack is dead. Replace it with a new one . • Use a recommended battery pack (page 8). Turn on the power. 3 Initialize the settings (page 23). 4 Consult your Sony dealer or local authorized Sony service facility. Troubleshooting If you do not operate the camera for about...
Instruction Manual
Page 29
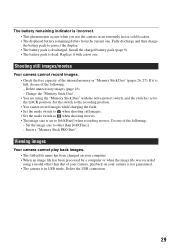
... display. • The battery pack is dead. Delete unnecessary images (page 16). - Viewing images Your camera cannot play back images. • The folder/file name has been changed on your computer. • When an image file has been processed by a computer or when the image file was recorded using the "Memory Stick Duo" with a new one . Set the switch to the recording position. • You cannot record images while charging the flash. • Set the mode switch to when shooting...
... display. • The battery pack is dead. Delete unnecessary images (page 16). - Viewing images Your camera cannot play back images. • The folder/file name has been changed on your computer. • When an image file has been processed by a computer or when the image file was recorded using the "Memory Stick Duo" with a new one . Set the switch to the recording position. • You cannot record images while charging the flash. • Set the mode switch to when shooting...
Instruction Manual
Page 30
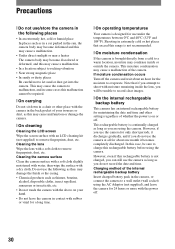
... camera. [ On cleaning Cleaning the LCD screen Wipe the screen surface with rubber or vinyl for a long time. [ On operating temperatures Your camera is designed for use under the temperatures between 0°C and 40°C (32°F and 104°F). This rechargeable battery is continually charged as long as this range is not recommended. [ On moisture condensation If the camera is brought directly...
... camera. [ On cleaning Cleaning the LCD screen Wipe the screen surface with rubber or vinyl for a long time. [ On operating temperatures Your camera is designed for use under the temperatures between 0°C and 40°C (32°F and 104°F). This rechargeable battery is continually charged as long as this range is not recommended. [ On moisture condensation If the camera is brought directly...

Instruction Manual
Page 31
... exposure, Scene Selection (9 modes) White balance: Automatic, Daylight, Cloudy, Fluorescent, Incandescent, Flash File format (DCF compliant): Still images: Exif Ver. 2.21 JPEG compliant, DPOF compatible Movies: MPEG1 compliant (Monaural) Recording media: Internal Memory (approx. 56 MB), "Memory Stick Duo" Flash: Recommended distance (ISO set to Auto): approx. 0.1 to 2.8 m (4 inches to 9 feet 2 1/4 inches) (W)/approx. 0.25 to 2.3 m (9 7/8 inches to 7 feet 6 5/8 inches) (T) [Input and Output connectors] Multi connector USB communication: Hi-Speed USB (USB 2.0 compliant) [LCD screen] LCD...
... exposure, Scene Selection (9 modes) White balance: Automatic, Daylight, Cloudy, Fluorescent, Incandescent, Flash File format (DCF compliant): Still images: Exif Ver. 2.21 JPEG compliant, DPOF compatible Movies: MPEG1 compliant (Monaural) Recording media: Internal Memory (approx. 56 MB), "Memory Stick Duo" Flash: Recommended distance (ISO set to Auto): approx. 0.1 to 2.8 m (4 inches to 9 feet 2 1/4 inches) (W)/approx. 0.25 to 2.3 m (9 7/8 inches to 7 feet 6 5/8 inches) (T) [Input and Output connectors] Multi connector USB communication: Hi-Speed USB (USB 2.0 compliant) [LCD screen] LCD...


