
Operating Instructions
Page 1
Refer to these numbers whenever you call upon your Sony dealer regarding this manual thoroughly, and retain it for future reference. Record the serial number in the space provided below. Model No Serial No DSC-S50 DSC-S30/S50 ©2000 Sony Corporation 3-060-523-12(1) Digital Still Camera Operating Instructions Before operating the unit, please read this product. Owner's Record The model and serial numbers are located on the bottom.
Refer to these numbers whenever you call upon your Sony dealer regarding this manual thoroughly, and retain it for future reference. Record the serial number in the space provided below. Model No Serial No DSC-S50 DSC-S30/S50 ©2000 Sony Corporation 3-060-523-12(1) Digital Still Camera Operating Instructions Before operating the unit, please read this product. Owner's Record The model and serial numbers are located on the bottom.
Operating Instructions
Page 4
...with your camera. • The illustrations in CANADA This Class B digital apparatus complies with Part 15 of the FCC Rules. Over 99.99% of the pixels are not guaranteed. "Memory Stick" N50 For the Customers in this manual show the DSC-S50. No compensation for effective use your camera on ...and playback of images recorded or edited with the Design Rules for the two models of the DSC-S30 and the DSC-S50. LCD screen and lens • The LCD screen is for Camera File Systems universal standard established by the JEIDA (Japan Electronic Industries Development Association). You cannot ...
...with your camera. • The illustrations in CANADA This Class B digital apparatus complies with Part 15 of the FCC Rules. Over 99.99% of the pixels are not guaranteed. "Memory Stick" N50 For the Customers in this manual show the DSC-S50. No compensation for effective use your camera on ...and playback of images recorded or edited with the Design Rules for the two models of the DSC-S30 and the DSC-S50. LCD screen and lens • The LCD screen is for Camera File Systems universal standard established by the JEIDA (Japan Electronic Industries Development Association). You cannot ...

Operating Instructions
Page 5
... supply 8 Setting the date and time 13 Inserting the "Memory Stick 15 Basic operations B Recording Recording still images 16 Recording moving images (DSC-S50 only 20 B Playback Playing back still images 21 Playing back moving images 22 Viewing images using a personal computer 24 Image file storage destinations...the control button 29 How to print (PRINT MARK 53 Additional information Precautions 54 On "Memory Sticks 55 Using your camera abroad 56 Troubleshooting 57 Warning and notice messages 61 Self-diagnosis display 62 Specifications 63 LCD screen indicators 64 Index 66 5
... supply 8 Setting the date and time 13 Inserting the "Memory Stick 15 Basic operations B Recording Recording still images 16 Recording moving images (DSC-S50 only 20 B Playback Playing back still images 21 Playing back moving images 22 Viewing images using a personal computer 24 Image file storage destinations...the control button 29 How to print (PRINT MARK 53 Additional information Precautions 54 On "Memory Sticks 55 Using your camera abroad 56 Troubleshooting 57 Warning and notice messages 61 Self-diagnosis display 62 Specifications 63 LCD screen indicators 64 Index 66 5
Operating Instructions
Page 6
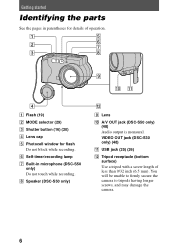
F Self-timer/recording lamp G Built-in parentheses for flash Do not block while recording. VIDEO OUT jack (DSC-S30 only) (48) K USB jack (25) (26) L Tripod receptacle (bottom surface) Use a tripod with a screw length of operation. 1 5 6 2 7 3 8 9 0 qa 4 A Flash (19) B MODE...for details of less than 9/32 inch (6.5 mm). You will be unable to firmly secure the camera to tripods having longer screws, and may damage the camera. 6 H Speaker (DSC-S50 only) qs I Lens J A/V OUT jack (DSC-S50 only) (48) Audio output is monaural. Getting started Identifying the parts See the pages in ...
F Self-timer/recording lamp G Built-in parentheses for flash Do not block while recording. VIDEO OUT jack (DSC-S30 only) (48) K USB jack (25) (26) L Tripod receptacle (bottom surface) Use a tripod with a screw length of operation. 1 5 6 2 7 3 8 9 0 qa 4 A Flash (19) B MODE...for details of less than 9/32 inch (6.5 mm). You will be unable to firmly secure the camera to tripods having longer screws, and may damage the camera. 6 H Speaker (DSC-S50 only) qs I Lens J A/V OUT jack (DSC-S50 only) (48) Audio output is monaural. Getting started Identifying the parts See the pages in ...
Operating Instructions
Page 7
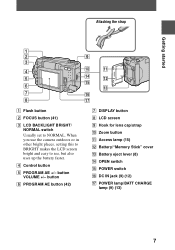
... A Flash button B FOCUS button (41) C LCD BACKLIGHT BRIGHT/ NORMAL switch Usually set to see, but also uses up the battery faster. When you use the camera outdoors or in other bright places, setting this to BRIGHT makes the LCD screen bright and easy to NORMAL. D Control button E PROGRAM AE +/- button F PROGRAM...
... A Flash button B FOCUS button (41) C LCD BACKLIGHT BRIGHT/ NORMAL switch Usually set to see, but also uses up the battery faster. When you use the camera outdoors or in other bright places, setting this to BRIGHT makes the LCD screen bright and easy to NORMAL. D Control button E PROGRAM AE +/- button F PROGRAM...
Operating Instructions
Page 8
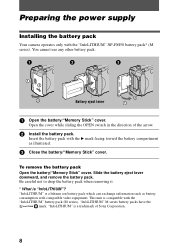
... battery pack with compatible video equipment. You cannot use any other battery pack. Open the cover while sliding the OPEN switch in the direction of Sony Corporation. 8 Slide the battery eject lever downward, and remove the battery pack. Be careful not to drop the battery pack when removing it. * What is... arrow. 2 Install the battery pack. "InfoLITHIUM" M series battery packs have the mark. This unit is "InfoLITHIUM"? Preparing the power supply Installing the battery pack Your camera operates only with the "InfoLITHIUM" battery pack (M series).
... battery pack with compatible video equipment. You cannot use any other battery pack. Open the cover while sliding the OPEN switch in the direction of Sony Corporation. 8 Slide the battery eject lever downward, and remove the battery pack. Be careful not to drop the battery pack when removing it. * What is... arrow. 2 Install the battery pack. "InfoLITHIUM" M series battery packs have the mark. This unit is "InfoLITHIUM"? Preparing the power supply Installing the battery pack Your camera operates only with the "InfoLITHIUM" battery pack (M series).
Operating Instructions
Page 9
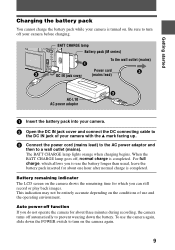
...(M series) To the wall outlet (mains) DC IN jack cover Power cord (mains lead) AC-L10 AC power adaptor 1 Insert the battery pack into your camera. 2 Open the DC IN jack cover and connect the DC connecting cable to use and the operating environment. The BATT CHARGE lamp lights orange when... charging begins. For full charge, which you can still record or play back images. Auto power-off function If you do not operate the camera for about one hour after normal charge is completed. Battery remaining indicator The LCD screen on . When the BATT CHARGE lamp goes off automatically to...
...(M series) To the wall outlet (mains) DC IN jack cover Power cord (mains lead) AC-L10 AC power adaptor 1 Insert the battery pack into your camera. 2 Open the DC IN jack cover and connect the DC connecting cable to use and the operating environment. The BATT CHARGE lamp lights orange when... charging begins. For full charge, which you can still record or play back images. Auto power-off function If you do not operate the camera for about one hour after normal charge is completed. Battery remaining indicator The LCD screen on . When the BATT CHARGE lamp goes off automatically to...

Operating Instructions
Page 11
The above figures are a guide when you use your camera at low temperatures, use the flash, repeatedly turn the power on/off or use the zoom. • The capacity of the AC power adaptor with a ...
The above figures are a guide when you use your camera at low temperatures, use the flash, repeatedly turn the power on/off or use the zoom. • The capacity of the AC power adaptor with a ...

Operating Instructions
Page 12
Using the AC power adaptor DC IN jack cover To the wall outlet (mains) Power cord (mains lead) AC-L10 AC power adaptor 1 Open the DC IN jack cover and connect the DC connecting cable to the DC IN jack of your camera with the v mark facing up. 2 Connect the power cord (mains lead) to the AC power adaptor and then to a wall outlet (mains). Using a car battery Use Sony DC adaptor/charger. 12
Using the AC power adaptor DC IN jack cover To the wall outlet (mains) Power cord (mains lead) AC-L10 AC power adaptor 1 Open the DC IN jack cover and connect the DC connecting cable to the DC IN jack of your camera with the v mark facing up. 2 Connect the power cord (mains lead) to the AC power adaptor and then to a wall outlet (mains). Using a car battery Use Sony DC adaptor/charger. 12

Operating Instructions
Page 13
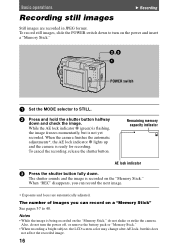
Getting started Setting the date and time When you first use your camera for recording. The POWER lamp lights up. 2 Press v on the control button, then press the center z. 13 The menu bar appears on the LCD screen. 3 Select [SETUP] with B on the control button, then press the center z. 4 Select [CLOCK SET] with v/V on the control button. If these are not set the date and time. Control button POWER lamp 1 Slide down the POWER switch to turn on your camera, set , the CLOCK SET screen appears whenever you turn on the power.
Getting started Setting the date and time When you first use your camera for recording. The POWER lamp lights up. 2 Press v on the control button, then press the center z. 13 The menu bar appears on the LCD screen. 3 Select [SETUP] with B on the control button, then press the center z. 4 Select [CLOCK SET] with v/V on the control button. If these are not set the date and time. Control button POWER lamp 1 Slide down the POWER switch to turn on your camera, set , the CLOCK SET screen appears whenever you turn on the power.
Operating Instructions
Page 16
... the automatic adjustments*, the AE lock indicator z lights up and the camera is recorded on the "Memory Stick." When "REC" disappears, you can record the next image. ∗ Exposure and focus are recorded in JPEG format. To ..., release the shutter button. The number of images you can record on the power and insert a "Memory Stick." Also, do not shake or strike the camera. While the AE lock indicator z (green) is being recorded on the "Memory Stick," do not turn on a "Memory Stick" See pages 37 to turn the...
... the automatic adjustments*, the AE lock indicator z lights up and the camera is recorded on the "Memory Stick." When "REC" disappears, you can record the next image. ∗ Exposure and focus are recorded in JPEG format. To ..., release the shutter button. The number of images you can record on the power and insert a "Memory Stick." Also, do not shake or strike the camera. While the AE lock indicator z (green) is being recorded on the "Memory Stick," do not turn on a "Memory Stick" See pages 37 to turn the...
Operating Instructions
Page 17
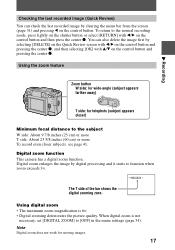
... to the normal recording mode, press lightly on the shutter button or select [RETURN] with v/V on the control button and pressing the center z. Digital zoom enlarges the image by digital processing and it starts to [OFF] in the menu settings (page 34). B Recording Checking the last recorded image (Quick Review) You can... the center z. You can check the last recorded image by clearing the menu bar from the screen (page 31) and pressing b on the control button. Digital zoom function This camera has a digital zoom function.
... to the normal recording mode, press lightly on the shutter button or select [RETURN] with v/V on the control button and pressing the center z. Digital zoom enlarges the image by digital processing and it starts to [OFF] in the menu settings (page 34). B Recording Checking the last recorded image (Quick Review) You can... the center z. You can check the last recorded image by clearing the menu bar from the screen (page 31) and pressing b on the control button. Digital zoom function This camera has a digital zoom function.
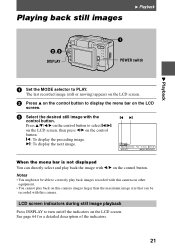
Operating Instructions
Page 21
... page 64 for a detailed description of the indicators. 21 When the menu bar is not displayed You can directly select and play back on this camera images larger than the maximum image size that can be able to correctly play back images recorded with b/B on the control button. LCD screen indicators... POWER switch 1 Set the MODE selector to turn on/off the indicators on the LCD screen. Notes • You might not be recorded with this camera on other equipment. • You cannot play back the image with this...
... page 64 for a detailed description of the indicators. 21 When the menu bar is not displayed You can directly select and play back on this camera images larger than the maximum image size that can be able to correctly play back images recorded with b/B on the control button. LCD screen indicators... POWER switch 1 Set the MODE selector to turn on/off the indicators on the LCD screen. Notes • You might not be recorded with this camera on other equipment. • You cannot play back the image with this...
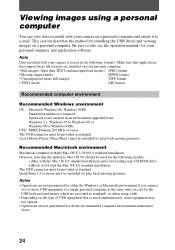
Operating Instructions
Page 24
... newer must be provided as standard), or when using a personal computer You can view data recorded with your camera on a personal computer and attach it to also see the operation manuals for your camera is required. Note Data recorded with your personal computer and application software. CPU: MMX Pentium 200 MHz or...
... newer must be provided as standard), or when using a personal computer You can view data recorded with your camera on a personal computer and attach it to also see the operation manuals for your camera is required. Note Data recorded with your personal computer and application software. CPU: MMX Pentium 200 MHz or...
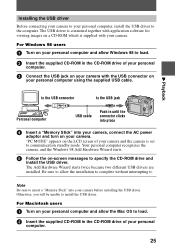
Operating Instructions
Page 25
...connector clicks into place 4 Insert a "Memory Stick" into your personal computer using the supplied USB cable. Your personal computer recognizes the camera, and the Windows 98 Add Hardware Wizard starts. 5 Follow the on your personal computer, install the USB driver to the computer. ...Otherwise, you will be unable to communication standby mode. Installing the USB driver Before connecting your camera to your personal computer and allow the installation to complete without interrupting it. The USB driver is contained together with the USB ...
...connector clicks into place 4 Insert a "Memory Stick" into your personal computer using the supplied USB cable. Your personal computer recognizes the camera, and the Windows 98 Add Hardware Wizard starts. 5 Follow the on your personal computer, install the USB driver to the computer. ...Otherwise, you will be unable to communication standby mode. Installing the USB driver Before connecting your camera to your personal computer and allow the installation to complete without interrupting it. The USB driver is contained together with the USB ...
Operating Instructions
Page 26
...icon to open the window. 5 Move the following two files from the window opened in step 4 (drag and drop). • Sony USB Driver • Sony USB Shim 6 When "Put these items into your camera, and connect the AC power adaptor to your personal computer. appears, click "OK." 7 Restart your... camera and then to the "System Folder" icon in the window opened in until the connector clicks into place 3 Insert a "Memory ...
...icon to open the window. 5 Move the following two files from the window opened in step 4 (drag and drop). • Sony USB Driver • Sony USB Shim 6 When "Put these items into your camera, and connect the AC power adaptor to your personal computer. appears, click "OK." 7 Restart your... camera and then to the "System Folder" icon in the window opened in until the connector clicks into place 3 Insert a "Memory ...
Operating Instructions
Page 27
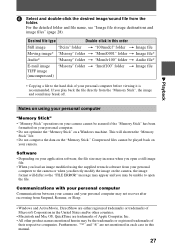
... trademarks or registered trademarks of their respective companies. Compressed files cannot be assured if the "Memory Stick" has been formatted on your camera. Software • Depending on your application software, the file size may increase when you open the file. This will differ so...storage destinations and image files" (page 28). Communications with your personal computer Communications between your camera and your personal computer to the camera or when you directly modify the image on the camera, the image format will shorten the "Memory Stick" life. • Do not compress ...
... trademarks or registered trademarks of their respective companies. Compressed files cannot be assured if the "Memory Stick" has been formatted on your camera. Software • Depending on your application software, the file size may increase when you open the file. This will differ so...storage destinations and image files" (page 28). Communications with your personal computer Communications between your camera and your personal computer to the camera or when you directly modify the image on the camera, the image format will shorten the "Memory Stick" life. • Do not compress ...
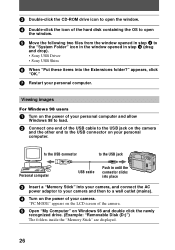
Operating Instructions
Page 28
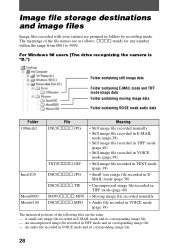
For Windows 98 users (The drive recognizing the camera is "D.") Folder containing still image data Folder containing E-MAIL mode and TIFF mode image data Folder containing moving image data Folder containing VOICE mode audio ... its corresponding image file - An audio file recorded in folders by recording mode. Image file storage destinations and image files Image files recorded with your camera are grouped in VOICE mode and its corresponding image file 28 The meanings of the following files are the same. - ssss stands for any number...
For Windows 98 users (The drive recognizing the camera is "D.") Folder containing still image data Folder containing E-MAIL mode and TIFF mode image data Folder containing moving image data Folder containing VOICE mode audio ... its corresponding image file - An audio file recorded in folders by recording mode. Image file storage destinations and image files Image files recorded with your camera are grouped in VOICE mode and its corresponding image file 28 The meanings of the following files are the same. - ssss stands for any number...
Operating Instructions
Page 29
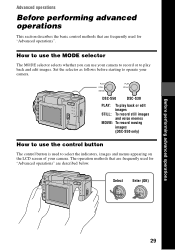
...use the MODE selector The MODE selector selects whether you can use your camera to record or to play back or edit images STILL: To record still images and voice memos MOVIE: To record moving images (DSC-S50 only) How to use the control button The control button is used... for "Advanced operations" are frequently used to operate your camera. Advanced operations Before performing advanced operations This section describes the basic control methods ...
...use the MODE selector The MODE selector selects whether you can use your camera to record or to play back or edit images STILL: To record still images and voice memos MOVIE: To record moving images (DSC-S50 only) How to use the control button The control button is used... for "Advanced operations" are frequently used to operate your camera. Advanced operations Before performing advanced operations This section describes the basic control methods ...
Operating Instructions
Page 31
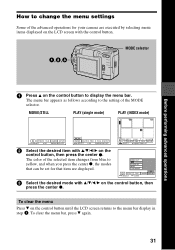
... the menu settings Some of the MODE selector. How to yellow, and when you press the center z, the modes that can be set for your camera are displayed. 3 Select the desired mode with v/V/b/B on the control button, then press the center z. MODE selector Before performing advanced operations 1 Press v on the control...
... the menu settings Some of the MODE selector. How to yellow, and when you press the center z, the modes that can be set for your camera are displayed. 3 Select the desired mode with v/V/b/B on the control button, then press the center z. MODE selector Before performing advanced operations 1 Press v on the control...


