Operating Instructions
Page 7
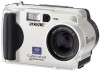
... camera outdoors or in other bright places, setting this to BRIGHT makes the LCD screen bright and easy to NORMAL. button F PROGRAM AE button (42) G DISPLAY button H LCD screen I Hook for lens cap/strap J Zoom button K Access lamp (15) L Battery/"Memory Stick" cover M Battery eject lever (8) N OPEN switch O POWER switch P DC IN jack (9) (12) Q POWER...
... camera outdoors or in other bright places, setting this to BRIGHT makes the LCD screen bright and easy to NORMAL. button F PROGRAM AE button (42) G DISPLAY button H LCD screen I Hook for lens cap/strap J Zoom button K Access lamp (15) L Battery/"Memory Stick" cover M Battery eject lever (8) N OPEN switch O POWER switch P DC IN jack (9) (12) Q POWER...
Operating Instructions
Page 8
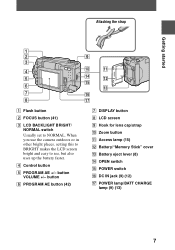
... the battery pack. "InfoLITHIUM" is "InfoLITHIUM"? Open the cover while sliding the OPEN switch in the direction of Sony Corporation. 8 To remove the battery pack Open the battery/"Memory Stick" cover. Preparing the power supply Installing the battery pack Your camera operates only with the B mark facing toward the battery compartment as battery consumption...
... the battery pack. "InfoLITHIUM" is "InfoLITHIUM"? Open the cover while sliding the OPEN switch in the direction of Sony Corporation. 8 To remove the battery pack Open the battery/"Memory Stick" cover. Preparing the power supply Installing the battery pack Your camera operates only with the B mark facing toward the battery compartment as battery consumption...
Operating Instructions
Page 9
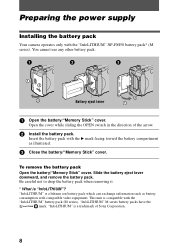
...the battery pack while your camera with the v mark facing up. 3 Connect the power cord (mains lead) to the AC power adaptor and then to a wall outlet (mains). The BATT CHARGE lamp lights orange when charging begins. Auto power-off automatically to prevent wearing down the POWER switch to turn off , ...normal charge is turned on the camera shows the remaining time for which allows you to use the battery longer than usual, ...
...the battery pack while your camera with the v mark facing up. 3 Connect the power cord (mains lead) to the AC power adaptor and then to a wall outlet (mains). The BATT CHARGE lamp lights orange when charging begins. Auto power-off automatically to prevent wearing down the POWER switch to turn off , ...normal charge is turned on the camera shows the remaining time for which allows you to use the battery longer than usual, ...

Operating Instructions
Page 13
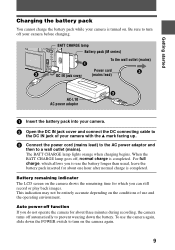
If these are not set the date and time. The POWER lamp lights up. 2 Press v on the control button, then press the center z. 13 The menu bar appears on the LCD screen. 3 Select [SETUP] with B on the control button, then press the center z. 4 Select [CLOCK SET] with v/V on the control button. Control button POWER lamp 1 Slide down the POWER switch to turn on your camera, set , the CLOCK SET screen appears whenever you first use your camera for recording. Getting started Setting the date and time When you turn on the power.
If these are not set the date and time. The POWER lamp lights up. 2 Press v on the control button, then press the center z. 13 The menu bar appears on the LCD screen. 3 Select [SETUP] with B on the control button, then press the center z. 4 Select [CLOCK SET] with v/V on the control button. Control button POWER lamp 1 Slide down the POWER switch to turn on your camera, set , the CLOCK SET screen appears whenever you first use your camera for recording. Getting started Setting the date and time When you turn on the power.
Operating Instructions
Page 15
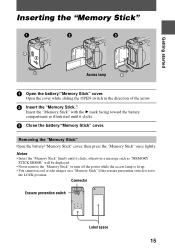
Open the cover while sliding the OPEN switch in the direction of the arrow. 2 Insert the "Memory Stick." Insert the "Memory Stick" with the B mark facing toward the battery compartment as illustrated until ... Stick" firmly until it clicks, otherwise a message such as "MEMORY STICK ERROR" will be displayed. • Never remove the "Memory Stick" or turn off the power while the access lamp is lit up. • You cannot record or edit images on a "Memory Stick" if the erasure prevention...
Open the cover while sliding the OPEN switch in the direction of the arrow. 2 Insert the "Memory Stick." Insert the "Memory Stick" with the B mark facing toward the battery compartment as illustrated until ... Stick" firmly until it clicks, otherwise a message such as "MEMORY STICK ERROR" will be displayed. • Never remove the "Memory Stick" or turn off the power while the access lamp is lit up. • You cannot record or edit images on a "Memory Stick" if the erasure prevention...
Operating Instructions
Page 16
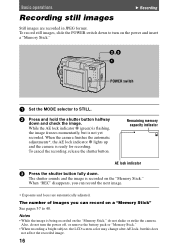
... shake or strike the camera. When the camera finishes the automatic adjustments*, the AE lock indicator z lights up and the camera is being recorded on the power and insert a "Memory Stick." Basic operations Recording still images B Recording Still images are automatically adjusted. POWER switch 1 Set the MODE ... flashing, the image freezes momentarily, but this does not affect the recorded image. 16 To record still images, slide the POWER switch down to turn the power off, or remove the battery pack or "Memory Stick." • When recording a bright subject, the LCD screen color...
... shake or strike the camera. When the camera finishes the automatic adjustments*, the AE lock indicator z lights up and the camera is being recorded on the power and insert a "Memory Stick." Basic operations Recording still images B Recording Still images are automatically adjusted. POWER switch 1 Set the MODE ... flashing, the image freezes momentarily, but this does not affect the recorded image. 16 To record still images, slide the POWER switch down to turn the power off, or remove the battery pack or "Memory Stick." • When recording a bright subject, the LCD screen color...

Operating Instructions
Page 20
...215;240], the maximum recording time is held down to turn on/off the indicators on the "Memory Stick." See pages 17 and 18. DISPLAY POWER switch 1 Set the MODE selector to 10 or 15 seconds with audio are recorded on the LCD screen. However, when [IMAGE SIZE] in the menu...down The image and sound are recorded while the shutter button is 15 seconds (page 33). "REC" appears on the power and insert a "Memory Stick." Recording moving images, slide the POWER switch down for up to 60 seconds. See page 64 for a detailed description of the indicators. 20 You can change the...
...215;240], the maximum recording time is held down to turn on/off the indicators on the "Memory Stick." See pages 17 and 18. DISPLAY POWER switch 1 Set the MODE selector to 10 or 15 seconds with audio are recorded on the LCD screen. However, when [IMAGE SIZE] in the menu...down The image and sound are recorded while the shutter button is 15 seconds (page 33). "REC" appears on the power and insert a "Memory Stick." Recording moving images, slide the POWER switch down for up to 60 seconds. See page 64 for a detailed description of the indicators. 20 You can change the...
Operating Instructions
Page 21
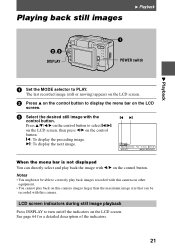
Playing back still images B Playback B Playback DISPLAY POWER switch 1 Set the MODE selector to display the menu bar on the LCD screen. ...still image playback Press DISPLAY to correctly play back images recorded with this camera on other equipment. • You cannot play back the image with this camera images larger than the maximum image size that can directly select and ... display the preceding image. Notes • You might not be recorded with b/B on this camera. The last recorded image (still or moving) appears on the LCD screen. 2 Press v on the control button to PLAY...
Playing back still images B Playback B Playback DISPLAY POWER switch 1 Set the MODE selector to display the menu bar on the LCD screen. ...still image playback Press DISPLAY to correctly play back images recorded with this camera on other equipment. • You cannot play back the image with this camera images larger than the maximum image size that can directly select and ... display the preceding image. Notes • You might not be recorded with b/B on this camera. The last recorded image (still or moving) appears on the LCD screen. 2 Press v on the control button to PLAY...
Operating Instructions
Page 22
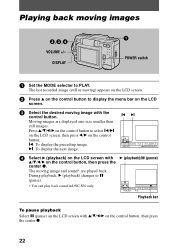
... control button. Moving images are played back. During playback, B (playback) changes to PLAY. The moving images VOLUME +/- DISPLAY POWER switch 1 Set the MODE selector to X (pause). ∗ You can play back sound in DSC-S50 only. "b: To display the preceding image. Playing back moving image and sound* are displayed one-size smaller than still...
... control button. Moving images are played back. During playback, B (playback) changes to PLAY. The moving images VOLUME +/- DISPLAY POWER switch 1 Set the MODE selector to X (pause). ∗ You can play back sound in DSC-S50 only. "b: To display the preceding image. Playing back moving image and sound* are displayed one-size smaller than still...
Operating Instructions
Page 55
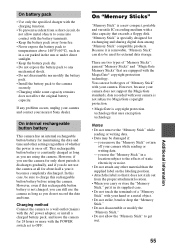
... a "Memory Stick" with the AC power adaptor, or install a charged battery pack, and leave the camera for exchanging and sharing digital data among "Memory Stick" compatible products. Charging method Connect the camera to OFF. You can still use the camera as long as you do not record...not touch the terminals of "Memory Stick" with your camera is not subject to MagicGate copyright protection. ∗ MagicGate is specially designed for 24 hours or more with the POWER switch set to a wall outlet (mains) with your nearest Sony dealer. There are equipped with a data capacity that ...
... a "Memory Stick" with the AC power adaptor, or install a charged battery pack, and leave the camera for exchanging and sharing digital data among "Memory Stick" compatible products. Charging method Connect the camera to OFF. You can still use the camera as long as you do not record...not touch the terminals of "Memory Stick" with your camera is not subject to MagicGate copyright protection. ∗ MagicGate is specially designed for 24 hours or more with the POWER switch set to a wall outlet (mains) with your nearest Sony dealer. There are equipped with a data capacity that ...
Operating Instructions
Page 57
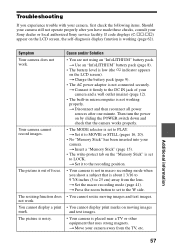
...cm) away from the TV, etc. 57 If code displays (C:ss:ss) appear on by sliding the POWER switch down and check that the camera works properly. • The MODE selector is out of your camera and a wall outlet (mains) (page 12). • The built-in macro recording mode when you... have made these checks, consult your Sony dealer or local authorized Sony service facility. Your camera cannot record images. The picture is not working (page 62). t Connect it firmly to the W side. • You cannot resize...
...cm) away from the TV, etc. 57 If code displays (C:ss:ss) appear on by sliding the POWER switch down and check that the camera works properly. • The MODE selector is out of your camera and a wall outlet (mains) (page 12). • The built-in macro recording mode when you... have made these checks, consult your Sony dealer or local authorized Sony service facility. Your camera cannot record images. The picture is not working (page 62). t Connect it firmly to the W side. • You cannot resize...


