Operating Instructions
Page 74
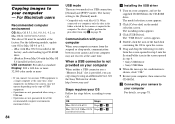
... OS. • Close down all the recommended computer environments mentioned above. When a USB connector is not provided on your camera, may not operate depending on the type of the CD-ROM x USB Driver This driver is copied to easily transfer images from step 2 on page 58. The factory setting...Operation is used to less than 800 × 600 dots or 256 colors or less, the model selection screen does not appear. See the Sony Website for a USB connection, [Normal] and [PTP]* modes. x ImageMixer This application is the [Normal] mode. * Compatible only with your computer When your...
... OS. • Close down all the recommended computer environments mentioned above. When a USB connector is not provided on your camera, may not operate depending on the type of the CD-ROM x USB Driver This driver is copied to easily transfer images from step 2 on page 58. The factory setting...Operation is used to less than 800 × 600 dots or 256 colors or less, the model selection screen does not appear. See the Sony Website for a USB connection, [Normal] and [PTP]* modes. x ImageMixer This application is the [Normal] mode. * Compatible only with your computer When your...
Operating Instructions
Page 75
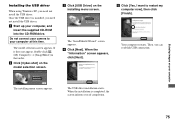
... installed, you need not install the USB driver. When the "Information" screen appears, click [Next]. Your computer restarts. b Click [Cyber-shot] on the installing menu screen. c Click [USB Driver] on the model selection screen. Then, you of completion. 75 The "InstallShield Wizard" screen appears. d Click [Next]. Do not connect your camera to restart my computer now], then...
... installed, you need not install the USB driver. When the "Information" screen appears, click [Next]. Your computer restarts. b Click [Cyber-shot] on the installing menu screen. c Click [USB Driver] on the model selection screen. Then, you of completion. 75 The "InstallShield Wizard" screen appears. d Click [Next]. Do not connect your camera to restart my computer now], then...
Operating Instructions
Page 77
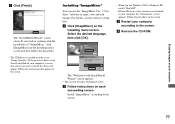
...to continue with the installation of "ImageMixer," click [ImageMixer] on the installing menu screen and then follow the procedure. • The USB driver is needed in your computer according to the screen. Select the desired language, then click [OK]. Follow the procedure on the installing ...; If DirectX8.0a or a later version is not already installed on your computer g Click [Finish]. If the necessary driver is not installed in order to use the "ImageMixer Ver. 1.5 for Sony" software to copy, view and edit images. Installing "ImageMixer" You can use "Image Transfer".
...to continue with the installation of "ImageMixer," click [ImageMixer] on the installing menu screen and then follow the procedure. • The USB driver is needed in your computer according to the screen. Select the desired language, then click [OK]. Follow the procedure on the installing ...; If DirectX8.0a or a later version is not already installed on your computer g Click [Finish]. If the necessary driver is not installed in order to use the "ImageMixer Ver. 1.5 for Sony" software to copy, view and edit images. Installing "ImageMixer" You can use "Image Transfer".

Operating Instructions
Page 80
...you find either of the devices above window, you can set to a folder in your camera appear. • This section describes an example of the "Memory Stick" inserted in ...Hardware] on the tasktray, select [Open Settings]. When a removable disk icon is deleted. Try the USB driver installation again using "Image Transfer" - When you select [Settings] from the above , follow the ...already installed. 1 Click [Device Manager]. 2 Double-click [ Other Devices]. 3 Confirm if there is a " Sony DSC" with a mark. 3 If you want to the "My Documents" folder. • When the "Removable Disk"...
...you find either of the devices above window, you can set to a folder in your camera appear. • This section describes an example of the "Memory Stick" inserted in ...Hardware] on the tasktray, select [Open Settings]. When a removable disk icon is deleted. Try the USB driver installation again using "Image Transfer" - When you select [Settings] from the above , follow the ...already installed. 1 Click [Device Manager]. 2 Double-click [ Other Devices]. 3 Confirm if there is a " Sony DSC" with a mark. 3 If you want to the "My Documents" folder. • When the "Removable Disk"...
Operating Instructions
Page 84
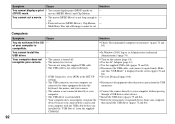
... slot loading type CD-ROM drive - When a USB connector is not provided on the model selection screen. See the Sony Website for a USB connection, [Normal] and [PTP]* modes. The model selection screen appears. 2 Click [Cyber-shot] on your camera, may not recover at the same time, some ...steps below, according to your OS to a computer, only the data in step 4. • Sony USB Driver • Sony USB Shim 6 When the message for confirmation is provided, you connect two or more USB equipment to your computer - OS Mac OS 8.5.1/8.6/9.0 Mac OS 9.1/9.2/Mac OS X (v10.0/v10.1/v10.2)...
... slot loading type CD-ROM drive - When a USB connector is not provided on the model selection screen. See the Sony Website for a USB connection, [Normal] and [PTP]* modes. The model selection screen appears. 2 Click [Cyber-shot] on your camera, may not recover at the same time, some ...steps below, according to your OS to a computer, only the data in step 4. • Sony USB Driver • Sony USB Shim 6 When the message for confirmation is provided, you connect two or more USB equipment to your computer - OS Mac OS 8.5.1/8.6/9.0 Mac OS 9.1/9.2/Mac OS X (v10.0/v10.1/v10.2)...
Operating Instructions
Page 85
...Open]. The image file opens. • Close down all applications running on the computer before installing the USB driver and application. • You can use the "ImageMixer Ver. 1.5 for the operation method. • ...your computer 1 Double-click the hard disk icon. 2 Double-click the desired image file in your camera appear. 2 Double-click "DCIM." 3 Double-click the folder contained the desired image file. 4... and 83 for details about the installation method, or see the software's help files for Sony" software to copy images to your computer and to the menu screen. The selected image ...
...Open]. The image file opens. • Close down all applications running on the computer before installing the USB driver and application. • You can use the "ImageMixer Ver. 1.5 for the operation method. • ...your computer 1 Double-click the hard disk icon. 2 Double-click the desired image file in your camera appear. 2 Double-click "DCIM." 3 Double-click the folder contained the desired image file. 4... and 83 for details about the installation method, or see the software's help files for Sony" software to copy images to your computer and to the menu screen. The selected image ...
Operating Instructions
Page 92
... be cut a movie. p Use the AC Adaptor (page 13). p Disconnect all equipment other than your camera from your computer with the USB cable before you installed the "USB Driver" from the supplied CD-ROM. Cause • You cannot display print (DPOF) marks on as Administrator (...the SET UP settings. • The USB connectors on the camera (page 14). You cannot install the USB driver. Symptom You cannot display a print (DPOF) mark. p Install the USB driver (pages 75 and 84). Your computer does not recognize your computer. • The USB driver is set to other device. You ...
... be cut a movie. p Use the AC Adaptor (page 13). p Disconnect all equipment other than your camera from your computer with the USB cable before you installed the "USB Driver" from the supplied CD-ROM. Cause • You cannot display print (DPOF) marks on as Administrator (...the SET UP settings. • The USB connectors on the camera (page 14). You cannot install the USB driver. Symptom You cannot display a print (DPOF) mark. p Install the USB driver (pages 75 and 84). Your computer does not recognize your computer. • The USB driver is set to other device. You ...
Operating Instructions
Page 111
P8: 16 MB) • CD-ROM (USB driver SPVD-010) • Operating instructions • Soft carrying case (DSC-P12 only) Design and specifications are subject to +140°F) Dimensions Approx. 48×29×81 mm (1 15/16×1 3/16...V Capacity 2.8 Wh (780 mAh) Accessories • NP-FC11 battery pack (DSC-P12: 2, DSC-P8/ P10: 1) • AC-LS5 AC Adaptor • Power cord (mains lead) • A/V connecting cable • USB cable • Wrist strap • "Memory Stick" (DSC-P10/P12: 32MB, DSC- White balance Flash, Automatic, Daylight, Cloudy, Fluorescent, Incandescent Data format (DCF...
P8: 16 MB) • CD-ROM (USB driver SPVD-010) • Operating instructions • Soft carrying case (DSC-P12 only) Design and specifications are subject to +140°F) Dimensions Approx. 48×29×81 mm (1 15/16×1 3/16...V Capacity 2.8 Wh (780 mAh) Accessories • NP-FC11 battery pack (DSC-P12: 2, DSC-P8/ P10: 1) • AC-LS5 AC Adaptor • Power cord (mains lead) • A/V connecting cable • USB cable • Wrist strap • "Memory Stick" (DSC-P10/P12: 32MB, DSC- White balance Flash, Automatic, Daylight, Cloudy, Fluorescent, Incandescent Data format (DCF...

Operating Instructions
Page 115
... pack 10, 109 charging time 11 Cleaning 107 Clip Motion 51 Clock Set 15 Computer copying images 79, 85 Image Transfer 76 ImageMixer 77 USB cable 78 USB driver 75 Contrast 101 Control button 9, 14, 39 Copying images 79, 85 D DC plug 10, 13 Deleting images 34, 70 Divide 72 DPOF 65 E Editing...
... pack 10, 109 charging time 11 Cleaning 107 Clip Motion 51 Clock Set 15 Computer copying images 79, 85 Image Transfer 76 ImageMixer 77 USB cable 78 USB driver 75 Contrast 101 Control button 9, 14, 39 Copying images 79, 85 D DC plug 10, 13 Deleting images 34, 70 Divide 72 DPOF 65 E Editing...

Operating Instructions
Page 116
... 19, 40 image size 18, 19, 98 Image Transfer 79 ImageMixer 77 Index screen 30 "InfoLITHIUM" battery pack 109 Installation Image Transfer 76 ImageMixer 77 USB driver 75 ISO 101 J Jog playback 62 JPEG 83 L LCD screen brightness 105 on/off 28 screen display 112, 113, 114 M Memory Stick formatting a "Memory Stick...
... 19, 40 image size 18, 19, 98 Image Transfer 79 ImageMixer 77 Index screen 30 "InfoLITHIUM" battery pack 109 Installation Image Transfer 76 ImageMixer 77 USB driver 75 ISO 101 J Jog playback 62 JPEG 83 L LCD screen brightness 105 on/off 28 screen display 112, 113, 114 M Memory Stick formatting a "Memory Stick...

