Operating Instructions
Page 3
... pack For the Customers in the EMC Directive for using connection cables shorter than 3 meters (9.8 feet). THIS CLASS B DIGITAL APPARATUS COMPLIES WITH CANADIAN ICES-003. 3 For the Customers in the United Kingdom A moulded plug complying with BS 1363 ... and recycling location nearest you should lose the fuse cover, please contact your nearest Sony service station. If the plug supplied with this camera. and Canada THIS DEVICE COMPLIES WITH PART 15 OF THE FCC RULES. Certain countries... discontinue midway (fail), restart the application or disconnect and connect the USB cable again.
... pack For the Customers in the EMC Directive for using connection cables shorter than 3 meters (9.8 feet). THIS CLASS B DIGITAL APPARATUS COMPLIES WITH CANADIAN ICES-003. 3 For the Customers in the United Kingdom A moulded plug complying with BS 1363 ... and recycling location nearest you should lose the fuse cover, please contact your nearest Sony service station. If the plug supplied with this camera. and Canada THIS DEVICE COMPLIES WITH PART 15 OF THE FCC RULES. Certain countries... discontinue midway (fail), restart the application or disconnect and connect the USB cable again.

Operating Instructions
Page 9
... button (for shooting) (23)/ Index button (for viewing) (31) K Battery/"Memory Stick" cover L RESET button (87) M Access lamp (17) N Battery eject lever (10) O Jack cover P (USB) jack (78) 9
... button (for shooting) (23)/ Index button (for viewing) (31) K Battery/"Memory Stick" cover L RESET button (87) M Access lamp (17) N Battery eject lever (10) O Jack cover P (USB) jack (78) 9
Operating Instructions
Page 14
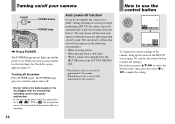
...not remove the battery pack or the AC Adaptor with the lens portion extended, as this may cause malfunction. • If you turn on your camera POWER POWER button POWER lamp , Press POWER. The auto power-off the power Press POWER again. For each item, press v/V/b/B to select the ... do not operate the camera for the first time, the Clock Set screen appears (page 15). The auto power-off function also will not operate in the following circumstances. • When viewing movies • When playing back a slide show • When a connector is plugged into the (USB) jack or the A/V...
...not remove the battery pack or the AC Adaptor with the lens portion extended, as this may cause malfunction. • If you turn on your camera POWER POWER button POWER lamp , Press POWER. The auto power-off the power Press POWER again. For each item, press v/V/b/B to select the ... do not operate the camera for the first time, the Clock Set screen appears (page 15). The auto power-off function also will not operate in the following circumstances. • When viewing movies • When playing back a slide show • When a connector is plugged into the (USB) jack or the A/V...
Operating Instructions
Page 74
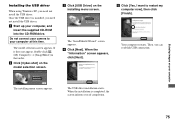
... operate depending on the type of the CD-ROM x USB Driver This driver is provided, you need not install the USB driver. See the Sony Website for a USB connection, [Normal] and [PTP]* modes. http://www.sony.net/ 74 Contents of USB equipment. • Operations are two modes for details.... installed at the same time. When set to the operating systems described above . To select a folder, perform the procedure from the camera to your camera, may differ depending on your OS. • Close down all the recommended computer environments mentioned above or in a computer. •...
... operate depending on the type of the CD-ROM x USB Driver This driver is provided, you need not install the USB driver. See the Sony Website for a USB connection, [Normal] and [PTP]* modes. http://www.sony.net/ 74 Contents of USB equipment. • Operations are two modes for details.... installed at the same time. When set to the operating systems described above . To select a folder, perform the procedure from the camera to your camera, may differ depending on your OS. • Close down all the recommended computer environments mentioned above or in a computer. •...
Operating Instructions
Page 75
...into the CD-ROM drive. When the installation is installed, you can establish USB connection. The model selection screen appears. The "InstallShield Wizard" screen appears. Then, you need not install the USB driver. a Start up your computer at this time. When the "Information..." screen appears, click [Next]. Your computer restarts. Do not connect your camera to restart my computer now], then click [Finish]. Enjoying images on the installing menu screen. b Click [Cyber-shot] on...
...into the CD-ROM drive. When the installation is installed, you can establish USB connection. The model selection screen appears. The "InstallShield Wizard" screen appears. Then, you need not install the USB driver. a Start up your computer at this time. When the "Information..." screen appears, click [Next]. Your computer restarts. Do not connect your camera to restart my computer now], then click [Finish]. Enjoying images on the installing menu screen. b Click [Cyber-shot] on...
Operating Instructions
Page 76
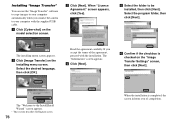
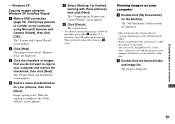
... the supplied USB cable. The installing menu screen appears. Select the desired language, then click [OK]. Select the program folder, then click [Next]. a Click [Cyber-shot] on the model selection screen. Installing "Image Transfer" You can use the "Image Transfer" software to copy images to your computer automatically when you connect the camera to...
... the supplied USB cable. The installing menu screen appears. Select the desired language, then click [OK]. Select the program folder, then click [Next]. a Click [Cyber-shot] on the model selection screen. Installing "Image Transfer" You can use the "Image Transfer" software to copy images to your computer automatically when you connect the camera to...
Operating Instructions
Page 77
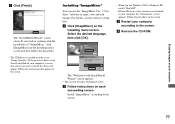
...screen. Follow the procedure on each succeeding screen. If the necessary driver is not installed in order to use the "ImageMixer Ver. 1.5 for Sony" software to copy, view and edit images. c Restart your computer g Click [Finish]. Installing "ImageMixer" You can use "Image Transfer".... wish to continue with the installation of "ImageMixer," click [ImageMixer] on the installing menu screen and then follow the procedure. • The USB driver is needed in your computer, a screen that appear on the screen. a Click [ImageMixer] on your computer, the "Information" screen ...
...screen. Follow the procedure on each succeeding screen. If the necessary driver is not installed in order to use the "ImageMixer Ver. 1.5 for Sony" software to copy, view and edit images. c Restart your computer g Click [Finish]. Installing "ImageMixer" You can use "Image Transfer".... wish to continue with the installation of "ImageMixer," click [ImageMixer] on the installing menu screen and then follow the procedure. • The USB driver is needed in your computer, a screen that appear on the screen. a Click [ImageMixer] on your computer, the "Information" screen ...
Operating Instructions
Page 78
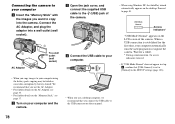
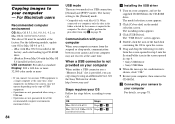
... socket). b Turn on your computer automatically runs the used program to the (USB) jack of the camera. c Open the jack cover, and connect the supplied USB cable to recognize the camera. Wait for the first time, your computer and the camera. • When you use the AC Adaptor. • For further details ...not appear in the SET UP settings (page 106). 78 Connect the AC Adaptor, and plug the adaptor into the camera. We recommend that you copy images to the USB connector on the rear panel. • When using the battery pack, copying may be failed or cause data corruption by...
... socket). b Turn on your computer automatically runs the used program to the (USB) jack of the camera. c Open the jack cover, and connect the supplied USB cable to recognize the camera. Wait for the first time, your computer and the camera. • When you use the AC Adaptor. • For further details ...not appear in the SET UP settings (page 106). 78 Connect the AC Adaptor, and plug the adaptor into the camera. We recommend that you copy images to the USB connector on the rear panel. • When using the battery pack, copying may be failed or cause data corruption by...

Operating Instructions
Page 79
... the camera and your camera or turning off the power. Windows XP is unnecessary for Windows XP users. 5 Disconnect the USB cable, remove the "Memory Stick" or turn off the power during USB connection For Windows 2000, Me, or XP users 1 Double-click on the tasktray. 2 Click (Sony DSC), then... click [Stop]. 3 Confirm the device on the confirmation screen, then click [OK]. 4 Click [OK]. b Right-click [Sony MemoryStick], then click [Properties]. If ...
... the camera and your camera or turning off the power. Windows XP is unnecessary for Windows XP users. 5 Disconnect the USB cable, remove the "Memory Stick" or turn off the power during USB connection For Windows 2000, Me, or XP users 1 Double-click on the tasktray. 2 Click (Sony DSC), then... click [Stop]. 3 Confirm the device on the confirmation screen, then click [OK]. 4 Click [OK]. b Right-click [Sony MemoryStick], then click [Properties]. If ...

Operating Instructions
Page 80
...: [Basic], [Copy], and [Delete]. Try the USB driver installation again using the supplied CD-ROM (page 75). Right-click here When the "Image Transfer" starts, the below to delete them. 1 Click [ Sony DSC]. (When using Windows 2000, rightclick [ Sony DSC].) 2 Click [Remove] (or [Uninstall] in Windows...installed. 1 Click [Device Manager]. 2 Double-click [ Other Devices]. 3 Confirm if there is a " Sony DSC" with a mark. 3 If you try to copy an image to a folder in your camera appear. • This section describes an example of the devices above window, you want to overwrite the existing...
...: [Basic], [Copy], and [Delete]. Try the USB driver installation again using the supplied CD-ROM (page 75). Right-click here When the "Image Transfer" starts, the below to delete them. 1 Click [ Sony DSC]. (When using Windows 2000, rightclick [ Sony DSC].) 2 Click [Remove] (or [Uninstall] in Windows...installed. 1 Click [Device Manager]. 2 Double-click [ Other Devices]. 3 Confirm if there is a " Sony DSC" with a mark. 3 If you try to copy an image to a folder in your camera appear. • This section describes an example of the devices above window, you want to overwrite the existing...
Operating Instructions
Page 81
... step 1 again. I'm finished working with these pictures], then click [Next]. The "My Documents" folder contents are displayed. The "Scanner and Camera Wizard" screen appears. The images stored on page 79 to view and edit images on the desktop. c Click the checkbox of images that order...other images, follow the procedure given under P on the "Memory Stick" are displayed. • This section describes the procedure for Sony" software to disconnect the USB cable and reconnect it. For details, see the software's help files. When the copying is displayed. 81 f Click [Finish]....
... step 1 again. I'm finished working with these pictures], then click [Next]. The "My Documents" folder contents are displayed. The "Scanner and Camera Wizard" screen appears. The images stored on page 79 to view and edit images on the desktop. c Click the checkbox of images that order...other images, follow the procedure given under P on the "Memory Stick" are displayed. • This section describes the procedure for Sony" software to disconnect the USB cable and reconnect it. For details, see the software's help files. When the copying is displayed. 81 f Click [Finish]....
Operating Instructions
Page 84
..., update your computer, then remove the CD-ROM. The model selection screen appears. 2 Click [Cyber-shot] on your camera, may not recover at the same time, some equipment, including your computer When neither a USB connector nor a "Memory Stick" slot is provided, you connect two or more... The above . 84 USB mode There are not guaranteed when using an additional device. When connected to the computer. iMac with Mac OS X. See the Sony Website for confirmation is copied to a computer, only the data in step 4. • Sony USB Driver • Sony USB Shim 6 When the message...
..., update your computer, then remove the CD-ROM. The model selection screen appears. 2 Click [Cyber-shot] on your camera, may not recover at the same time, some equipment, including your computer When neither a USB connector nor a "Memory Stick" slot is provided, you connect two or more... The above . 84 USB mode There are not guaranteed when using an additional device. When connected to the computer. iMac with Mac OS X. See the Sony Website for confirmation is copied to a computer, only the data in step 4. • Sony USB Driver • Sony USB Shim 6 When the message...
Operating Instructions
Page 85
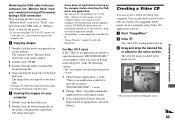
...in the folder containing the copied files. The video CD creating mode turns on the desktop. Removing the USB cable from your computer, the "Memory Stick" from your camera or turning off the power during a USB connection Drag and drop the drive icon or the "Memory Stick" icon to the "Trash" icon, ...help files for the operation method. • "ImageMixer" is not compatible with Mac OS X. • "Image Transfer" cannot be used with the CD-ROM for Sony" software to copy images to your computer and to view images on your computer. c Copying images 1 Double-click the newly recognized icon on .
...in the folder containing the copied files. The video CD creating mode turns on the desktop. Removing the USB cable from your computer, the "Memory Stick" from your camera or turning off the power during a USB connection Drag and drop the drive icon or the "Memory Stick" icon to the "Trash" icon, ...help files for the operation method. • "ImageMixer" is not compatible with Mac OS X. • "Image Transfer" cannot be used with the CD-ROM for Sony" software to copy images to your computer and to view images on your computer. c Copying images 1 Double-click the newly recognized icon on .

Operating Instructions
Page 91
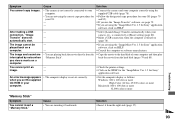
... does not • The video output signal setting of your camera in USB mode. The image cannot be - Unknown beeps are heard •...it to the recording position (page 108). p Cancel USB communication (page 79). p See page 92. viewing a movie. You have deleted an image, you from the camera while working. played back on the "Memory Stick" p...Motion and Multi Burst images. 91 p This is protected. Troubleshooting Deleting/Editing Images Symptom Cause Solution Your camera cannot delete an image. The resizing function does not work. • The image is not a ...
... does not • The video output signal setting of your camera in USB mode. The image cannot be - Unknown beeps are heard •...it to the recording position (page 108). p Cancel USB communication (page 79). p See page 92. viewing a movie. You have deleted an image, you from the camera while working. played back on the "Memory Stick" p...Motion and Multi Burst images. 91 p This is protected. Troubleshooting Deleting/Editing Images Symptom Cause Solution Your camera cannot delete an image. The resizing function does not work. • The image is not a ...
Operating Instructions
Page 92
...cut a movie. p Disconnect the USB cable, and connect it to your computer without passing through a USB hub or other than your camera from your computer with the USB cable before you installed the "USB Driver" from the supplied CD-ROM. Make sure that "USB Mode" is not installed. •...; Your computer does not properly recognize the device because you connected the camera and your computer, then install the USB driver (pages 75 and 80). 92 p Connect the camera directly to [Normal] (page 106). Symptom You cannot display a print (DPOF) mark. Your ...
...cut a movie. p Disconnect the USB cable, and connect it to your computer without passing through a USB hub or other than your camera from your computer with the USB cable before you installed the "USB Driver" from the supplied CD-ROM. Make sure that "USB Mode" is not installed. •...; Your computer does not properly recognize the device because you connected the camera and your computer, then install the USB driver (pages 75 and 80). 92 p Connect the camera directly to [Normal] (page 106). Symptom You cannot display a print (DPOF) mark. Your ...
Operating Instructions
Page 93
... Ver. 1.5 for your OS (pages 79 and 85). image. - p Connect the camera and your computer correctly using the "ImageMixer Ver. 1.5 for your OS. - - connection, "Image Transfer" does not - p Make a USB connection when the computer is turned on a computer. - played back on (page 78)....insert a "Memory Stick." Solution p Insert it backwards. p Follow the designated copy procedure for Sony" application software. Symptom Cause Solution You cannot copy images. • The camera is not correctly connected to the hard disk of your computer and then play back the movie ...
... Ver. 1.5 for your OS (pages 79 and 85). image. - p Connect the camera and your computer correctly using the "ImageMixer Ver. 1.5 for your OS. - - connection, "Image Transfer" does not - p Make a USB connection when the computer is turned on a computer. - played back on (page 78)....insert a "Memory Stick." Solution p Insert it backwards. p Follow the designated copy procedure for Sony" application software. Symptom Cause Solution You cannot copy images. • The camera is not correctly connected to the hard disk of your computer and then play back the movie ...

Operating Instructions
Page 106
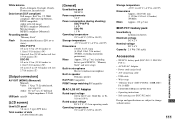
Sets the video output signal to PAL mode (e.g., Europe). 106 (Setup 2) 2 Item USB Connect Video Out Setting PTP / xNormal NTSC PAL Description Switches the USB mode (page 74). - Sets the video output signal to NTSC mode (e.g., USA, Japan). -
Sets the video output signal to PAL mode (e.g., Europe). 106 (Setup 2) 2 Item USB Connect Video Out Setting PTP / xNormal NTSC PAL Description Switches the USB mode (page 74). - Sets the video output signal to NTSC mode (e.g., USA, Japan). -
Operating Instructions
Page 111
...) Output impedance 2.2 kΩ USB jack mini-B [LCD screen] Used LCD panel 3.8 cm (1.5 type) TFT drive Total number of dots 123 200 (560×220) dots [General] Used battery pack NP-FC11 Power requirements 3.6 V Power consumption (during shooting) DSC-P10/P12 1.6 W DSC-P8 1.5 W Operating temperature ... V Nominal voltage DC 3.6 V Capacity 2.8 Wh (780 mAh) Accessories • NP-FC11 battery pack (DSC-P12: 2, DSC-P8/ P10: 1) • AC-LS5 AC Adaptor • Power cord (mains lead) • A/V connecting cable • USB cable • Wrist strap • "Memory Stick" (DSC-P10/P12: 32MB...
...) Output impedance 2.2 kΩ USB jack mini-B [LCD screen] Used LCD panel 3.8 cm (1.5 type) TFT drive Total number of dots 123 200 (560×220) dots [General] Used battery pack NP-FC11 Power requirements 3.6 V Power consumption (during shooting) DSC-P10/P12 1.6 W DSC-P8 1.5 W Operating temperature ... V Nominal voltage DC 3.6 V Capacity 2.8 Wh (780 mAh) Accessories • NP-FC11 battery pack (DSC-P12: 2, DSC-P8/ P10: 1) • AC-LS5 AC Adaptor • Power cord (mains lead) • A/V connecting cable • USB cable • Wrist strap • "Memory Stick" (DSC-P10/P12: 32MB...

Operating Instructions
Page 115
... pack 10, 109 charging time 11 Cleaning 107 Clip Motion 51 Clock Set 15 Computer copying images 79, 85 Image Transfer 76 ImageMixer 77 USB cable 78 USB driver 75 Contrast 101 Control button 9, 14, 39 Copying images 79, 85 D DC plug 10, 13 Deleting images 34, 70 Divide 72 DPOF 65...
... pack 10, 109 charging time 11 Cleaning 107 Clip Motion 51 Clock Set 15 Computer copying images 79, 85 Image Transfer 76 ImageMixer 77 USB cable 78 USB driver 75 Contrast 101 Control button 9, 14, 39 Copying images 79, 85 D DC plug 10, 13 Deleting images 34, 70 Divide 72 DPOF 65...

Operating Instructions
Page 116
... 19, 40 image size 18, 19, 98 Image Transfer 79 ImageMixer 77 Index screen 30 "InfoLITHIUM" battery pack 109 Installation Image Transfer 76 ImageMixer 77 USB driver 75 ISO 101 J Jog playback 62 JPEG 83 L LCD screen brightness 105 on/off 28 screen display 112, 113, 114 M Memory Stick formatting a "Memory...
... 19, 40 image size 18, 19, 98 Image Transfer 79 ImageMixer 77 Index screen 30 "InfoLITHIUM" battery pack 109 Installation Image Transfer 76 ImageMixer 77 USB driver 75 ISO 101 J Jog playback 62 JPEG 83 L LCD screen brightness 105 on/off 28 screen display 112, 113, 114 M Memory Stick formatting a "Memory...


