Instruction Manual
Page 1
Model No. Refer to "Cyber-shot Handbook (PDF)." Owner's Record The model and serial numbers are located on the advanced operations, please refer to these numbers whenever you call upon your Sony dealer regarding this manual thoroughly, and retain it for future reference. DSC-N2 Serial No © 2006 Sony Corporation 2-887-191-12(1) Digital Still Camera Instruction Manual GB DSC-N2 CD-ROM (supplied) For details on the bottom. Operating Instructions Before operating the unit, please read this product. Record the serial number in the space provided below.
Model No. Refer to "Cyber-shot Handbook (PDF)." Owner's Record The model and serial numbers are located on the advanced operations, please refer to these numbers whenever you call upon your Sony dealer regarding this manual thoroughly, and retain it for future reference. DSC-N2 Serial No © 2006 Sony Corporation 2-887-191-12(1) Digital Still Camera Instruction Manual GB DSC-N2 CD-ROM (supplied) For details on the bottom. Operating Instructions Before operating the unit, please read this product. Record the serial number in the space provided below.
Instruction Manual
Page 3
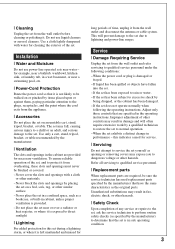
... conditions: - this indicates a need for this set during a lightning storm, or when it is exposed to direct sunlight. [ Lightning For added protection for service. [ Servicing Do not attempt to service the set yourself as a bookcase, or built-in performance - Use a cloth lightly dampened with a cloth or other controls may expose you to qualified service personnel. [ Replacement parts When replacement parts are specified in safe operating condition. 3 Installation [ Water and...
... conditions: - this indicates a need for this set during a lightning storm, or when it is exposed to direct sunlight. [ Lightning For added protection for service. [ Servicing Do not attempt to service the set yourself as a bookcase, or built-in performance - Use a cloth lightly dampened with a cloth or other controls may expose you to qualified service personnel. [ Replacement parts When replacement parts are specified in safe operating condition. 3 Installation [ Water and...
Instruction Manual
Page 4
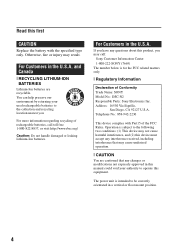
... cautioned that any questions about this first CAUTION Replace the battery with Part15 of Conformity Trade Name: SONY Model No.: DSC-N2 Responsible Party: Sony Electronics Inc. The power unit is intended to operate this manual could void your used rechargeable batteries to the collection and recycling location nearest you have any changes or modifications not expressly approved in a vertical or floor mount...
... cautioned that any questions about this first CAUTION Replace the battery with Part15 of Conformity Trade Name: SONY Model No.: DSC-N2 Responsible Party: Sony Electronics Inc. The power unit is intended to operate this manual could void your used rechargeable batteries to the collection and recycling location nearest you have any changes or modifications not expressly approved in a vertical or floor mount...
Instruction Manual
Page 5
... causes data transfer to discontinue midway (fail), restart the application or disconnect and connect the communication cable (USB, etc.) again. [ Disposal of the following measures: - Consult the dealer or an experienced radio/TV technician for help to conserve natural resources. Instead it shall be used in accordance with the instructions, may influence the picture and sound of this product. If you change...
... causes data transfer to discontinue midway (fail), restart the application or disconnect and connect the communication cable (USB, etc.) again. [ Disposal of the following measures: - Consult the dealer or an experienced radio/TV technician for help to conserve natural resources. Instead it shall be used in accordance with the instructions, may influence the picture and sound of this product. If you change...
Instruction Manual
Page 6
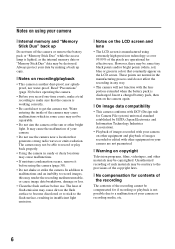
... not affect the recording in insufficient light emission. [ Notes on the LCD screen and lens • The LCD screen is manufactured using extremely high-precision technology so over 99.99% of your camera. • Do not use . Insert a charged battery pack, then turn off the camera or remove the battery pack or "Memory Stick Duo" while the access lamp is lighted, as the internal memory data or "Memory Stick Duo" data may be...
... not affect the recording in insufficient light emission. [ Notes on the LCD screen and lens • The LCD screen is manufactured using extremely high-precision technology so over 99.99% of your camera. • Do not use . Insert a charged battery pack, then turn off the camera or remove the battery pack or "Memory Stick Duo" while the access lamp is lighted, as the internal memory data or "Memory Stick Duo" data may be...
Instruction Manual
Page 7
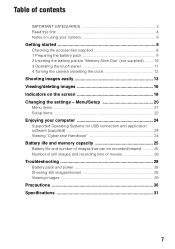
... recorded/viewed .......... 25 Number of still images and recording time of contents IMPORTANT SAFEGUARDS 2 Read this first 4 Notes on using your camera 6 Getting started 8 Checking the accessories supplied 8 1 Preparing the battery pack 9 2 Inserting the battery pack/a "Memory Stick Duo" (not supplied) ........ 10 3 Operating the touch panel 11 4 Turning the camera on/setting the clock 12 Shooting images easily 13 Viewing/deleting images 16 Indicators on the screen 18 Changing the settings - Table of movies 26 Troubleshooting 28 Battery pack and power...
... recorded/viewed .......... 25 Number of still images and recording time of contents IMPORTANT SAFEGUARDS 2 Read this first 4 Notes on using your camera 6 Getting started 8 Checking the accessories supplied 8 1 Preparing the battery pack 9 2 Inserting the battery pack/a "Memory Stick Duo" (not supplied) ........ 10 3 Operating the touch panel 11 4 Turning the camera on/setting the clock 12 Shooting images easily 13 Viewing/deleting images 16 Indicators on the screen 18 Changing the settings - Table of movies 26 Troubleshooting 28 Battery pack and power...
Instruction Manual
Page 10
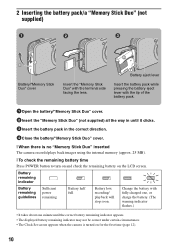
... displayed battery remaining indicator may not be correct under certain circumstances. • The Clock Set screen appears when the camera is no "Memory Stick Duo" inserted The camera records/plays back images using the internal memory (approx. 25 MB). [ To check the remaining battery time Press POWER button to turn on and check the remaining battery on for the first time (page 12). 10 Battery remaining indicator Battery remaining guidelines Sufficient power remaining Battery half full Battery low, recording/ playback...
... displayed battery remaining indicator may not be correct under certain circumstances. • The Clock Set screen appears when the camera is no "Memory Stick Duo" inserted The camera records/plays back images using the internal memory (approx. 25 MB). [ To check the remaining battery time Press POWER button to turn on and check the remaining battery on for the first time (page 12). 10 Battery remaining indicator Battery remaining guidelines Sufficient power remaining Battery half full Battery low, recording/ playback...

Instruction Manual
Page 11
... battery pack/"Memory Stick Duo" Open the battery/"Memory Stick Duo" cover. Slide the battery eject lever. • Be sure not to drop the battery pack. • Never remove the battery pack when the access lamp is lit. 3 Operating the touch panel Touch panel Mode switch (on-screen key) button 1 Press (on-screen key) to display the touch panel buttons. • When the mode switch is set to , skip this operation. 2 Lightly...
... battery pack/"Memory Stick Duo" Open the battery/"Memory Stick Duo" cover. Slide the battery eject lever. • Be sure not to drop the battery pack. • Never remove the battery pack when the access lamp is lit. 3 Operating the touch panel Touch panel Mode switch (on-screen key) button 1 Press (on-screen key) to display the touch panel buttons. • When the mode switch is set to , skip this operation. 2 Lightly...
Instruction Manual
Page 14
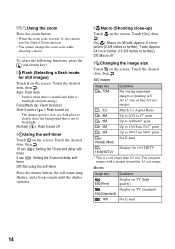
... self-timer Press the shutter button, the self-timer lamp flashes, and a beep sounds until the shutter operates. [ Macro (Shooting close-up) Touch on The shutter speed is slow in a dark place to 10×15cm /4×6" print : For E-mail VGA(E-Mail) : Display On 16:9 HDTV 16:9(HDTV) * This is out of flash light. Touch [On], then . Touch the desired item, then . Auto: Flash Auto Strobes when there is insufficient light or backlight (default setting...
... self-timer Press the shutter button, the self-timer lamp flashes, and a beep sounds until the shutter operates. [ Macro (Shooting close-up) Touch on The shutter speed is slow in a dark place to 10×15cm /4×6" print : For E-mail VGA(E-Mail) : Display On 16:9 HDTV 16:9(HDTV) * This is out of flash light. Touch [On], then . Touch the desired item, then . Auto: Flash Auto Strobes when there is insufficient light or backlight (default setting...
Instruction Manual
Page 18
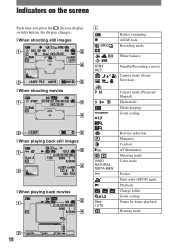
... 1.3 Step 12/16 Red-eye reduction Sharpness Contrast AF illuminator Metering mode Color mode Protect Print order (DPOF) mark Playback Change folder Zoom scaling Frame by frame playback Housing mode 18 Indicators on the screen Each time you press the (Screen display switch) button, the display changes. [ When shooting still images A z M BRK WB STBY REC [ When shooting movies SL 1.3 Battery remaining AE/AF lock Recording mode White balance Standby/Recording a movie Camera mode (Scene Selection) Camera mode (Program/ Manual) Flash mode Flash charging Zoom scaling [ When playing back still...
... 1.3 Step 12/16 Red-eye reduction Sharpness Contrast AF illuminator Metering mode Color mode Protect Print order (DPOF) mark Playback Change folder Zoom scaling Frame by frame playback Housing mode 18 Indicators on the screen Each time you press the (Screen display switch) button, the display changes. [ When shooting still images A z M BRK WB STBY REC [ When shooting movies SL 1.3 Battery remaining AE/AF lock Recording mode White balance Standby/Recording a movie Camera mode (Scene Selection) Camera mode (Program/ Manual) Flash mode Flash charging Zoom scaling [ When playing back still...

Instruction Manual
Page 19
... interval Remaining number of recordable images Self-timer Self-diagnosis display ISO number Bracket Step value Folder-file number 8/8 12/12 00:00:12 Image number/Number of images recorded in selected folder Counter D E +2.0EV WB + Vibration warning Low battery warning PictBridge connecting Exposure Value ISO number Metering mode Flash White balance Spot metering cross hair AF range finder frame 500 F3.5 2006 1 1 9:30 AM Shutter speed Aperture value Playback image Recorded date/time of the playback image Volume E S AF M AF 1.0m Macro AF mode AF range finder frame indicator Focus preset...
... interval Remaining number of recordable images Self-timer Self-diagnosis display ISO number Bracket Step value Folder-file number 8/8 12/12 00:00:12 Image number/Number of images recorded in selected folder Counter D E +2.0EV WB + Vibration warning Low battery warning PictBridge connecting Exposure Value ISO number Metering mode Flash White balance Spot metering cross hair AF range finder frame 500 F3.5 2006 1 1 9:30 AM Shutter speed Aperture value Playback image Recorded date/time of the playback image Volume E S AF M AF 1.0m Macro AF mode AF range finder frame indicator Focus preset...

Instruction Manual
Page 20
... this operation. 3Touch [MENU] to display the menu. 4Touch the item you want to turn off the menu. [ To select a Setup item Press (on -screen key) 1Set the mode switch. Changing the settings - Menu/Setup Touch panel Mode switch button (on -screen key) longer or display (Setup) in step 4, then touch it . 20 Different items are available depending on the position of the mode switch and the settings. (Camera) menu 2Press (on-screen key) to display the...
... this operation. 3Touch [MENU] to display the menu. 4Touch the item you want to turn off the menu. [ To select a Setup item Press (on -screen key) 1Set the mode switch. Changing the settings - Menu/Setup Touch panel Mode switch button (on -screen key) longer or display (Setup) in step 4, then touch it . 20 Different items are available depending on the position of the mode switch and the settings. (Camera) menu 2Press (on-screen key) to display the...

Instruction Manual
Page 22
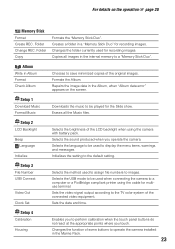
...a still image. Adjusts the volume. Selects the folder for playback zoom.) Setup items Camera 1 AF Mode Digital Zoom Red Eye Reduction AF Illuminator Selects the auto focus operation mode. Changes the image size of images. Changes Setup items. Records an enlarged image. (Available only for viewing images. Supplies fill light to focus more easily on the still images. Finishes playing back of images in dark surroundings. Rotates a still image. Selects the digital zoom mode. Prints images using the flash. Paints on a subject in the Album. Internal Memory Format Formats the...
...a still image. Adjusts the volume. Selects the folder for playback zoom.) Setup items Camera 1 AF Mode Digital Zoom Red Eye Reduction AF Illuminator Selects the auto focus operation mode. Changes the image size of images. Changes Setup items. Records an enlarged image. (Available only for viewing images. Supplies fill light to focus more easily on the still images. Finishes playing back of images in dark surroundings. Rotates a still image. Selects the digital zoom mode. Prints images using the flash. Paints on a subject in the Album. Internal Memory Format Formats the...
Instruction Manual
Page 23
... save minimized copies of the LCD backlight when using the cable for the Slide show. Setup 2 LCD Backlight Beep Language Initialize Selects the brightness of the original images. Folder Copy Formats the "Memory Stick Duo". Sets the video signal output according to the default setting. Initializes the setting to the TV color system of some buttons to a computer or a PictBridge compliant printer using the camera with battery pack. Selects the USB mode to be used for recording images. Changes the function...
... save minimized copies of the LCD backlight when using the cable for the Slide show. Setup 2 LCD Backlight Beep Language Initialize Selects the brightness of the original images. Folder Copy Formats the "Memory Stick Duo". Sets the video signal output according to the default setting. Initializes the setting to the TV color system of some buttons to a computer or a PictBridge compliant printer using the camera with battery pack. Selects the USB mode to be used for recording images. Changes the function...
Instruction Manual
Page 24
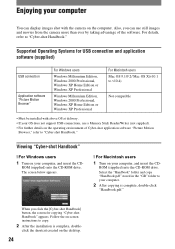
... can display images shot with above OS at delivery. • If your OS does not support USB connections, use still images and movies from the camera more than ever by taking advantage of Cyber-shot application software "Picture Motion Browser," refer to copy. 2 After the installation is complete, double-click "Handbook.pdf." For details, refer to your computer. 2 After copying is complete, double- The screen below appears. [ For Macintosh users 1 Turn on -screen instructions to "Cyber-shot Handbook...
... can display images shot with above OS at delivery. • If your OS does not support USB connections, use still images and movies from the camera more than ever by taking advantage of Cyber-shot application software "Picture Motion Browser," refer to copy. 2 After the installation is complete, double-click "Handbook.pdf." For details, refer to your computer. 2 After copying is complete, double- The screen below appears. [ For Macintosh users 1 Turn on -screen instructions to "Cyber-shot Handbook...
Instruction Manual
Page 25
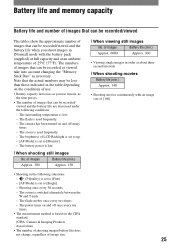
... times. - The brightness of images that can be recorded/ viewed and the battery life are decreased under the following situations: - (P.Quality) is set to [Fine]. - [AF Mode] is based on the CIPA standard. (CIPA: Camera & Imaging Products Association) • The number of shooting images/battery life does not change, regardless of image size. 25 The flash is set to [Monitor]. - The numbers of LCD Backlight is set to up. - [AF Mode] is used...
... times. - The brightness of images that can be recorded/ viewed and the battery life are decreased under the following situations: - (P.Quality) is set to [Fine]. - [AF Mode] is based on the CIPA standard. (CIPA: Camera & Imaging Products Association) • The number of shooting images/battery life does not change, regardless of image size. 25 The flash is set to [Monitor]. - The numbers of LCD Backlight is set to up. - [AF Mode] is used...
Instruction Manual
Page 28
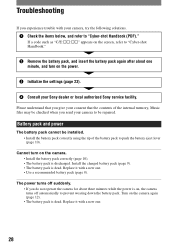
... turn on , the camera turns off suddenly. • If you give your camera to push the battery eject lever (page 10). The power turns off automatically to "Cyber-shot Handbook (PDF)." Install the charged battery pack (page 9). • The battery pack is dead. Replace it with your Sony dealer or local authorized Sony service facility. Turn on the camera. • Install the battery pack correctly (page 10). • The battery pack is on the power. 3 Initialize the settings...
... turn on , the camera turns off suddenly. • If you give your camera to push the battery eject lever (page 10). The power turns off automatically to "Cyber-shot Handbook (PDF)." Install the charged battery pack (page 9). • The battery pack is dead. Replace it with your Sony dealer or local authorized Sony service facility. Turn on the camera. • Install the battery pack correctly (page 10). • The battery pack is on the power. 3 Initialize the settings...
Instruction Manual
Page 29
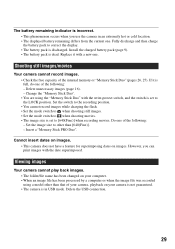
... hot or cold location. • The displayed battery remaining differs from the current one. However, you use the camera in USB mode. Delete the USB connection. 29 Shooting still images/movies Your camera cannot record images. • Check the free capacity of the following : - Insert a "Memory Stick PRO Duo". Viewing images Your camera cannot play back images. • The folder/file name has been changed on your camera, playback on images. Replace it is full, do one of your...
... hot or cold location. • The displayed battery remaining differs from the current one. However, you use the camera in USB mode. Delete the USB connection. 29 Shooting still images/movies Your camera cannot record images. • Check the free capacity of the following : - Insert a "Memory Stick PRO Duo". Viewing images Your camera cannot play back images. • The folder/file name has been changed on your camera, playback on images. Replace it is full, do one of your...
Instruction Manual
Page 30
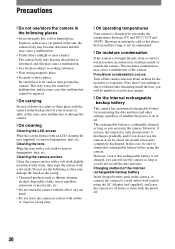
... not record the date and time. However, even if this rechargeable battery before using the camera. Cleaning the lens Wipe the lens with rubber or vinyl for a long time. [ On operating temperatures Your camera is designed for 24 hours or more with an LCD cleaning kit (not supplied) to remove fingerprints, dust, etc. This rechargeable battery is continually charged as long as you attempt to shoot with...
... not record the date and time. However, even if this rechargeable battery before using the camera. Cleaning the lens Wipe the lens with rubber or vinyl for a long time. [ On operating temperatures Your camera is designed for 24 hours or more with an LCD cleaning kit (not supplied) to remove fingerprints, dust, etc. This rechargeable battery is continually charged as long as you attempt to shoot with...
Instruction Manual
Page 31
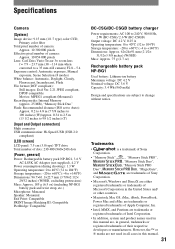
... number of camera: Approx. 10 054 000 pixels Lens: Carl Zeiss Vario-Tessar 3× zoom lens f = 7.9 - 23.7 mm (38 - 114 mm when converted to a 35 mm still camera) F2.8 - 5.4 Exposure control: Automatic exposure, Manual exposure, Scene Selection (8 modes) White balance: Automatic, Daylight, Cloudy, Fluorescent, Incandescent, Flash File format (DCF compliant): Still images: Exif Ver. 2.21 JPEG compliant, DPOF compatible Movies: MPEG1 compliant (Monaural) Recording media: Internal Memory (approx. 25 MB), "Memory Stick Duo" Flash: Recommended distance (ISO set...
... number of camera: Approx. 10 054 000 pixels Lens: Carl Zeiss Vario-Tessar 3× zoom lens f = 7.9 - 23.7 mm (38 - 114 mm when converted to a 35 mm still camera) F2.8 - 5.4 Exposure control: Automatic exposure, Manual exposure, Scene Selection (8 modes) White balance: Automatic, Daylight, Cloudy, Fluorescent, Incandescent, Flash File format (DCF compliant): Still images: Exif Ver. 2.21 JPEG compliant, DPOF compatible Movies: MPEG1 compliant (Monaural) Recording media: Internal Memory (approx. 25 MB), "Memory Stick Duo" Flash: Recommended distance (ISO set...


