Instruction Manual
Page 2
IMPORTANT SAFETY INSTRUCTIONS -SAVE THESE INSTRUCTIONS DANGER TO REDUCE THE RISK OF FIRE OR ELECTRIC SHOCK, CAREFULLY FOLLOW THESE INSTRUCTIONS If the shape of the plug does not fit the power outlet, use an attachment plug adaptor of in the space provided below. Refer to these numbers whenever you call your Sony dealer regarding this product. Model No. DSC-H70 Serial No WARNING...
IMPORTANT SAFETY INSTRUCTIONS -SAVE THESE INSTRUCTIONS DANGER TO REDUCE THE RISK OF FIRE OR ELECTRIC SHOCK, CAREFULLY FOLLOW THESE INSTRUCTIONS If the shape of the plug does not fit the power outlet, use an attachment plug adaptor of in the space provided below. Refer to these numbers whenever you call your Sony dealer regarding this product. Model No. DSC-H70 Serial No WARNING...

Instruction Manual
Page 3
... can help preserve our environment by GB disconnecting the plug from the AC power source (mains) as long as it is connected to the wall outlet (wall socket). Operation is not disconnected from the wall outlet (wall socket). If some trouble occurs while using a genuine Sony battery charger or a device that may not cause harmful interference, and (2) this camera only...
... can help preserve our environment by GB disconnecting the plug from the AC power source (mains) as long as it is connected to the wall outlet (wall socket). Operation is not disconnected from the wall outlet (wall socket). If some trouble occurs while using a genuine Sony battery charger or a device that may not cause harmful interference, and (2) this camera only...

Instruction Manual
Page 4
... installation. Connect the equipment into an outlet on a circuit different from that to the following measures: - Operation is for a Class B digital device, pursuant to correct the interference by turning the equipment off and on the product means it has been UL Listed. UL is encouraged to try to Part 15 of Conformity Trade Name: SONY Model No.: DSC-H70 Responsible...
... installation. Connect the equipment into an outlet on a circuit different from that to the following measures: - Operation is for a Class B digital device, pursuant to correct the interference by turning the equipment off and on the product means it has been UL Listed. UL is encouraged to try to Part 15 of Conformity Trade Name: SONY Model No.: DSC-H70 Responsible...
Instruction Manual
Page 5
... this product. The Authorized Representative for using connection cables shorter than 3 meters (9.8 feet). [ Attention The electromagnetic fields at the specific frequencies may influence the picture and sound of this unit. [ Notice If static electricity or electromagnetism causes data transfer to the addresses given in the EMC Directive for EMC and product safety is Sony Corporation, 1-7-1 Konan Minato-ku Tokyo, 108...
... this product. The Authorized Representative for using connection cables shorter than 3 meters (9.8 feet). [ Attention The electromagnetic fields at the specific frequencies may influence the picture and sound of this unit. [ Notice If static electricity or electromagnetism causes data transfer to the addresses given in the EMC Directive for EMC and product safety is Sony Corporation, 1-7-1 Konan Minato-ku Tokyo, 108...
Instruction Manual
Page 7
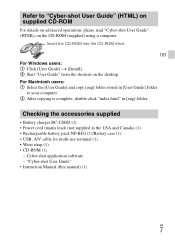
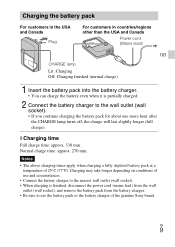
Checking the accessories supplied • Battery charger BC-CSGD (1) • Power cord (mains lead) (not supplied in [User Guide] folder to "Cyber-shot User Guide" (HTML) on supplied CD-ROM For details on advanced operations, please read "Cyber-shot User Guide" (HTML) on the desktop. GB For Windows users: 1 Click [User Guide] t [Install]. 2 Start "User Guide" from the shortcut on the CD-ROM (supplied) using a computer. Insert the CD-ROM into the CD-ROM drive. Refer...
Checking the accessories supplied • Battery charger BC-CSGD (1) • Power cord (mains lead) (not supplied in [User Guide] folder to "Cyber-shot User Guide" (HTML) on supplied CD-ROM For details on advanced operations, please read "Cyber-shot User Guide" (HTML) on the desktop. GB For Windows users: 1 Click [User Guide] t [Install]. 2 Start "User Guide" from the shortcut on the CD-ROM (supplied) using a computer. Insert the CD-ROM into the CD-ROM drive. Refer...
Instruction Manual
Page 9
... (wall socket), and remove the battery pack from the battery charger. • Be sure to the wall outlet (wall socket). • If you continue charging the battery pack for about one more hour after the CHARGE lamp turns off, the charge will last slightly longer (full charge). GB 9 Charging may take longer depending on conditions of 25°C (77°F). x Charging time Full charge time: approx. 330...
... (wall socket), and remove the battery pack from the battery charger. • Be sure to the wall outlet (wall socket). • If you continue charging the battery pack for about one more hour after the CHARGE lamp turns off, the charge will last slightly longer (full charge). GB 9 Charging may take longer depending on conditions of 25°C (77°F). x Charging time Full charge time: approx. 330...

Instruction Manual
Page 10
... recorded is when shooting under the following conditions: - Using Sony "Memory Stick PRO Duo" (Mark2) media (sold separately). - DISP (Screen Display Settings) is switched alternately between the W and T ends. - The flash strobes once every two times. - x Battery life and number of images you can be less depending on and off once every ten times. • The battery life for shooting under the following conditions. (CIPA: Camera & Imaging Products Association) - Recording mode...
... recorded is when shooting under the following conditions: - Using Sony "Memory Stick PRO Duo" (Mark2) media (sold separately). - DISP (Screen Display Settings) is switched alternately between the W and T ends. - The flash strobes once every two times. - x Battery life and number of images you can be less depending on and off once every ten times. • The battery life for shooting under the following conditions. (CIPA: Camera & Imaging Products Association) - Recording mode...
Instruction Manual
Page 11
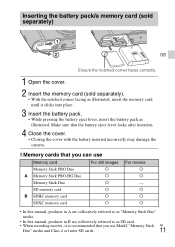
... the battery eject lever locks after insertion. 4 Close the cover. • Closing the cover with the battery inserted incorrectly may damage the camera. Inserting the battery pack/a memory card (sold separately) GB Ensure the notched corner faces correctly. 1 Open the cover. 2 Insert the memory card (sold separately). • With the notched corner facing as illustrated. Make sure that you can use Mark2 "Memory...
... the battery eject lever locks after insertion. 4 Close the cover. • Closing the cover with the battery inserted incorrectly may damage the camera. Inserting the battery pack/a memory card (sold separately) GB Ensure the notched corner faces correctly. 1 Open the cover. 2 Insert the memory card (sold separately). • With the notched corner facing as illustrated. Make sure that you can use Mark2 "Memory...
Instruction Manual
Page 12
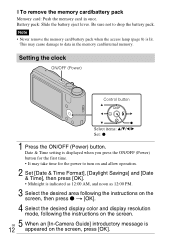
..., and noon as 12:00 PM. 3 Select the desired area following the instructions on the screen, then press z t [OK]. 4 Select the desired display color and display resolution mode, following the instructions on the screen. 5 GB When an [In-Camera Guide] introductory message is lit. Setting the clock ON/OFF (Power) Control button Select items: v/V/b/B Set: z 1 Press the ON/OFF (Power) button. x To remove the memory card/battery pack Memory card: Push the memory card in the memory card/internal memory.
..., and noon as 12:00 PM. 3 Select the desired area following the instructions on the screen, then press z t [OK]. 4 Select the desired display color and display resolution mode, following the instructions on the screen. 5 GB When an [In-Camera Guide] introductory message is lit. Setting the clock ON/OFF (Power) Control button Select items: v/V/b/B Set: z 1 Press the ON/OFF (Power) button. x To remove the memory card/battery pack Memory card: Push the memory card in the memory card/internal memory.
Instruction Manual
Page 13
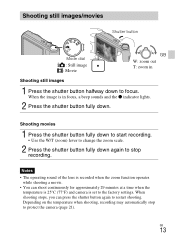
... the shutter button halfway down to protect the camera (page 21). Shooting movies 1 Press the shutter button fully down to start recording. • Use the W/T (zoom) lever to change the zoom scale. 2 Press the shutter button fully down again to stop to focus. Notes • The operating sound of the lens is set to restart shooting. Shooting still images/movies Shutter button Mode dial : Still image : Movie GB W: zoom out T: zoom in focus, a beep sounds and the z indicator lights. 2 Press the shutter button fully down. When shooting stops, you can shoot continuously...
... the shutter button halfway down to protect the camera (page 21). Shooting movies 1 Press the shutter button fully down to start recording. • Use the W/T (zoom) lever to change the zoom scale. 2 Press the shutter button fully down again to stop to focus. Notes • The operating sound of the lens is set to restart shooting. Shooting still images/movies Shutter button Mode dial : Still image : Movie GB W: zoom out T: zoom in focus, a beep sounds and the z indicator lights. 2 Press the shutter button fully down. When shooting stops, you can shoot continuously...
Instruction Manual
Page 14
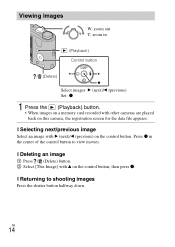
... Image] with B (next)/b (previous) on the control button. x Selecting next/previous image Select an image with v on this camera, the registration screen for the data file appears. GB 14 Press z in (Playback) Control button / (Delete) Select images: B (next)/b (previous) Set: z 1 Press the (Playback) button. • When images on a memory card recorded with other cameras are played back on the control button, then press z. x Returning to view movies. Viewing images W: zoom out T: zoom in the center of the control button to shooting images Press the shutter button halfway...
... Image] with B (next)/b (previous) on the control button. x Selecting next/previous image Select an image with v on this camera, the registration screen for the data file appears. GB 14 Press z in (Playback) Control button / (Delete) Select images: B (next)/b (previous) Set: z 1 Press the (Playback) button. • When images on a memory card recorded with other cameras are played back on the control button, then press z. x Returning to view movies. Viewing images W: zoom out T: zoom in the center of the control button to shooting images Press the shutter button halfway...

Instruction Manual
Page 15
.../playback guide: Search for various operation functions in [In-Camera Guide]. History: Display the last 12 items displayed in shooting/viewing mode. Troubleshooting: Search common problems and their solution. GB / (In-Camera Guide) 1 Press the / (In-Camera Guide) button. • When viewing images, [Delete/In-Camera Guide] is displayed. Objective guide: Search functions according to your needs. Keyword: Search functions by key words. Select [In-Camera Guide]. 2 Select a search method from [In-Camera Guide]. GB 15 Icon guide: Search the function and meaning of displayed icons...
.../playback guide: Search for various operation functions in [In-Camera Guide]. History: Display the last 12 items displayed in shooting/viewing mode. Troubleshooting: Search common problems and their solution. GB / (In-Camera Guide) 1 Press the / (In-Camera Guide) button. • When viewing images, [Delete/In-Camera Guide] is displayed. Objective guide: Search functions according to your needs. Keyword: Search functions by key words. Select [In-Camera Guide]. 2 Select a search method from [In-Camera Guide]. GB 15 Icon guide: Search the function and meaning of displayed icons...
Instruction Manual
Page 16
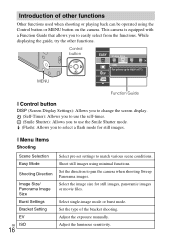
.... Shoot still images using the Control button or MENU button on the camera. Select single-image mode or burst mode. While displaying the guide, try the other functions Other functions used when shooting or playing back can be operated using minimal functions. Control button MENU Function Guide x Control button DISP (Screen Display Settings): Allows you to change the screen display. (Self-Timer): Allows you to use the self-timer. (Smile Shutter): Allows you to use the Smile Shutter mode. (Flash): Allows you to select a flash mode for still images, panoramic images or movie files.
.... Shoot still images using the Control button or MENU button on the camera. Select single-image mode or burst mode. While displaying the guide, try the other functions Other functions used when shooting or playing back can be operated using minimal functions. Control button MENU Function Guide x Control button DISP (Screen Display Settings): Allows you to change the screen display. (Self-Timer): Allows you to use the self-timer. (Smile Shutter): Allows you to use the Smile Shutter mode. (Flash): Allows you to select a flash mode for still images, panoramic images or movie files.
Instruction Manual
Page 17
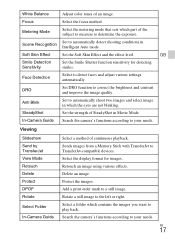
... the brightness and contrast and improve the image quality. Delete an image. DRO Set DRO function to detect faces and adjust various settings automatically. Scene Recognition Set to a still image. Viewing Slideshow Send by TransferJet View Mode Retouch Delete Protect DPOF Rotate Select Folder In-Camera Guide Select a method of an image. Add a print order mark to automatically detect shooting conditions in Intelligent Auto mode. Protect the images. Retouch an image using various effects. White Balance Adjust color tones of continuous playback.
... the brightness and contrast and improve the image quality. Delete an image. DRO Set DRO function to detect faces and adjust various settings automatically. Scene Recognition Set to a still image. Viewing Slideshow Send by TransferJet View Mode Retouch Delete Protect DPOF Rotate Select Folder In-Camera Guide Select a method of an image. Add a print order mark to automatically detect shooting conditions in Intelligent Auto mode. Protect the images. Retouch an image using various effects. White Balance Adjust color tones of continuous playback.
Instruction Manual
Page 18
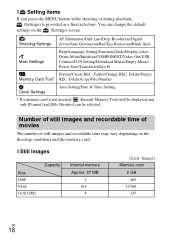
... only [Format] and [File Number] can change the default settings on the shooting conditions and the memory card. x Setting items If you press the MENU button while shooting or during playback, (Settings) is not inserted, (Internal Memory Tool) will be selected. Resolution/Digital Shooting Settings Zoom/Auto Orientation/Red Eye Reduction/Blink Alert Main Settings Beep/Language Setting/Function Guide/Display color/ Demo Mode/Initialize/COMPONENT/Video Out/USB Connect/LUN Setting/Download Music/Empty Music/ Power Save/TransferJet/Eye-Fi Format/Create REC. x Still images Size 16M VGA...
... only [Format] and [File Number] can change the default settings on the shooting conditions and the memory card. x Setting items If you press the MENU button while shooting or during playback, (Settings) is not inserted, (Internal Memory Tool) will be selected. Resolution/Digital Shooting Settings Zoom/Auto Orientation/Red Eye Reduction/Blink Alert Main Settings Beep/Language Setting/Function Guide/Display color/ Demo Mode/Initialize/COMPONENT/Video Out/USB Connect/LUN Setting/Download Music/Empty Music/ Power Save/TransferJet/Eye-Fi Format/Create REC. x Still images Size 16M VGA...

Instruction Manual
Page 19
... functions of the lens. x Movies The table below shows the approximate maximum recording times. When you record a fast-moving subject, the image is clearer but the recordable time is shorter because more memory is possible for recording. Continuous shooting is required for approximately 29 minutes. To check if your camera supports the TransferJet function, check for all movie files. Notes on using the camera Changing the language setting To change the language setting, press MENU t Settings) t [Language Setting]. (Settings) t (Main On use...
... functions of the lens. x Movies The table below shows the approximate maximum recording times. When you record a fast-moving subject, the image is clearer but the recordable time is shorter because more memory is possible for recording. Continuous shooting is required for approximately 29 minutes. To check if your camera supports the TransferJet function, check for all movie files. Notes on using the camera Changing the language setting To change the language setting, press MENU t Settings) t [Language Setting]. (Settings) t (Main On use...

Instruction Manual
Page 20
...; Under direct sunlight or near a heater The camera body may become unusable or image data may be repaired. • Do not aim the camera at the sun or other bright light. Notes on recording/playback • Before you may not be able to malfunction, and in some cases the color of the camera. • If moisture condensation occurs, remove it before using extremely...
...; Under direct sunlight or near a heater The camera body may become unusable or image data may be repaired. • Do not aim the camera at the sun or other bright light. Notes on recording/playback • Before you may not be able to malfunction, and in some cases the color of the camera. • If moisture condensation occurs, remove it before using extremely...
Instruction Manual
Page 21
... materials may be displayed on the LCD screen before the power turns off again or you may turn off or you turn off and wait until the camera and battery temperature goes down. GB 21 In this case, leave the power off automatically to charge it is not a malfunction. A message will be copyrighted. Charge the battery again. Cleaning the camera surface Clean the camera surface with...
... materials may be displayed on the LCD screen before the power turns off again or you may turn off or you turn off and wait until the camera and battery temperature goes down. GB 21 In this case, leave the power off automatically to charge it is not a malfunction. A message will be copyrighted. Charge the battery again. Cleaning the camera surface Clean the camera surface with...
Instruction Manual
Page 22
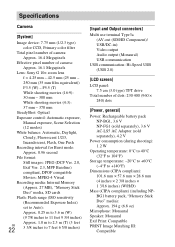
...) USB communication USB communication: Hi-Speed USB (USB 2.0) [LCD screen] LCD panel: 7.5 cm (3.0 type) TFT drive Total number of camera: Approx. 16.1 Megapixels Lens: Sony G 10× zoom lens f = 4.25 mm - 42.5 mm (25 mm - 250 mm (35 mm film equivalent)) F3.5 (W) - F5.5 (T) While shooting movies (16:9): 30 mm - 300 mm While shooting movies (4:3): 37 mm - 370 mm SteadyShot: Optical Exposure control: Automatic exposure, Manual exposure, Scene Selection (12 modes) White balance: Automatic, Daylight, Cloudy, Fluorescent 1/2/3, Incandescent, Flash...
...) USB communication USB communication: Hi-Speed USB (USB 2.0) [LCD screen] LCD panel: 7.5 cm (3.0 type) TFT drive Total number of camera: Approx. 16.1 Megapixels Lens: Sony G 10× zoom lens f = 4.25 mm - 42.5 mm (25 mm - 250 mm (35 mm film equivalent)) F3.5 (W) - F5.5 (T) While shooting movies (16:9): 30 mm - 300 mm While shooting movies (4:3): 37 mm - 370 mm SteadyShot: Optical Exposure control: Automatic exposure, Manual exposure, Scene Selection (12 modes) White balance: Automatic, Daylight, Cloudy, Fluorescent 1/2/3, Incandescent, Flash...
Instruction Manual
Page 23
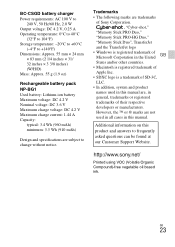
...) Rechargeable battery pack NP-BG1 Used battery: Lithium-ion battery Maximum voltage: DC 4.2 V Nominal voltage: DC 3.6 V Maximum charge voltage: DC 4.2 V Maximum charge current: 1.44 A Capacity: typical: 3.4 Wh (960 mAh) minimum: 3.3 Wh (910 mAh) Design and specifications are trademarks of Sony Corporation. , "Cyber-shot," "Memory Stick PRO Duo," "Memory Stick PRO-HG Duo," "Memory Stick Duo", TransferJet and the TransferJet logo • Windows is registered...
...) Rechargeable battery pack NP-BG1 Used battery: Lithium-ion battery Maximum voltage: DC 4.2 V Nominal voltage: DC 3.6 V Maximum charge voltage: DC 4.2 V Maximum charge current: 1.44 A Capacity: typical: 3.4 Wh (960 mAh) minimum: 3.3 Wh (910 mAh) Design and specifications are trademarks of Sony Corporation. , "Cyber-shot," "Memory Stick PRO Duo," "Memory Stick PRO-HG Duo," "Memory Stick Duo", TransferJet and the TransferJet logo • Windows is registered...


