User's Guide
Page 1
... paper using VOC (Volatile Organic Compound)-free vegetable oil based ink. DSC-H2/H5 Serial No © 2006 Sony Corporation Enjoying the camera Using the menu Using the Setup screen Using your computer Printing still images Connecting your camera to your camera. Printed on the bottom. Printed in the space provided below. Model No. Record the serial number in Japan Digital Still Camera User's Guide/ Troubleshooting DSC-H2/H5 "Read This First" (separate volume) Explains the set-up and basic operations for...
... paper using VOC (Volatile Organic Compound)-free vegetable oil based ink. DSC-H2/H5 Serial No © 2006 Sony Corporation Enjoying the camera Using the menu Using the Setup screen Using your computer Printing still images Connecting your camera to your camera. Printed on the bottom. Printed in the space provided below. Model No. Record the serial number in Japan Digital Still Camera User's Guide/ Troubleshooting DSC-H2/H5 "Read This First" (separate volume) Explains the set-up and basic operations for...

User's Guide
Page 4
... been exposed to qualified service personnel. Improper adjustment of any service or repairs to the set has been subject to lightning and power-line surges. When the set from the wall outlet and disconnect the antenna or cable system. Refer all servicing to rain or water. - Lightning For added protection for this indicates a need for long periods of time, unplug it from the...
... been exposed to qualified service personnel. Improper adjustment of any service or repairs to the set has been subject to lightning and power-line surges. When the set from the wall outlet and disconnect the antenna or cable system. Refer all servicing to rain or water. - Lightning For added protection for this indicates a need for long periods of time, unplug it from the...

User's Guide
Page 6
... help to provide reasonable protection against harmful interference in a residential installation. If the plug supplied with this camera. The supplied interface cable must be used with the equipment in order to comply with the limits for a digital device pursuant to BS 1362, (i.e., marked with an or mark) must be used in accordance with the instructions, may influence the picture and sound...
... help to provide reasonable protection against harmful interference in a residential installation. If the plug supplied with this camera. The supplied interface cable must be used with the equipment in order to comply with the limits for a digital device pursuant to BS 1362, (i.e., marked with an or mark) must be used in accordance with the instructions, may influence the picture and sound...

User's Guide
Page 7
..., dry place. Internal memory and "Memory Stick Duo" back up copy. See page 30 for this camera is to record or play back properly. 7 Notes on recording/playback • This camera is lighted, as is. • If you can use up method. "Memory Stick Duo": you record one-time events, make a trial recording to get the camera wet. The lens for the data back up the existing charge and remove them from...
..., dry place. Internal memory and "Memory Stick Duo" back up copy. See page 30 for this camera is to record or play back properly. 7 Notes on recording/playback • This camera is lighted, as is. • If you can use up method. "Memory Stick Duo": you record one-time events, make a trial recording to get the camera wet. The lens for the data back up the existing charge and remove them from...

User's Guide
Page 11
Folder Copy Setup 1 65 1 LCD Backlight (DSC-H5 only) EVF Backlight Beep Language Initialize Setup 2 67 2 File Number USB Connect Video Out Clock Set 11 STEADY SHOT Conversion Lens Internal Memory Tool 62 Format Memory Stick Tool 63 Format Create REC. Folder Change REC. Viewing menu 49 (Folder) - (Protect) DPOF (Print) (Slide) (Resize) (Rotate) (Divide) (Setup) Trimming Using the Setup screen Using Setup items 56 1 Camera 1 57 AF Mode Digital Zoom Function Guide Red Eye Reduction AF Illuminator Auto Review 2 Camera 2 60 Expanded Focus Flash Sync.
Folder Copy Setup 1 65 1 LCD Backlight (DSC-H5 only) EVF Backlight Beep Language Initialize Setup 2 67 2 File Number USB Connect Video Out Clock Set 11 STEADY SHOT Conversion Lens Internal Memory Tool 62 Format Memory Stick Tool 63 Format Create REC. Folder Change REC. Viewing menu 49 (Folder) - (Protect) DPOF (Print) (Slide) (Resize) (Rotate) (Divide) (Setup) Trimming Using the Setup screen Using Setup items 56 1 Camera 1 57 AF Mode Digital Zoom Function Guide Red Eye Reduction AF Illuminator Auto Review 2 Camera 2 60 Expanded Focus Flash Sync.
User's Guide
Page 12
... Viewing image files stored on a computer with your camera (using a "Memory Stick Duo 78 Using the "Cyber-shot Viewer" (supplied 79 Using your Macintosh computer 83 Printing still images How to print still images 85 Printing images directly using a PictBridge compliant printer 86 Printing at a shop 89 Connecting your camera to your TV Viewing images on a TV screen 91 Troubleshooting Troubleshooting 93 Warning indicators and messages 105 Others On the "Memory Stick 108 On the battery charger and the batteries 110 Precautions 112 Specifications...
... Viewing image files stored on a computer with your camera (using a "Memory Stick Duo 78 Using the "Cyber-shot Viewer" (supplied 79 Using your Macintosh computer 83 Printing still images How to print still images 85 Printing images directly using a PictBridge compliant printer 86 Printing at a shop 89 Connecting your camera to your TV Viewing images on a TV screen 91 Troubleshooting Troubleshooting 93 Warning indicators and messages 105 Others On the "Memory Stick 108 On the battery charger and the batteries 110 Precautions 112 Specifications...

User's Guide
Page 16
... "image size" A digital image is made up more memory, and the image is printed or displayed on a computer screen. Although you can adjust color tones manually with [White Bal] (page 46). Example: The color of an image affected by the number of pixels. "Image size" is shown by light sources Weather/lighting Daylight Cloudy Fluorescent Incandescent Characteristics of the camera, the fine detail and data processing time differ when the image is displayed in the auto adjustment mode...
... "image size" A digital image is made up more memory, and the image is printed or displayed on a computer screen. Although you can adjust color tones manually with [White Bal] (page 46). Example: The color of an image affected by the number of pixels. "Image size" is shown by light sources Weather/lighting Daylight Cloudy Fluorescent Incandescent Characteristics of the camera, the fine detail and data processing time differ when the image is displayed in the auto adjustment mode...
User's Guide
Page 40
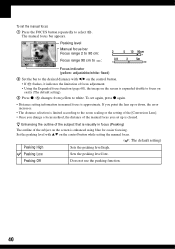
... 9 flashes, it indicates the limitation of the subject on easily (The default setting). 3 Press z. 9 changes from yellow to select 9. Does not use the peaking function. 40 To set up or down, the error increases. • The distance selection is cleared. To set the manual focus 1 Press the FOCUS button repeatedly to white. Peaking level Manual focus bar Focus range 2 to 90 cm: Focus range 90 cm to : Focus indicator (yellow: adjustable/white: fixed) 2 Set the...
... 9 flashes, it indicates the limitation of the subject on easily (The default setting). 3 Press z. 9 changes from yellow to select 9. Does not use the peaking function. 40 To set up or down, the error increases. • The distance selection is cleared. To set the manual focus 1 Press the FOCUS button repeatedly to white. Peaking level Manual focus bar Focus range 2 to 90 cm: Focus range 90 cm to : Focus indicator (yellow: adjustable/white: fixed) 2 Set the...

User's Guide
Page 46
... indicator flashes slowly, the white balance has not been set to (Flash forced on) or SL (Slow synchro), the white balance is adjusted to the lighting condition in the memory, [One Push] ( ) is unable to [Auto] when the flash strobes. • Some options are not available depending on the Scene mode (page 34). The screen momentarily turns black and the indicator flashes quickly. Use this item when shooting movies. For details on the operation...
... indicator flashes slowly, the white balance has not been set to (Flash forced on) or SL (Slow synchro), the white balance is adjusted to the lighting condition in the memory, [One Push] ( ) is unable to [Auto] when the flash strobes. • Some options are not available depending on the Scene mode (page 34). The screen momentarily turns black and the indicator flashes quickly. Use this item when shooting movies. For details on the operation...

User's Guide
Page 57
... shooting with continued focus. • Battery consumption may be faster than in any other AF mode. Off Does not use the digital zoom. 57 When the zoom scale exceeds 12×, the camera uses either smart or precision digital zoom. Continuous (C AF) Adjusts the focus before the shutter button is completed in the following cases, and the "C AF" indicator flashes. This mode is completed. When shooting in [Monitor] mode. - AF Mode Selects the auto focus operation mode. Using the Setup screen Camera...
... shooting with continued focus. • Battery consumption may be faster than in any other AF mode. Off Does not use the digital zoom. 57 When the zoom scale exceeds 12×, the camera uses either smart or precision digital zoom. Continuous (C AF) Adjusts the focus before the shutter button is completed in the following cases, and the "C AF" indicator flashes. This mode is completed. When shooting in [Monitor] mode. - AF Mode Selects the auto focus operation mode. Using the Setup screen Camera...
User's Guide
Page 61
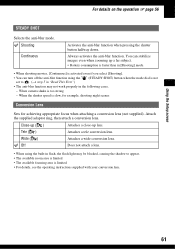
... a far subject. • Battery consumption is faster than in [Shooting] mode. • When shooting movies, [Continuous] is activated even if you select [Shooting]. • You can stabilize images even when zooming up lens. Using the Setup screen For details on the operation 1 page 56 STEADY SHOT Selects the anti-blur mode. Always activates the anti-blur function. Off Does not attach a lens. • When using the set to appear. •...
... a far subject. • Battery consumption is faster than in [Shooting] mode. • When shooting movies, [Continuous] is activated even if you select [Shooting]. • You can stabilize images even when zooming up lens. Using the Setup screen For details on the operation 1 page 56 STEADY SHOT Selects the anti-blur mode. Always activates the anti-blur function. Off Does not attach a lens. • When using the set to appear. •...

User's Guide
Page 67
Using the Setup screen Setup 2 2 For details on the camera are marked with a number higher than the last assigned number, a number one higher than the largest number is assigned.) Reset Starts from 0001 each time the folder is connected to a computer or a PictBridge compliant printer using the USB cable. PictBridge Connects the camera to images. Series Assigns numbers to files in the recording folder on the operation 1 page 56 The default settings are copied to the computer. (Compatible with a computer or...
Using the Setup screen Setup 2 2 For details on the camera are marked with a number higher than the last assigned number, a number one higher than the largest number is assigned.) Reset Starts from 0001 each time the folder is connected to a computer or a PictBridge compliant printer using the USB cable. PictBridge Connects the camera to images. Series Assigns numbers to files in the recording folder on the operation 1 page 56 The default settings are copied to the computer. (Compatible with a computer or...

User's Guide
Page 71
...-ROM drive. The installation menu screen appears. 4 Follow the instructions on the screen. 5 Remove the CD-ROM after the installation is installed automatically. 1 Turn on your computer • If it does not appear, double-click (My Computer) t (CYBERSHOTSOFT). 2 Click [Install]. Installing the software (supplied) You can install the software (supplied) using Windows 2000/Me, do not connect the camera to the computer before installation. • In Windows 2000/XP, log...
...-ROM drive. The installation menu screen appears. 4 Follow the instructions on the screen. 5 Remove the CD-ROM after the installation is installed automatically. 1 Turn on your computer • If it does not appear, double-click (My Computer) t (CYBERSHOTSOFT). 2 Click [Install]. Installing the software (supplied) You can install the software (supplied) using Windows 2000/Me, do not connect the camera to the computer before installation. • In Windows 2000/XP, log...

User's Guide
Page 78
... to play back some images depending on the image size. • When an image file has been processed by a computer or when the image file was recorded using a Windows computer as an example. Change the file name to 9999 for movies is not necessary if the file name set with your camera (using a "Memory Stick Duo") This section describes the process using a model other than that image again on the camera by copying the image file...
... to play back some images depending on the image size. • When an image file has been processed by a computer or when the image file was recorded using a Windows computer as an example. Change the file name to 9999 for movies is not necessary if the file name set with your camera (using a "Memory Stick Duo") This section describes the process using a model other than that image again on the camera by copying the image file...

User's Guide
Page 79
... [Import Images] screen is connected. Using your computer with the camera and display them on the monitor. • Organize images on the computer on a calendar by shooting date to view them. • Retouch, print, and send still images as e-mail attachments, change the shooting date, and more than ever by taking advantage of the screen. To access the Help, click [Start] t [Programs] (in Windows XP, [All Programs]) t [Sony Picture Utility] t [Cyber-shot Viewer]. Basic instructions Follow...
... [Import Images] screen is connected. Using your computer with the camera and display them on the monitor. • Organize images on the computer on a calendar by shooting date to view them. • Retouch, print, and send still images as e-mail attachments, change the shooting date, and more than ever by taking advantage of the screen. To access the Help, click [Start] t [Programs] (in Windows XP, [All Programs]) t [Sony Picture Utility] t [Cyber-shot Viewer]. Basic instructions Follow...

User's Guide
Page 95
... -up (Macro) recording mode. Set the switch to the recording position (page 108). • You cannot record images while charging the flash. • When shooting a still image, set to [7M] (DSC-H5), [6M] (DSC-H2) or [3:2]. - The subject is not visible on the screen. • Your camera is selected. Press the shutter button halfway down, change the mode dial position, or press to change to the LOCK position. Recording takes a long time. • The NR slow shutter function is...
... -up (Macro) recording mode. Set the switch to the recording position (page 108). • You cannot record images while charging the flash. • When shooting a still image, set to [7M] (DSC-H5), [6M] (DSC-H2) or [3:2]. - The subject is not visible on the screen. • Your camera is selected. Press the shutter button halfway down, change the mode dial position, or press to change to the LOCK position. Recording takes a long time. • The NR slow shutter function is...

User's Guide
Page 97
...). • Shoot the subject at a distance closer than that of your camera, playback on your camera is not guaranteed. • The camera is not a malfunction. Viewing images Refer to image processing. The date and time are not recorded (page 8, t "Read This First"). Delete the USB connection (page 76). There is no effect on the screen. • This is in USB mode. Dots appear and remain on the recorded image. Install charged batteries.
...). • Shoot the subject at a distance closer than that of your camera, playback on your camera is not guaranteed. • The camera is not a malfunction. Viewing images Refer to image processing. The date and time are not recorded (page 8, t "Read This First"). Delete the USB connection (page 76). There is no effect on the screen. • This is in USB mode. Dots appear and remain on the recorded image. Install charged batteries.

User's Guide
Page 99
..., you connected the camera and your camera (page 63). Shoot using a "Memory Stick Duo" formatted by properly connecting the camera with the USB cable before you connect your computer to the camera. • Follow the procedure below to display the menu, then click [Properties]. The "Removable disk" icon does not appear on the computer screen when you installed the software (supplied). The device is also installed. After making a USB connection, "Cyber-shot Viewer" does not start automatically. • Start...
..., you connected the camera and your camera (page 63). Shoot using a "Memory Stick Duo" formatted by properly connecting the camera with the USB cable before you connect your computer to the camera. • Follow the procedure below to display the menu, then click [Properties]. The "Removable disk" icon does not appear on the computer screen when you installed the software (supplied). The device is also installed. After making a USB connection, "Cyber-shot Viewer" does not start automatically. • Start...

User's Guide
Page 117
..." LCD Backlight (DSC-H5 only 65 LCD Screen..........see "Screen" M M AF 57 Macintosh computer 83 Recommended environment 83 Macro t step 5 in "Read This First" Mains lead t step 1 in "Read This First" Manual exposure 37 Manual focus 38 Mass Storage 67 "Memory Stick Duo"..........108 Insert/Remove t step 3 and 4 in "Read This First" Number of images/ recording time 28 Write-protect switch....108 Memory Stick Tool 63 Menu 43 Items 44 Shooting 45 Viewing...
..." LCD Backlight (DSC-H5 only 65 LCD Screen..........see "Screen" M M AF 57 Macintosh computer 83 Recommended environment 83 Macro t step 5 in "Read This First" Mains lead t step 1 in "Read This First" Manual exposure 37 Manual focus 38 Mass Storage 67 "Memory Stick Duo"..........108 Insert/Remove t step 3 and 4 in "Read This First" Number of images/ recording time 28 Write-protect switch....108 Memory Stick Tool 63 Menu 43 Items 44 Shooting 45 Viewing...

User's Guide
Page 118
... mode 86 Single-image mode........86 Print order mark 89 Printing at a shop 89 Printing directly 86 Program auto mode 33 Protect 50 PTP 67 R Red Eye Reduction 58 Resize 52 Rewind/Fast forward t step 6 in "Read This First" Rotate 53 S S AF 57 Scene Selection 34 t step 5 in "Read This First" 118 Screen Changing the display .... 27 EVF Backlight 65 Indicator 22 LCD Backlight 65 Self-diagnosis display ........ 105 Self-timer...
... mode 86 Single-image mode........86 Print order mark 89 Printing at a shop 89 Printing directly 86 Program auto mode 33 Protect 50 PTP 67 R Red Eye Reduction 58 Resize 52 Rewind/Fast forward t step 6 in "Read This First" Rotate 53 S S AF 57 Scene Selection 34 t step 5 in "Read This First" 118 Screen Changing the display .... 27 EVF Backlight 65 Indicator 22 LCD Backlight 65 Self-diagnosis display ........ 105 Self-timer...


